pthon--ctypes包装C语言数据类型
一. ctypes使用介绍
ctypes 是 Python 的外部函数库。它提供了与 C 兼容的数据类型,并允许调用 DLL 或共享库中的函数。可使用该模块以纯 Python 形式对这些库进行封装。这篇文章主要是介绍如何使用ctypes模块对C语言编译的动态链接库要求的数据类型进行封装,主要包括以下几类:
- C语言中基础的数据类型(如char, int等)
- 数组类型
- 指针类型
- 结构体类型
- 嵌套结构体
- 结构体数组
- 结构体指针
- 指针数组
- 结构体指针数组
1. 动态链接库
(1)下面是测试用的C语言代码
 1 #include <stdio.h>
 2 #include <string.h>
 3
 4 typedef struct student {
 5     char class;
 6     int grade;
 7     long array[3];
 8     int *point;
 9 }student_t;
10
11 typedef struct nest_stu {
12     char rank;
13     student_t nest_stu;
14     student_t strct_array[2];
15     student_t *strct_point;
16     student_t *strct_point_array[2];
17 }nest_stu_t;
18
19 typedef struct g_student {
20     int g_grade;
21 }g_stu;
22
23 g_stu g_stu_t = {11};
24
25 int test_func(char char_arg, int int_arg, float float_arg, char *stu_buf, char *nest_stu_buf, char *out_buf)
26 {
27     //data type test
28     printf("char arg: %c\n", char_arg);
29     printf("int arg: %d\n", int_arg);
30     printf("float arg: %f\n", float_arg);
31
32     student_t *stu_p = NULL;
33     nest_stu_t *nest_stu_p = NULL;
34
35     stu_p = (student_t *)stu_buf;
36     nest_stu_p = (nest_stu_t *)nest_stu_buf;
37     //struct type test
38     printf("struct class: %c\n", stu_p->class);
39     printf("struct grade: %d\n", stu_p->grade);
40     printf("struct array[0]: %d array[1]: %d\n", stu_p->array[0], stu_p->array[1]);
41     printf("struct point: %d\n", *(stu_p->point));
42
43     //nest struct test
44     printf("nest struct rank: %d\n", nest_stu_p->rank);
45     printf("nest struct stu grade: %d\n", nest_stu_p->nest_stu.grade);
46
47     //struct array
48     printf("nest struct array[0] grade: %d\n", nest_stu_p->strct_array[0].grade);
49     printf("nest struct array[1] grade: %d\n", nest_stu_p->strct_array[1].grade);
50
51     //struct point
52     printf("nest struct point grade: %d\n", nest_stu_p->strct_point->grade);
53     //struct point array
54     printf("nest struct point array[0] grade: %d\n", nest_stu_p->strct_point_array[0]->grade);
55     printf("nest struct point array[1] grade: %d\n", nest_stu_p->strct_point_array[1]->grade);
56
57     //out buf test
58     memcpy(out_buf, stu_p, sizeof(int)*2);
59
60     return 1;
61 }
(2)生成动态链接库
使用编译命令gcc -Wall -g -fPIC -shared -o libstruct.so.0 ctype_code.c生成动态链接库, 可以使用nm -D <文件名>查看内部的符号信息,如下图:
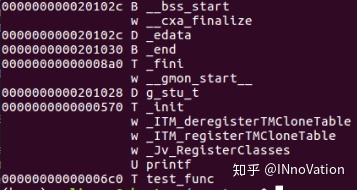
还可以使用readelf -s查看elf文件内的符号分布。
2. ctypes的使用
(1)C语言中基础的数据类型
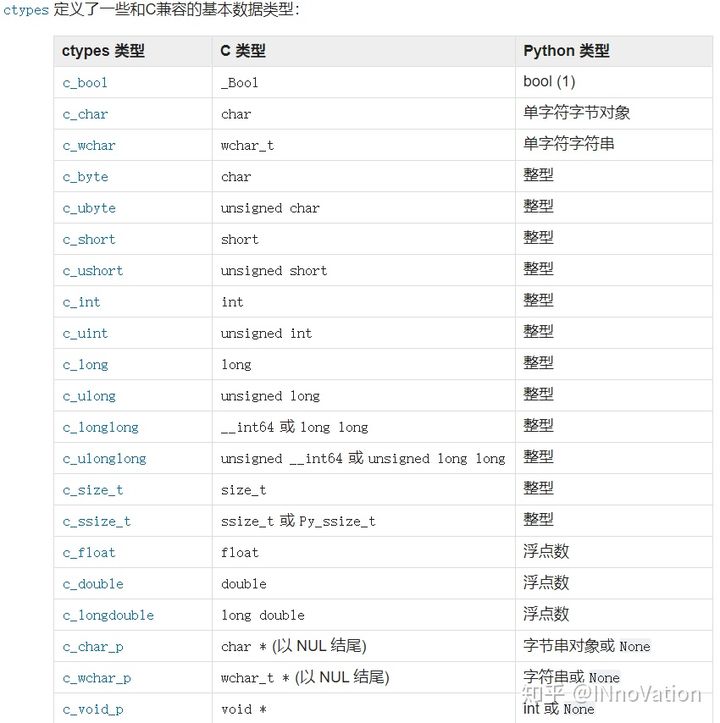
这部分的使用比较简单,直接使用ctypes内置的方法创建对象即可,ctypes提供的方法和C语言对应的数据类型如下表:
使用方法:
 1 # -*- coding: utf-8 -*-
 2 from ctypes import *
 3
 4 # 字符,仅接受one character bytes, bytearray or integer
 5 char_type = c_char(b"a")
 6 # 字节
 7 byte_type = c_char(1)
 8 # 字符串
 9 string_type = c_wchar_p("abc")
10 # 整型
11 int_type = c_int(2)
12 # 直接打印输出的是对象信息,获取值需要使用value方法
13 print(char_type, byte_type, int_type)
14 print(char_type.value, byte_type.value, string_type.value, int_type.value)
输出:
c_char(b'a') c_char(b'\x01') c_int(2)
b'a' b'\x01' abc 2
(2)数组类型
数组的创建和C语言的类似,给定数据类型和长度即可,如下:
1 # 数组
2 # 定义类型
3 char_array = c_char * 3
4 # 初始化
5 char_array_obj = char_array(b"a", b"b", 2)
6 # 打印只能打印数组对象的信息
7 print(char_array_obj)
8 # 打印值通过value方法
9 print(char_array_obj.value)
输出:
< main.c_char_Array_3 object at 0x7f2252e6dc20>
b'ab\x02'
也可以在创建的时候直接进行初始化,如下:
1 int_array = (c_int * 3)(1, 2, 3)
2 for i in int_array:
3     print(i)
4
5 char_array_2 = (c_char * 3)(1, 2, 3)
6 print(char_array_2.value)
输出:
1
2
3
b'\x01\x02\x03'
这里需要注意,通过value方法获取值只适用于字符数组,其他类型如print(int_array.value)的使用会报错:
AttributeError: 'c_int_Array_3' object has no attribute 'value'
(3)指针类型
ctypes提供了pointer()和POINTER()两种方法创建指针,区别在于:
pointer()用于将对象转化为指针,如下:
1 # 指针类型
2 int_obj = c_int(3)
3 int_p = pointer(int_obj)
4 print(int_p)
5 # 使用contents方法访问指针
6 print(int_p.contents)
7 # 获取指针指向的值
8 print(int_p[0])
输出:
<__main__.LP_c_int object at 0x7fddbcb1de60>
c_int(3)
3
POINTER()用于定义某个类型的指针,如下:
1 # 指针类型
2 int_p = POINTER(c_int)
3 # 实例化
4 int_obj = c_int(4)
5 int_p_obj = int_p(int_obj)
6 print(int_p_obj)
7 print(int_p_obj.contents)
8 print(int_p_obj[0])
输出:
<__main__.LP_c_int object at 0x7f47df7f79e0>
c_int(4)
4
如果弄错了初始化的方式会报错,POINTER()如下:
1 # 指针类型
2 int_p = POINTER(c_int)
3 # 实例化
4 int_obj = c_int(4)
5 int_p_obj = POINTER(int_obj)
报错:
TypeError: must be a ctypes type
pointer()如下:
1 # 指针类型
2 int_p = pointer(c_int)
报错:
TypeError: _type_ must have storage info
创建空指针的方式
1 null_ptr = POINTER(c_int)()
2 print(bool(null_ptr))
输出:
False
指针类型的转换
ctypes提供cast()方法将一个ctypes实例转换为指向另一个ctypes数据类型的指针,cast()接受两个参数,一个是ctypes对象,它是或可以转换成某种类型的指针,另一个是ctypes指针类型。它返回第二个参数的一个实例,该实例引用与第一个参数相同的内存块。
1 int_p = pointer(c_int(4))
2 print(int_p)
3
4 char_p_type = POINTER(c_char)
5 print(char_p_type)
6
7 cast_type = cast(int_p, char_p_type)
8 print(cast_type)
输出:
结构体类型的实现,结构和联合必须派生自ctypes模块中定义的结构和联合基类。每个子类必须 定义一个_fields_属性,_fields_必须是一个二元组列表,包含字段名和字段类型。
_pack_属性 决定结构体的字节对齐方式,默认是4字节对齐,创建时使用_pack_=1可以指定1字节对齐。比如初始化student_t的方法如下,特别需要注意的是字段名不能和python关键字重名,不然会报错:1 # -*- coding: utf-8 -*- 2 from ctypes import * 3 4 # 学生信息如下 5 stu_info = [("class", "A"), 6 ("grade", 90), 7 ("array", [1, 2, 3]), 8 ("point", 4)] 9 10 # 创建结构提类 11 class Student(Structure): 12 _fields_ = [("class", c_char), 13 ("grade", c_int), 14 ("array", c_long * 3), 15 ("point", POINTER(c_int))] 16 17 print("sizeof Student: ", sizeof(Student)) 18 19 # 实例化 20 long_array = c_long * 3 21 long_array_obj = long_array(1, 2, 3) 22 int_p = pointer(c_int(4)) 23 stu_info_value = [c_char(b"A"), c_int(90), long_array_obj, int_p] 24 25 stu_obj = Student(*stu_info_value) 26 # 这样打印报错,因为字段名和python关键字class重名了,这是需要特别注意的点 27 # print("stu info:", stu_obj.class, stu_obj.grade, stu_obj.array[0], stu_obj.point[0]) 28 print("stu info:", stu_obj.grade, stu_obj.array[0], stu_obj.point[0])
输出:
sizeof Student: 40
stu info: 90 1 4
如果把_pack_改为1,则输出:
sizeof Student: 37
stu info: 90 1 4
(5)嵌套结构体
嵌套结构体的使用需要创建基础结构体的类型,然后将基础结构体的类型作为嵌套结构体 的成员,注意基础结构体所属字段的字段类型是基础结构体的类名,如下:
# 创建类型, nest_stu字段的类型为基础结构体的类名
class NestStudent(Structure):
    _fields_ = [("rank", c_char),
                ("nest_stu", Student)]

# 实例化
nest_stu_info_list = [c_char(b"M"), stu_obj]
nest_stu_obj = NestStudent(*nest_stu_info_list)

print("nest stu info: ", nest_stu_obj.rank, "basic stu info: ", nest_stu_obj.nest_stu.grade)
输出:
nest stu info: b'M' basic stu info: 90
(6)结构体数组
结构体数组与普通数组的创建类似,需要提前创建结构体的类型,然后使用struct type * array_length 的方法创建数组。
 1 # 结构体数组
 2 # 创建结构体数组类型
 3 stu_array = Student * 2
 4 # 用Student类的对象实例化结构体数组
 5 stu_array_obj = stu_array(stu_obj, stu_obj)
 6
 7 # 增加结构体数组成员
 8 class NestStudent(Structure):
 9     _fields_ = [("rank", c_char),
10                 ("nest_stu", Student),
11                 ("strct_array", Student * 2)]
12
13 # 实例化
14 nest_stu_info_list = [c_char(b"M"), stu_obj, stu_array_obj]
15 nest_stu_obj = NestStudent(*nest_stu_info_list)
16
17 # 打印结构体数组第二个索引的grade字段的信息
18 print("stu struct array info: ", nest_stu_obj.strct_array[1].grade, nest_stu_obj.strct_array[1].array[0])
输出:
stu struct array info: 90 1
(7)结构体指针
首先创建结构体,然后使用ctype的指针方法包装为指针。
 1 # 结构体指针
 2 # # 创建结构体数组类型
 3 stu_array = Student * 2
 4 # # 用Student类的对象实例化结构体数组
 5 stu_array_obj = stu_array(stu_obj, stu_obj)
 6 # 曾接结构体指针成员,注意使用类型初始化指针是POINTER()
 7 class NestStudent(Structure):
 8     _fields_ = [("rank", c_char),
 9                 ("nest_stu", Student),
10                 ("strct_array", Student * 2),
11                 ("strct_point", POINTER(Student))]
12
13 # 实例化,对Student的对象包装为指针使用pointer()
14 nest_stu_info_list = [c_char(b"M"), stu_obj, stu_array_obj, pointer(stu_obj)]
15 nest_stu_obj = NestStudent(*nest_stu_info_list)
16
17 # 结构体指针指向Student的对象
18 print("stu struct point info: ", nest_stu_obj.strct_point.contents)
19 # 访问Student对象的成员
20 print("stu struct point info: ", nest_stu_obj.strct_point.contents.grade)
输出:
stu struct point info: <__main__.Student object at 0x7f8d80e70200> # 结构体指针指向的对象信息
stu struct point info: 90 # Student结构体grade成员
(8)结构体指针数组
创建结构体指针数组的顺序为先创建结构体,然后包装为指针,最后再创建数组,用结构体指针去实例化数组。
 1 # 结构体指针数组
 2 # 创建结构体数组类型
 3 stu_array = Student * 2
 4 # # 用Student类的对象实例化结构体数组
 5 stu_array_obj = stu_array(stu_obj, stu_obj)
 6 # 创建结构体指针数组
 7 stu_p_array = POINTER(Student) * 2
 8 # 使用pointer()初始化
 9 stu_p_array_obj = stu_p_array(pointer(stu_obj), pointer(stu_obj))
10 # 曾接结构体指针成员,注意使用类型初始化指针是POINTER()
11 class NestStudent(Structure):
12     _fields_ = [("rank", c_char),
13                 ("nest_stu", Student),
14                 ("strct_array", Student * 2),
15                 ("strct_point", POINTER(Student)),
16                 ("strct_point_array", POINTER(Student) * 2)]
17
18 # 实例化,对Student的对象包装为指针使用pointer()
19 nest_stu_info_list = [c_char(b"M"), stu_obj, stu_array_obj, pointer(stu_obj), stu_p_array_obj]
20 nest_stu_obj = NestStudent(*nest_stu_info_list)
21
22 # 数组第二索引为结构体指针
23 print(nest_stu_obj.strct_point_array[1])
24 # 指针指向Student的对象
25 print(nest_stu_obj.strct_point_array[1].contents)
26 # Student对象的grade字段
27 print(nest_stu_obj.strct_point_array[1].contents.grade)
输出:
<__main__.LP_Student object at 0x7f3f9a8e6200>
<__main__.Student object at 0x7f3f9a8e6290>
90
二. 调用动态链接库
ctypes导出了cdll对象,在Windows系统中还导出了windll和oledll对象用于载入动态连接库。通过操作这些对象的属性,你可以载入外部的动态链接库。cdll载入按标准的 cdecl调用协议导出的函数,而windll导入的库按stdcall调用协议调用其中的函数。 oledll也按stdcall调用协议调用其中的函数,并假定该函数返回的是Windows HRESULT错误 代码,并当函数调用失败时,自动根据该代码甩出一个OSError异常。
1. 快速创建内存区域的方法
ctypes提供了create_string_buffer()函数创建一定长度的内存区域。当前的内存块 内容可以通过raw属性存取,如果是创建NULL结束的字符串,使用value属性获取内存块的值。
 1 >>> p = create_string_buffer(3)            # create a 3 byte buffer, initialized to NUL bytes
 2 >>> print(sizeof(p), repr(p.raw))
 3 3 b'\x00\x00\x00'
 4 >>> p = create_string_buffer(b"Hello")     # create a buffer containing a NUL terminated string
 5 >>> print(sizeof(p), repr(p.raw))
 6 6 b'Hello\x00'
 7 >>> print(repr(p.value))
 8 b'Hello'
 9 >>> p = create_string_buffer(b"Hello", 10) # create a 10 byte buffer
10 >>> print(sizeof(p), repr(p.raw))
11 10 b'Hello\x00\x00\x00\x00\x00'
12 >>> p.value = b"Hi"
13 >>> print(sizeof(p), repr(p.raw))
14 10 b'Hi\x00lo\x00\x00\x00\x00\x00'
2. 调用动态链接库
使用方法如下:
 1 # 结构体指针数组
 2 # 创建结构体数组类型
 3 stu_array = Student * 2
 4 # # 用Student类的对象实例化结构体数组
 5 stu_array_obj = stu_array(stu_obj, stu_obj)
 6 # 创建结构体指针数组
 7 stu_p_array = POINTER(Student) * 2
 8 # 使用pointer()初始化
 9 stu_p_array_obj = stu_p_array(pointer(stu_obj), pointer(stu_obj))
10 # 曾接结构体指针成员,注意使用类型初始化指针是POINTER()
11 class NestStudent(Structure):
12     _fields_ = [("rank", c_char),
13                 ("nest_stu", Student),
14                 ("strct_array", Student * 2),
15                 ("strct_point", POINTER(Student)),
16                 ("strct_point_array", POINTER(Student) * 2)]
17
18 # 实例化,对Student的对象包装为指针使用pointer()
19 nest_stu_info_list = [c_char(b"M"), stu_obj, stu_array_obj, pointer(stu_obj), stu_p_array_obj]
20 nest_stu_obj = NestStudent(*nest_stu_info_list)
21
22 # # 数组第二索引为结构体指针
23 # print(nest_stu_obj.strct_point_array[1])
24 # # 指针指向Student的对象
25 # print(nest_stu_obj.strct_point_array[1].contents)
26 # # Student对象的grade字段
27 # print(nest_stu_obj.strct_point_array[1].contents.grade)
28
29
30 # 实例化动态链接库的载入对象
31 so_obj = cdll.LoadLibrary("./libstruct.so.0")
32
33 # 准备入参
34 char_arg = c_char(b"Z")
35 int_arg = c_int(13)
36 float_arg = c_float(3.14159)
37
38 # 准备出参
39 out_buf = create_string_buffer(b"", sizeof(Student))
40
41 # 注意C语言源码中入参要求是指针,所以这里需要再次使用pointer()
42 # rest = so_obj.test_func(char_arg, int_arg, float_arg, pointer(stu_obj), pointer(nest_stu_obj), out_buf)
43 # 或者使用ctypes.bryef()方法自动转换,更快一点
44 rest = so_obj.test_func(char_arg, int_arg, float_arg, byref(stu_obj), byref(nest_stu_obj), out_buf)
45
46 # 打印函数返回值
47 print("func rest: ", rest)
48 # 打印出参
49 print("out buf: ", out_buf[0:sizeof(c_int) * 2])
输出:
stu info: 90 1 4
char arg: Z
int arg: 13
float arg: 3.141590
struct class: A
struct grade: 90
struct array[0]: 1 array[1]: 2
struct point: 4
nest struct rank: 77
nest struct stu grade: 90
nest struct array[0] grade: 90
nest struct array[1] grade: 90
nest struct point grade: 90
nest struct point array[0] grade: 90
nest struct point array[1] grade: 90
func rest: 1
out buf: b'A\x00\x00\x00Z\x00\x00\x00' # 此处90转换为字符打印了
如果python需要使用动态链接库的符号,直接调用即可,如下:
1 # 调用C源码中的g_stu结构体
2 so_symble = so_obj.g_stu_t
3 print(so_symble)
输出:
<_FuncPtr object at 0x7fa8aff57120>
c_int(3)
3