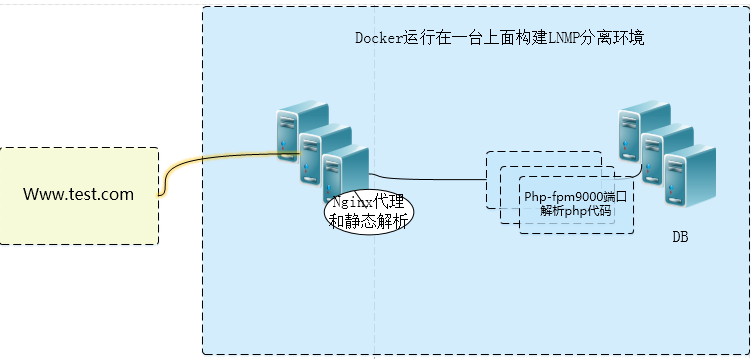
最近忙着写自己的项目,也把一个站点的bbs论坛打算迁移到Docker中,测试没发现啥大问题。在单台上面的架构如下;(往后我们也是要讲到compose和swarm调度的慢慢来)
1、首先我们先安装一下docker,好多人都发现国内用yum安装有各种问题;这里我们用国内的https://www.daocloud.io.登录后注册,然后点击下载。里面有提示,我们点击Linxu安装然后复制代码执行到shell上即可。
[root@test nginx]# curl -sSL https://get.daocloud.io/docker | sh
2、安装好之后,安装dockhub加速器,点击加速器,复制代码粘贴到shell.
[root@test nginx]# curl -sSL https://get.daocloud.io/daotools/set_mirror.sh | sh -s http://681a96df.m.daocloud.io
{"registry-mirrors": ["http://681a96df.m.daocloud.io"],
    "live-restore": true
}
Success.
You need to restart docker to take effect: sudo systemctl restart docker
##执行脚本,主要是把仓库地址写到daemon.json文件下。
[root@test nginx]# cat /etc/docker/daemon.json
{"registry-mirrors": ["http://681a96df.m.daocloud.io"],
    "live-restore": true
}
3、准备工作都已经完成了,接下来我们来构建一下dockerfile在三个目录下,看下目录结构:
[root@test test]# tree -L 2 --charset ASCII
|-- mysql
|   |-- Dockerfile
|   |-- epel-6.repo
|   |-- my.cnf
|   `-- startup.sh
|-- nginx
|   |-- Dockerfile
|   |-- nginx-1.11.10
|   |-- nginx-1.11.10.tar.gz
|   |-- nginx.conf
|   `-- nginx_default.conf
`-- php-fpm
    |-- Centos-6.repo
    |-- Dockerfile
    |-- epel-6.repo
    |-- php-5.5.38
    `-- php-5.5.38.tar.gz
5、看一下nginx 的 Dockerfile:
[root@test nginx]# cat Dockerfile
#lnmp centos 6.0
from centos:centos6
MAINTAINER xiaoluo <xiaoluo@test.com>
ENV APP_DIR /web
add nginx-1.11.10 /nginx-1.11.10
RUN yum -y groupinstall "Development Tools" "Server Platform Deveopment"
RUN yum -y install openssl-devel pcre-devel
RUN useradd nginx -s /sbin/nologin
RUN cd /nginx-1.11.10 && ./configure --prefix=/usr/local/nginx --user=nginx --group=nginx --with-http_ssl_module --with-http_flv_module --with-http_stub_status_module --with-http_gzip_static_module  --with-pcre && make && make install
RUN mkdir /usr/local/nginx/conf/vhosts
RUN mkdir /var/log/nginx
ADD nginx.conf /usr/local/nginx/conf/nginx.conf
ADD nginx_default.conf /usr/local/nginx/conf/vhosts/default.conf
EXPOSE 80
CMD ["/usr/local/nginx/sbin/nginx"]
##nginx 相关php配置:
[root@test nginx]# cat nginx_default.conf
server {
    listen       80 default_server;
    server_name  localhost;
    #charset koi8-r;
    location / {
        root   /web;
        index  index.php index.html index.htm;
    }
    # redirect server error pages to the static page /50x.html
    #
    error_page   500 502 503 504  /50x.html;
    location = /50x.html {
        root   APP_DIR;
    }
    # Disable nginx log write favicon.ico
    location = /favicon.ico {
    log_not_found off;
    access_log off;
        }
    # pass the PHP scripts to FastCGI server listening on port 9000
    #
    location ~ .php$ {
        root           /web;
        fastcgi_pass   php:9000;
        #fastcgi_pass  unix:/tmp/php-fpm.sock;
        fastcgi_index  index.php;
        fastcgi_param  SCRIPT_FILENAME  $document_root$fastcgi_script_name;
        include        fastcgi_params;
    }
}
###php:9000是通过后面的--link 容器之间互联指定
6、开始构建nginx镜像:
[root@test nginx]# docker build -t lnmp/nginx:1.0 .
##查看是否生成镜像:
[root@test nginx]# docker images
REPOSITORY          TAG                 IMAGE ID            CREATED             SIZE
lnmp/nginx          1.0                 5f5d4169189d        4 minutes ago       669 MB
7、开始构建php镜像:
[root@test php-fpm]# cat Dockerfile
from centos:centos6
ADD Centos-6.repo /etc/yum.repos.d/CentOS-Base.repo
ADD epel-6.repo /etc/yum.repos.d/epel.repo
add php-5.5.38 /php-5.5.38
RUN yum -y groupinstall  "Desktop Platform Development"
RUN yum -y install libmcrypt-devel bzip2-devel gcc openssl-devel php-mcrypt libmcrypt
RUN cd /php-5.5.38 && ./configure --prefix=/usr/local/php --with-mysql=mysqlnd --with-pdo-mysql=mysqlnd --with-mysqli=mysqlnd --with-openssl --enable-mbstring --with-freetype-dir --with-jpeg-dir --with-png-dir --with-zlib --with-libxml-dir=/usr --enable-xml --enable-sockets --with-mcrypt  --with-bz2 --enable-fpm --with-gd && make && make install
RUN cp /php-5.5.38/php.ini-production  /usr/local/php/etc/php.ini
RUN mv /usr/local/php/etc/php-fpm.conf.default /usr/local/php/etc/php-fpm.conf
RUN useradd -M -s /sbin/nologin php
RUN sed -i -e 's;pid = run/php-fpm.pidpid = run/php-fpm.pidg' -e 's
obodyphpg' -e 'slisten = 127.0.0.1:9000listen = 0.0.0.0:9000g' /usr/local/php/etc/php-fpm.conf
RUN sed -i 's;daemonize = yesdaemonize = nog' /usr/local/php/etc/php-fpm.conf
EXPOSE 9000
CMD ["/usr/local/php/sbin/php-fpm"]
8、开始构建php镜像:
[root@test php-fpm]# docker build -t lnmp/php:1.0 .
9、构建mysql镜像的Dockerfile:
[root@test mysql]# cat Dockerfile
FROM centos:centos6
MAINTAINER xiaoluo "18878774@163.com"
RUN yum install -y mysql-server mysql
ADD ./startup.sh /opt/startup.sh
RUN chmod +x /opt/startup.sh
EXPOSE 3306
CMD ["/bin/bash","/opt/startup.sh"]
##启动脚本:
[root@test mysql]# cat startup.sh
#!/bin/bash
if [ ! -f /var/lib/mysql/ibdata1 ]; then
        mysql_install_db
        /usr/bin/mysqld_safe &
        sleep 10s
        mysql -e "grant all privileges on *.* to 'root'@'%' identified by '123456'; FLUSH PRIVILEGES;"
        killall mysqld
        sleep 10s
fi
/usr/bin/mysqld_safe
**正常启动的时候,是没有问题的;当时当我们用-v做持久化的时候,好像说用户就失去对/var/lib/mysql的控制权,所以启动的时候我们要判断初始化才可以用-v来持久化相关目录,这个地方之前搞了好久就是挂不起来,后面原来是这个地方。
10、开始构建mysql镜像:
[root@test mysql]# docker build -t lnmp/mysql:1.0 .
11、下面我们开始启动相关容器:
[root@test web]# docker run -dit --name php -v /web:/web lnmp/php:1.0
[root@test web]# docker run -dit --name web -p 80:80 -v /web:/web --link php:php lnmp/nginx:1.0
[root@test web]#docker run -dit --name mysql -p 3306:3306 -v /opt/data:/var/lib/mysql lnmp/mysql:1.0
#####
[root@test mysql]# docker ps
CONTAINER ID        IMAGE               COMMAND                  CREATED              STATUS              PORTS                    NAMES
3527cddb4c50        lnmp/mysql:1.0      "/bin/bash /opt/st..."   4 seconds ago        Up 3 seconds        0.0.0.0:3306->3306/tcp   mysql
fab93953c438        lnmp/nginx:1.0      "/usr/local/nginx/..."   About a minute ago   Up About a minute   0.0.0.0:80->80/tcp       web
d5854337c10b        lnmp/php:1.0        "/usr/local/php/sb..."   3 minutes ago        Up 2 minutes        9000/tcp
php
##可以看到我们已经都启动了所有的容器了。
12、接下来我们登录一下mysql.创建一下wordpress使用的数据库:
[root@test mysql]# mysql -uroot -p123456 -h 192.168.63.200
MySQL [(none)]> CREATE DATABASE wordpress DEFAULT CHARACTER SET utf8;
Query OK, 1 row affected (0.00 sec)
13、然后我们把wordpress代码放到我们挂载的本地/web目录下面:
[root@test web]# wget https://cn.wordpress.org/wordpress-4.7.2-zh_CN.tar.gz
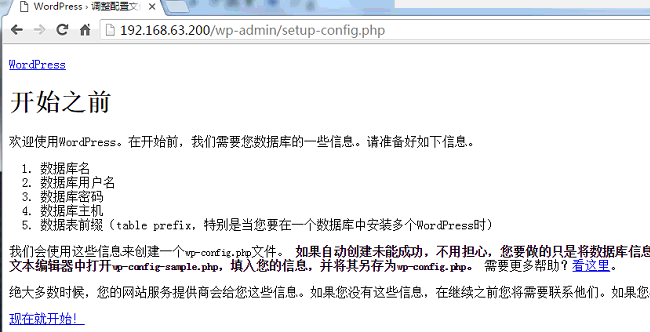
#然后解压出来。我们直接访问一下当前主机的IP地址:
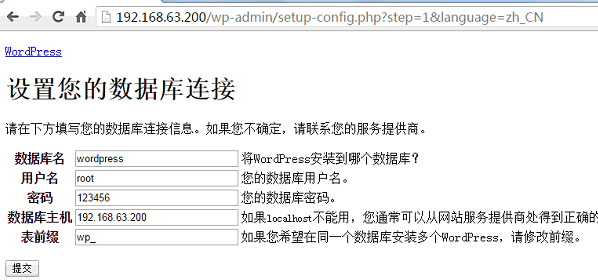
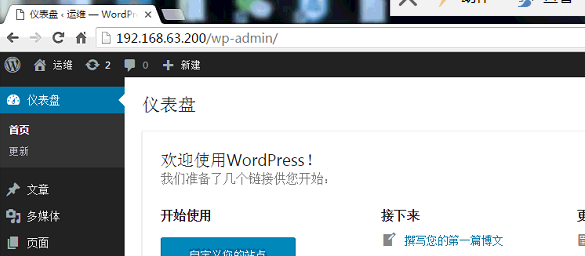
直接往下走注册即可:
##到此在Docker 分离下安装wordpress已经完成,但是我们要思考一个问题,就是有没有更好的方法统一编排一下这些容器呢,给容器更好的分组管理:可以留意一下docker-compose,在1.13之后更是结合栈来实现跨主机编排。
##还有一个就是如何给这些容器做成集群管理,保证节点的高可用。和资源监控调度呢。可以看一下1.12之后的docker swarm,构建集群非常简单。


