概念
Elasticsearch 是一个开源的搜索引擎,建立在一个全文搜索引擎库 Apache Lucene™ 基础之上。
然而,Elasticsearch 不仅仅是 Lucene,并且也不仅仅只是一个全文搜索引擎。 它可以被下面这样准确的形容:
- 一个分布式的实时文档存储,每个字段 可以被索引与搜索
- 一个分布式实时分析搜索引擎
- 能胜任上百个服务节点的扩展,并支持 PB 级别的结构化或者非结构化数据
来自 https://www.elastic.co/guide/cn/elasticsearch/guide/current/intro.html
index、type、document (索引、类型、文档)
Index 里面单条的记录称为 Document(文档)。许多条 Document 构成了一个 Index。
文档使用json格式表示:
curl -X PUT 'localhost:9200/megacorp/employee/1' -d '
{
    "first_name" : "John",
    "last_name" :  "Smith",
    "age" :        25,
    "about" :      "I love to go rock climbing",
    "interests": [ "sports", "music" ]
}'
说明:
megacorp:索引名称
employee:类型名称
1:特定雇员的ID
安装
wget https://artifacts.elastic.co/downloads/elasticsearch/elasticsearch-5.5.1.zip

unzip elasticsearch-5.5.1.zip

cd elasticsearch-5.5.1/

./bin/elasticsearch
注意:不能使用root运行es;并且elasticsearch-5.5.1 这个目录所有者不是root。
curl localhost:9200

索引操作
新增索引
curl -X PUT 'localhost:9200/user'

服务端返回json:
{"acknowledged":true,"shards_acknowledged":true}
查询索引
curl -X GET 'localhost:9200/user?pretty=true'
# pretty=true 表示结果以易读的形式展示出来

服务端返回json:
	{
	  "user" : {
	    "aliases" : { },
	    "mappings" : { },
	    "settings" : {
	      "index" : {
	        "creation_date" : "1516421830842",
	        "number_of_shards" : "5",
	        "number_of_replicas" : "1",
	        "uuid" : "tY2XLVTmTGCkCe4Y9cw_0w",
	        "version" : {
	          "created" : "5050199"
	        },
	        "provided_name" : "user"
	      }
	    }
	  }
}
返回当前节点的所有Index
curl -X GET 'http://localhost:9200/_cat/indices?v'

### 删除索引
``` shell curl -X DELETE 'localhost:9200/user'
服务端返回json:
{"acknowledged":true}
----------

## 文档操作</br>

### 新增文档
``` shell
curl -X PUT 'localhost:9200/user/admin_user/1' -d '
{
  "userName": "张三",
  "title": "工程师",
  "desc": "数据库管理"
} '
在user索引在新建类型为admin_user的文档,1是这个文档的id。第一个admin_user有三个属性:user、title、desc。
新增文档也可以不指定ID,这里的ID不一定要数字。不指定ID时要用POST请求。
新增文档不指定ID:
curl -X POST 'localhost:9200/user/admin_user/?pretty=true' -d '
		{
		 "userName" : "李四",
		 "title" : "工程师",
		 "desc" : "网络管理"
		} '

返回:_id 就是随机的字符串。
		{
		  "_index" : "user",
		  "_type" : "admin_user",
		  "_id" : "AWESLcupvcrWFMesxEQY",
		  "_version" : 1,
		  "result" : "created",
		  "_shards" : {
		    "total" : 2,
		    "successful" : 1,
		    "failed" : 0
		  },
		  "created" : true
		}
更新文档也是用put,删除用DELETE。
查询文档
curl -X GET 'localhost:9200/user/admin_user/1?pretty=true'
结果:
		{
		  "_index" : "user",
		  "_type" : "admin_user",
		  "_id" : "1",
		  "_version" : 1,
		  "found" : true,
		  "_source" : {
		    "userName" : "张三",
		    "title" : "工程师",
		    "desc" : "数据库管理"
		  }
		}

"found":true 表示查询成功。
查询所有结果:
curl -X GET localhost:9200/user/admin_user/_search?pretty=true
结果:
		{
		  "took" : 75,
		  "timed_out" : false,
		  "_shards" : {
		    "total" : 5,
		    "successful" : 5,
		    "failed" : 0
		  },
		  "hits" : {
		    "total" : 2,
		    "max_score" : 1.0,
		    "hits" : [
		      {
		        "_index" : "user",
		        "_type" : "admin_user",
		        "_id" : "1",
		        "_score" : 1.0,
		        "_source" : {
		          "userName" : "张三",
		          "title" : "工程师",
		          "desc" : "数据库管理"
		        }
		      },
		      {
		        "_index" : "user",
		        "_type" : "admin_user",
		        "_id" : "AWESLcupvcrWFMesxEQY",
		        "_score" : 1.0,
		        "_source" : {
		          "userName" : "李四",
		          "title" : "工程师",
		          "desc" : "网络管理"
		        }
		      }
		    ]
		  }
		}
一个搜索默认返回10条结果。
### match查询
以上的查询是带ID查询,返回所有文档,还有一种就是自定义查询,自己封装查询参数,实现全文搜索。Match查询主要是模糊匹配,不仅能返回结果,而且对结果还有相似度的判定。
Match参数设置
查询用户名为张三的文档:

curl -X GET 'localhost:9200/user/admin_user/_search?pretty=true' -d'
	{
	"query":{"match":{"userName":"张三"}}
	} '
结果:
	{
	  "took" : 6,
	  "timed_out" : false,
	  "_shards" : {
	    "total" : 5,
	    "successful" : 5,
	    "failed" : 0
	  },
	  "hits" : {
	    "total" : 1,
	    "max_score" : 1.7600523,
	    "hits" : [
	      {
	        "_index" : "user",
	        "_type" : "admin_user",
	        "_id" : "1",
	        "_score" : 1.7600523,
	        "_source" : {
	          "userName" : "张三",
	          "title" : "工程师",
	          "desc" : "数据库管理"
	        }
	      }
	    ]
	  }
	}
上面提到,一次查询默认返回10条记录,这里可以设置查询结果的条数。
	curl -X GET 'localhost:9200/user/admin_user/_search?pretty=true' -d'
	{
	"query":{"match":{"userName":"三"}},
	"size": 12
	} '
用了这种match方式去匹配查询,结果中有个_score这个属性,也就是相似度的参数(相关性得分)。

这里match不能匹配多个字段。匹配多个字段要使用multi_match
[match] query doesn't support multiple fields, found [userName]and[title]
curl -X GET 'localhost:9200/user/admin_user/_search?pretty=true' -d'
	{
	"query":{
		"multi_match":{
			"query":"张三",
			"fields": ["userName","title"]
			}
		   }
	} '
去匹配userName字段和title字段,匹配关键字就是 张三。
### bool查询
Bool查询相当于sql中的 OR AND NOT。
同一个字段用空格隔开表示 OR 。查询只会匹配当前字段,且多个关键词都会匹配。
curl -X GET 'localhost:9200/user/admin_user/_search?pretty=true' -d'
	{
	"query":{"match":{"userName":"三 四"}}
} '
这里的查询会去匹配userName中有 三 和 四的记录。
bool查询也可以查询多个字段
curl -X GET 'localhost:9200/user/admin_user/_search?pretty=true' -d'
	{
      "query": {
        "bool": {
          "must": [
          { "match": { "userName": "三" } },
          { "match": { "title": "师" } }
        ]
    }
  }
}'
结果:

Bool查询中的关键字有:
- must
所有的语句都 必须(must) 匹配,与 AND 等价。 - must_not
所有的语句都 不能(must not) 匹配,与 NOT 等价。 - should
至少有一个语句要匹配,与 OR 等价。
bool查询也可以多个条件嵌套使用:
curl -X GET 'localhost:9200/user/admin_user/_search?pretty=true' -d'
	{
	  "query": {
	    "bool": {
	      "must":[
	        { "match": { "desc": "管理" } }
	      ],
		   "should":[
		      {"match" : {"title":"师"}} ,
		      {"match": { "userName": "三" }}
		  ]
	    }
	  }
	}'
这样匹配的结果中desc字段中一定有 '管理',要么title中有' 师 ',要么userName中有' 三 '。
Range查询
在本实例中user索引的类型是admin_user,字段都为字符类型,需要再加一个数字类型的字段,相同的索引下可以有不同类型的数据结构,也就是type可以不唯一。可以直接插入新的文档:
curl -X POST 'localhost:9200/user/admin_user/?pretty=true' -d '
	{
	 "userName" : "李四",
	 "title" : "工程师",
	 "desc" : "网络管理",
	 "age" : 27
	} '

range 查询找出那些落在指定区间内的数字或者时间:
curl -X GET 'localhost:9200/user/admin_user/_search?pretty=ture' -d '
	{
	"query":{
		"range":{
		            "age" : { "gte":20, "lt":30 }
	     }
	  }
	}'
查询age在20到30之间的记录。

Range操作符如下:
- gt:大于
- gte:大于等于
- lt:小于
- lte:小于等于
term查询
term 查询被用于精确值匹配。在match查询中,会对输入值进行分词,然后再去匹配。term查询则没有分词这个过程,输入值是什么就去匹配什么。
curl -X GET 'localhost:9200/user/admin_user/_search?pretty=true' -d'
	{
	"query":{"term":{"desc":"网络,管理"}},
	"size": 12
	} '
结果什么都匹配不到:

更多搜索方式:https://www.elastic.co/guide/cn/elasticsearch/guide/current/_more_complicated_searches.html
注意,如果没有先创建 Index(这个例子是user),直接执行上面的命令,ES 也不会报错,而是直接生成指定的 Index。所以,不要写错 Index 的名称。
安装ES遇到的一些问题
failed ; error = ' Cannot allocate memory (errno=12)'

vim jvm.options
# change to 512m
-Xms512m
-Xms512m
can not run elasticsearch as root
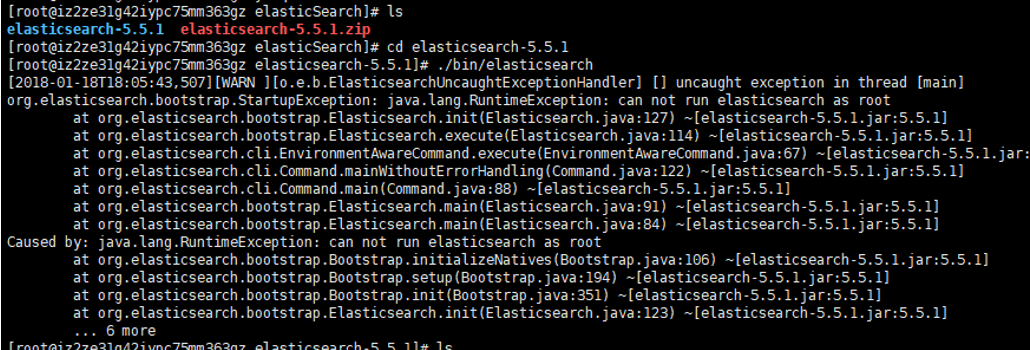
root 用户不能执行,需要创建其他用户运行。
groupadd elsearch
useradd elsearch -g elsearch
passwd elsearch
main ERROR Could not register mbeans java.security.AccessControlException:access denied
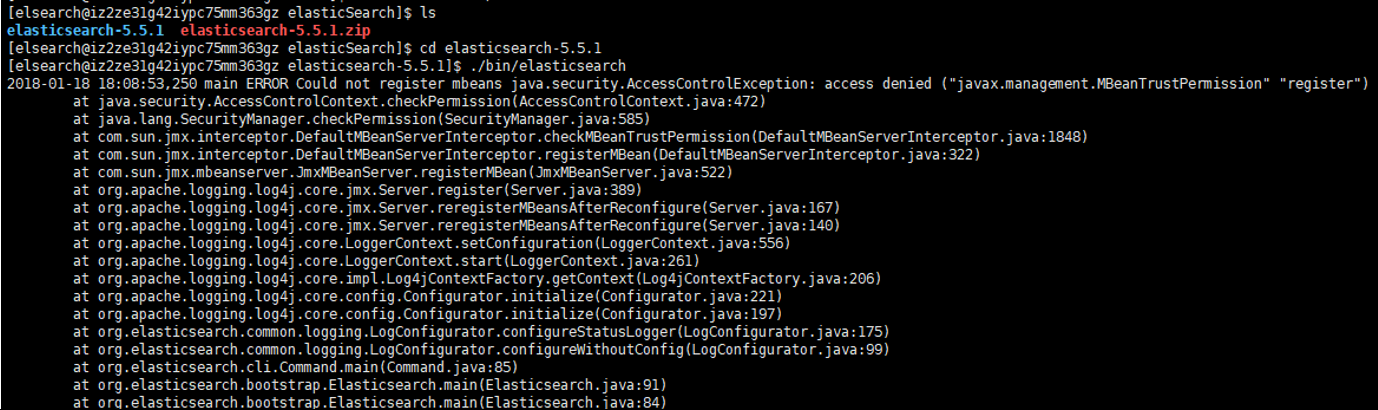
切换到普通用户出现的问题
需要把elasticSearch目录的所有者改变成当前用户:(-R 递归该目录下的所有文件)
sudo chown -R elsearch:elsearch elasticSearch
ERROR:[1] bootstrap check failed

修改 config/elasticsearch.yml之后无法启动
切换到root用户,
vi /etc/security/limits.conf
添加如下内容:
* soft nofile 65536
* hard nofile 131072
* soft nproc 2048
* hard nproc 4096
此文件修改后需要重新登录用户,才会生效