前面讲完Linux下一系列服务的配置和使用之后,本文简单介绍一款数据库管理系统(MySQL的兄弟)MariaDB。
如果你有MySQL或其他数据的使用经验,MariaDB使用起来将非常轻松。
本文讲解Centos7默认的数据MariaDB,由于是入门系列文章因此不会深入讲解,后面有机会在单独深入。
一、MariaDB产生背景
数据处理是软件的核心,软件的本质就是处理数据,包括输入输入、处理、输出。目前数据库主要分为关系型数据库和非关系型数据,关系型数据库主要有:SQLServer、Oracle、MySQL、MariaDB等;非关系型数据库(NoSQL)包含:Redis、HBase、MongoDB等等。
相信大家都听过或者用过MySQL数据库,它是一款市场占有率非常高的数据库管理系统,技术成熟、配置步骤相对简单,而且具有良好的可扩展性。
但是由于Oracle公司在2009年收购了MySQL的母公司Sun,因此MySQL项目也随之纳入了Oracle。被收购后,虽然MySQL仍然保持着开源软件的身份,但是却申请了多项商业专利,这就不禁让人担心其会被逐渐商业化。
一方面,MySQL本身是一款开源软件,是全球极客、程序员等技术高手在开源社区的大旗下的公共智慧结晶,自己的劳动成果被其他公司商业化自然也伤了一大批开源工作者的心,因此由MySQL项目创始者重新研发了一款名为MariaDB的全新数据库管理系统。
另一方面,各大公司都会存在竞争或利益关系,MySQL被收购后,谷歌、维基百科等公司决定将MySQL数据库上的业务转移到 MariaDB 数据库,红帽公司也决定在 RHEL 7、CentOS 7 以及最新的 Fedora 系统中,将 MariaDB 作为默认的数据库管理系统。
这样一样,MariaDB也因此快速占据了市场。MariaDB当前由开源社区进行维护,是MySQL的分支产品,而且几乎完全兼容 MySQL,并增加了一些新的特性,例如对微秒级别的 支持、线程池、子查询优化、进程报告等。
支持windows、linux等不同的操作系统,本文演示在Centos7下进行安装。
二、MariaDB安装
2.1 安装MariaDB
通过挂载光盘或yum仓库安装MariaDB
[root@mariadb ~]# rpm -q mariadb
package mariadb is not installed
[root@mariadb ~]# yum install mariadb mariadb-server
Loaded plugins: fastestmirror, langpacks
...省略部分内容
Dependency Updated:
  mariadb-libs.x86_64 1:5.5.64-1.el7
Complete!
[root@mariadb ~]# rpm -q mariadb
mariadb-5.5.64-1.el7.x86_64
[root@mariadb ~]# rpm -q mariadb-server
mariadb-server-5.5.64-1.el7.x86_64
[root@mariadb ~]# systemctl start mariadb
[root@mariadb ~]# systemctl enable mariadb
ln -s '/usr/lib/systemd/system/mariadb.service' '/etc/systemd/system/multi-user.target.wants/mariadb.service'
[root@mariadb ~]#
安装完成后,重启并设为开机启动,在正式使用之前先按下边步骤进行初始化
2.2 初始化MariaDB
为了确保数据库的安全性和正常运转,需要通过mysql_secure_installation对数据库程序进行初始化操作。
初始化的工作主要用于设置root的密码以及删除一些无关的账户信息,根据提示一路按y即可完成,主要步骤如下图所示:
[root@mariadb ~]# mysql_secure_installation
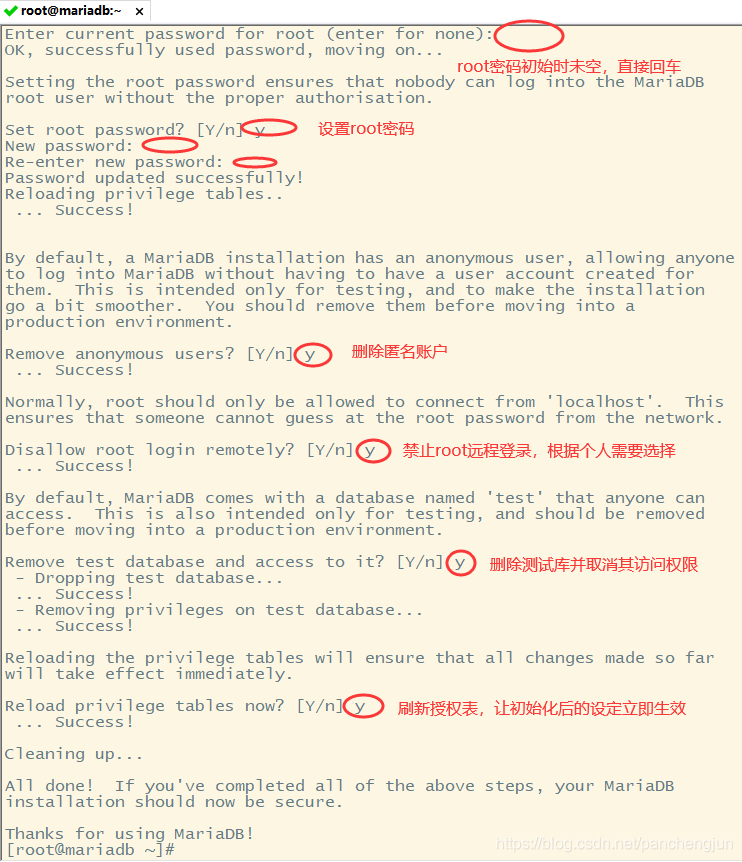
注意:上边设置的root密码为MariaDB数据的root账户的密码,而非Centos系统的root账户和密码。
2.3 测试安装是否成功
在虚拟机中通过mysql命令登录,并用show databases命令查看默认有哪些数据库,如果能查看说明安装成功并能正常连接。
[root@mariadb ~]# mysql -u root -p
Enter password:
Welcome to the MariaDB monitor.  Commands end with ; or g.
Your MariaDB connection id is 11
Server version: 5.5.64-MariaDB MariaDB Server

Copyright (c) 2000, 2018, Oracle, MariaDB Corporation Ab and others.

Type 'help;' or 'h' for help. Type 'c' to clear the current input statement.

MariaDB [(none)]> show databases;
+--------------------+
| Database           |
+--------------------+
| information_schema |
| mysql              |
| performance_schema |
+--------------------+
3 rows in set (0.00 sec)

MariaDB [(none)]> exit
Bye
[root@mariadb ~]#
mysql命令中,-u参数用来指定以root管理员的身份登录,而-p参数用来验证该用户在数据库中的密码值。
注意事项:
(1)MariaDB默认端口为3306,在防火墙中服务名称为mysql。因此MariaDB和MySQL不要同时使用。
(2)本例中直接禁止了root的远程登录,但实际上有可能需要远程访问数据,这可以在上边的初始化操作中设置允许root管理员远程访问;然后在设置防火墙,使其放行对数据库服务的访问请求。
[root@mariadb ~]# firewall-cmd --permanent --add-service=mysql
success
[root@mariadb ~]# firewall-cmd --reload
success
2.4 修改密码
通过set密码可以修改root用户的密码,假设密码修改为888888
MariaDB [(none)]> set password=password('888888');
Query OK, 0 rows affected (0.00 sec)
MariaDB [(none)]> exit
Bye
[root@mariadb ~]# mysql -uroot -p
Enter password: 输入新密码登录
修改密码后,退出再登录就只能用刚设置的新密码登录了。
三、MariaDB账户管理
为了保障数据库系统的安全性,以及让其他用户协同管理数据库,生产环境一般不用root管理员账户。一般是以在MariaDB数据库管理系统中创建多个专用的数据库管理账户,然后再分配合理的权限,以满足工作需求。
3.1 添加账户
添加账户的语句为:“CREATE USER 用户名@主机名 IDENTIFIED BY '密码'; ”
MariaDB [(none)]> create user heima@localhost identified by 'heima';
Query OK, 0 rows affected (0.00 sec)
MariaDB [(none)]> use mysql
Reading table information for completion of table and column names
You can turn off this feature to get a quicker startup with -A
Database changed
MariaDB [mysql]> select host,user,password from user where user='heima';
+-----------+-------+-------------------------------------------+
| host      | user  | password                                  |
+-----------+-------+-------------------------------------------+
| localhost | heima | *58613E96F5518C264EA39AA2A57D3DFEB191E343 |
+-----------+-------+-------------------------------------------+
1 row in set (0.00 sec)
MariaDB [mysql]>exit
创建用户后,存储在mysql数据库的user表中,可以进行查看。
3.2 账户授权管理
通过上边的方式创建的heima用户仅仅是一个普通用户,没有数据库的任何操作权限。
[root@mariadb ~]# mysql -uheima -pheima
Welcome to the MariaDB monitor.  Commands end with ; or g.
Your MariaDB connection id is 15
Server version: 5.5.64-MariaDB MariaDB Server
Copyright (c) 2000, 2018, Oracle, MariaDB Corporation Ab and others.
Type 'help;' or 'h' for help. Type 'c' to clear the current input statement.
MariaDB [(none)]> show databases;
+--------------------+
| Database           |
+--------------------+
| information_schema |
+--------------------+
1 row in set (0.00 sec)
MariaDB [(none)]> exit
Bye
[root@mariadb ~]#
我们用heima账户登录,通过查询看不到mysql数据库,说明该用户连数据库查看的权限都没有。
3.2.1 账号授权
(1)grant授权语句
授权使用grant语句,语法格式为:"grant 权限 on 数据库.表名称 to 账户名@主机名"。
举几个例子:
- 对某个特定数据库中的特定表单给予授权
GRANT 权限ON 数据库.表单名称TO 账户名@主机名
- 对某个特定数据库中的所有表单给予授权
GRANT 权限 ON 数据库.*TO 账户名@主机名
- 对所有数据库及所有表单给予授权
GRANT 权限 ON.TO 账户名@主机名
- 对某个数据库中的所有表单给予多个授权
GRANT 权限1,权限2 ON 数据库.*TO 账户名@主机 名
- 对所有数据库及所有表单给予全部授权
GRANT ALL PRIVILEGES ON .TO 账户名@主机
(2)对heima账户授权
用root管理员账户登录,通过grant语句给heima用户对msyql数据库user表的增删改查的授权:
MariaDB [(none)]> show grants for heima@localhost;
+------------------------------+
| Grants for heima@localhost   |
+------------------------------+
| GRANT USAGE ON *.* TO 'heima'@'localhost' IDENTIFIED BY PASSWORD '*58613E96F5518C264EA39AA2A57D3DFEB191E343' |
+------------------------------+
1 row in set (0.01 sec)
MariaDB [(none)]> grant select,update,delete,insert on mysql.user to heima@localhost;
Query OK, 0 rows affected (0.00 sec)
MariaDB [(none)]> show grants for heima@localhost;               +-----------------+
| Grants for heima@localhost     |
+----------------------------+
| GRANT USAGE ON *.* TO 'heima'@'localhost' IDENTIFIED BY PASSWORD '*58613E96F5518C264EA39AA2A57D3DFEB191E343' |
| GRANT SELECT, INSERT, UPDATE, DELETE ON `mysql`.`user` TO 'heima'@'localhost'    |
+-------------------------------+
2 rows in set (0.00 sec)
MariaDB [(none)]>
通过show grants命令可以看到对用户授予了哪些权限。
授权完成后,切换到heima用户,再次查看数据库就可以看到刚才授权的mysql数据库了,并且可以操作mysql数据库中user表的内容
MariaDB [(none)]> show databases;
+--------------------+
| Database           |
+--------------------+
| information_schema |
| mysql              |
+--------------------+
2 rows in set (0.01 sec)
MariaDB [(none)]> use mysql;
Reading table information for completion of table and column names
You can turn off this feature to get a quicker startup with -A
Database changed
MariaDB [mysql]> show tables;
+-----------------+
| Tables_in_mysql |
+-----------------+
| user            |
+-----------------+
1 row in set (0.00 sec)
MariaDB [mysql]> select host,user,password from user where user='heima';
+-----------+-------+-------------------------------------------+
| host      | user  | password                                  |
+-----------+-------+-------------------------------------------+
| localhost | heima | *58613E96F5518C264EA39AA2A57D3DFEB191E343 |
+-----------+-------+-------------------------------------------+
1 row in set (0.00 sec)
MariaDB [mysql]> exit
Bye
[root@mariadb ~]#
3.2.2 移除账户权限
当员工离职或其他原因需要移除账户权限时,可以使用root管理员登录,通过revoke语句进行移除
MariaDB [(none)]> revoke select,update,delete,insert on mysql.user from heima@localhost;
Query OK, 0 rows affected (0.00 sec)

MariaDB [(none)]> show grants for heima@localhost;
+------------+
| Grants for heima@localhost  |
+------------+
| GRANT USAGE ON *.* TO 'heima'@'localhost' IDENTIFIED BY PASSWORD '*58613E96F5518C264EA39AA2A57D3DFEB191E343' |
+-------------+
1 row in set (0.00 sec)
MariaDB [(none)]> exit
四、MariaDB数据库和表管理
4.0 知识储备
简单列举几个最基础的命令
- 创建数据库
CREATE DATABASE 数据库名称 (大小写不敏感,大小写都是可以的)
- 描述表
DESCRIBE 表单名称
- 更新表单中的数据
UPDATE 表单名称 SET attribute=新值 WHERE attribute>原始 值
- 指定使用的数据库
USE 数据库名称
- 显示当前已有的数据库
SHOW databases
- 显示当前数据库中的表
SHOW tables
- 从表单中选中某个记录值
SELECT * FROM 表单名称
- 从表单中删除某个记录值
DELETE FROM 表单名 WHERE attribute=值
4.1 创建数据库
创建一个名为 heima的数据库
MariaDB [(none)]> create database heima;
Query OK, 1 row affected (0.00 sec)
MariaDB [(none)]> show databases;
+--------------------+
| Database           |
+--------------------+
| information_schema |
| heima              |
| mysql              |
| performance_schema |
+--------------------+
4 rows in set (0.00 sec)
MariaDB [(none)]>
4.2 创建数据库表
切换到刚才创建的heima数据库,在其中创建user表,包含姓名和年龄两个字段
MariaDB [(none)]> use heima
Database changed
MariaDB [heima]> create table user(name char(15),age int);
Query OK, 0 rows affected (0.01 sec)
MariaDB [heima]> show tables;
+-----------------+
| Tables_in_heima |
+-----------------+
| user            |
+-----------------+
1 row in set (0.00 sec)
MariaDB [heima]> describe user;
+-------+----------+------+-----+---------+-------+
| Field | Type     | Null | Key | Default | Extra |
+-------+----------+------+-----+---------+-------+
| name  | char(15) | YES  |     | NULL    |       |
| age   | int(11)  | YES  |     | NULL    |       |
+-------+----------+------+-----+---------+-------+
2 rows in set (0.00 sec)
MariaDB [heima]>
五、MariaDB表数据管理
数据库表中数据的查找分为CRUD,也就是通常所说的增、删、改、查。
5.1 添加数据
使用insert into语句向heima数据库的user表中插入数据
MariaDB [heima]> insert into user(name,age) values('heima',18);
Query OK, 1 row affected (0.00 sec)
MariaDB [heima]> select * from user;
+-------+------+
| name  | age  |
+-------+------+
| heima |   18 |
+-------+------+
1 row in set (0.00 sec)
MariaDB [heima]>
5.2 查询数据
查询使用select语句,并可以结合where、group by、order by等语句进行综合查询。
在user表插入一条数据,然后根据年龄查询小于1岁的用户
MariaDB [heima]> insert into user(name,age) values("leo",1);
Query OK, 1 row affected (0.00 sec)
MariaDB [heima]> select * from user where age<2;
+------+------+
| name | age  |
+------+------+
| leo  |    1 |
+------+------+
1 row in set (0.00 sec)
MariaDB [heima]>
5.3 修改数据
修改数据使用update语句,在user表中将heima用户的年龄修改为19岁
MariaDB [heima]> update user set age=19 where name='heima';
Query OK, 1 row affected (0.00 sec)
Rows matched: 1  Changed: 1  Warnings: 0
MariaDB [heima]> select * from user;
+-------+------+
| name  | age  |
+-------+------+
| heima |   19 |
+-------+------+
1 row in set (0.00 sec)
MariaDB [heima]>
5.4 删除数据
删除数据使用delete语句,以下分别演示,删除用户名为leo的用户和删除所有用户
MariaDB [heima]> delete from user where name='leo';
Query OK, 1 row affected (0.00 sec)
MariaDB [heima]> select * from user;
+-------+------+
| name  | age  |
+-------+------+
| heima |   19 |
+-------+------+
1 row in set (0.00 sec)
MariaDB [heima]> delete from user;
Query OK, 1 row affected (0.00 sec)
MariaDB [heima]> select * from user;
Empty set (0.00 sec)
MariaDB [heima]>
六、MariaDB数据库备份及恢复
为了保证数据的安全性需要定期备份数据库,一旦出现问题可以通过备份文件进行恢复。
6.1 数据库备份
备份数据库数据使用mysqldump命令,格式为“mysqldump [参数] [数据库名称]”。参数与mysql命令基本相同,-u参数用于定义登录数据库的账户名称,-p参数代表密码提示符。
下面将 之前创建的heima数据库中的内容导出成一个文件,并保存到root管理员的家目录中:
[root@mariadb ~]# mysqldump -u root -p heima> /root/heima-db-back.dump
Enter password:
[root@mariadb ~]# ll heima-db-back.dump
-rw-r--r--. 1 root root 1794 Feb 13 12:48 heima-db-back.dump
[root@mariadb ~]# pwd
/root
[root@mariadb ~]#
此时模拟数据库故障,直接用root登录MariaDB数据,然后删除整个heima数据库
MariaDB [(none)]> drop database heima;
Query OK, 1 row affected (0.00 sec)
MariaDB [(none)]> show databases;
+--------------------+
| Database           |
+--------------------+
| information_schema |
| mysql              |
| performance_schema |
+--------------------+
3 rows in set (0.00 sec)
MariaDB [(none)]> exit
Bye
[root@mariadb ~]#
6.2 数据库恢复
要恢复数据库,先用root登录数据库,再次建一个空的heima数据库
MariaDB [(none)]> create database heima;
Query OK, 1 row affected (0.00 sec)
MariaDB [(none)]> show databases;
+--------------------+
| Database           |
+--------------------+
| information_schema |
| heima              |
| mysql              |
| performance_schema |
+--------------------+
4 rows in set (0.00 sec)
MariaDB [(none)]> exit
Bye
[root@mariadb ~]#
然后再用mysq重定向将刚备份的数据库文件导入mysql命令即可恢复
[root@mariadb ~]# mysql -uroot -p heima</root/heima-db-back.dump
Enter password:
[root@mariadb ~]# mysql -uroot -p888888
...省略部分内容
MariaDB [(none)]> use heima;
Reading table information for completion of table and column names
You can turn off this feature to get a quicker startup with -A
Database changed
MariaDB [heima]> show tables;
+-----------------+
| Tables_in_heima |
+-----------------+
| user            |
+-----------------+
1 row in set (0.00 sec)
MariaDB [heima]>exit
这样就完成了数据表中内容的恢复。
下一篇文章将是入门系列的最后一篇文章,综合讲解LNMP环境搭建动态WEB网站。