为什么要使用springMVC
很多应用程序的问题在于处理业务数据和显示业务数据的视图的对象之间存在紧密耦合。通常,更新业务对象的命令都是从视图本身发起的,使视图对任何业务对象更改都有高度敏感性。而且,当多个视图依赖于同一个业务对象时是没有灵活性的。
Spring Web MVC是一种基于Java的实现了Web MVC设计模式的请求驱动类型的轻量级Web框架,即使用了MVC架构模式的思想,将web层进行职责解耦,基于请求驱动指的就是使用请求-响应模型,框架的目的就是帮助我们简化开发,Spring Web MVC也是要简化我们日常Web开发的。
MVC设计模型
MVC 是一种著名的设计模式,特别是在 Web 应用程序领域。模式全都是关于将包含业务数据的模块与显示模块的视图解耦的。这是怎样发生的?视图(例如,JSP 页面)怎样能够与其模型(例如,包含数据的 JavaBean)解耦?记得这句格言么?一个层次的重定向几乎可以解决计算机业中的所有问题。确实,在模型和视图之间引入重定向层可以解决问题。此重定向层是控制器。控制器将接收请求,执行更新模型的操作,然后通知视图关于模型更改的消息。依赖于模型的状态并且依赖于请求的控制器可以决定要显示哪个视图。

Spring的强大之处
1.Spring MVC 实现了即用的 MVC 的核心概念。它为控制器和处理程序提供了大量与此模式相关的功能。并且当向 MVC 添加反转控制(Inversion of Control,IoC)时,它使应用程序高度解耦,提供了通过简单的配置更改即可动态更改组件的灵活性。Spring MVC 为您提供了完全控制应用程序的各个方面的力量。
2.Spring 的 Web MVC 模块是围绕 DispatcherServlet 而设计的。DispatcherServlet 给处理程序分派请求,执行视图解析,并且处理语言环境和主题解析,此外还为上传文件提供支持。
3.DispatcherServlet 通过使用处理程序映射来决定哪一个处理程序应当处理传入的请求。处理程序映射只是用于标识使用哪一个处理程序来处理特定 URL 模式的映射。处理程序是只有一种方法 ModelAndView handleRequest(request,response) 的控制器接口的实现。Spring 还有一些可用的高级处理程序实现;其中一个重要的高级处理程序实现是 SimpleFormController,它提供了将命令对象绑定到表单、对其执行验证等功能。
4.您已经在本系列教程的先前教程中使用了 DispatcherServlet 和简单的处理程序。在下一个部分中,将使用 SimpleFormController 并说明 Spring MVC 提供的各种即用功能。
Spring的优势
1、清晰的角色划分:前端控制器(DispatcherServlet)、请求到处理器映射(HandlerMapping)、处理器适配器(HandlerAdapter)、视图解析器(ViewResolver)、处理器或页面控制器(Controller)、验证器( Validator)、命令对象(Command 请求参数绑定到的对象就叫命令对象)、表单对象(Form Object 提供给表单展示和提交到的对象就叫表单对象)。
2、分工明确,而且扩展点相当灵活,可以很容易扩展,虽然几乎不需要;
3、由于命令对象就是一个POJO,无需继承框架特定API,可以使用命令对象直接作为业务对象;
4、和Spring 其他框架无缝集成,是其它Web框架所不具备的;
5、可适配,通过HandlerAdapter可以支持任意的类作为处理器;
6、可定制性,HandlerMapping、ViewResolver等能够非常简单的定制;
7、功能强大的数据验证、格式化、绑定机制;
8、利用Spring提供的Mock对象能够非常简单的进行Web层单元测试;
9、本地化、主题的解析的支持,使我们更容易进行国际化和主题的切换。
10、强大的JSP标签库,使JSP编写更容易。
MVC(Model-View-Controller)三元组的概念
Model(模型):数据模型,提供要展示的数据,因此包含数据和行为,可以认为是领域模型或 JavaBean 组件(包含数据和行为),不过现在一般都分离开来:Value Object(数据) 和 服务层(行为)。也就是模型提供了模型数据查询和模型数据的状态更新等功能,包括数据和业务。
领域模型
javaBean组件等价于 域模型层 + 业务逻辑层 + 持久层
View(视图):负责进行模型的展示,一般就是我们见到的用户界面,客户想看到的东西。
Controller(控制器):接收用户请求,委托给模型进行处理(状态改变),处理完毕后把返回的模型数据返回给视图,
由视图负责展示。 也就是说控制器做了个调度员的工作。
springmvc是spring框架的一个模块,springmvc和spring无需通过中间整合层进行整合。
springmvc是一个基于mvc的web框架。
springmvc 表现层:方便前后端数据的传输
Spring MVC 拥有控制器,作用跟Struts类似,接收外部请求,解析参数传给服务层
MVC是指,C控制层,M模块层,V显示层这样的设计理念,而SSM框架里面SPRING MVC本身就是MVC框架,作用是帮助(某种意义上也可以 理解为约束)我们要按照MVC这样的设计来开发WEB项目,而另外两个框架spring主要是用作IOC,AOF等其他的一些设计原则,至于mybatis是用来方便操作数据库的,所以他们都在MV里面,至于V指的是展示部分,一般是指JSP,freemarks这种前提其实,和SSM就没有太大的关系了
SpringMVC实例(注解式)
步骤一:导入依赖
<dependency>
  <groupId>org.springframework</groupId>
  <artifactId>spring-webmvc</artifactId>
  <version>4.2.0.RELEASE</version>
</dependency>

<dependency>
  <groupId>org.springframework</groupId>
  <artifactId>spring-web</artifactId>
  <version>4.2.0.RELEASE</version>
</dependency>
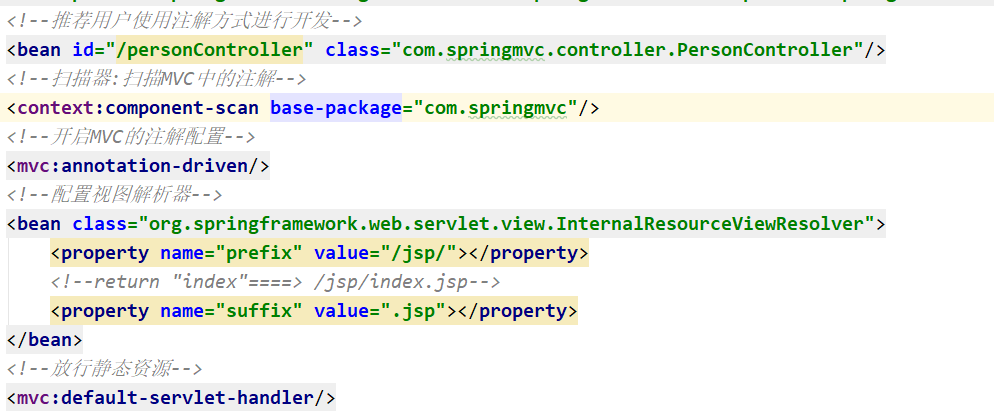
步骤二:创建spring-mvc文件
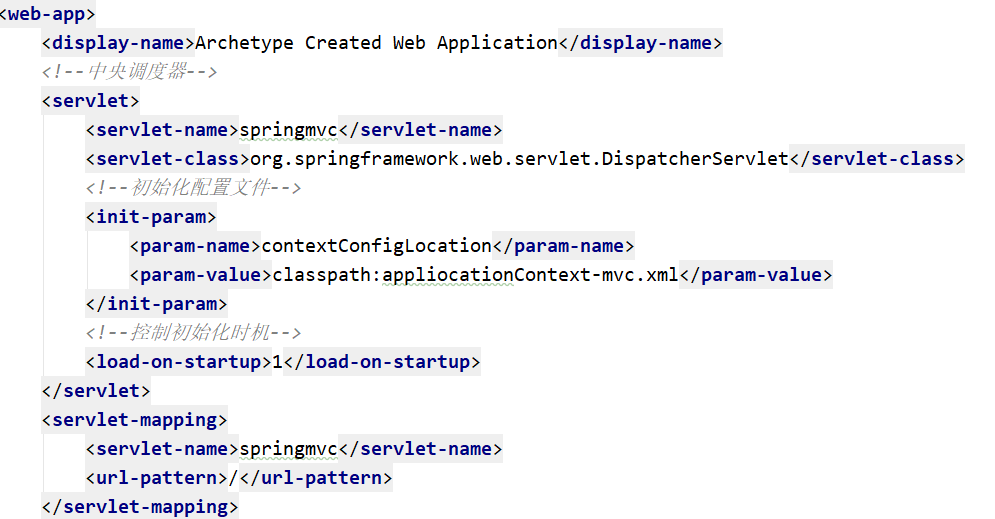
步骤三:配置web.xml文件
步骤四:entity实体类
package com.cmy.entity;

public class Accounts {
    private int accountid;
    private String accountname;
    private double balance;

    public int getAccountid() {
        return accountid;
    }

    public void setAccountid(int accountid) {
        this.accountid = accountid;
    }

    public String getAccountname() {
        return accountname;
    }

    public void setAccountname(String accountname) {
        this.accountname = accountname;
    }

    public double getBalance() {
        return balance;
    }

    public void setBalance(double balance) {
        this.balance = balance;
    }
}
步骤五:创建dao层
package com.cmy.dao;

import com.cmy.entity.Accounts;
import org.springframework.stereotype.Repository;

import java.util.List;

@Repository("accountDao")
public interface AccountDao {
    //查询全部
    List<Accounts> getAll();

    //根據名字查詢钱数
    public List<Accounts> getName(int accountid);

}
步骤六:创建dao.xml文件
<?xml version="1.0" encoding="UTF-8"?>
<!DOCTYPE mapper
        PUBLIC "-//mybatis.org//DTD mapper 3.0//EN"
        "http://mybatis.org/dtd/mybatis-3-mapper.dtd">

<!-- mapper为映射的根节点,namespace指定Dao接口的完整类名
mybatis会依据这个接口动态创建一个实现类去实现这个接口,
而这个实现类是一个Mapper对象-->

<mapper namespace="com.cmy.dao.AccountDao">
    <select id="getAll" resultType="com.cmy.entity.Accounts">
        SELECT * FROM accounts
    </select>

    <select id="getName" resultType="com.cmy.entity.Accounts">
        SELECT * FROM accounts WHERE accountid=#{accountid}
    </select>


</mapper>
步骤七:创建service业务接口层
package com.cmy.service;

import com.cmy.entity.Accounts;

import java.util.List;

public interface AccountService {
    //查询全部
    List<Accounts> getAll();

    //根據名字查詢钱数
    public List<Accounts> getName(int accountid);
}
步骤八:创建serviceImpl业务实现层
package com.cmy.serviceimpl;

import com.cmy.dao.AccountDao;
import com.cmy.entity.Accounts;
import com.cmy.service.AccountService;
import org.springframework.beans.factory.annotation.Autowired;
import org.springframework.stereotype.Service;

import javax.annotation.Resource;
import java.util.List;

@Service("accountService")
public class AccountServiceImpl implements AccountService {

    //植入对象
    @Resource(name = "accountDao")
    private AccountDao accountDao;

    @Override
    public List<Accounts> getAll() {
        return accountDao.getAll();
    }

    @Override
    public List<Accounts> getName(int accountid) {
        return accountDao.getName(accountid);
    }
}
步骤九:创建jdbc.properties文件
driver=com.mysql.jdbc.Driver
url=jdbc:mysql:///account
user=root
password=123
步骤十:配置application文件
<?xml version="1.0" encoding="UTF-8"?>
<beans xmlns="http://www.springframework.org/schema/beans"
       xmlns:xsi="http://www.w3.org/2001/XMLSchema-instance" xmlns:tx="http://www.springframework.org/schema/tx"
       xmlns:context="http://www.springframework.org/schema/context"
       xsi:schemaLocation="http://www.springframework.org/schema/beans http://www.springframework.org/schema/beans/spring-beans.xsd http://www.springframework.org/schema/tx http://www.springframework.org/schema/tx/spring-tx.xsd http://www.springframework.org/schema/context http://www.springframework.org/schema/context/spring-context.xsd">

    <!--加載屬性文件-->
    <bean class="org.springframework.beans.factory.config.PropertyPlaceholderConfigurer">
       <!-- <property name="location" value="classpath:jdbc.properties"></property>-->
        <property name="locations">
            <array>
                <value>classpath*:*.properties</value>
            </array>
        </property>
    </bean>

    <!--配置数据源-->
    <bean id="dataSource" class="org.springframework.jdbc.datasource.DriverManagerDataSource">
        <property name="url" value="${url}"></property>
        <property name="driverClassName" value="${driver}"></property>
        <property name="username" value="${user}"></property>
        <property name="password" value="${password}"></property>
    </bean>

    <!--配置SqlSessionFactoryBean-->
    <bean id="sqlSessionFactory" class="org.mybatis.spring.SqlSessionFactoryBean">
        <property name="dataSource" ref="dataSource"></property>
        <property name="mapperLocations" value="classpath*:mapper/*.xml"></property>
        <property name="typeAliasesPackage" value="com.cmy.entity"></property>
    </bean>

    <!--包扫描-->
    <bean class="org.mybatis.spring.mapper.MapperScannerConfigurer">
        <property name="basePackage" value="com.cmy.dao"></property>
    </bean>

    <!--事务管理器-->
    <bean class="org.springframework.jdbc.datasource.DataSourceTransactionManager">
        <property name="dataSource" ref="dataSource"></property>
    </bean>

    <!--开启各种注解配置-->
    <tx:annotation-driven/>
    <context:annotation-config/>
    <context:component-scan base-package="com.cmy"></context:component-scan>

</beans>
步骤十一:创建控制器
package com.cmy.controller;

import com.cmy.editor.DateFormat;
import com.cmy.entity.Accounts;
import com.cmy.service.AccountService;
import org.apache.commons.io.FileUtils;
import org.omg.CORBA.OBJ_ADAPTER;
import org.springframework.beans.propertyeditors.CustomDateEditor;
import org.springframework.http.HttpHeaders;
import org.springframework.http.HttpStatus;
import org.springframework.http.MediaType;
import org.springframework.http.ResponseEntity;
import org.springframework.stereotype.Controller;
import org.springframework.ui.Model;
import org.springframework.web.bind.WebDataBinder;
import org.springframework.web.bind.annotation.*;
import org.springframework.web.multipart.MultipartFile;
import org.springframework.web.servlet.ModelAndView;

import javax.annotation.Resource;
import javax.servlet.http.HttpServletRequest;
import javax.servlet.http.HttpSession;
import java.io.File;
import java.io.IOException;
import java.io.UnsupportedEncodingException;
import java.text.SimpleDateFormat;
import java.util.Date;
import java.util.List;

@Controller     //标识该类是一个控制器
public class HelloWorldController {

    @Resource(name = "accountService")
    private AccountService accountService;

    @RequestMapping("/hello")       //设置处理器方法与用户请求的url之间的映射关系@WebServlet
    public String toIndex() throws Exception {
return "index";
    }

    @RequestMapping("/getAll")
    @ResponseBody   //将该方法设置为响应体    代表能够异步请求
    public Object getAll(){
        return accountService.getAll();
    }

   @RequestMapping("/getName")
   @ResponseBody
    public List<Accounts> toIndex(HttpServletRequest request, Model model){
       int id=1;
       List<Accounts> name = accountService.getName(id);
       model.addAttribute("name",name);
       return name;
   }
}
步骤十二:创建jsp页面实现
<%@ page contentType="text/html;charset=UTF-8" language="java" isELIgnored="false" %>
<html>
<head>
    <title>Title</title>
</head>
<body>
<h1></h1></body>
</html>
SpringMVC实现(配置式)
步骤一:编写控制器
public class Controller  implements org.springframework.web.servlet.mvc.Controller {

    @Override
    public ModelAndView handleRequest(HttpServletRequest httpServletRequest, HttpServletResponse httpServletResponse) throws Exception {
        ModelAndView mv=new ModelAndView();
        //传数据
        mv.addObject("user","张三");
        //转发页面
        mv.setViewName("index");

        return mv;
    }

}
步骤二:编写application.xml文件
<!--配置式-->
<bean id="/controller" class="com.pei.contrlloer.Controller"></bean>
步骤三:编写web.xml文件
<web-app xmlns="http://xmlns.jcp.org/xml/ns/javaee" xmlns:xsi="http://www.w3.org/2001/XMLSchema-instance"
         xsi:schemaLocation="http://xmlns.jcp.org/xml/ns/javaee
                      http://xmlns.jcp.org/xml/ns/javaee/web-app_3_1.xsd"
         version="3.1" metadata-complete="true">
  <!--中央控制器-->
  <servlet>
    <servlet-name>SpringMVC</servlet-name>
    <servlet-class>org.springframework.web.servlet.DispatcherServlet</servlet-class>
    <!--读取springMVC.xml文件-->
    <init-param>
      <param-name>contextConfigLocation</param-name>
      <param-value>classpath:spring-mvc.xml</param-value>
    </init-param>
  </servlet>

 <!-- 请求,然后通过SpringDispatcherServlet的url-pattern-->
  <servlet-mapping>
    <servlet-name>SpringMVC</servlet-name>
    <url-pattern>/</url-pattern>
  </servlet-mapping>
</web-app>
步骤四:页面
<%@ page contentType="text/html;charset=UTF-8" language="java" isELIgnored="false" %>
<html>
<head>
    <title>Title</title>
</head>
<body>
<h1></h1>
<img src="/img/yzj.jpg" width="300px" height="300px"/>
${user}
</body>
</html>