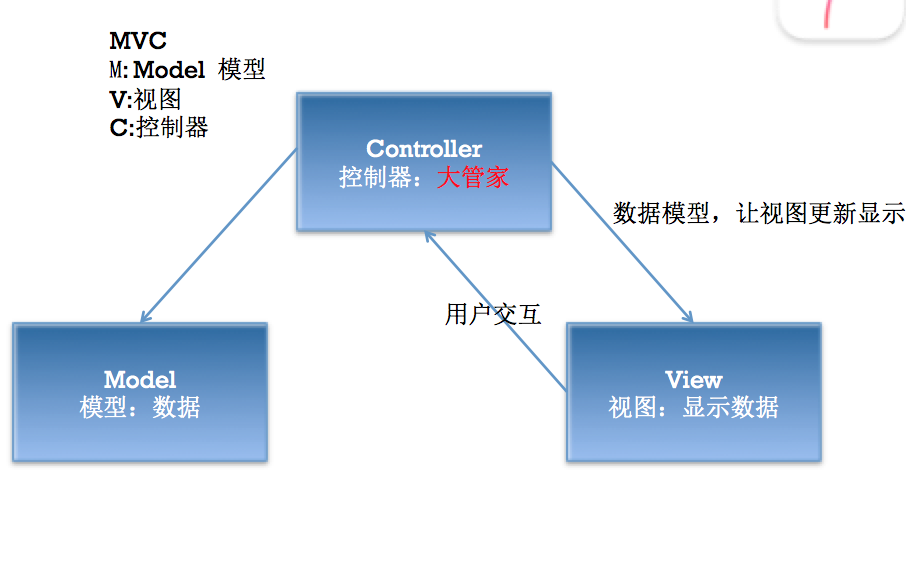
一.MVC简介
说明:
(1)在开发过程中,作为控制器处理的量级应该很轻,不该操心的不操心。协调好模型和视图就ok了,要学会当一个好老板。
(2)三个部分各司其职,数据模型只负责数据的处理,视图部分只负责把拿到的数据进行显示,两个部分都是被动的,等待着大管家控制器的调遣。
(3)在OC中,如果视图和数据模型之间有通道,那控制器是否处于失控状态呢?
二.代码实现步骤
2.1 Controller层
#import "ViewController.h"
#import "AppInfo.h"
#import "AppView.h"
#define KappW 100
#define KappH 100
#define KappMargin 30
#define KappCount 12
#define KappRowNum 3
@interface ViewController ()
@property(nonatomic , strong)NSArray *appList;
@end
@implementation ViewController
-(NSArray *)appList
{
if(_appList == nil){
// 字典转模型
// _appList = arrayM; // 别死记代码,OK???
_appList = [AppInfo appList];
}
return _appList;
}
- (void)viewDidLoad {
[super viewDidLoad];
for(int i = 0 ; i < KappCount ; i++){
int row = i/KappRowNum;
int col = i%KappRowNum;
int pointW = KappMargin + (KappW + KappMargin)*col;
int pointH = KappMargin + (KappH + KappMargin)*row;
// 从xib来加载自定义视图
// AppView *appView = [[[NSBundle mainBundle]loadNibNamed:@"AppView" owner:nil options:nil]lastObject];
// AppView *appView = [AppView appView];
AppView *appView = [AppView appViewWithAppInfo:self.appList[i]];
appView.frame = CGRectMake(pointW, pointH, KappW , KappH);
[self.view addSubview:appView];
// 数组转为字典 self 【哥】 需要有人调这个数组的
// NSDictionary *dict = self.appList[i];
// AppInfo *appInfo = self.appList[i];
// appView.appInfo = self.appList[i]; 设置视图的显示
}
}
2.Model
AppInfo.h类
#import <Foundation/Foundation.h>
#import <UIKit/UIKit.h>
@interface AppInfo : NSObject
// 字典转模型 , 模型属性
@property (nonatomic , copy) NSString *name;
@property (nonatomic , copy) NSString *icon;
@property (nonatomic , strong , readonly) UIImage *image;
// 模型实例化方法
/** 使用字典实例化模型 instancetype */
-(instancetype)initWithDict:(NSDictionary *)dict;
/** 类方法可以快速实例化一个对象 */
+(instancetype)initWithDict:(NSDictionary *)dict;
/** 返回plist中的数据模型数组 */
+(NSArray *)appList;
@end
AppInfo.m
#import "AppInfo.h"
@implementation AppInfo
// 合成指令,主动指定属性使用的成员变量名称
@synthesize image = _image;
/**
使用KVC的注意事项
1> plist中的键值名称必须与模型中的属性一致
2> 模型中的属性可以不全部出现在plist中
*/
- (UIImage *)image
{
if(_image == nil){
_image = [UIImage imageNamed:self.icon];
}
return _image;
}
/** 实现字典转模型的方法 */
-(instancetype)initWithDict:(NSDictionary *)dict
{
// self为对象
self = [super init];
if(self){
// 用字典给属性赋值
// self.name = dict[@"name"];
// self.icon = dict[@"icon"];
// 使用kVC
[self setValuesForKeysWithDictionary:dict];
}
return self;
}
+(instancetype)initWithDict:(NSDictionary *)dict
{
// [self init] 通过类实例化模型,调用对象方法 懂点脑子啊,哥哥,这样搞就不用写了。回家种田去
return [[self alloc]initWithDict:dict];
}
// 类方法数组转对象字典
+(NSArray *)appList
{
NSArray *array = [NSArray arrayWithContentsOfFile:[[NSBundle mainBundle] pathForResource:@"app.plist" ofType:nil]];
NSMutableArray *arrayM = [NSMutableArray array];
for(NSDictionary *dict in array){
[arrayM addObject:[AppInfo initWithDict:dict]];
}
return arrayM;
}
@end
3.View(视图层:视图+数据)
AppView.h 接口文件
#import <UIKit/UIKit.h>
@class AppInfo; // 一个类引用一个类使用
@interface AppView : UIView
// 类方法加载xib,方便调用视图
+ (instancetype)appView;
/** 实例化视图,并使用appInfo设置视图显示*/
+ (instancetype)appViewWithAppInfo:(AppInfo *)appInfo;
//@property (weak, nonatomic) IBOutlet UIButton *button;
// 自定义视图中显示的数据来源是数据模型
// 使用模型设置自定义视图的显示
@property (nonatomic,strong) AppInfo *appInfo;
@end
AppView.m // 视图实现类
#import <UIKit/UIKit.h>
#import "AppView.h"
#import "AppInfo.h"
@interface AppView()
@property (weak, nonatomic) IBOutlet UIImageView *iconView;
@property (weak, nonatomic) IBOutlet UILabel *label;
@end
@implementation AppView
+(instancetype)appView
{
return [[[NSBundle mainBundle]loadNibNamed:@"AppView" owner:nil options:nil]lastObject];
}
+(instancetype)appViewWithAppInfo:(AppInfo *)appInfo
{
// 实例化一个视图
AppView *view = [self appView];
// 设置视图的显示
view.appInfo = appInfo;
// 返回视图
return view;
}
// 将数据封装在他需要的地方
// 利用setter方法设置视图界面的显示
- (void)setAppInfo:(AppInfo *)appInfo
{
_appInfo = appInfo;
self.label.text = appInfo.name;
self.iconView.image = appInfo.image;
}
- (IBAction)click:(UIButton *)button
{
//AppInfo *appInfo = self.appList[button.tag];
UILabel *label = [[UILabel alloc]initWithFrame:CGRectMake(120, 600, 160, 40)];
label.text = self.appInfo.name;
label.textAlignment = NSTextAlignmentCenter;
label.backgroundColor = [UIColor colorWithWhite:0.0 alpha:0.2];
[self.superview addSubview:label];
}
@end
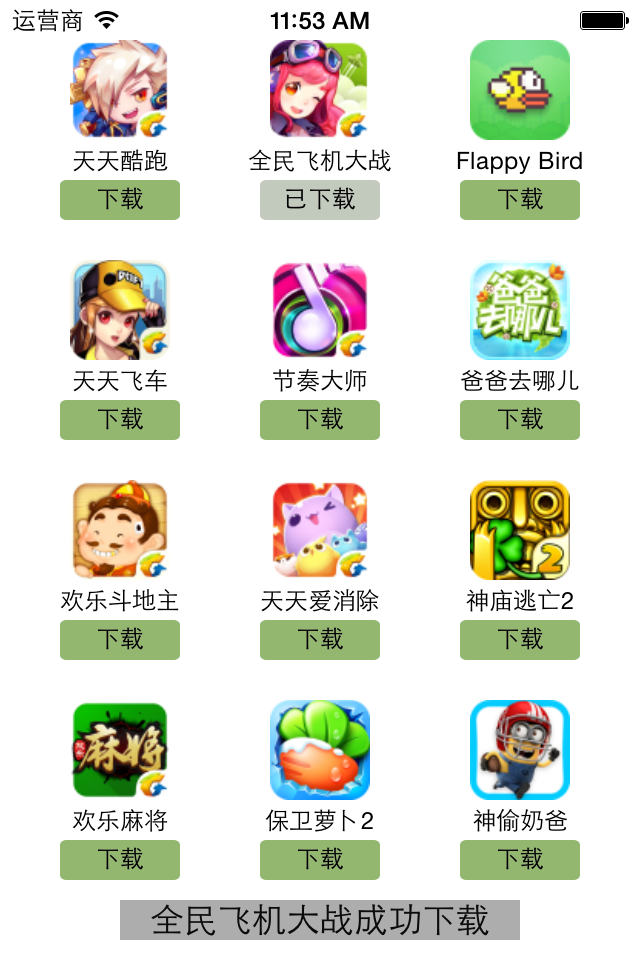
三.运行效果