正文前先来一波福利推荐:
福利一:
百万年薪架构师视频,该视频可以学到很多东西,是本人花钱买的VIP课程,学习消化了一年,为了支持一下女朋友公众号也方便大家学习,共享给大家。
福利二:
毕业答辩以及工作上各种答辩,平时积累了不少精品PPT,现在共享给大家,大大小小加起来有几千套,总有适合你的一款,很多是网上是下载不到。
获取方式:
微信关注 精品3分钟 ,id为 jingpin3mins,关注后回复 百万年薪架构师 ,精品收藏PPT 获取云盘链接,谢谢大家支持!

-----------------------正文开始---------------------------
概念
池:一个高级的集合体(集合存储元素 + 管理方式–>提高效率),是对外提供同一种类型对象的集合,如(线程池、数据库连接池)
特性:复用性(每条连接可重复使用),隔离性(每条连接一个时间内只能由一个线程获取)!!
连接池功能:
1.最大限度的满足并发复用,提高响应效率
2.大大的节省了服务器资源,(一定程度上)减少大量初始化问题
代码实现:
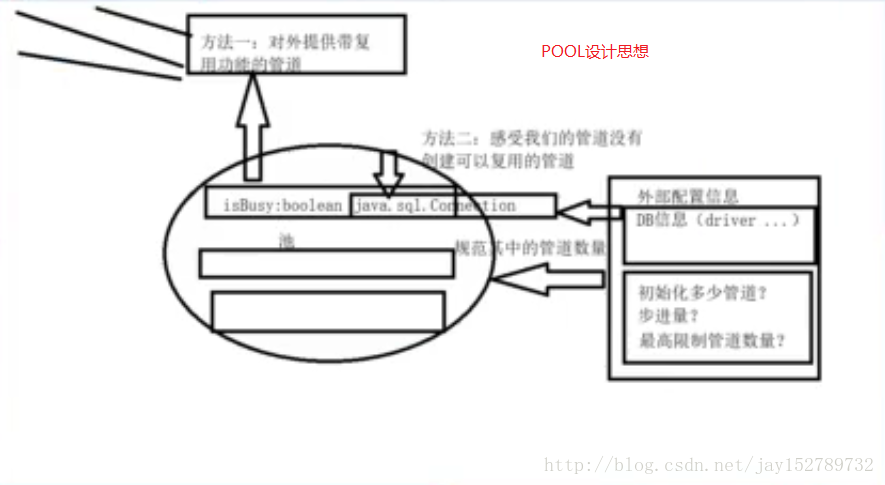
1.POOL Interface设计思想
一对外提供复用连接包装内<—[pool]—>一对内创建连接
//抽取连接池架构接口
public interface MyPool {
//对外提供可复用连接包装内
PooledConnection getConnection();
//对内创建连接
void createConnections(int count);
}
2.PooledConnection
为自定义连接池包装类bean(原生的Connection没有复用的标志,若不close回收掉,则不能判断该connection是否在用情况)
成员变量:
//表示繁忙标志     复用的标志 线程安全
private boolean busy = false;
//真正的sql 连接connection(java.sql.Connection)
private Connection con;
//只是用来测试当前connectionName,便于观察
private String connName;
public boolean isBusy() {
return busy;
}
public void setBusy(boolean busy) {
this.busy = busy;
}
public Connection getCon() {
return con;
}
public void setCon(Connection con) {
this.con = con;
}
public String getConnName() {
return connName;
}
public void setConnName(String connName) {
this.connName = connName;
}
对外提供关闭方法
// 将该连接置为不可用,而不是真正关掉连接
public void close() {
    this.busy = false;
}
对外提供一个简单的测试方法,也就是获得了连接之后,就可以使用statement进行执行Sql语句;
public ResultSet queryBySql(String sql) {
    Statement sttm = null;
    ResultSet rs = null;
    try {
        sttm = con.createStatement();
        rs = sttm.executeQuery(sql);
        //System.out.println("当前连接编号是:" + connName);
    } catch (SQLException e) {
        e.printStackTrace();
    }
    return rs;
}
上面一个简单的PooledConnection连接包装类就完成了,主要功能就如之前所说的一样,将DriverManager获取的Connection进行包装使其可复用(连接不是用完就关掉),隔离性由一个简单的标志位属性busy决定(当busy为false时,表明该连接空闲可用,为true则表示该连接已被使用)
3.MyPoolImpl(重点关键实现类)为Pool的实现类
功能:
1.初始化数据连接driver
2.初始化连接池容量(扩容容量)
3.获取连接单个连接
成员变量
private static String driver = null;
private static String url = null;
private static String user = null;
private static String password = null;
/**连接池中管道参数**/
private static int initCount = 5;
private static int stepSize = 10;
private static int poolMaxSize = 55;
private static int expandTime = 0;
/**线程安全集合,用来放(可复用)数据库连接管道(集合之前用Vector,但在测试的时候发现多线程并发出错了ConcurrentModificationException)这个还要仔细研究一下**/
//连接池
private static CopyOnWriteArrayList<PooledConnection> pooledCons = new CopyOnWriteArrayList<PooledConnection>();
几个重要实现方法
1.注册driver(根据配置文件properties文件修改初始化参数JdbcUtil操作)
private void init() {
    InputStream inStream = this.getClass().getClassLoader().getResourceAsStream("jdbc.properties");
    Properties properties = new Properties();
    try {
        properties.load(inStream);
    } catch (IOException e) {
        //若这里抛出异常则下面不运行
        e.printStackTrace();
    }
    this.driver = properties.getProperty("jdbc_driver");
    this.url = properties.getProperty("jdbc_url");
    this.user = properties.getProperty("jdbc_username");
    this.password = properties.getProperty("jdbc_password");
    if(Integer.valueOf(properties.getProperty("initCount")) > 0) {
        this.initCount = Integer.valueOf(properties.getProperty("initCount"));
    }else if(Integer.valueOf(properties.getProperty("stepSize")) > 0) {
        this.stepSize = Integer.valueOf(properties.getProperty("stepSize"));
    }else if(Integer.valueOf(properties.getProperty("poolMaxSize")) > 0) {
        this.poolMaxSize = Integer.valueOf(properties.getProperty("poolMaxSize"));
    }
    //准备创建DriverManager
    try {
        Driver dbDriver = (Driver) Class.forName(this.driver).newInstance();
        DriverManager.registerDriver(dbDriver);
    } catch (Exception e) {
        // TODO Auto-generated catch block
        e.printStackTrace();
    }
    //获取连接,用create方法获取
    /**DriverManager.getConnection(url, user, password);**/
    this.createConnections(initCount);
    }
2.初始化连接池容量(也就是实现Pool Interface的方法创建连接连接池)
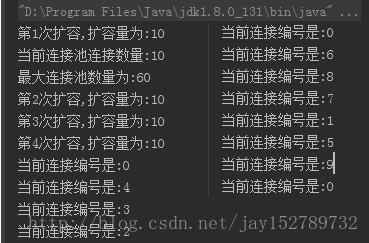
所有的Console都是为了便于观察
@Override
public void createConnections(int count) {
    //this.expandTime++;
    //System.out.println("第"+expandTime+"次扩容,扩容量为:"+count);
    if((pooledConnections.size() + count) <= poolMaxSize) {
        for(int i = 0;i < count ;i++) {
            try {
                //获取连接放入线程安全的连接池中
                Connection conn = DriverManager.getConnection(url, user, password);
                PooledConnection pooledConnection = new PooledConnection(conn,false,String.valueOf(i));
                this.pooledConnections.add(pooledConnection);
                //System.out.println("初始化"+(i + 1) + "个连接");
            } catch (SQLException e) {
                e.printStackTrace();
            }
        }
    }
    System.out.println("当前连接池连接数量:"+ pooledConnections.size());
    System.out.println("最大连接池数量为:"+ this.poolMaxSize);
}
3.1 对外提供获取连接包装类(也是实现Interface的方法)
@Override
public PooledConnection getConnection() {
    //spring思想要拿连接,先判断管道集合中是否有连接
    if(this.pooledConnections.size() == 0) {
        System.out.println("连接池没有连接!");
        //如果没有就手动再建一把连接池
        this.createConnections(initCount);
    }
    PooledConnection connection = getRealConnection();
    //如果还是没有拿到,说明全部线程都处于busy状态,得扩容
    while(connection == null) {
        this.createConnections(stepSize);
        connection = getRealConnection();
        try {//拿到连接等待一会,防止连接又被别的线程抢夺
            Thread.sleep(50);
        } catch (InterruptedException e) {
            e.printStackTrace();
        }
    }
    return connection;
}
3.2 真正的获取连接包装类getRealConnection()
//同步方法,真正的获取连接(连接包装内包括:connection和标志位busy)
private synchronized PooledConnection getRealConnection() {
    for(PooledConnection conn:pooledConnections) {
        //判断该连接是否已被占用
        if(!conn.isBusy()) {//false为可用(空闲),true为占用(繁忙)
            Connection connection = conn.getConnection();
            try {
                //判断该连接是否在设定时间连接通数据库(连接通为true)
                if(!connection.isValid(2000)) {
                    connection = DriverManager.getConnection(url, user, password);
                }
            } catch (SQLException e) {
                // TODO Auto-generated catch block
                e.printStackTrace();
            }
            conn.setBusy(true);
            return conn;
        }
    }
    //如果连接池中的连接都被占用,则返回null,由调用函数处理(即扩容)
    return null;
}
以上连接池实现大致功能就完成了,主要包涵初始化注册,连接池扩容和获取连接方法
4.连接池管理类对象的封装PoolManager
public class PoolManager {
private PoolManager(){}
/**
 * 内部类单利模式 伪造类加载器加载原理:实现线程安全问题(类加载器加载内部类实例是互斥特性)
 */
private static class createPool {
    private static MyPoolImpl poolImpl = new MyPoolImpl();
}
public static MyPool getInstace() {
    return createPool.poolImpl;
}
}
特性:每个线程对类加载内部类实例时是互斥
测试
测试类Test.class
测试主方法
//测试2000条线程 jdk1.8 内部类用lambda表达示
public static void main(String[] args) {
    for(int i =0; i < 2000; i++) {
        new Thread(() -> selectDate()).start();
    }
}
测试方法selectDate()
成员变量
public static MyPool myPool = PoolManager.getInstace();
//方法加了synchronized之后,连接池不扩容了???
public static void selectDate() {
    PooledConnection connection = myPool.getConnection();
    String sql = "select * from t_area";
    ResultSet rs = connection.queryBySql(sql);
    try {
        while(rs.next()) {
            String name = rs.getString("name");
            Integer id = rs.getInt("id");
            //System.out.println("当前线程:"+ Thread.currentThread().getName() +",id:"+ id + ",name" + name);
        }
    } catch (SQLException e) {
        e.printStackTrace();
    }
    connection.close();
}
问题:
1.myPoolImpl类中连接池的集合问题用线程安全的Vector,在多次测试中出现Java ConcurrentModificationException 异常Java ConcurrentModificationException异常原因和解决方法
2.当在测试方法selectDate()上加了synchronized之后,连接池不扩容问题???,相关锁问题还不够了解
3.运行观测问题:扩容的连接数量远远大于了实际运行使用的数量(基本上就是0-10号连接在用)???