一、定时导出Excel并定时发送到邮箱
首先我们先分析一下该功能有多少个小的任务点:1.Windows计划服务
2.定时导出Excel定指定路径
3.定时发送邮件包含附件
接下来我们一个个解决,
1.1发送邮件
- 现提供一下相关资料:
http://www.cnblogs.com/ForEvErNoME/archive/2012/06/05/2529259.html
- 了解SMTP服务器
SMTP具体是指什么?
SMTP的全称是"Simple Mail Transfer Protocol",即简单邮件传输协议。它是一组用于从源地址到目的地址传输邮件的规范,通过它来控制邮件的中转方式。SMTP 协议属于 TCP/IP 协议簇,它帮助每台计算机在发送或中转信件时找到下一个目的地。SMTP 服务器就是遵循 SMTP 协议的发送邮件服务器。
- 了解常用邮件服务器(例如:QQ邮箱,网易邮箱,新浪邮箱,163邮箱…)
这里以QQ邮箱为例讲解如何注册邮件服务器:
首先需要注册对应服务提供商免费邮箱,因为你要使用邮件服务提供商的SMTP,他们需要对身份进行验证,这样可以避免产生大量的垃圾邮件。
※ 注册方式:打开QQ上的QQ邮箱,点击设置,选择账号,找到POP3/IMAP/SMTP/Exchange/CardDAV/CalDAV服务,第一个pop3、SMTP服务,点击后面的 开启,会弹出密保验证,根据要求发短信到号码,发送至后会给你一个密码(一定要记住此密码,这是登陆的凭证)
相关参数:QQ邮箱STMP服务器地址为stmp.qq.com,端口为25(别的邮箱自行百度)
到此,注册邮箱服务器就完成了。
- 接下来我们看如何用程序发送邮件
这里可以参考相关资料:
再次,附上自己的源代码,仅供参考
需要导入命名空间 using System.Net.Mail;
public static void SendEmail() { //声明一个Mail对象 MailMessage mymail = new MailMessage(); mymail.Attachments.Add(new Attachment("D:\mail.txt")); //为该电子邮件添加附件 附件的路径 //如果是多个附件 继续.Add() mymail.Attachments.Add(new Attachment("C:\mail.txt")); //发件人地址 //如是自己,在此输入自己的邮箱 mymail.From = new MailAddress(“发件人邮箱号”) //收件人地址 mymail.To.Add(new MailAddress(“收件人邮箱号”)); //邮件主题 mymail.Subject = “邮件主题…”; //邮件标题编码 mymail.SubjectEncoding = System.Text.Encoding.UTF8; //发送邮件的内容 mymail.Body =“邮件内容…”; //邮件内容编码 mymail.BodyEncoding = System.Text.Encoding.UTF8; //抄送到其他邮箱 mymail.CC.Add(new MailAddress(“抄送邮箱号”)); //是否是HTML邮件 mymail.IsBodyHtml = true; //邮件优先级 mymail.Priority = MailPriority.High; //创建一个邮件服务器类 SmtpClient myclient = new SmtpClient(); myclient.Host = "SMTP.qq.com"; //qq邮箱服务器地址,不同的邮箱不同 //SMTP服务端口s myclient.Port = 25; myclient.EnableSsl = true; //验证登录 myclient.Credentials = new NetworkCredential(EmailKey, PasswordKey);//"@"输入有效的邮箱名, "*"输入有效的密码(此密码就是注册邮箱服务器是发送短信后给的密码) myclient.Send(mymail); Console.WriteLine("导出Excel成功!"); } 然而这种方法有一定的弊端,程序发布后,.cs文件不可编辑,而配置文件可以用记事本的方式打开编辑,所以跟数据库的连接字符串一个性质,我们把相关可变的信息放到连接字符串。 在配置文件中进行以下操作: <appSettings> 节点添加以下内容:key value 的形式 <appSettings> <add key="FromKey" value="727472902@qq.com" /> <!—发件人 --> <!--如果发给多个人 改这里 NPOI 教程 http://www.cnblogs.com/atao/archive/2009/11/15/1603528.html "--> <add key="ToAddKey" value="727472902@qq.com" /> <!—收件人 --> <!—主题 --> <add key="SubjectKey" value="仓鲜智能便利店" /> <!—内容--> <add key="BodyKey" value="今日销售报表相关情况" /> <!--抄送人--> <add key="CCAddKey" value="222222@qq.com" /> <!—邮箱服务器 --> <add key="EmailKey" value="222****222@qq.com" /> <!—邮箱服务器 密码 --> <add key="PasswordKey" value="cau****yudhi" /> </appSettings> 接下来看看后台代码如何使用它: public static void SendEmail() { //声明一个Mail对象 MailMessage mymail = new MailMessage(); mymail.Attachments.Add(new Attachment(ExportExcelSaleDetail())); //为该电子邮件添加附件 mymail.Attachments.Add(new Attachment(ExportExcelStorage())); //发件人地址 //配置文件的方式读取 在这里读取配置文件中的内容 需要引入 //using System.Configuration; var FromKey = ConfigurationManager.AppSettings["FromKey"].ToString(); //对应配置文件中的key var ToAddKey = ConfigurationManager.AppSettings["ToAddKey"].ToString(); var SubjectKey = ConfigurationManager.AppSettings["SubjectKey"].ToString(); var BodyKey = ConfigurationManager.AppSettings["BodyKey"].ToString(); var CCAddKey = ConfigurationManager.AppSettings["CCAddKey"].ToString(); var EmailKey = ConfigurationManager.AppSettings["EmailKey"].ToString(); var PasswordKey = ConfigurationManager.AppSettings["PasswordKey"].ToString(); //----在这里用configuration 那个类 和读取连接字符串似得 读取刚才的key --- mymail.From = new MailAddress(FromKey); //收件人地址 mymail.To.Add(new MailAddress(ToAddKey)); //邮件主题 mymail.Subject = SubjectKey; //邮件标题编码 mymail.SubjectEncoding = System.Text.Encoding.UTF8; //发送邮件的内容 mymail.Body = BodyKey; //邮件内容编码 mymail.BodyEncoding = System.Text.Encoding.UTF8; //抄送到其他邮箱 mymail.CC.Add(new MailAddress(CCAddKey)); //是否是HTML邮件 mymail.IsBodyHtml = true; //邮件优先级 mymail.Priority = MailPriority.High; //创建一个邮件服务器类 SmtpClient myclient = new SmtpClient(); myclient.Host = "SMTP.qq.com"; //SMTP服务端口s myclient.Port = 25; myclient.EnableSsl = true; //验证登录 myclient.Credentials = new NetworkCredential(EmailKey, PasswordKey);//"@"输入有效的邮件名, "*"输入有效的密码 myclient.Send(mymail); Console.WriteLine("导出Excel成功!"); } 再次发送邮件的相关内容就完成了…下面我们学习.net MVC + NPOI 导出Excel1.2导出Excel到定指路径
1.去官网下载 NPOI相关dll文件:http://npoi.codeplex.com/downloads/get/1572743
2.在项目中添加引用
把Net40文件夹下的NPOI.Dll文件复制到自己的项目中的相关文件夹下,添加引用,浏览,找到刚刚的NPOI.Dll文件,确定
下面直接上代码:
        public FileResult ExportExcel(string wareName, string date1, string date2)
        {             //创建一个工作簿
NPOI.HSSF.UserModel.HSSFWorkbook book = new NPOI.HSSF.UserModel.HSSFWorkbook();
            //添加一个sheet     //创建一个页
            NPOI.SS.UserModel.ISheet sheet1 = book.CreateSheet("Sheet1");
            //设置单元格 的宽高
            sheet1.DefaultColumnWidth = 1 * 25;  //宽度
            sheet1.DefaultRowHeightInPoints = 25;  //高度
            //创建一行
            IRow row = sheet1.CreateRow(0);
            //创建一列
            ICell cell = row.CreateCell(0);
            ICellStyle cellStyle = book.CreateCellStyle();////创建样式对象
            IFont font = book.CreateFont(); //创建一个字体样式对象
            font.FontName = "方正舒体"; //和excel里面的字体对应
            font.FontHeightInPoints = 16;//字体大小
            font.Boldweight = short.MaxValue;//字体加粗
            cellStyle.SetFont(font); //将字体样式赋给样式对象
            cellStyle.VerticalAlignment = NPOI.SS.UserModel.VerticalAlignment.Center;//垂直对齐
            cellStyle.Alignment = NPOI.SS.UserModel.HorizontalAlignment.Center;//水平对齐
            cell.CellStyle = cellStyle; //把样式赋给单元格
            //给sheet1添加第一行的头部标题
            NPOI.SS.UserModel.IRow row1 = sheet1.CreateRow(0);
            row1.CreateCell(0).SetCellValue("商品编号");
            row1.CreateCell(1).SetCellValue("商品名称");
            row1.CreateCell(2).SetCellValue("销售数量");
            row1.CreateCell(3).SetCellValue("商品售价");
            row1.CreateCell(4).SetCellValue("出售总金额");
            //将数据逐步写入sheet1各个行
            for (int i = 0; i < listSale.Count; i++)
            {
                NPOI.SS.UserModel.IRow rowtemp = sheet1.CreateRow(i + 1);
                //创建单元格并设置它的值 ID
                rowtemp.CreateCell(0).SetCellValue(listSale[i].waresCode);
                rowtemp.CreateCell(1).SetCellValue(listSale[i].waresName);
                rowtemp.CreateCell(2).SetCellValue(listSale[i].saleNum);
                rowtemp.CreateCell(3).SetCellValue(listSale[i].waresPrice.ToString());
                rowtemp.CreateCell(4).SetCellValue(listSale[i].saleMoney.ToString());
            }
            // 写入到客户端
            System.IO.MemoryStream ms = new System.IO.MemoryStream();
            book.Write(ms);
            ms.Seek(0, SeekOrigin.Begin);
            string a = DateTime.Now.ToString("yyyyMMddHHmmssffff");//这个路径 有 :等符号,路径不支持
           //这里是导出到指定的路径
            string PPath = @"C:UsersAdministratorDesktop新建文件夹 (2)YuanManagerTestWinPlaneExcel" + a + "商品销售明细报表.xls";
            using (FileStream fs = new FileStream(PPath, FileMode.Create, FileAccess.Write))
            {
                byte[] datab = ms.ToArray();
                fs.Write(datab, 0, datab.Length);
                fs.Flush();
            }
            ms.Close();
            ms.Dispose();
return File(ms, "application/vnd.ms-excel", a + "销售明细统计.xls");
}
}
1.3 定时计划任务
1.新建项目à 创建控制台应用程序
把定时导出跟定时发送邮件的代码写在这里面:(下面直接上代码)
using System;
using System.Collections.Generic;
using System.Linq;
using System.Text;
using System.Threading.Tasks;
using Manager.BLL;
using NPOI.SS.UserModel;
using System.IO;
using System.Linq.Expressions;
using System.Web;
using System.Web.Mvc;
using Manager;
using System.Net;
using System.Net.Mail;
using System.Configuration;
using System.Diagnostics;

namespace TestWinPlane
{
    public class Program
    {

        public static BaseBll<usersorder> bllorder
        {
            get
            {
                return new UsersOrderBll();
            }
        }
        static Wares2Bll wareBll = new Wares2Bll();
        public static UserBll userbll = new UserBll();
        public static void Main(string[] args)
        {
            //这个里面写你发送邮件的代码  让 win计划去执行他
            Console.WriteLine("发送邮件!!");
            ExportExcelSaleDetail();
            ExportExcelStorage();
            SendEmail();
            //DeleteIO();
        }
        //当前货架商品统计
        public static Manager.BLL.BaseBll2<wares> bll
        {
            get
            {
                return new Wares2Bll();
            }
        }

        public class ListSalePro
        {
            public string waresCode { get; set; }
            public string waresName { get; set; }
            public decimal waresPrice { get; set; }    //单价
            public decimal saleMoney { get; set; }   // 出售总金额
            public int saleNum { get; set; }   //出售数量
            public decimal buyonePrice;
            public decimal buyMoney;
            public decimal ProfitMoney;
        }
        public class ListWare
        {
            public string waresCode { get; set; }
            public string waresName { get; set; }
            public long  saleNum { get; set; }

        }
        static string a = DateTime.Now.ToString("yyyyMMddHHmm");//这个路径 有 :等符号,路径不支持

        static string pathUnchange = @"C:Excel" + a; //导出的Excel 要存放的路径

        static string ExportExcelSaleDetailPath = "";//商品销售明细报表路径

        static string ExportExcelStoragePath = "";//货架上商品统计报表路径

        static OrderDetailsBll orderDetailBll = new OrderDetailsBll();
        /// <summary>
        /// 当前货架商品统计报表
        /// </summary>
        /// <returns></returns>
        public static string ExportExcelStorage()
        {
            // 1.先筛选出   有效的商品   == 1 ? "有效" : "已下架"
            Expression<Func<wares, bool>> condition1 = x => x.validstatus == 1;
            var listCode = bll.Search2(condition1).Select(x => new { x.waresCode, x.waresName, x.waresActual, x.waresBid, x.waresPrice, x.waresSum, x.waresSpec, x.waresUnit, x.validstatus , x.waresWarning }).ToList();
            //创建一个工作簿
            NPOI.HSSF.UserModel.HSSFWorkbook book = new NPOI.HSSF.UserModel.HSSFWorkbook();
            //添加一个sheet     //创建一个页
            NPOI.SS.UserModel.ISheet sheet1 = book.CreateSheet("Sheet1");
            //设置单元格 的宽高
            sheet1.DefaultColumnWidth = 1 * 25;  //宽度
            sheet1.DefaultRowHeightInPoints = 25;  //高度
            //创建一行
            IRow row = sheet1.CreateRow(0);
            //创建一列
            ICell cell = row.CreateCell(0);
            ICellStyle cellStyle = book.CreateCellStyle();////创建样式对象
            IFont font = book.CreateFont(); //创建一个字体样式对象
            font.FontName = "方正舒体"; //和excel里面的字体对应
            font.FontHeightInPoints = 16;//字体大小
            font.Boldweight = short.MaxValue;//字体加粗
            cellStyle.SetFont(font); //将字体样式赋给样式对象
            //设置单元格的样式:水平对齐居中
            cellStyle.VerticalAlignment = NPOI.SS.UserModel.VerticalAlignment.Center;//垂直对齐
            cellStyle.Alignment = NPOI.SS.UserModel.HorizontalAlignment.Center;//水平对齐  这两个在这里不起作用
            cell.CellStyle = cellStyle; //把样式赋给单元格
            //给sheet1添加第一行的头部标题               NPOI.SS.UserModel.IRow row1 = sheet1.CreateRow(0);
            row1.CreateCell(0).SetCellValue("商品编号");
            row1.CreateCell(1).SetCellValue("商品名称");
            row1.CreateCell(2).SetCellValue("商品售价");
            row1.CreateCell(3).SetCellValue("商品进价");
            row1.CreateCell(4).SetCellValue("商品单位");
            row1.CreateCell(5).SetCellValue("商品规格");
            row1.CreateCell(6).SetCellValue("货架承载量 ");
            row1.CreateCell(7).SetCellValue("商品预警值");
            row1.CreateCell(8).SetCellValue("当前货架商品数量 ");
         //   row1.CreateCell(9).SetCellValue("有效标志 ");
            //将数据逐步写入sheet1各个行
            for (int i = 0; i < listCode.Count; i++)
            {
                NPOI.SS.UserModel.IRow rowtemp = sheet1.CreateRow(i + 1);
                //创建单元格并设置它的值 ID
                rowtemp.CreateCell(0).SetCellValue(listCode[i].waresCode);
                rowtemp.CreateCell(1).SetCellValue(listCode[i].waresName);
                rowtemp.CreateCell(2).SetCellValue(listCode[i].waresPrice.ToString());
                rowtemp.CreateCell(3).SetCellValue(listCode[i].waresBid.ToString());
                rowtemp.CreateCell(4).SetCellValue(listCode[i].waresUnit);
                rowtemp.CreateCell(5).SetCellValue(listCode[i].waresSpec);
                rowtemp.CreateCell(6).SetCellValue(listCode[i].waresSum.ToString());
                rowtemp.CreateCell(7).SetCellValue(listCode[i].waresWarning.ToString());
                rowtemp.CreateCell(8).SetCellValue(listCode[i].waresActual.ToString());
              //  rowtemp.CreateCell(9).SetCellValue(listCode[i].validstatus==1?"有效":"已下架");
            }
            // 写入到客户端
            System.IO.MemoryStream ms = new System.IO.MemoryStream();
            book.Write(ms);
            ms.Seek(0, SeekOrigin.Begin);
            string completePath = pathUnchange + "当前货架商品报表.xls";

            using (FileStream fs = new FileStream(completePath, FileMode.Create, FileAccess.Write))
            {
                byte[] datab = ms.ToArray();
                fs.Write(datab, 0, datab.Length);
                fs.Flush();
                fs.Dispose();
            }
            ms.Close();
            ms.Dispose();
            ExportExcelStoragePath = completePath;
            return ExportExcelStoragePath;
        }

        /// <summary>
        ///发送邮件  导入命名空间 using System.Net.Mail;
        /// </summary>
        public static void SendEmail()
        {
            //声明一个Mail对象
            MailMessage mymail = new MailMessage();
            mymail.Attachments.Add(new Attachment(ExportExcelSaleDetailPath));  //为该电子邮件添加附件
            mymail.Attachments.Add(new Attachment(ExportExcelStoragePath));
            //发件人地址
            //如是自己,在此输入自己的邮箱
            //配置文件的方式读取
            var FromKey = ConfigurationManager.AppSettings["FromKey"].ToString();
            var ToAddKey = ConfigurationManager.AppSettings["ToAddKey"].ToString();
            var SubjectKey = ConfigurationManager.AppSettings["SubjectKey"].ToString();
            var BodyKey = ConfigurationManager.AppSettings["BodyKey"].ToString();
            var CCAddKey = ConfigurationManager.AppSettings["CCAddKey"].ToString();
            var EmailKey = ConfigurationManager.AppSettings["EmailKey"].ToString();
            var PasswordKey = ConfigurationManager.AppSettings["PasswordKey"].ToString();
            //----在这里用configuration 那个类 和读取连接字符串似得 读取刚才的key ---
            mymail.From = new MailAddress(FromKey);
            //收件人地址
            mymail.To.Add(new MailAddress(ToAddKey));
            //邮件主题
            mymail.Subject = SubjectKey;
            //邮件标题编码
            mymail.SubjectEncoding = System.Text.Encoding.UTF8;
            //发送邮件的内容
            mymail.Body = BodyKey;
            //邮件内容编码
            mymail.BodyEncoding = System.Text.Encoding.UTF8;
            //添加附件
            //Attachment myfiles = new Attachment(tb_Attachment.PostedFile.FileName);
            //mymail.Attachments.Add(myfiles);
            //抄送到其他邮箱
            mymail.CC.Add(new MailAddress(CCAddKey));
            //是否是HTML邮件
            mymail.IsBodyHtml = true;
            //邮件优先级
            mymail.Priority = MailPriority.High;
            //创建一个邮件服务器类
            SmtpClient myclient = new SmtpClient();
            myclient.Host = "SMTP.qq.com";
            //SMTP服务端口s
            myclient.Port = 25;
            myclient.EnableSsl = true;
            //验证登录
            myclient.Credentials = new NetworkCredential(EmailKey, PasswordKey);//"@"输入有效的邮件名, "*"输入有效的密码
            myclient.Send(mymail);
            Console.WriteLine("导出Excel成功!");
        }
    }
}
2.代码完成之后,运行看看能不能正常运行,正常之后 就该开始部署Windows计划任务了,
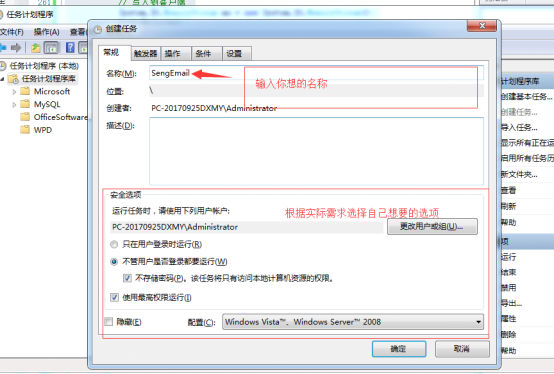
1.打开电脑的控制面板-->选择小图标-->管理工具-->任务计划程序-->新文件夹-->创建任务
2.选择触发器选项卡,点击新建,根据自己的需求选择执行的时间
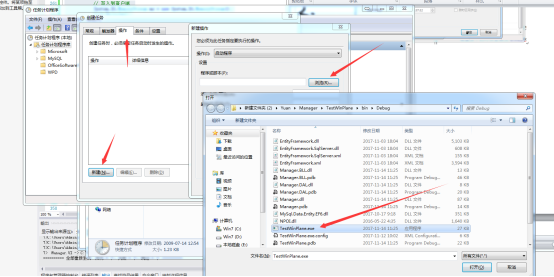
3.选择操作选项卡,点击下方的新建,点击浏览,选择自己项目下的bin文件夹àDebugà选择自己项项目的.exe文件,下面添加参数 可以忽略,点击确定
4.还有条件 跟 设置选项卡,在这里根据需求自己选择。
到此,定时导出跟发送邮件的相关信息就完成了。


