前言
入门
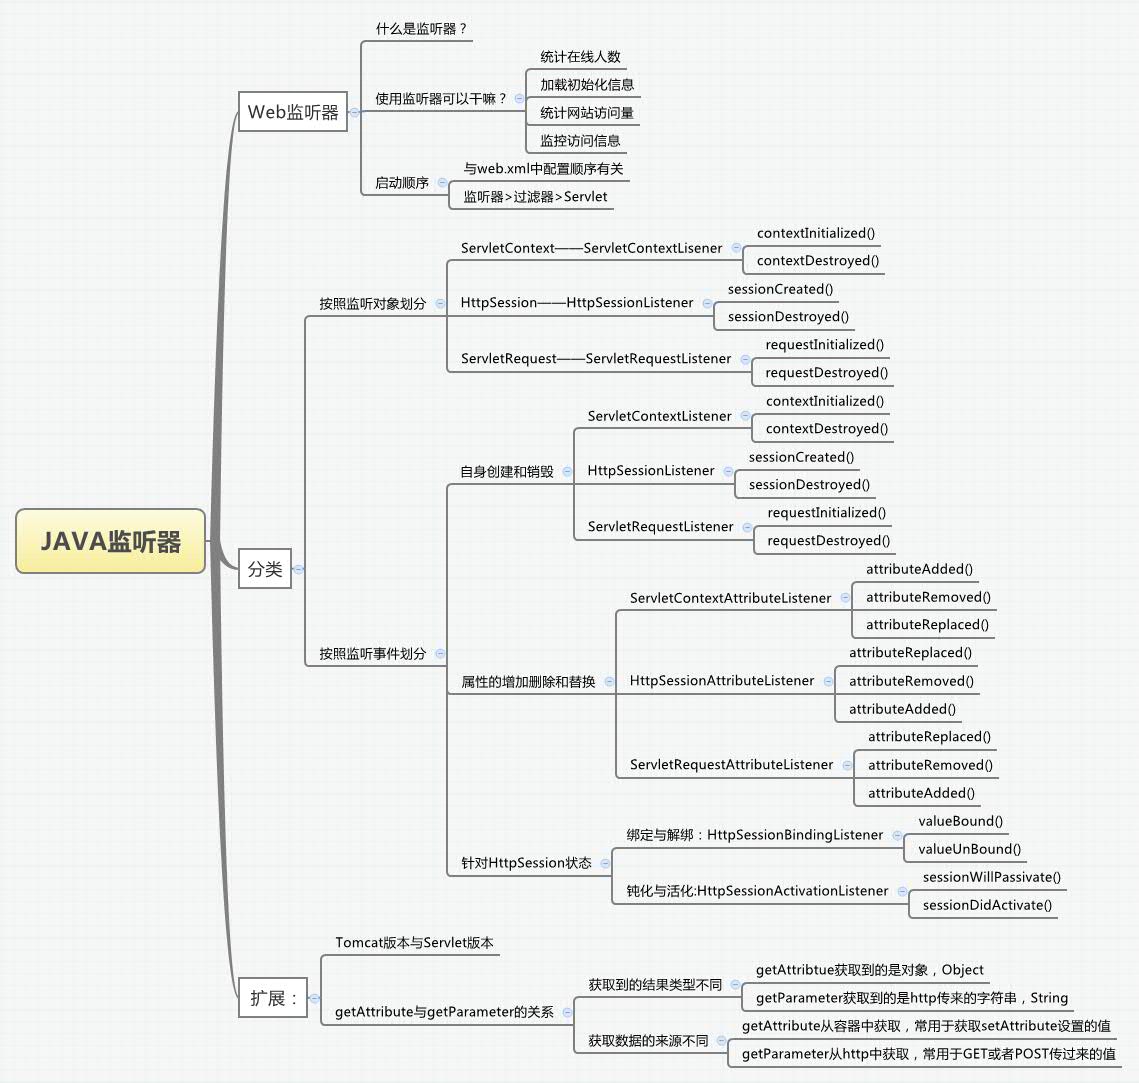
监听器是JAVA Web开发中非常重要的内容。当中涉及到的知识,能够參考以下导图:

Web监听器
1 什么是web监听器?
web监听器是一种Servlet中的特殊的类,它们能帮助开发人员监听web中的特定事件,比方ServletContext,HttpSession,ServletRequest的创建和销毁;变量的创建、销毁和改动等。
能够在某些动作前后添加处理,实现监控。
2 监听器经常使用的用途
通常使用Web监听器做下面的内容:
统计在线人数。利用HttpSessionLisener
载入初始化信息:利用ServletContextListener
统计站点訪问量
实现訪问监控
3 接下里看看一个监听器的创建以及运行过程
首先须要创建一个监听器,实现某种接口,比如我想实现一个对在线人数的监控,能够创建例如以下的监听器:
public class MyListener implements HttpSessionListener{
    private int userNumber = 0;
    public void sessionCreated(HttpSessionEvent arg0) {
        userNumber++;
        arg0.getSession().setAttribute("userNumber", userNumber);
    }
    public void sessionDestroyed(HttpSessionEvent arg0) {
        userNumber--;
        arg0.getSession().setAttribute("userNumber", userNumber);
    }
}
然后在web.xml中配置该监听器,在web-app中加入:
  <listener>
      <listener-class>com.test.MyListener</listener-class>
  </listener>
在JSP中加入訪问人数:
<body>
    在线人数:<%=session.getAttribute("userNumber") %><br/>
</body>
当我使用我的浏览器訪问时。运行结果例如以下:

当打开还有一个浏览器訪问时:

因为打开还有一个浏览器訪问。相当于还有一个会话,因此在线人数会添加。
对于3.0版本号的Servlet来说,还支持使用注解的方式进行配置。
那么接下来看看都有哪些监听器以及方法吧。
监听器的分类
1 依照监听的对象划分:
依照监听对象的不同能够划分为三种:
ServletContext监控:相应监控application内置对象的创建和销毁。
当web容器开启时,运行contextInitialized方法;当容器关闭或重新启动时,运行contextDestroyed方法。
实现方式:直接实现ServletContextListener接口:
public class MyServletContextListener implements ServletContextListener{
    public void contextDestroyed(ServletContextEvent sce) {

    }
    public void contextInitialized(ServletContextEvent sce) {

    }
}
HttpSession监控:相应监控session内置对象的创建和销毁。
当打开一个新的页面时。开启一个session会话。运行sessionCreated方法;当页面关闭session过期时,或者容器关闭销毁时,运行sessionDestroyed方法。
实现方式:直接实现HttpSessionListener接口:
public class MyHttpSessionListener implements HttpSessionListener{
    public void sessionCreated(HttpSessionEvent arg0) {

    }
    public void sessionDestroyed(HttpSessionEvent arg0) {

    }
}
ServletRequest监控:相应监控request内置对象的创建和销毁。
当訪问某个页面时,出发一个request请求。运行requestInitialized方法;当页面关闭时,运行requestDestroyed方法。
实现方式,直接实现ServletRequestListener接口:
public class MyServletRequestListener implements ServletRequestListener{
    public void requestDestroyed(ServletRequestEvent arg0) {

    }
    public void requestInitialized(ServletRequestEvent arg0) {

    }
}
2 依照监听事件划分:
2.1 监听事件自身的创建和销毁:同上面的按对象划分。
2.2 监听属性的新增、删除和改动:
监听属性的新增、删除和改动也是划分成三种。分别针对于ServletContext、HttpSession、ServletRequest对象:
ServletContext,实现ServletContextAttributeListener接口:
通过调用ServletContextAttribtueEvent的getName方法能够得到属性的名称。
public class MyServletContextAttrListener implements ServletContextAttributeListener{

    public void attributeAdded(ServletContextAttributeEvent hsbe) {
        System.out.println("In servletContext added :name = "+hsbe.getName());
    }

    public void attributeRemoved(ServletContextAttributeEvent hsbe) {
        System.out.println("In servletContext removed :name = "+hsbe.getName());
    }

    public void attributeReplaced(ServletContextAttributeEvent hsbe) {
        System.out.println("In servletContext replaced :name = "+hsbe.getName());
    }

}
HttpSession。实现HttpSessionAttributeListener接口:
public class MyHttpSessionAttrListener implements HttpSessionAttributeListener{

    public void attributeAdded(HttpSessionBindingEvent hsbe) {
        System.out.println("In httpsession added:name = "+hsbe.getName());
    }

    public void attributeRemoved(HttpSessionBindingEvent hsbe) {
        System.out.println("In httpsession removed:name = "+hsbe.getName());
    }

    public void attributeReplaced(HttpSessionBindingEvent hsbe) {
        System.out.println("In httpsession replaced:name = "+hsbe.getName());
    }

}
ServletRequest,实现ServletRequestAttributeListener接口:
public class MyServletRequestAttrListener implements ServletRequestAttributeListener{

    public void attributeAdded(ServletRequestAttributeEvent hsbe) {
        System.out.println("In servletrequest added :name = "+hsbe.getName());
    }

    public void attributeRemoved(ServletRequestAttributeEvent hsbe) {
        System.out.println("In servletrequest removed :name = "+hsbe.getName());
    }

    public void attributeReplaced(ServletRequestAttributeEvent hsbe) {
        System.out.println("In servletrequest replaced :name = "+hsbe.getName());
    }

}
2.3 监听对象的状态:
针对某些POJO类。能够通过实现HttpSessionBindingListener接口。监听POJO类对象的事件。比如:
public class User implements HttpSessionBindingListener,Serializable{

    private String username;
    private String password;

    public String getUsername() {
        return username;
    }

    public void setUsername(String username) {
        this.username = username;
    }

    public String getPassword() {
        return password;
    }

    public void setPassword(String password) {
        this.password = password;
    }

    public void valueBound(HttpSessionBindingEvent hsbe) {
        System.out.println("valueBound name: "+hsbe.getName());
    }

    public void valueUnbound(HttpSessionBindingEvent hsbe) {
        System.out.println("valueUnbound name: "+hsbe.getName());
    }

}
Session数据的钝化与活化:
因为session中保存大量訪问站点相关的重要信息,因此过多的session数据就会server性能的下降。占用过多的内存。
因此类似数据库对象的持久化,web容器也会把不常使用的session数据持久化到本地文件或者数据中。这些都是有web容器自己完毕。不须要用户设定。
不用的session数据序列化到本地文件里的过程。就是钝化;
当再次訪问须要到该session的内容时。就会读取本地文件,再次放入内存中,这个过程就是活化。
类似的,仅仅要实现HttpSeesionActivationListener接口就是实现钝化与活化事件的监听:
public class User implements HttpSessionBindingListener,
HttpSessionActivationListener,Serializable{

    private String username;
    private String password;

    public String getUsername() {
        return username;
    }

    public void setUsername(String username) {
        this.username = username;
    }

    public String getPassword() {
        return password;
    }

    public void setPassword(String password) {
        this.password = password;
    }

    public void valueBound(HttpSessionBindingEvent hsbe) {
        System.out.println("valueBound name: "+hsbe.getName());
    }

    public void valueUnbound(HttpSessionBindingEvent hsbe) {
        System.out.println("valueUnbound name: "+hsbe.getName());
    }

    public void sessionDidActivate(HttpSessionEvent hsbe) {
        System.out.println("sessionDidActivate name: "+hsbe.getSource());
    }

    public void sessionWillPassivate(HttpSessionEvent hsbe) {
        System.out.println("sessionWillPassivate name: "+hsbe.getSource());
    }

}
Servlet版本号与Tomcat版本号
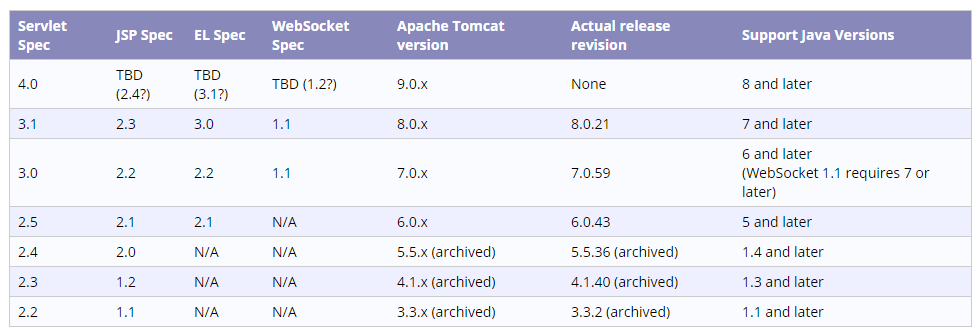
首先看一下Tomcat官网给出的匹配:

假设版本号不匹配,那么tomcat是不能公布该project的。首先看一下版本号不匹配时,会发生什么!
我试图创建一个webproject。而且选取了Servlet3.0版本号:

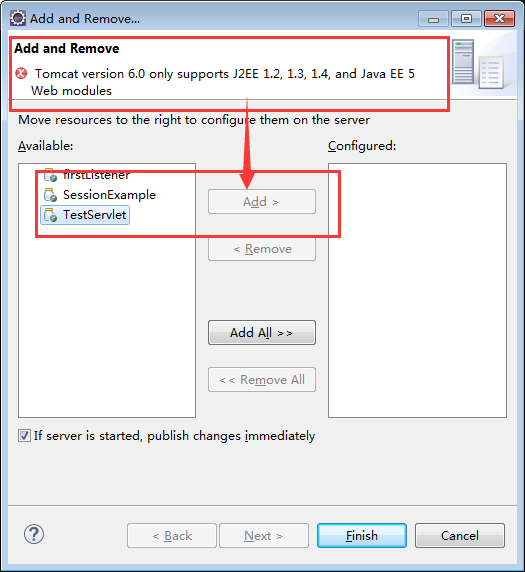
然后我想要在tomcat6中公布。能够看到报错了!
JDK版本号不正确....这是在平时开发假设对Servlet不熟悉的web新手。常犯的错误。

解决方法:
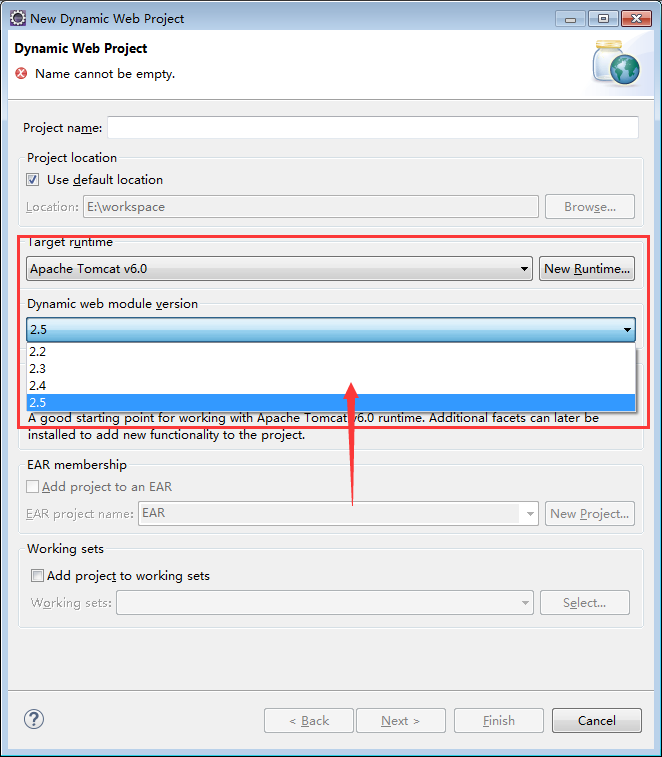
1 在创建时。直接公布到Tomcat容器中,此时Servlet只会列出Tomcat支持的版本号:

2 改动工程Servlet版本号配置信息,文件为:工作文件夹SessionExample.settingsorg.eclipse.wst.common.project.facet.core.xml
<?xml version="1.0" encoding="UTF-8"?>
<faceted-project>
  <runtime name="Apache Tomcat v6.0"/>
  <fixed facet="java"/>
  <fixed facet="wst.jsdt.web"/>
  <fixed facet="jst.web"/>
  <installed facet="java" version="1.7"/>
  <installed facet="jst.web" version="2.5"/>
  <installed facet="wst.jsdt.web" version="1.0"/>
</faceted-project>
getAttribute与getParameter的差别
这部分是对JSP的扩展。常常在JSP或者Servlet中获取数据,那么getAttribute与getParameter有什么差别呢?
1 从获取到数据的来源来说:
getAttribtue获取到的是web容器中的值,比方:
我们在Servlet中通过setAttribute设定某个值。这个值存在于容器中。就能够通过getAttribute方法获取;
getParameter获取到的是通过http传来的值。比方这样一个http请求:
http:localhost:8080/test/test.html?username=xingoo
还有其它的GET和POST方式。都能够通过getParameter来获取。
2 从获取到的数据类型来说:
getAttribute返回的是一个对象,Object。
getParameter返回的是,前面页面中某个表单或者http后面參数传递的值,是个字符串。
參考
【1】慕课网,监听器:http://www.imooc.com/learn/271
【2】jsp中getAttribute与getParameter的差别:http://wenku.baidu.com/link?url=4URJWerrusLTFRviR1sAlTH4BKc7QswiRYsso3xaYs_nZMiTMV-TwCnIIgu31K1N9HbrUhfgO2-jXjpYe1hGZn9RBo3b8HHzY2Dn2-Fcbs7
原文链接:Web监听器导图具体解释
