一:
先要apache 请求ssl证书的csr 一下是步骤:
重要注意事项 An Important Note Before You Start
在生成CSR文件时同时生成您的私钥,如果您丢了私钥或忘了私钥密码,则颁发 证书给您后不能安装成功!您必须重新生成私钥和CSR文件,免费重新颁发新的 证书。为了避免此情况的发生,请在生成CSR后一定要备份私钥文件和记住私钥 密码,最好是在收到证书之前不要再动服务器。 By far the most common problem users have when going through this process is related to private keys. If you lose or cannot access a private key, you cannot use the certificate we issue to you and will need to request a free reissue. To ensure this never happens, we advise that a backup of the private key file is made and that a note is made of the password that is used to protect the export of the private key.
“openssl”用于生成私钥和CSR,OpenSSL一般安装在/user/bin下,如果您的 系统安装在其他目录,请指定正确的目录路径。 The utility "openssl" that you use to generate the private key and CSR comes with the OpenSSL toolkit and is usually installed under /usr/bin. If you have installed it elsewhere you will need to modify these instructions appropriately.
以下所有命令假设您已经成功安装OpenSSL,将产生2048位的密钥,加密算法 采用3DES,您必须使用您要申请SSL证书的域名来命名密钥文件。 The following sequence of commands will generate a 2048 bit key, encrypt it using the triple-DES cipher, and create a CSR based upon it (they assume that you have openssl in your path - if not then you should prefix the openssl command with the path to the binary). You should use the domain name that you are wishing to have certified as the core of the filenames. You should also make sure you do not overwrite existing keys and CSR's:
1. 生成私钥 Generate the private key
请使用以下命令来生成私钥 Please type the following command at the prompt:
openssl genrsa -des3 -out www.mydomain.com.key 2048
www.mydomain.com.key,会提示您设定私钥密码,请设置密码,并牢记!
This command will generate a 1024 bit RSA private key and stores it in
the file www.mydomain.com.key. It will ask you for a pass phrase: use
something secure and remember it. Your certificate will be useless without
it's corresponding key
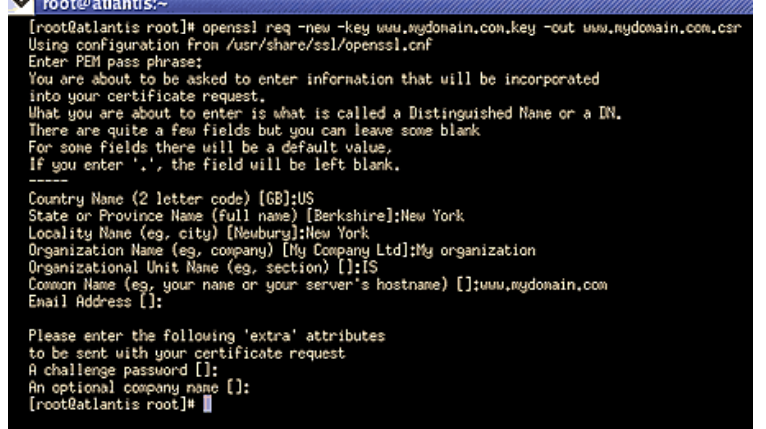
2. 生成 CSR 文件 Generate the CSR 请使用以下命令来生成CSR Please type the following command at the prompt:
openssl req -new -key www.mydomain.com.key -out www.mydomain.com.csr
如果提示“Unable to load config info from /usr/local/ssl/openssl.cnf ”, 则加上一个指定openssl.cnf 路径的参数: openssl req -new -config openssl.cnf -key www.mydomain.com.key -out www.mydomain.com.csr
此命令将提示您输入X.509证书所要求的字段信息,包括国家(中国添CN)、省 份、所在城市、单位名称、单位部门名称(可以不填直接回车)。请注意: 除国 家缩写必须填CN外,其余都可以是英文或中文。
This command will prompt you for the X.509 attributes of your certificate. Enter your country, state or province and locality or city. You should enter the company name as it appears on your official company registration documents. The organization unit is optional, we verify and authenticate the company name and not the organization unit. To skip the organization unit (OU) field please press enter on your keyboard.
请输入您要申请SSL证书的域名,如果您需要为www.domain.com申请SSL证书 就不能只输入domain.com。SSL证书是严格绑定域名的。 The term "Common Name" is X.509 speak for the name that distinguishes the certificate best, and ties it to your Organization. Enter your exact host and domain name that you wish to secure. Example: If you wish to secure www.mydomain.com, then you will need to enter the exact host (www) and domain name (mydomain.com) in this field. If you enter mydomain.com then the certificate issued to you will only work error free on https://mydomain.com. It will cause a certificate mismatch error when you or your users access the domain via https:// www.mydomain.com.

注意: Common name 一定得写好 nihao.com 就不能是 www.nihao.com
请不要输入Email、口令(challenge password)和可选的公司名称,直接打回车 即可。 Please do not enter your email address, challenge password or an optional company name when generating the CSR.
您现在已经成功生成了密钥对,私钥文件:www.mydomain.com.key 保存在您的 服务器中, 请把CSR文件:www.mydomain.com.csr 发给Willrey/Thawte即可, CSR文件格式如下图所示。 You have now created a public/private key pair. The private key (www.mydomain.com.key) is stored locally on your machine and is used for decryption. The public portion is sent to thawte in the form of a Certificate Signing Request, and will be used by your users to encrypt the data they send to your site. The Certificate Signing Request (CSR) looks something like this:
openssl req -new -nodes -keyout myserver.key -out myserver.csr 或 openssl req -new -config openssl.cnf -nodes -keyout myserver.key -out myserver.csr
3. 备份私钥文件 Backup your private key
请备份您的私钥文件并记下私钥密码。最好是把私钥文件备份到软盘或光盘中。 Please backup your keystore file and make a note of the password. A good choice is to create a copy of this file onto a diskette or other removeable media.
完成之后 你就会受到 你购买的证书的机构发给你的确认邮件 里边就是你的 web server certificate 也就是接下来的 public .crt
二.
Step 1: Save your SSL Certificate File
Firstly when your issuance email arrives it will contain your web server certificate. Copy your web server certificate into a text editor such as Notepad including the header and footer. You should then have a text file that looks like:
-----BEGIN CERTIFICATE-----
[encoded data]
-----END CERTIFICATE-----
Make sure you have 5 dashes to either side of the BEGIN CERTIFICATE and END CERTIFICATE and that no white space, extra line breaks or additional characters have been inadvertently added.
Save the certificate file as public.crt
Step 2: Obtain the Intermediate CA Bundle
Here is the intermediate file: intermediate_file (你网站的web certificate)
Right click the above intermediate_file link and save as intermediate.crt
Step 3: Set up your httpd.conf file
Open your httpd.conf file (some installations keep the SSL section separately in the ssl.conf file or separate ) using a text editor, and locate the virtual host section for the site for which the SSL Certificate will secure.
Your virtual host section will need to contain the following directives:
SSLCertificateFile – This will need to point to the your SSL certificate itself that we issued to you
SSLCertificateKeyFile – This will need to point to the private key file associated with your certificate.
SSLCertificateChainFile – This will need to point to the the intermediate file
Note: Some versions of Apache will not accept the SSLCACertificateFile directive. Try usingSSLCertificateChainFile instead.
For example
Save the changes to the file and quit the text editor
Stop and start apache to register the change.
Note: Some instances of Apache contain both a httpd.conf and ssl.conf file. Please enter or amend the httpd.conf or the ssl.conf with the above directives. Do not enter both as there will be a conflict and Apache may not start.