一:环境配置
我用的分析的工具是eclipse,源码用maven的自动下载源码的功能.然后在maven中添加相应的dependence.这样但我们ctrl+leftmouse的时候就会自动帮我们下载源代码.
SpringMVC版本为3.2.4,虽然现在基本用的是Spring4.x或是SpringBoot,但基本的原理没有变动太大所以有典型性.
Tomcat的版本为8.0.47.
servlet-api的版本为3.1.0.
二:Tomcat的基本原理
1.调用在Bootstrap中的主函数main()程序入口调用自身的start()方法,在start()方法中实例化org.apache.catalina.startup.Catalina类调用其start()方法,在Catalina的start()中调用load()载入tomcat文件夹目录下conf文件夹下的server.xml并创建Server类,然后调用Server的start()方法,到这里我们的tomcat就运行起来了.
2.Server类代表整个Tomcat服务器,这里有必要介绍一下为什么Tomcat叫Servlet容器,在Tomcat中包含四个容器,分别为Engine,Host,Context,Wrapper.Engine是Host的父容器,依次类推.四者都继承自Container接口.一般在Tomcat中一个Engine实例中包含一个Host实例,一个Host实例中包含一个Context实例,一个Context代表一个WEB程序并包含多个Wrapper实例,一个Wrapper代表一个Servlet类.
3.一次请求的大题流程是这样的,首先由Connector获取到Http请求,封装ServletRequest和ServletResponse对象并派发给Context管道中的所有Valve,执行完所有Valve后执行基础Valve根据请求的url映射到对应的Wrapper,然后调用个Wrapper管道中的所有Valve,最后调用基础Valve在如这个Wrapper类所封装的Servlet,实例化后调用器Service方法对用户的请求进行处理,最后将结果负载在response中返回给用户.
三:从源码开始分析Tomcat运行原理
1.Bootsrap作为整个Tomcat的入口,实例化Catalinna然后载入并启动Server容器。
   public static void main(String args[])
    {
        if (daemon == null)
        {
            // Don't set daemon until init() has completed
            Bootstrap bootstrap = new Bootstrap();
            try
            {
                bootstrap.init();
            } catch (Throwable t)
            {
                handleThrowable(t);
                t.printStackTrace();
                return;
            }
            daemon = bootstrap;
        } else
        {
            // When running as a service the call to stop will be on a new
            // thread so make sure the correct class loader is used to prevent
            // a range of class not found exceptions.
            Thread.currentThread().setContextClassLoader(daemon.catalinaLoader);
        }
        try
        {
            String command = "start";
            if (args.length > 0)
            {
                command = args[args.length - 1];
            }

            if (command.equals("startd"))
            {
                args[args.length - 1] = "start";
                daemon.load(args);
                daemon.start();
            } else if (command.equals("stopd"))
            {
                args[args.length - 1] = "stop";
                daemon.stop();
            } else if (command.equals("start"))
            {
                // 在这里读取命令行参数,然后启动。
                daemon.setAwait(true);
                daemon.load(args);
                daemon.start();
            } else if (command.equals("stop"))
            {
                daemon.stopServer(args);
            } else if (command.equals("configtest"))
            {
                daemon.load(args);
                if (null == daemon.getServer())
                {
                    System.exit(1);
                }
                System.exit(0);
            } else
            {
                log.warn("Bootstrap: command "" + command + "" does not exist.");
            }
        } catch (Throwable t)
        {
            // Unwrap the Exception for clearer error reporting
            if (t instanceof InvocationTargetException && t.getCause() != null)
            {
                t = t.getCause();
            }
            handleThrowable(t);
            t.printStackTrace();
            System.exit(1);
        }
    }
第一次启动是会调用内部生成的Bootstrap类,调用start方法。
    public void start() throws Exception
    {
        if (catalinaDaemon == null)
            init();

        Method method = catalinaDaemon.getClass().getMethod("start", (Class[]) null);
        method.invoke(catalinaDaemon, (Object[]) null);

    }
在init方法中实例化Catalinna类然后通过反射调用其start方法。
    public void init() throws Exception
    {
        initClassLoaders();

        Thread.currentThread().setContextClassLoader(catalinaLoader);

        SecurityClassLoad.securityClassLoad(catalinaLoader);

        // Load our startup class and call its process() method
        if (log.isDebugEnabled())
            log.debug("Loading startup class");
        Class<?> startupClass = catalinaLoader.loadClass("org.apache.catalina.startup.Catalina");
        Object startupInstance = startupClass.newInstance();

        // Set the shared extensions class loader
        if (log.isDebugEnabled())
            log.debug("Setting startup class properties");
        String methodName = "setParentClassLoader";
        Class<?> paramTypes[] = new Class[1];
        paramTypes[0] = Class.forName("java.lang.ClassLoader");
        Object paramValues[] = new Object[1];
        paramValues[0] = sharedLoader;
        Method method = startupInstance.getClass().getMethod(methodName, paramTypes);
        method.invoke(startupInstance, paramValues);

        catalinaDaemon = startupInstance;
    }
在start()中调用load()方法载入了Server类,然后调用了其start()方法启动了Tomcat.
   public void start()
    {

        if (getServer() == null)
        {
            load();
        }

        if (getServer() == null)
        {
            log.fatal("Cannot start server. Server instance is not configured.");
            return;
        }

        long t1 = System.nanoTime();

        // Start the new server
        try
        {
            getServer().start();
        } catch (LifecycleException e)
        {
            log.fatal(sm.getString("catalina.serverStartFail"), e);
            try
            {
                getServer().destroy();
            } catch (LifecycleException e1)
            {
                log.debug("destroy() failed for failed Server ", e1);
            }
            return;
        }

        long t2 = System.nanoTime();
        if (log.isInfoEnabled())
        {
            log.info("Server startup in " + ((t2 - t1) / 1000000) + " ms");
        }

        // Register shutdown hook
        if (useShutdownHook)
        {
            if (shutdownHook == null)
            {
                shutdownHook = new CatalinaShutdownHook();
            }
            Runtime.getRuntime().addShutdownHook(shutdownHook);

            // If JULI is being used, disable JULI's shutdown hook since
            // shutdown hooks run in parallel and log messages may be lost
            // if JULI's hook completes before the CatalinaShutdownHook()
            LogManager logManager = LogManager.getLogManager();
            if (logManager instanceof ClassLoaderLogManager)
            {
                ((ClassLoaderLogManager) logManager).setUseShutdownHook(false);
            }
        }

        if (await)
        {
            await();
            stop();
        }
    }
2.下面让我们仔细分析Tomcat是怎么以优雅的方式配置Server类的。
首先回到上面的load方法。
   public void load()
    {
        long t1 = System.nanoTime();

        initDirs();

        // Before digester - it may be needed
        initNaming();

        // Create and execute our Digester
        Digester digester = createStartDigester();

        InputSource inputSource = null;
        InputStream inputStream = null;
        File file = null;
        try
        {
            try
            {
                file = configFile();
                inputStream = new FileInputStream(file);
                inputSource = new InputSource(file.toURI().toURL().toString());
            } catch (Exception e)
            {
                if (log.isDebugEnabled())
                {
                    log.debug(sm.getString("catalina.configFail", file), e);
                }
            }
            if (inputStream == null)
            {
                try
                {
                    inputStream = getClass().getClassLoader().getResourceAsStream(getConfigFile());
                    inputSource = new InputSource(getClass().getClassLoader().getResource(getConfigFile()).toString());
                } catch (Exception e)
                {
                    if (log.isDebugEnabled())
                    {
                        log.debug(sm.getString("catalina.configFail", getConfigFile()), e);
                    }
                }
            }

            // This should be included in catalina.jar
            // Alternative: don't bother with xml, just create it manually.
            if (inputStream == null)
            {
                try
                {
                    inputStream = getClass().getClassLoader().getResourceAsStream("server-embed.xml");
                    inputSource = new InputSource(getClass().getClassLoader().getResource("server-embed.xml").toString());
                } catch (Exception e)
                {
                    if (log.isDebugEnabled())
                    {
                        log.debug(sm.getString("catalina.configFail", "server-embed.xml"), e);
                    }
                }
            }

            if (inputStream == null || inputSource == null)
            {
                if (file == null)
                {
                    log.warn(sm.getString("catalina.configFail", getConfigFile() + "] or [server-embed.xml]"));
                } else
                {
                    log.warn(sm.getString("catalina.configFail", file.getAbsolutePath()));
                    if (file.exists() && !file.canRead())
                    {
                        log.warn("Permissions incorrect, read permission is not allowed on the file.");
                    }
                }
                return;
            }

            try
            {
                inputSource.setByteStream(inputStream);
                digester.push(this);
                digester.parse(inputSource);
            } catch (SAXParseException spe)
            {
                log.warn("Catalina.start using " + getConfigFile() + ": " + spe.getMessage());
                return;
            } catch (Exception e)
            {
                log.warn("Catalina.start using " + getConfigFile() + ": ", e);
                return;
            }
        } finally
        {
            if (inputStream != null)
            {
                try
                {
                    inputStream.close();
                } catch (IOException e)
                {
                    // Ignore
                }
            }
        }

        getServer().setCatalina(this);
        getServer().setCatalinaHome(Bootstrap.getCatalinaHomeFile());
        getServer().setCatalinaBase(Bootstrap.getCatalinaBaseFile());

        // Stream redirection
        initStreams();

        // Start the new server
        try
        {
            getServer().init();
        } catch (LifecycleException e)
        {
            if (Boolean.getBoolean("org.apache.catalina.startup.EXIT_ON_INIT_FAILURE"))
            {
                throw new java.lang.Error(e);
            } else
            {
                log.error("Catalina.start", e);
            }
        }

        long t2 = System.nanoTime();
        if (log.isInfoEnabled())
        {
            log.info("Initialization processed in " + ((t2 - t1) / 1000000) + " ms");
        }
    }
这里最核心的部分Digester digester = createStartDigester(),它创建了一个Digester,在createStartDigester内部。
   protected Digester createStartDigester()
    {
        long t1 = System.currentTimeMillis();
        // Initialize the digester
        Digester digester = new Digester();
        digester.setValidating(false);
        digester.setRulesValidation(true);
        HashMap<Class<?>, List<String>> fakeAttributes = new HashMap<>();
        ArrayList<String> attrs = new ArrayList<>();
        attrs.add("className");
        fakeAttributes.put(Object.class, attrs);
        digester.setFakeAttributes(fakeAttributes);
        digester.setUseContextClassLoader(true);

        // Configure the actions we will be using
        digester.addObjectCreate("Server", "org.apache.catalina.core.StandardServer", "className");
        digester.addSetProperties("Server");
        digester.addSetNext("Server", "setServer", "org.apache.catalina.Server");

        digester.addObjectCreate("Server/GlobalNamingResources", "org.apache.catalina.deploy.NamingResourcesImpl");
        digester.addSetProperties("Server/GlobalNamingResources");
        digester.addSetNext("Server/GlobalNamingResources", "setGlobalNamingResources", "org.apache.catalina.deploy.NamingResourcesImpl");

        digester.addObjectCreate("Server/Listener", null, "className");
        digester.addSetProperties("Server/Listener");
        digester.addSetNext("Server/Listener", "addLifecycleListener", "org.apache.catalina.LifecycleListener");

        digester.addObjectCreate("Server/Service", "org.apache.catalina.core.StandardService", "className");
        digester.addSetProperties("Server/Service");
        digester.addSetNext("Server/Service", "addService", "org.apache.catalina.Service");

        digester.addObjectCreate("Server/Service/Listener", null, "className");
        digester.addSetProperties("Server/Service/Listener");
        digester.addSetNext("Server/Service/Listener", "addLifecycleListener", "org.apache.catalina.LifecycleListener");

        // Executor
        digester.addObjectCreate("Server/Service/Executor", "org.apache.catalina.core.StandardThreadExecutor", "className");
        digester.addSetProperties("Server/Service/Executor");

        digester.addSetNext("Server/Service/Executor", "addExecutor", "org.apache.catalina.Executor");

        digester.addRule("Server/Service/Connector", new ConnectorCreateRule());
        digester.addRule("Server/Service/Connector", new SetAllPropertiesRule(new String[] { "executor" }));
        digester.addSetNext("Server/Service/Connector", "addConnector", "org.apache.catalina.connector.Connector");

        digester.addObjectCreate("Server/Service/Connector/Listener", null, "className");
        digester.addSetProperties("Server/Service/Connector/Listener");
        digester.addSetNext("Server/Service/Connector/Listener", "addLifecycleListener", "org.apache.catalina.LifecycleListener");

        // Add RuleSets for nested elements
        digester.addRuleSet(new NamingRuleSet("Server/GlobalNamingResources/"));
        digester.addRuleSet(new EngineRuleSet("Server/Service/"));
        digester.addRuleSet(new HostRuleSet("Server/Service/Engine/"));
        digester.addRuleSet(new ContextRuleSet("Server/Service/Engine/Host/"));
        addClusterRuleSet(digester, "Server/Service/Engine/Host/Cluster/");
        digester.addRuleSet(new NamingRuleSet("Server/Service/Engine/Host/Context/"));

        // When the 'engine' is found, set the parentClassLoader.
        digester.addRule("Server/Service/Engine", new SetParentClassLoaderRule(parentClassLoader));
        addClusterRuleSet(digester, "Server/Service/Engine/Cluster/");

        long t2 = System.currentTimeMillis();
        if (log.isDebugEnabled())
        {
            log.debug("Digester for server.xml created " + (t2 - t1));
        }
        return (digester);

    }
上面的太多我们看几个尤其有用的地方。
        digester.addObjectCreate("Server", "org.apache.catalina.core.StandardServer", "className");
        digester.addSetProperties("Server");
        digester.addSetNext("Server", "setServer", "org.apache.catalina.Server");
这里先解释一下Digester是一个用于解析xml的小框架,内部通过封装sax解析来实现的.介绍一下Digester的功能:
A.在遇到patter对应的标签时创建对应的对象,将对象压栈,然后标签结束后再将这个对象出栈。
digester.addObjectCreate("Server", "org.apache.catalina.core.StandardServer", "className");
通过上面的代码配置在遇到<Server>标签时创建StandardServer对象,并将该对象压进Digester内部的stack中,遇到</Server>的时候将StandardServer对象出栈。
B.开启对应标签的attribute属性填充到实例化的类中的功能。
digester.addSetProperties("Server");
C.这是最关键的地方,在遇到对应的匹配规则后在end方法调用栈顶下面紧挨着的对象的指定的方法并将栈顶的对象作为参数穿进去。
digester.addSetNext("Server", "setServer", "org.apache.catalina.Server");
上面传进来的方法名就是setServer也就是说会调用栈低的setServer方法将它上面的类作为参数传进去。
    public void end(String namespace, String name) throws Exception
    {
        // Identify the objects to be used
        Object child = digester.peek(0);
        Object parent = digester.peek(1);
        if (digester.log.isDebugEnabled())
        {
            if (parent == null)
            {
                digester.log.debug(
                        "[SetNextRule]{" + digester.match + "} Call [NULL PARENT]." + methodName + "(" + child + ")");
            } else
            {
                digester.log.debug("[SetNextRule]{" + digester.match + "} Call " + parent.getClass().getName() + "."
                        + methodName + "(" + child + ")");
            }
        }

        // Call the specified method
        IntrospectionUtils.callMethod1(parent, methodName, child, paramType, digester.getClassLoader());
    }
刚开始的时候我很迷惑,因为在整个程序中都没有看到Catalina什么时候显式的设置了Server类型的属性,后来我才发现这个秘密:还是在Catalina的load()方法中。
            try
            {
                inputSource.setByteStream(inputStream);
                digester.push(this);
                digester.parse(inputSource);
            }
在真正开始Digester的parse()方法之前先将自身压进了自身的栈中,然后我们再看下面,这个是Tomcat的server.xml配置文件。

我们结合Tomcat中conf目录下的server.xml文件,<Server>就是根元素.所以解析最后出栈的肯定是<Server>标签对应的StandardServer对象.我接着看这几行代码.
digester.addSetNext("Server", "setServer", "org.apache.catalina.Server");
因为最开始将Catalina类自身以this传了进来所以栈底是Catalina对象,<server>标签结束的时候会调用Ctalina的setServer()方法将StandardServer对象的实例作为参数传进来。到这里我们成功设置了server属性,调用StandardServer的start()方法。
3.StandardServer中的start方法继承自LifecycleBase然后又调用自己的startInternal方法。
    public final synchronized void start() throws LifecycleException
    {

        if (LifecycleState.STARTING_PREP.equals(state) || LifecycleState.STARTING.equals(state)
                || LifecycleState.STARTED.equals(state))
        {

            if (log.isDebugEnabled())
            {
                Exception e = new LifecycleException();
                log.debug(sm.getString("lifecycleBase.alreadyStarted", toString()), e);
            } else if (log.isInfoEnabled())
            {
                log.info(sm.getString("lifecycleBase.alreadyStarted", toString()));
            }

            return;
        }

        if (state.equals(LifecycleState.NEW))
        {
            init();
        } else if (state.equals(LifecycleState.FAILED))
        {
            stop();
        } else if (!state.equals(LifecycleState.INITIALIZED) && !state.equals(LifecycleState.STOPPED))
        {
            invalidTransition(Lifecycle.BEFORE_START_EVENT);
        }

        try
        {
            setStateInternal(LifecycleState.STARTING_PREP, null, false);
            startInternal();
            if (state.equals(LifecycleState.FAILED))
            {
                // This is a 'controlled' failure. The component put itself into
                // the
                // FAILED state so call stop() to complete the clean-up.
                stop();
            } else if (!state.equals(LifecycleState.STARTING))
            {
                // Shouldn't be necessary but acts as a check that sub-classes
                // are
                // doing what they are supposed to.
                invalidTransition(Lifecycle.AFTER_START_EVENT);
            } else
            {
                setStateInternal(LifecycleState.STARTED, null, false);
            }
        } catch (Throwable t)
        {
            // This is an 'uncontrolled' failure so put the component into the
            // FAILED state and throw an exception.
            ExceptionUtils.handleThrowable(t);
            setStateInternal(LifecycleState.FAILED, null, false);
            throw new LifecycleException(sm.getString("lifecycleBase.startFail", toString()), t);
        }
    }
我们看一看StandardServer的startInternal方法。
    protected void startInternal() throws LifecycleException
    {

        fireLifecycleEvent(CONFIGURE_START_EVENT, null);
        setState(LifecycleState.STARTING);

        globalNamingResources.start();

        // Start our defined Services
        synchronized (servicesLock)
        {
            for (int i = 0; i < services.length; i++)
            {
                services[i].start();
            }
        }
    }
在startInternal()中启动了由Digester从server.xml中解析出来的默认的Service组件,再看一下Catalina中的代码。
        digester.addObjectCreate("Server/Service", "org.apache.catalina.core.StandardService", "className");
        digester.addSetProperties("Server/Service");
        digester.addSetNext("Server/Service", "addService", "org.apache.catalina.Service");
和Catalinna配置Server的原理一样,遇到<Service>后会实例化StandardService实例然后在解析</Service>结束后会将StandardService的实例添加到StandardServer实例中。
4.StandardService中一次调用了StandardEngine和StandardHost的start方法,但是我们始终找不到StandardContext是什么时候被初始化,下面让我们看看程序是怎么创建StandardContext实例的。
        digester.addRuleSet(new NamingRuleSet("Server/GlobalNamingResources/"));
        digester.addRuleSet(new EngineRuleSet("Server/Service/"));
        digester.addRuleSet(new HostRuleSet("Server/Service/Engine/"));
        digester.addRuleSet(new ContextRuleSet("Server/Service/Engine/Host/"));
        addClusterRuleSet(digester, "Server/Service/Engine/Host/Cluster/");
        digester.addRuleSet(new NamingRuleSet("Server/Service/Engine/Host/Context/"));
还是回到Catalina初始化Digester实例时的代码,我们看对于<Host>标签加的一些规则。
   public void addRuleInstances(Digester digester)
    {
        digester.addObjectCreate(prefix + "Host", "org.apache.catalina.core.StandardHost", "className");
        digester.addSetProperties(prefix + "Host");
        digester.addRule(prefix + "Host", new CopyParentClassLoaderRule());
     // 最为核心的配置
        digester.addRule(prefix + "Host", new LifecycleListenerRule("org.apache.catalina.startup.HostConfig", "hostConfigClass"));
        digester.addSetNext(prefix + "Host", "addChild", "org.apache.catalina.Container");

        digester.addCallMethod(prefix + "Host/Alias", "addAlias", 0);

        // Cluster configuration start
        digester.addObjectCreate(prefix + "Host/Cluster", null, "className");
        digester.addSetProperties(prefix + "Host/Cluster");
        digester.addSetNext(prefix + "Host/Cluster", "setCluster", "org.apache.catalina.Cluster");
        // Cluster configuration end

        digester.addObjectCreate(prefix + "Host/Listener", null, "className");
        digester.addSetProperties(prefix + "Host/Listener");
        digester.addSetNext(prefix + "Host/Listener", "addLifecycleListener", "org.apache.catalina.LifecycleListener");

        digester.addRuleSet(new RealmRuleSet(prefix + "Host/"));

        digester.addObjectCreate(prefix + "Host/Valve", null, "className");
        digester.addSetProperties(prefix + "Host/Valve");
        digester.addSetNext(prefix + "Host/Valve", "addValve", "org.apache.catalina.Valve");

    }
这里的比较核心的就是HostConfig,它继承了LifecycleListener,当StandHost启动的时候会调用监听器的启动事件的处理逻辑,当调用StandardHost的start方法实际上调用的是父类LifecycleBase的start方法。
这里调用子类的startInternal方法,StandardHost和ContainerBase都实现了这个方法,根据多态规则首先会调用最底层子类的方法。
   protected synchronized void startInternal() throws LifecycleException
    {

        // Set error report valve
        String errorValve = getErrorReportValveClass();
        if ((errorValve != null) && (!errorValve.equals("")))
        {
            try
            {
                boolean found = false;
                Valve[] valves = getPipeline().getValves();
                for (Valve valve : valves)
                {
                    if (errorValve.equals(valve.getClass().getName()))
                    {
                        found = true;
                        break;
                    }
                }
                if (!found)
                {
                    Valve valve = (Valve) Class.forName(errorValve).newInstance();
                    getPipeline().addValve(valve);
                }
            } catch (Throwable t)
            {
                ExceptionUtils.handleThrowable(t);
                log.error(sm.getString("standardHost.invalidErrorReportValveClass", errorValve), t);
            }
        }
        super.startInternal();
    }
然后在这里又会调用父类ContainerBase类的startInternal()方法,让我们看这个方法。
    protected synchronized void startInternal() throws LifecycleException
    {

        // Start our subordinate components, if any
        logger = null;
        getLogger();
        Cluster cluster = getClusterInternal();
        if ((cluster != null) && (cluster instanceof Lifecycle))
            ((Lifecycle) cluster).start();
        Realm realm = getRealmInternal();
        if ((realm != null) && (realm instanceof Lifecycle))
            ((Lifecycle) realm).start();

        // Start our child containers, if any
        Container children[] = findChildren();
        List<Future<Void>> results = new ArrayList<>();
        for (int i = 0; i < children.length; i++)
        {
            results.add(startStopExecutor.submit(new StartChild(children[i])));
        }

        boolean fail = false;
        for (Future<Void> result : results)
        {
            try
            {
                result.get();
            } catch (Exception e)
            {
                log.error(sm.getString("containerBase.threadedStartFailed"), e);
                fail = true;
            }

        }
        if (fail)
        {
            throw new LifecycleException(sm.getString("containerBase.threadedStartFailed"));
        }

        // Start the Valves in our pipeline (including the basic), if any
        if (pipeline instanceof Lifecycle)
            ((Lifecycle) pipeline).start();
     // 触发生命周期时间,触发监听器。
        setState(LifecycleState.STARTING);

        // Start our thread
        threadStart();

    }
   public enum LifecycleState
   {
       NEW(false, null),
       INITIALIZING(false, Lifecycle.BEFORE_INIT_EVENT),
       INITIALIZED(false, Lifecycle.AFTER_INIT_EVENT),
       STARTING_PREP(false, Lifecycle.BEFORE_START_EVENT),
       STARTING(true, Lifecycle.START_EVENT),
       STARTED(true, Lifecycle.AFTER_START_EVENT),
       STOPPING_PREP(true, Lifecycle.BEFORE_STOP_EVENT),
       STOPPING(false, Lifecycle.STOP_EVENT),
       STOPPED(false, Lifecycle.AFTER_STOP_EVENT),
       DESTROYING(false, Lifecycle.BEFORE_DESTROY_EVENT),
       DESTROYED(false, Lifecycle.AFTER_DESTROY_EVENT),
       FAILED(false, null),
   }
这个方法会出发生命周期start的状态。
    protected synchronized void setState(LifecycleState state) throws LifecycleException
    {
        setStateInternal(state, null, true);
    }
在setStateInternal的方法中获取上面的枚举类型的LifecycleState中String类型的成员变量,STARTING类型对应Lifecycle.START_EVENT类型的事件,然后看fireLifecycleEvent方法。
    private synchronized void setStateInternal(LifecycleState state, Object data, boolean check) throws LifecycleException
    {

        if (log.isDebugEnabled())
        {
            log.debug(sm.getString("lifecycleBase.setState", this, state));
        }

        if (check)
        {
            // Must have been triggered by one of the abstract methods (assume
            // code in this class is correct)
            // null is never a valid state
            if (state == null)
            {
                invalidTransition("null");
                // Unreachable code - here to stop eclipse complaining about
                // a possible NPE further down the method
                return;
            }

            // Any method can transition to failed
            // startInternal() permits STARTING_PREP to STARTING
            // stopInternal() permits STOPPING_PREP to STOPPING and FAILED to
            // STOPPING
            if (!(state == LifecycleState.FAILED
                    || (this.state == LifecycleState.STARTING_PREP && state == LifecycleState.STARTING)
                    || (this.state == LifecycleState.STOPPING_PREP && state == LifecycleState.STOPPING)
                    || (this.state == LifecycleState.FAILED && state == LifecycleState.STOPPING)))
            {
                // No other transition permitted
                invalidTransition(state.name());
            }
        }

        this.state = state;
        String lifecycleEvent = state.getLifecycleEvent();
        if (lifecycleEvent != null)
        {
            fireLifecycleEvent(lifecycleEvent, data);
        }
    }
这里将实践类型传给了LifecycleSupport中维护的LifecycleListener类型的集合,并调用Catalinna从Server.xml中解析出来的LifecycleListener方法lifecycleEvent方法。
    protected void fireLifecycleEvent(String type, Object data)
    {
        lifecycle.fireLifecycleEvent(type, data);
    }
所以回到上面创建Digester的时候我们定义了将匹配规则,在解析到<Host>的时候会开始实例化HostConfig类型的LifecycleListener并将其添加到StandardHost当中,然后在start()方法调用后会触发HostConfig中的lifecycleEvent()方法。
   public void lifecycleEvent(LifecycleEvent event)
    {

        // Identify the host we are associated with
        try
        {
            host = (Host) event.getLifecycle();
            if (host instanceof StandardHost)
            {
                setCopyXML(((StandardHost) host).isCopyXML());
                setDeployXML(((StandardHost) host).isDeployXML());
                setUnpackWARs(((StandardHost) host).isUnpackWARs());
                setContextClass(((StandardHost) host).getContextClass());
            }
        } catch (ClassCastException e)
        {
            log.error(sm.getString("hostConfig.cce", event.getLifecycle()), e);
            return;
        }

        // Process the event that has occurred
        if (event.getType().equals(Lifecycle.PERIODIC_EVENT))
        {
            check();
        } else if (event.getType().equals(Lifecycle.BEFORE_START_EVENT))
        {
            beforeStart();
        } else if (event.getType().equals(Lifecycle.START_EVENT))
        {
            start();
        } else if (event.getType().equals(Lifecycle.STOP_EVENT))
        {
            stop();
        }
    }
调用start()方法.
    public void start()
    {

        if (log.isDebugEnabled())
            log.debug(sm.getString("hostConfig.start"));

        try
        {
            ObjectName hostON = host.getObjectName();
            oname = new ObjectName(hostON.getDomain() + ":type=Deployer,host=" + host.getName());
            Registry.getRegistry(null, null).registerComponent(this, oname, this.getClass().getName());
        } catch (Exception e)
        {
            log.error(sm.getString("hostConfig.jmx.register", oname), e);
        }

        if (!host.getAppBaseFile().isDirectory())
        {
            log.error(sm.getString("hostConfig.appBase", host.getName(), host.getAppBaseFile().getPath()));
            host.setDeployOnStartup(false);
            host.setAutoDeploy(false);
        }

        if (host.getDeployOnStartup())
            deployApps();

    }
在start()中调用了deployApps方法,其中appBase = "webapps"。
    protected void deployApps()
    {

        File appBase = host.getAppBaseFile();
        File configBase = host.getConfigBaseFile();
        String[] filteredAppPaths = filterAppPaths(appBase.list());
        // Deploy XML descriptors from configBase
        deployDescriptors(configBase, configBase.list());
        // Deploy WARs
        deployWARs(appBase, filteredAppPaths);
        // Deploy expanded folders
        deployDirectories(appBase, filteredAppPaths);

    }
让我们直接看Tomcat我们部署的项目的载入方式deployDirectories(appBase, filteredAppPaths),项目的文件夹为webapps。
   protected void deployDirectories(File appBase, String[] files)
    {

        if (files == null)
            return;

        ExecutorService es = host.getStartStopExecutor();
        List<Future<?>> results = new ArrayList<>();

        for (int i = 0; i < files.length; i++)
        {

            if (files[i].equalsIgnoreCase("META-INF"))
                continue;
            if (files[i].equalsIgnoreCase("WEB-INF"))
                continue;
            File dir = new File(appBase, files[i]);
            if (dir.isDirectory())
            {
                ContextName cn = new ContextName(files[i], false);

                if (isServiced(cn.getName()) || deploymentExists(cn.getName()))
                    continue;

                results.add(es.submit(new DeployDirectory(this, cn, dir)));
            }
        }

        for (Future<?> result : results)
        {
            try
            {
                result.get();
            } catch (Exception e)
            {
                log.error(sm.getString("hostConfig.deployDir.threaded.error"), e);
            }
        }
    }
向Digester解析生成的线程池中提交一个DeployDirectory类的实例。
    private static class DeployDirectory implements Runnable
    {

        private HostConfig config;
        private ContextName cn;
        private File dir;

        public DeployDirectory(HostConfig config, ContextName cn, File dir)
        {
            this.config = config;
            this.cn = cn;
            this.dir = dir;
        }

        @Override
        public void run()
        {
            config.deployDirectory(cn, dir);
        }
    }
在里面又调用了HostConfig类的deployDirectory()方法.

在deployDirectory()方法中前面对路径进行了一系列的判断
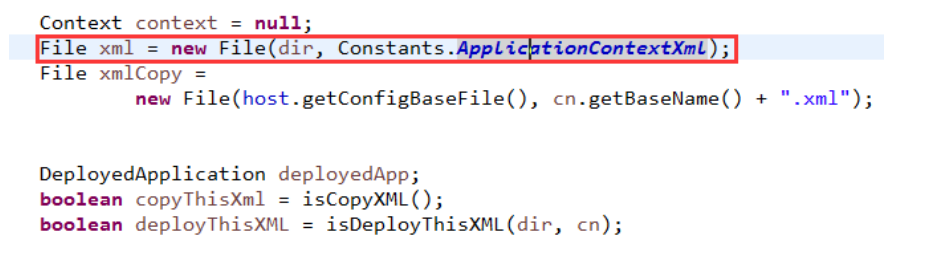
让我们看看这个路径.

有时候我们的的项目的相关目录下并没有这个文件.

所以直接进入了else块直接生成了StandardContext实例初始化参数后直接添加到了父容器StandardHost中.
5.StandardContext类的初始化
让我们先看看在HostConfig中是怎么配置StandardContext的.
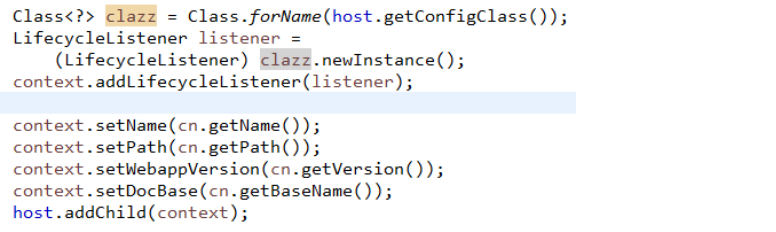
首先先给他添加了一个生命周期事件监听器.
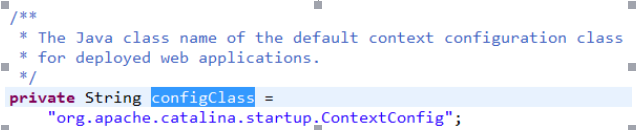
在StandardContext中我们找到了这个监听器,ContextConfig.想必到这里大家如果看懂前面HostConfig的执行原理,这个也不难理解,在这里我就不仔细的介绍了,当Context启动的时候肯定会出发start类型的时间,然后调用ContextConfig的lifecycleEvent()方法.让我们看看在这个ContextConfig中都做了什么.

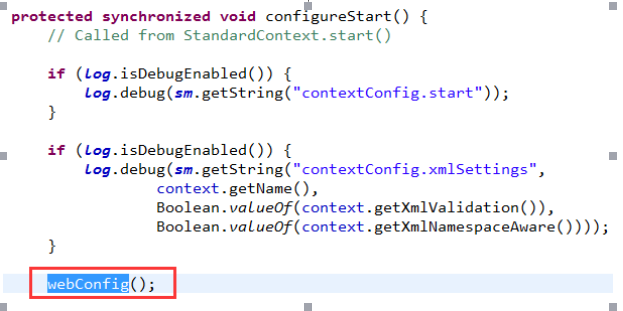
调用configureStart()方法中调用webConfig()载入我们WEB-INF文件夹下面的web.xml.
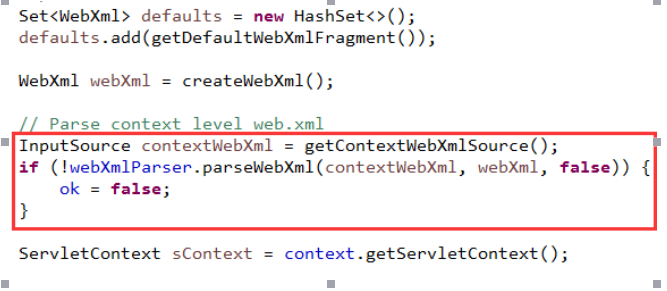
这里也是用Digester进行解析的,添加的匹配规则无非是对Servlet,Filter等我们在开发中经常用到的配置标签的解析并将生成的实体类填充在WebXml类型的实例中.还有一点值得提示的是在第一次获取ServletContext的时候会对其进行初始化为ApplicationContext.
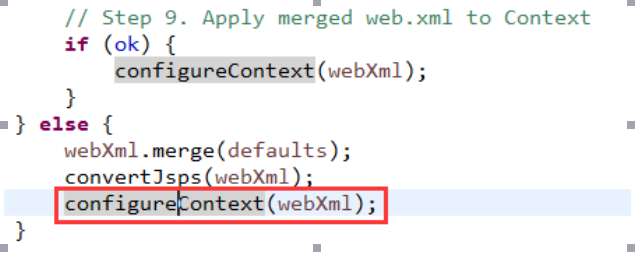
最后在configureContext方法中将填充完毕的WebXml实例中的相关数据填充到Context中.
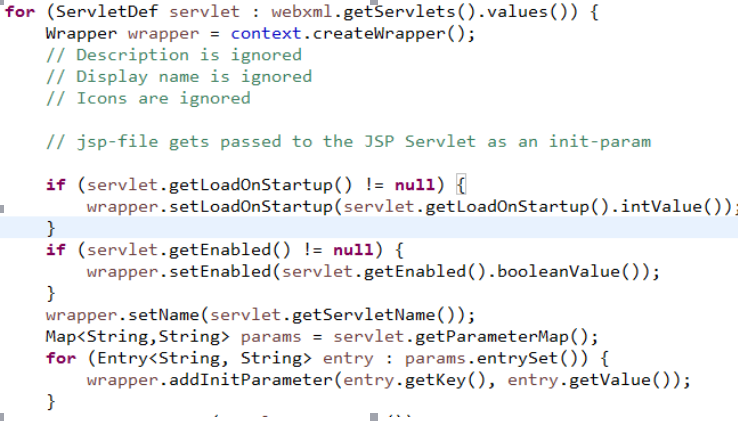
下面的代码接着上面的.
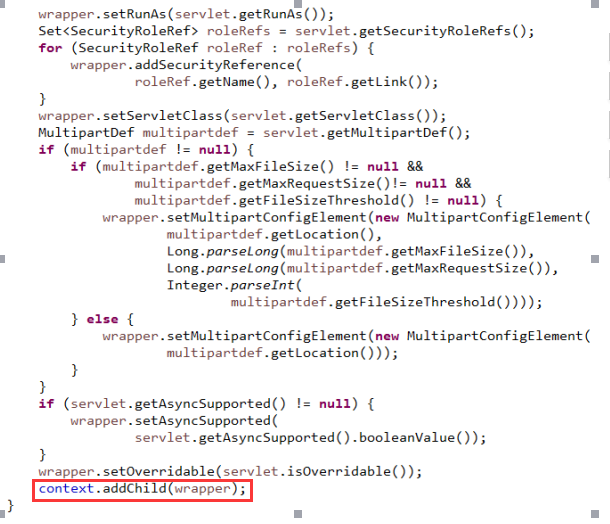
这里看Servlet填充的过程,用Wrapper包装Servlet再将这些Wrapper填充到Context中.
让我们接着看在StandardContext的startInternal()我们比较感兴趣的地方.
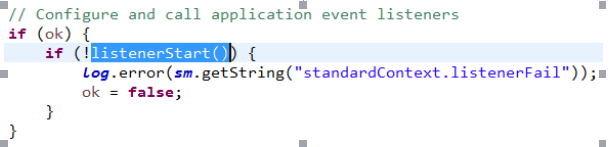
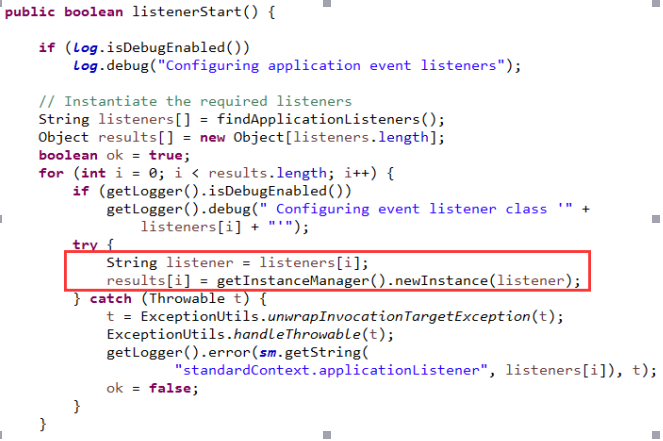
这里会将以字符串数组保存的listener数组进行初始化.
对实例化的listener进行分类

对初始化的监听器分类我们这里关心ServletContextListener类型的监听器,判断如果符合该类型的监听器后便会加入方法中临时创建的名为lifecycleListeners的ArrayList中.
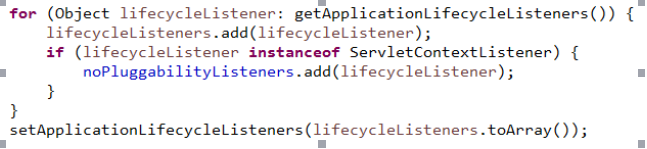
设置刚生成的lifecycleListenders.
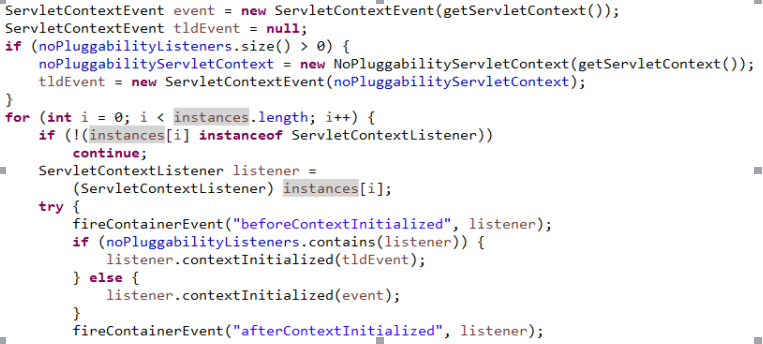
生成事件,调用ServletContextListener类型实例的contextInitialized()方法,这就是Tomcat和SpringMVC勾搭开始的地方.具体的内容我们在下一篇讲,睡了.