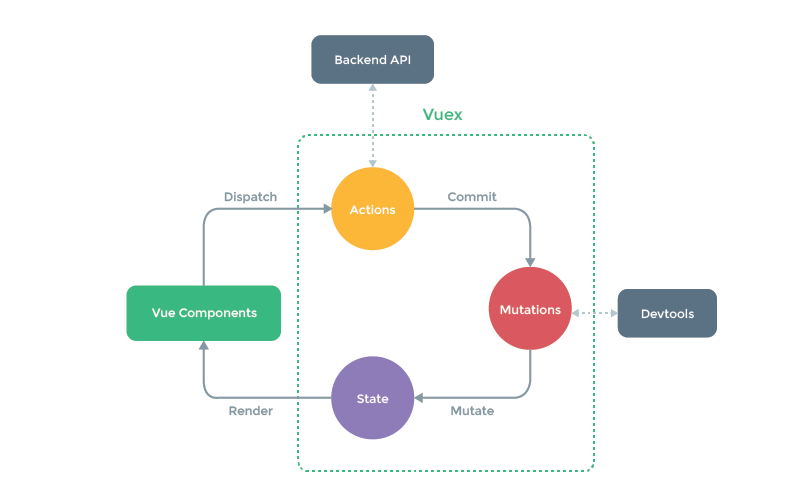
//本文主要参考vuex官方文档做的总结
vuex是vue的状态管理模式,主要可以解决父子组件嵌套层数较多,或者兄弟组件之间需要维护同一个状态的情况。
vuex的核心是"store",简单的store如下:
// 如果在模块化构建系统中,请确保在开头调用了 Vue.use(Vuex)

const store = new Vuex.Store({
  state: {
    count: 0
  },
  mutations: {
    increment (state) {
      state.count++
    }
  }
})
可以通过 store.state 来获取状态对象,以及通过 store.commit 方法触发状态变更:
store.commit('increment')

console.log(store.state.count) // -> 1
通过store选项将状态从根组件『注入』到每一个子组件中:
const app = new Vue({
  el: '#app',
  // 把 store 对象提供给 “store” 选项,这可以把 store 的实例注入所有的子组件
  store,
  components: { Counter },
  template: `
    <div class="app">
      <counter></counter>
    </div>
  `
})
通过在根实例中注册 store 选项,该 store 实例会注入到根组件下的所有子组件中,且子组件能通过 this.$store访问到。让我们更新下 Counter 的实现:
const Counter = {
  template: `<div>{{ count }}</div>`,
  computed: {
    count () {
      return this.$store.state.count
    }
  }
}
值得注意的是我们这里需要在computed计算属性里面去获取这个count,而当一个组件需要获取的状态比较多的时候都声明为计算属性就会显得比较冗余,因此可以引入mapstate这个辅助函数:
// 在单独构建的版本中辅助函数为 Vuex.mapState
import { mapState } from 'vuex'

export default {
  // ...
  computed: {
    ...mapState({
        // 箭头函数可使代码更简练
        count: state => state.count,

        // 传字符串参数 'count' 等同于 `state => state.count`
        countAlias: 'count',

        // 为了能够使用 `this` 获取局部状态,必须使用常规函数
        countPlusLocalState (state) {
          return state.count + this.localCount
        }
      })
    }
}
以上代码等同于:
import { mapState } from 'vuex'
export default {
    computed: {
        count() {
            return this.$store.state.count
         },
        countAlias() {
            return this.$store.state['count']
        },
         countPlusLocalState() {
            return this.$store.state.count + this.localCount
        }
    }
}
当映射的计算属性的名称与 state 的子节点名称相同时,我们也可以给 mapState 传一个字符串数组:
computed: mapState([
  // 映射 this.count 为 store.state.count
  'count'
])
有时候我们需要从 store 中的 state 中派生出一些状态,Vuex 允许我们在 store 中定义『getters』(可以认为是 store 的计算属性)。Getters 接受 state 作为其第一个参数,也可以接受getter作为第二个参数:
const store = new Vuex.Store({
  state: {
    todos: [
      { id: 1, text: '...', done: true },
      { id: 2, text: '...', done: false }
    ]
  },
  getters: {
    doneTodos: state => {
      return state.todos.filter(todo => todo.done)
    }
  }
})
Getters 会暴露为 store.getters 对象:
store.getters.doneTodos
我们可以很容易地在任何组件中使用它:
computed: {
  doneTodosCount () {
    return this.$store.getters.doneTodosCount
  }
}
就像映射state一样,getters也可以通过mapGetters进行映射:
import { mapGetters } from 'vuex'

export default {
  // ...
  computed: {
  // 使用对象展开运算符将 getters 混入 computed 对象中
    ...mapGetters([
      'doneTodosCount',
      'anotherGetter',
      // ...
    ])
  }
}
以上介绍的是怎么获取状态,那么如何修改状态?Vuex 中的 mutations 非常类似于事件:每个 mutation 都有一个字符串的 事件类型 (type) 和 一个 回调函数 (handler)。这个回调函数就是我们实际进行状态更改的地方,并且它会接受 state 作为第一个参数:
const store = new Vuex.Store({
  state: {
    count: 1
  },
  mutations: {
    increment (state) {
      // 变更状态
      state.count++
    }
  }
})
这里increment称为type,调用的函数称为handler,要唤醒一个 mutation handler,你需要以相应的 type 调用 store.commit 方法:
store.commit('increment')
你可以在组件中使用 this.$store.commit('xxx') 提交 mutation,或者使用 mapMutations 辅助函数将组件中的 methods 映射为 store.commit 调用:
import { mapMutations } from 'vuex'

export default {
  // ...
  methods: {
    ...mapMutations([
      'increment' // 映射 this.increment() 为 this.$store.commit('increment')
    ]),
    ...mapMutations({
      add: 'increment' // 映射 this.add() 为 this.$store.commit('increment')
    })
  }
}
需要注意的是mutation 必须是同步函数。那么如何进行异步操作,此时可以通过action。与mutation的区别在于:
- Action 提交的是 mutation,而不是直接变更状态。
- Action 可以包含任意异步操作。
const store = new Vuex.Store({
  state: {
    count: 0
  },
  mutations: {
    increment (state) {
      state.count++
    }
  },
  actions: {
    increment (context) {
      context.commit('increment')
    }
  }
})
也可以通过参数解构:
actions: {
  increment ({ commit }) {
    commit('increment')
  }
}
Action 函数接受一个与 store 实例具有相同方法和属性的 context 对象,因此你可以调用 context.commit 提交一个 mutation,或者通过 context.state 和 context.getters 来获取 state 和 getters。
Action 通过 store.dispatch 方法触发:
store.dispatch('increment')
同样的,action也可以映射:
import { mapActions } from 'vuex'

export default {
  // ...
  methods: {
    ...mapActions([
      'increment' // 映射 this.increment() 为 this.$store.dispatch('increment')
    ]),
    ...mapActions({
      add: 'increment' // 映射 this.add() 为 this.$store.dispatch('increment')
    })
  }
}
Vuex 允许我们将 store 分割到模块(module)。每个模块拥有自己的 state、mutation、action、getters、甚至是嵌套子模块——从上至下进行类似的分割:
const moduleA = {
  state: { ... },
  mutations: { ... },
  actions: { ... },
  getters: { ... }
}

const moduleB = {
  state: { ... },
  mutations: { ... },
  actions: { ... }
}

const store = new Vuex.Store({
  modules: {
    a: moduleA,
    b: moduleB
  }
})

store.state.a // -> moduleA 的状态
store.state.b // -> moduleB 的状态