| Hudson Continuous Integration Server |
| Website |
| Download |
| Community |
| Mailing List • Forums • IRC |
| Bugzilla |
| Open |
| Help Wanted |
| Bug Day |
| Contribute |
| Browse Source |
 |
Installing Hudson as a Windows Service |
|---|
Contents[hide] |
Install Hudson as a Windows service
First, you need to start Hudson before installing it. This can be done by running java -jar hudson.war. Now connect to hudson by going to the following URL http://locahost:8080/
Once Hudson is started, click the manage Hudson link and look for the "Install as Windows Service" link on the management page.
Clicking this link shows you the installation screen:
Choose the directory where Hudson shall be installed (the directory must already exist). This will become HUDSON_HOME and will be used to store data files and programs.
Upon successful completion of the installation, you should see a page asking you to restart Hudson. Note that you will need administrator privileges to complete this operation.
Hudson will then be relaunched as a Windows service.
At this point you can use the service manager to confirm that Hudson is running as a service.
Install Slave as a Windows service (requires .Net 2 framework)
Hudson also allows you to install a slave agent as a Windows service. (See Distributed Builds for more about how to do distributed builds in general.)
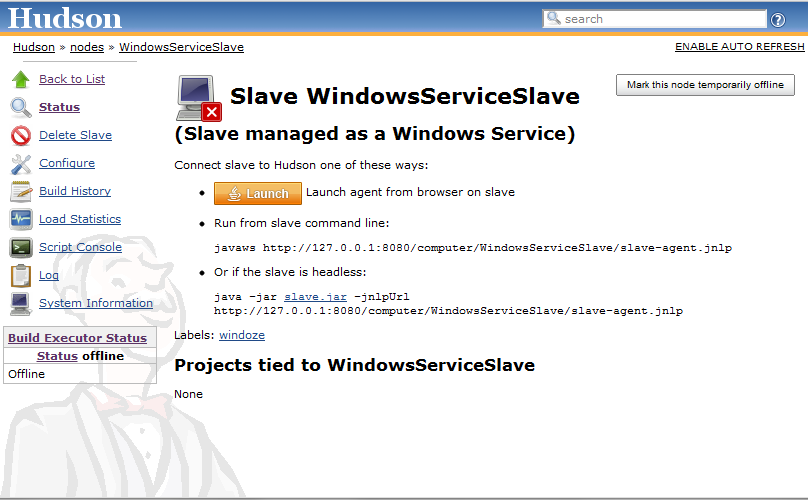
First, you configure your slave to run as a JNLP slave agent. This should create a JNLP launch icon in the corresponding page, as shown below: 
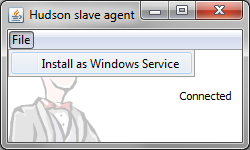
From the slave machine, launch a slave agent. You should see a window like this:
Choose "File" > "Install as Windows Service" from the menu:
Confirm your intention to install as a service. The installation will place the program files to the directory designated as the slave root directory (from the "configure executors" screen.)
Once the installation succeeds, you'll be asked if you'd like to stop the current slave agent and immediately start a slave agent. When you click "OK", the slave agent window will terminate. The new slave agent runs as a service without showing a window, so head over to the service manager from the control panel and confirm that the slave agent is indeed running as a service.
Changing the configuration of services
The JVM launch parameters of these Windows services are controlled by an XML file hudson.xml and hudson-slave.xml respectively. These files can be found in$HUDSON_HOME and in the slave root directory respectively, after you've install them as Windows services.
The file format should be self-explanatory. Tweak the arguments for example to give JVM a bigger memory.
Stdout and stderr from the service processes go to log files in the same directory.
Uninstallation
To uninstall the service, run hudson-slave.exe uninstall from the command line. The Hudson-slave executable can be found in the slave root directory. Note that you should run the uninstall from a admin command prompt on Windows 7 and the service will not be removed until the service is manually stopped or the Windows machine is re-booted. you can also manually uninstall the service using the command: sc delete Hudson Slave, again issue this from an admin console.


