1 单点登录
关于单点登录的原理,我觉得下面这位老哥讲的比较清楚,有兴趣可以看一下,下面我把其中的重点在此做个笔记总结
https://juejin.cn/post/6844904079274197005
主流的单点登录都是基于共享 cookie 来实现的
1.1 同域单点登录
适用场景:都是企业内部系统,所有系统都适用同一个一级域名,并通过不同的二级域名区分
举个例子:公司有一个一级域名cjs.com,我们有三个系统需要实现单点登录,分别是门户系统(sso.cjs.com)、应用系统1(app1.cjs.com)、应用系统2(app2.cjs.com)
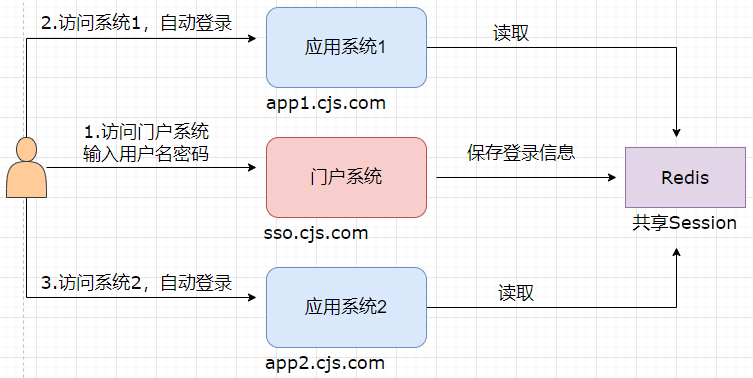
核心原理:
- 门户系统设置 Cookie 的 domain 为一级域名也就是 cjs.com,这样就可以共享门户的 Cookie 给所有的使用该域名(xxx.cjs.com)的系统
- 使用 Spring Session 等技术让所有系统共享 Session
- 所有登录都跳转到门户系统去登录,也就说门户系统有两个页面就够了:登录页(login.html)和首页(index.html)。通过首页链接可以进入到各子业务系统。
- 可以在加一层网关(Spring Cloud Gateway)
1.2 跨域单点登录
由于域名不一样不能共享 Cookie 了,这样就需要通过一个单独的授权服务(UAA)来做统一登录,并基于共享UAA的 Cookie 来实现单点登录。
举个例子:公司接到一个大项目,把其中部分系统外包给第三方来做,或者直接采购第三方服务商的系统,或者是子业务系统1采购服务商A的系统,子系统2采购B服务商的系统。无论什么情况,总之系统集成就需要单点登录。
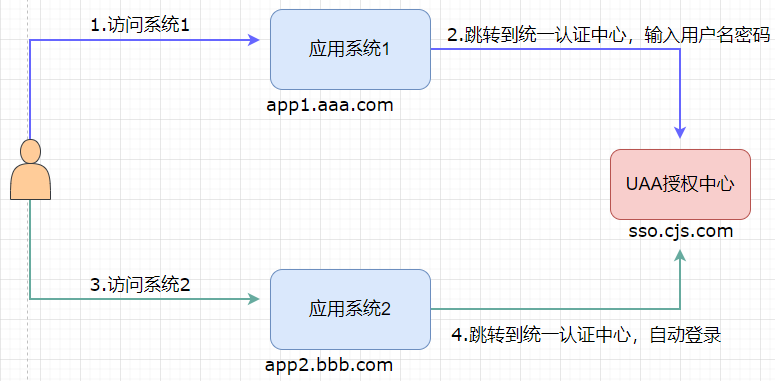
核心原理:
- 用户访问系统1,如果未登录,则跳转到UAA系统请求授权,并输入用户名/密码完成登录
- 登录成功后UAA系统把登录信息保存到 Session 中,并在浏览器写入域为 sso.com 的 Cookie
- 用户访问系统2,如未登录,则跳转到UAA系统请求授权
- 由于是跳转到UAA系统的域名 sso.com 下,所以能通过浏览器中UAA的 Cookie 读取到 Session 中之前的登录信息完成单点登录
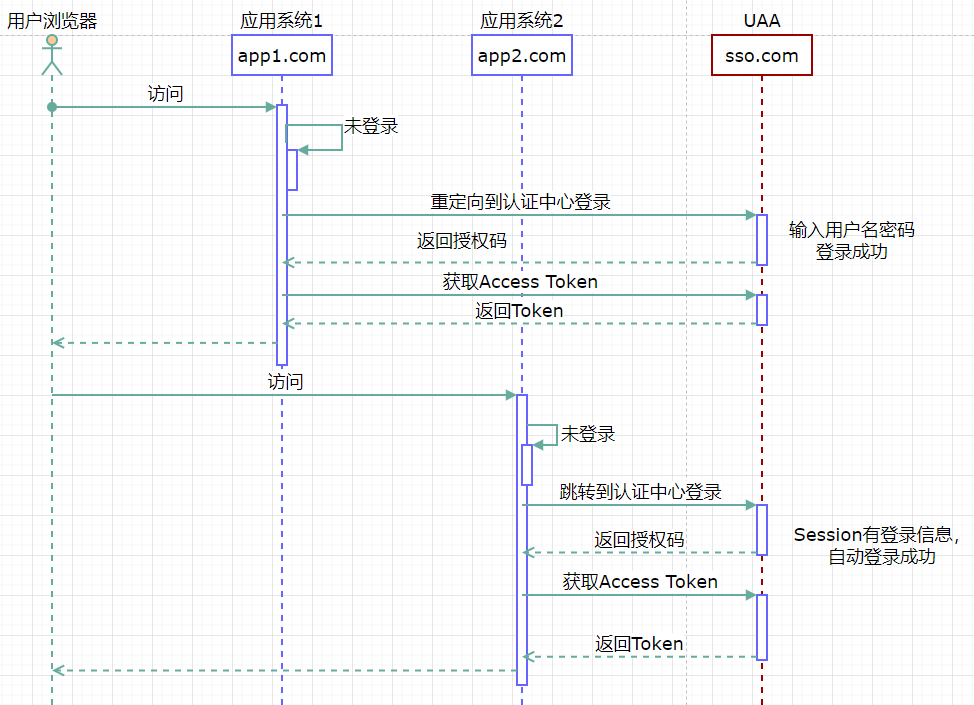
1.3 基于OAuth2的跨域单点登录
1.4 前后端分离的跨域单点登录
前后端分离的核心概念是后端仅返回前端所需的数据,不再渲染HTML页面,前端HTML页面通过AJAX调用后端的RESTFUL API接口并使用JSON数据进行交互
跨域间的前后端分离项目也是基于共享统一授权服务(UAA)的cookie来实现单点登录的,但是与非前后分离不一样的是存在以下问题需要解决
- 没有过滤器/拦截器,需要在前端判断登录状态
- 需要自己实现oauth2的授权码模式交互逻辑
- 需要解决安全性问题,oauth2的clientSecret参数放在前端不安全
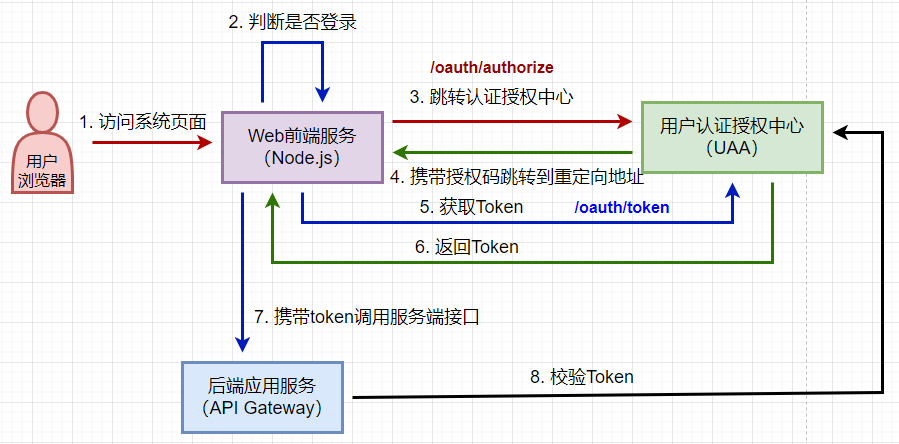
补充:前端获取授权码
- redirect_uri写前端地址
- 重定向到前端页面,页面获取到授权码code,拿code换token
示例参考:
http://localhost:9000/callback.html?code=xxx
<!DOCTYPE html>
<html lang="zh">
<head>
    <meta charset="UTF-8">
    <title>Title</title>
    <script type="text/javascript" src="jquery-3.6.0.min.js"></script>
    <script>
    	/**
         * 获取指定请求参数的值
         * @param name  请求参数名称
         * @returns {string|null}
         */
        function getQueryParameter(name) {
            let queryString = window.location.search.substring(1);
            let params = queryString.split("&");
            for (let i = 0; i < params.length; i++) {
                let pair = params[i].split("=");
                if (name == pair[0]) {
                    return pair[1];
                }
            }
            return null;
        }
        /**
         * 获取指定请求参数的值
         * @param name  请求参数名称
         * @returns {string|null}
         */
        function getUrlParameter(name) {
            let reg = new RegExp("(^|&)" + name + "=([^&]*)(&|$)");
            let queryString = window.location.search.substring(1);
            let result = queryString.match(reg);
            if (null != result) {
                return unescape(result[2])
            }
            return null;
        }
        let authorizationCode = getUrlParameter("code");
	$.post("http://localhost:8081/auth/oauth/token", {
	    grant_type: "authorization_code",
	    code: authorizationCode,
	    redirect_uri: "http://localhost:9000/callback.html"
	}, function (resp) {
	    console.log(resp);
	    sessionStorage.setItem("token", resp.access_token);
	});
    </script>
</head>
<body>
</body>

</html>
2 Spring Security OAuth 2.0迁移指南
从 Spring Security 5.2.x 开始,OAuth 2.0 Clients 和 Resource Servers 已经从 Security OAuth 2.x 迁移到 从 Spring Security,而且 Spring Security 不再提供 Authorization Server 的支持。
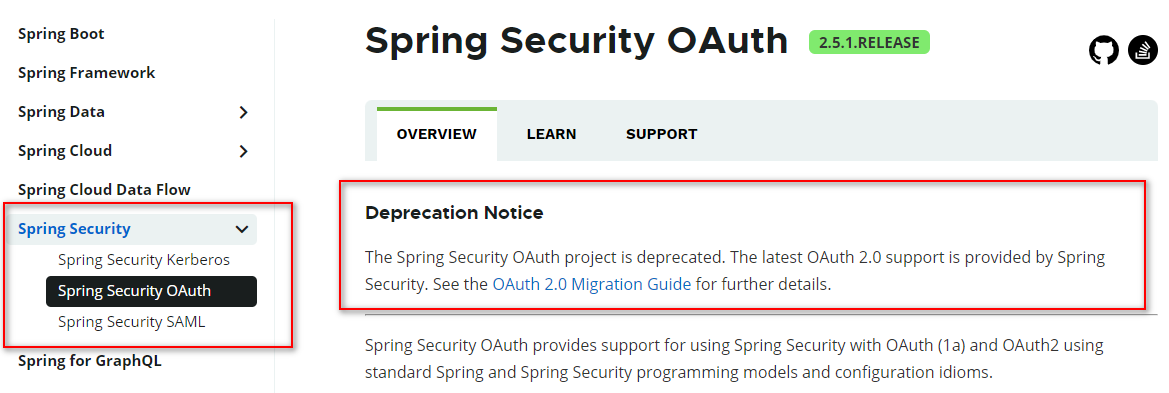
总之呢,Spring Security OAuth这个项目以后就处于维护状态了,不会再更新了,建议使用Spring Security
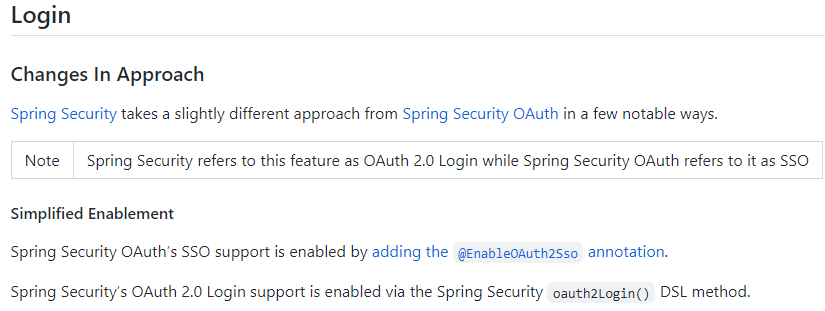
迁移以后,很多地方都不一样了,就我注意到的说下几点变化
首先,以前单点登录使用@EnableOAuth2Sso注解,现在推荐使用oauth2Login()方法
其次,授权服务器的写法不一样了
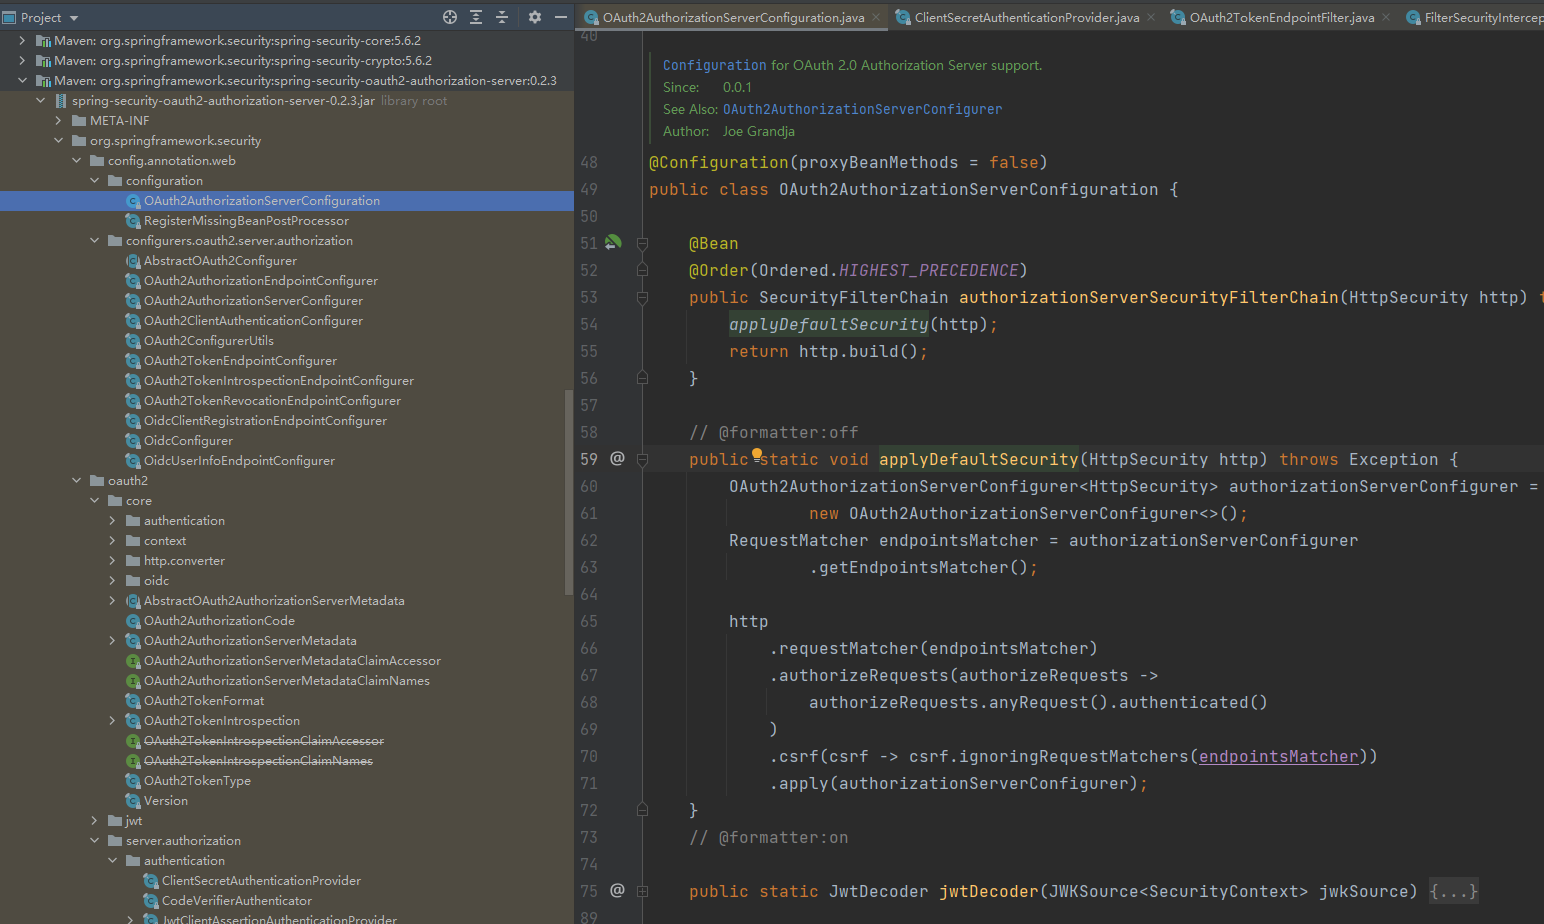
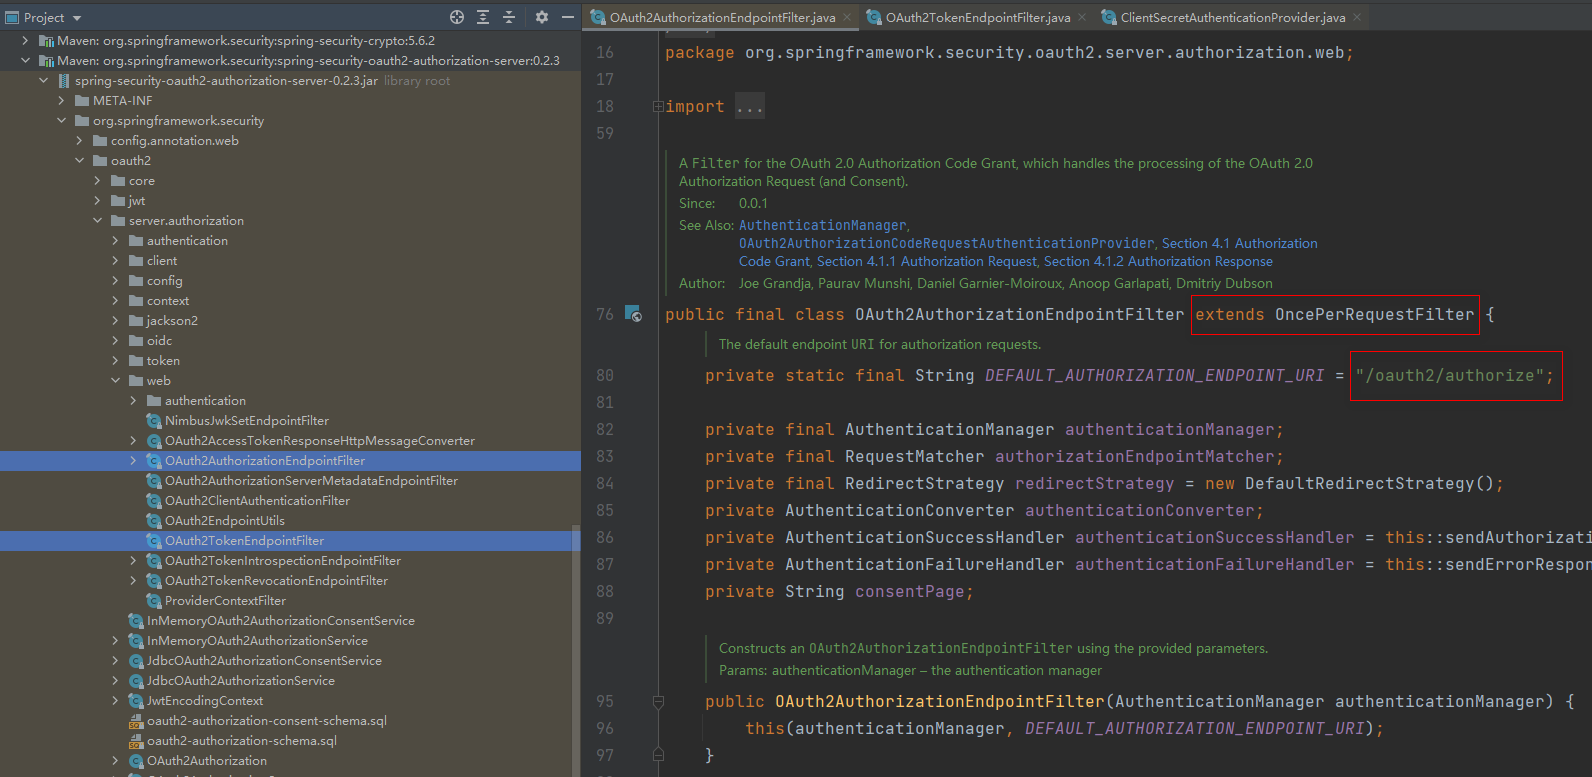
默认的端点都变成 /oauth2 开头了
更多变化可以阅读源码,亦可参见 OAuth 2.0 Features Matrix 查看二者支持的特性
3 @EnableOAuth2Sso的作用
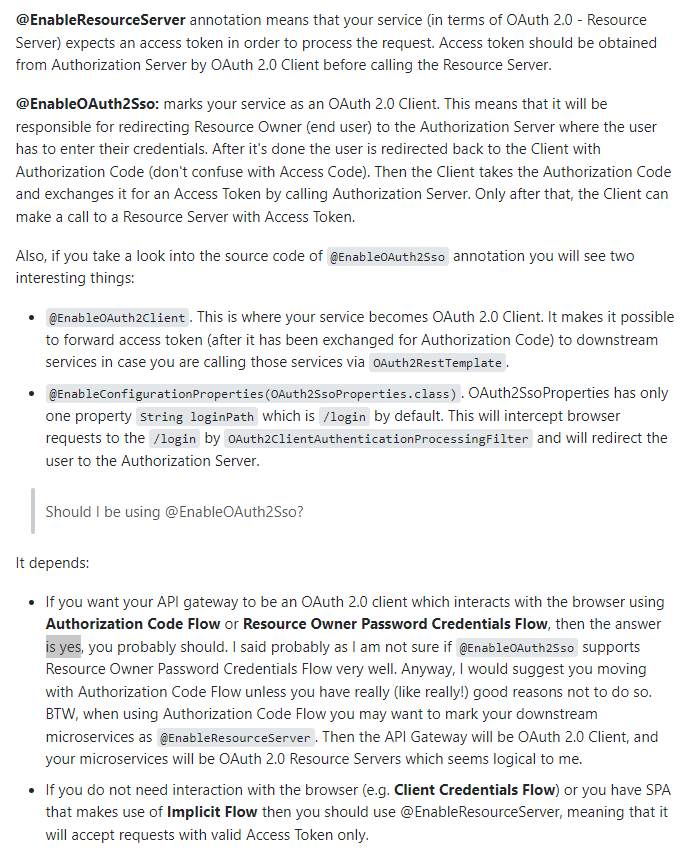
@EnableOAuth2Sso: 标记服务作为一个OAuth 2.0客户端。这意味着它将负责将资源所有者(最终用户)重定向到授权服务器,在那里用户必须输入他们的凭据。完成后,用户被重定向回客户端,并携带授权码。然后,客户端获取授权码,并通过调用授权服务器以获取访问令牌。只有在此之后,客户端才能使用访问令牌调用资源服务器。
4 补充:根据pid递归查找子机构
package com.soa.supervision.gateway.service.impl;

import com.alibaba.fastjson.JSON;
import com.soa.supervision.gateway.entity.SysDept;
import com.soa.supervision.gateway.repository.SysDeptRepository;
import com.soa.supervision.gateway.service.SysDeptService;
import org.apache.commons.lang3.StringUtils;
import org.springframework.data.redis.core.StringRedisTemplate;
import org.springframework.stereotype.Service;
import org.springframework.util.CollectionUtils;

import javax.annotation.Resource;
import java.util.ArrayList;
import java.util.List;
import java.util.concurrent.TimeUnit;

/**
 * 机构表 服务实现类
 *
 * @author ChengJianSheng
 * @since 2022-03-08
 */
@Service
public class SysDeptServiceImpl implements SysDeptService {
    private static final String CACHE_PREFIX = "DEPT:";
    @Resource
    private SysDeptRepository sysDeptRepository;
    @Resource
    private StringRedisTemplate stringRedisTemplate;

    /**
     * 递归 向下查找当前机构的所有子机构
     */
    @Override
    public List getAllByPid(Integer pid, List list) {
        List subDeptIdList = sysDeptRepository.findIdByPid(pid);
        if (CollectionUtils.isEmpty(subDeptIdList)) {
            return new ArrayList<>();
        } else {
            list.addAll(subDeptIdList);
            subDeptIdList.forEach(e->{
                getAllByPid(e, list);
            });
        }
        return list;
    }

    @Override
    public String getSubDeptIdListByPid(Integer pid) {
        String key = CACHE_PREFIX + pid;
        String val = stringRedisTemplate.opsForValue().get(key);
        if (StringUtils.isBlank(val)) {
            synchronized (SysDept.class) {
                if (StringUtils.isBlank(val)) {
                    List deptIds = getAllByPid(pid, new ArrayList<>());
                    deptIds.add(pid);
                    val = JSON.toJSONString(deptIds);
                    stringRedisTemplate.opsForValue().set(key, val, 1, TimeUnit.HOURS);
                }
            }
        }
        return val;
    }
}

package com.soa.supervision.gateway.repository;

import com.soa.supervision.gateway.entity.SysDept;
import org.springframework.data.jpa.repository.JpaRepository;
import org.springframework.data.jpa.repository.Query;
import org.springframework.data.repository.query.Param;

import java.util.List;

/**
 * @Author ChengJianSheng
 * @Date 2022/3/8
 */
public interface SysDeptRepository extends JpaRepository {

    @Query(value = "SELECT id FROM sys_dept WHERE pid = :pid", nativeQuery = true)
    List findIdByPid(@Param("pid") Integer pid);
}
5 有用的文档
Spring Security相关
- https://docs.spring.io/spring-security/reference/index.html
- https://docs.spring.io/spring-security/reference/servlet/index.html
- https://docs.spring.io/spring-security/reference/servlet/oauth2/index.html
- https://github.com/spring-projects/spring-security-samples/tree/main
- https://github.com/spring-projects/spring-security-samples/tree/main/servlet/spring-boot/java
- https://github.com/spring-projects/spring-security-samples/tree/5.6.x/servlet/spring-boot/java/oauth2/login
- https://github.com/spring-projects/spring-security/wiki/OAuth-2.0-Migration-Guide
- https://github.com/jgrandja/spring-security-oauth-5-2-migrate
Spring Boot OAuth相关