实例一
1、分析源文件代码依赖关系

mian.c
#include "test1.h"
#include "test2.h"
#include <stdio.h>
int main()
{
        test1_func("hello test1!");
        test2_func("hello test2!");
        return 0;
}
这里可以看出 main.o 文件的生成需要 main.c , test1.h , test2.h
test1.h
#ifndef _TEST_1_H
#define _TEST_1_H
        void test1_func(char *str);
#endif
test1.h 里面有 test1.c 里面函数的声明
test2.h
fndef _TEST_2_H
#define _TEST_2_H
        void test2_func(char *str);
#endif
test2.h 里面有 test2.c 里面函数的声明
test1.c
#include "test1.h"
#include <stdio.h>

void test1_func(char *str)
{
        printf("This is test1 : %s ",str);
}
生成 test1.o 文件,需要 test1.c , test1.h
test2.c
#include "test2.h"
#include <stdio.h>

void test2_func(char *str)
{
        printf("This is test2 : %s",str);
}
生成 test2.o 文件,需要 test2.c , test2.h
2、直接编写Makefile文件
[root@localhost MakefileExample]# vim Makefile
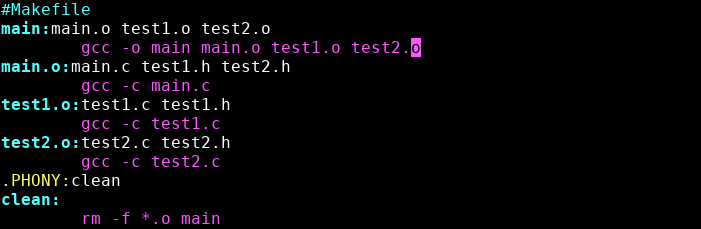
#Makefile
main:main.o test1.o test2.o
        gcc -o main main.o test1.o test2.o
main.o:main.c test1.h test2.h
        gcc -c main.c
test1.o:test1.c test1.h
        gcc -c test1.c
test2.o:test2.c test2.h
        gcc -c test2.c
.PHONY:clean
clean:
        rm -f *.o main
make 编译

清除生成的 .o 文件

3、运用变量编写Makefile文件
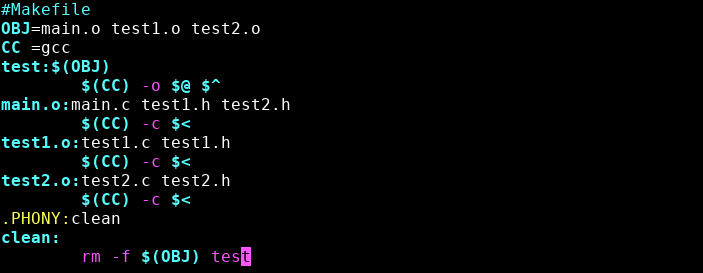
#Makefile
OBJ=main.o test1.o test2.o
CC =gcc
test:$(OBJ)
        $(CC) -o $@ $^
main.o:main.c test1.h test2.h
        $(CC) -c $<
test1.o:test1.c test1.h
        $(CC) -c $<
test2.o:test2.c test2.h
        $(CC) -c $<
.PHONY:clean
clean:
        rm -f $(OBJ) test
make编译

实例二
1、分析源文件代码依赖关系

hello.c
void showhello()  {
        hello();
}
生成 hello.o 文件需要依赖 hello.c , hello.h
hello.h
/*hello.h*/
#ifndef  HELLO_H
#define  HELLO_H


void hello()   {
        star1();
        printf("hello,my friends
");
}

#endif
hello.h 里面有 star() 函数的函数体
star.c
#include "starfun.h"
#include "hello.h"
#include <stdio.h>
int main() {
        star1();
        star2();
        showhello();
        return 0;
}
生成 star.o 文件,需要依赖 star.c , hello.h , starfun.h 文件
starfun.h
/*****starfun.h*****/
#ifndef STARFUN_H
#define STARFUN_H


#define  NUM 4
#define  NUMBER 3

int star1() {
        int i,j,k;
        for(k=1;k<=NUM;++k) {
                for(i=1;i<=(NUM-k);++i)
                        printf(" ");
                for(j=1;j<=(2*k-1);++j)
                        printf("*");
                printf("
");
        }
        return 0;
}
int star2() {
        int i,j,k;
        for(k=NUMBER;k>=0;--k)  {
                for(i=1;i<=(NUMBER-k+1);++i)
                        printf(" ");
                for(j=1;j<=(2*k-1);++j)
                        printf("*");
                printf("
");
        }
        return 0;
}

#endif
2、直接编写Makefile文件
[root@localhost test_2]# vim Makefile
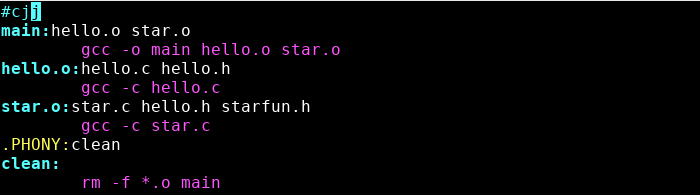
#cjj
main:hello.o star.o
        gcc -o main hello.o star.o
hello.o:hello.c hello.h
        gcc -c hello.c
star.o:star.c hello.h starfun.h
        gcc -c star.c
.PHONY:clean
clean:
        rm -f *.o main
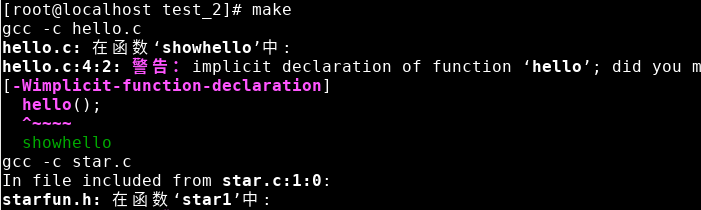
make 编译(会出现警告,不影响运行)
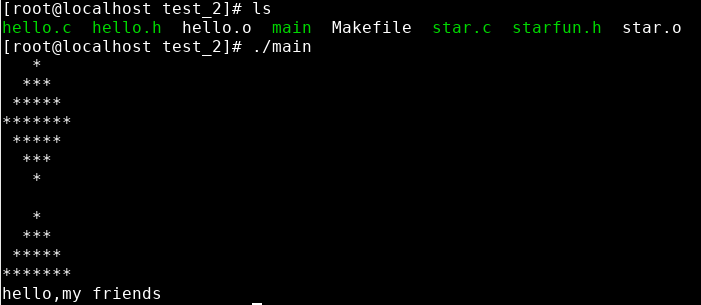
运行生成的文件
[root@localhost test_2]# ./main
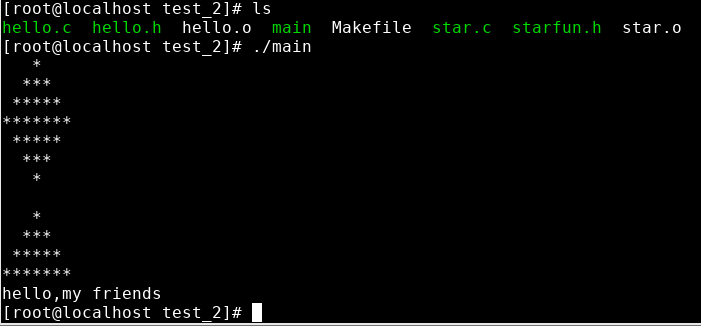
删除 .o 文件和 main 文件

3、运用变量编写Makefile文件
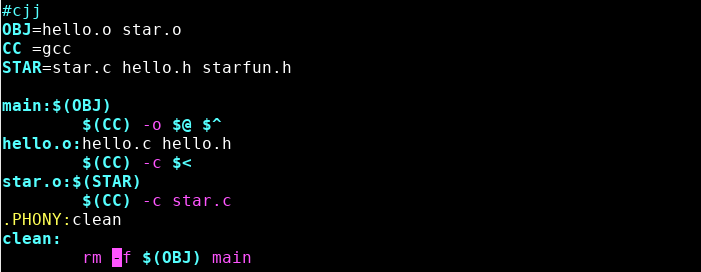
#cjj
OBJ=hello.o star.o
CC =gcc
STAR=star.c hello.h starfun.h

main:$(OBJ)
        $(CC) -o $@ $^
hello.o:hello.c hello.h
        $(CC) -c $<
star.o:$(STAR)
        $(CC) -c star.c
.PHONY:clean
clean:
        rm -f $(OBJ) main
编译并运行