最近一直在使用Vue.js开发项目,现将在学习过程中遇到的一些学习小细节总结如下:
1、只处理单次插值,今后的数据变化就不会再引起插值更新了
<span>This will never change: {{* msg }}</span>
2、为了输出真的 HTML 字符串,需要用三 Mustache 标签]
<div>{{{ raw_html }}}</div>
3、v-bind缩写
<!-- 完整语法 -->
<a v-bind:href="url"></a>
<!-- 缩写 -->
<a :href="url"></a>
<!-- 完整语法 -->
<button v-bind:disabled="someDynamicCondition">Button</button>
<!-- 缩写 -->
<button :disabled="someDynamicCondition">Button</button>
4、v-on缩写
<!-- 完整语法 -->
<a v-on:click="doSomething"></a>
<!-- 缩写 -->
<a @click="doSomething"></a>
5、v-if与v-show的区别
1、v-if 有更高的切换消耗

2、 v-show 有更高的初始渲染消耗
因此,如果需要频繁切换 v-show 较好,如果在运行时条件不大可能改变 v-if 较好。

3、v-show也是条件渲染指令,和v-if指令不同的是,使用v-show指令的元素始终会被渲染到HTML,它只是简单地为元素设置CSS的style属性。
6、v-bind:class
一、v-bind:class 数组语法
<!DOCTYPE html>
<html lang="en">
<head>
    <meta charset="UTF-8">
    <title>v-bind:class 数组语法</title>
    <meta name="viewport" content="width=device-width, initial-scale=1.0, maximum-scale=1.0, user-scalable=0">
    <meta name="apple-mobile-web-app-capable" content="yes">
    <meta name="apple-mobile-web-app-status-bar-style" content="black">
    <style>
        .red{
            color: red;
        }
        .blue{
            background: blue;
        }
    </style>
    <script src="vue.js"></script>
    <script>
        window.onload=function(){
            new Vue({
                el:'#box',
                data:{
                    red:'red',
                    blue:'blue'
                },
                methods:{
                }
            });
        };
    </script>
</head>
<body>
    <div id="box">
        <strong :class="[red,blue]">v-bind:class数组语法</strong>
    </div>
</body>
</html>
二、v-bind:class 对象语法
<!DOCTYPE html>
<html lang="en">
<head>
    <meta charset="UTF-8">
    <title>v-bind:class 对象语法</title>
    <meta name="viewport" content="width=device-width, initial-scale=1.0, maximum-scale=1.0, user-scalable=0">
    <meta name="apple-mobile-web-app-capable" content="yes">
    <meta name="apple-mobile-web-app-status-bar-style" content="black">
    <style>
        .red{
            color: red;
        }
        .blue{
            background: blue;
        }
    </style>
    <script src="vue.js"></script>
    <script>
        window.onload=function(){
            new Vue({
                el:'#box',
                data:{
                },
                methods:{
                }
            });
        };
    </script>
</head>
<body>
    <div id="box">
        <strong :class="{red:true,blue:true}">v-bind:class对象语法</strong>
    </div>
</body>
</html>
7、v-bind:style
一、v-bind:style 数组语法
<!DOCTYPE html>
<html lang="en">
<head>
    <meta charset="UTF-8">
    <title>v-bind:style 数组语法</title>
    <meta name="viewport" content="width=device-width, initial-scale=1.0, maximum-scale=1.0, user-scalable=0">
    <meta name="apple-mobile-web-app-capable" content="yes">
    <meta name="apple-mobile-web-app-status-bar-style" content="black">
    <style>
        .red{
            color: red;
        }
        .blue{
            background: blue;
        }
    </style>
    <script src="vue.js"></script>
    <script>
        window.onload=function(){
            new Vue({
                el:'#box',
                data:{
                    red:{color:'red'},
                    blue:{backgroundColor:'blue'}
                },
                methods:{
                }
            });
        };
    </script>
</head>
<body>
    <div id="box">
        <strong :style="[red,blue]">v-bind:style数组语法</strong>
    </div>
</body>
</html>
二、v-bind:style 对象语法
<!DOCTYPE html>
<html lang="en">
<head>
    <meta charset="UTF-8">
    <title>v-bind:style 对象语法</title>
    <meta name="viewport" content="width=device-width, initial-scale=1.0, maximum-scale=1.0, user-scalable=0">
    <meta name="apple-mobile-web-app-capable" content="yes">
    <meta name="apple-mobile-web-app-status-bar-style" content="black">
    <style>
        .red{
            color: red;
        }
        .blue{
            background: blue;
        }
    </style>
    <script src="vue.js"></script>
    <script>
        window.onload=function(){
            new Vue({
                el:'#box',
                data:{
                    a:{
                        color:'red',
                        backgroundColor:'gray'
                    }
                },
                methods:{
                }
            });
        };
    </script>
</head>
<body>
    <div id="box">
        <strong :style="a">v-bind:style 对象语法</strong>
    </div>
</body>
</html>
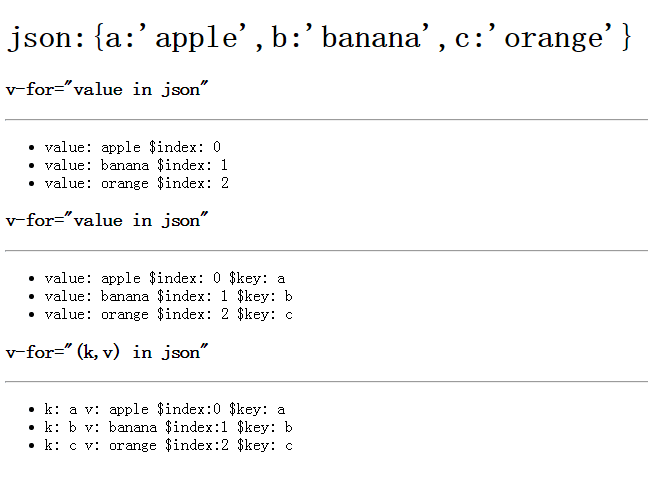
8、v-for 循环
<!DOCTYPE html>
<html lang="en">
<head>
    <meta charset="UTF-8">
    <title>v-for 循环</title>
    <meta name="viewport" content="width=device-width, initial-scale=1.0, maximum-scale=1.0, user-scalable=0">
    <meta name="apple-mobile-web-app-capable" content="yes">
    <meta name="apple-mobile-web-app-status-bar-style" content="black">
    <script src="vue.js"></script>
    <script>
        window.onload = function () {
            new Vue({
                el: '#box',
                data: {
                    json: {a: 'apple', b: 'banana', c: 'orange'}
                }
            });
        };
    </script>
</head>
<body>
<h1>json:{a:'apple',b:'banana',c:'orange'}</h1>
<div id="box">
    <h3> v-for="value in json"</h3>
    <hr>
    <ul>
        <li v-for="value in json">
            value: {{value}} $index: {{$index}}
        </li>
    </ul>
    <h3> v-for="value in json"</h3>
    <hr>
    <ul>
        <li v-for="value in json">
            value: {{value}} $index: {{$index}} $key: {{$key}}
        </li>
    </ul>
    <h3> v-for="(k,v) in json"</h3>
    <hr>
    <ul>
        <li v-for="(k,v) in json">
            k: {{k}} v: {{v}} $index:{{$index}} $key: {{$key}}
        </li>
    </ul>
</div>
</body>
</html>
9、vue基本雏形
            <div id="box">
                {{msg}}
            </div>

            var c=new Vue({
                el:'#box',    //选择器  class tagName
                data:{
                    msg:'welcome vue'
                }
            });
10、vue事件
    v-on:click/mouseover......

    简写的:
    @click=""        推荐

    事件对象:
        @click="show($event)"
    事件冒泡:
        阻止冒泡:
            a). ev.cancelBubble=true;
            b). @click.stop    推荐
    默认行为(默认事件):
        阻止默认行为:
            a). ev.preventDefault();
            b). @contextmenu.prevent    推荐
    键盘:
        @keydown    $event    ev.keyCode
        @keyup

        常用键:
            回车
                a). @keyup.13
                b). @keyup.enter
            上、下、左、右
                @keyup/keydown.left
                @keyup/keydown.right
                @keyup/keydown.up
                @keyup/keydown.down
11、vue属性
    v-bind:src=""
        width/height/title....

    简写:
    :src=""    推荐
    <img src="{{url}}" alt="">    效果能出来,但是会报一个404错误
    <img v-bind:src="url" alt="">    效果可以出来,不会发404请求
-----------------------------------------
class和style:

    :class=""    v-bind:class=""
    :style=""    v-bind:style=""
    :class="[red]"    red是数据
    :class="[red,b,c,d]"
    :class="{red:a, blue:false}"
    :class="json"
        data:{
            json:{red:a, blue:false}
        }
-----------------------------------------
    style:
    :style="[c]"
    :style="[c,d]"
        注意:  复合样式,采用驼峰命名法
    :style="json"
12、vue模板
    {{msg}}     数据更新模板变化

    {{*msg}}    数据只绑定一次

    {{{msg}}}  HTML转意输出
13、vue过滤器
   过滤模板数据

    系统提供一些过滤器:
    {{msg| filterA}}
    {{msg| filterA | filterB}}

    uppercase    eg:    {{'welcome'| uppercase}}
    lowercase
    capitalize
    currency    钱

    {{msg| filterA 参数}}

    debounce    配合事件,延迟执行

    数据配合使用过滤器:
        limitBy    限制几个
        limitBy 参数(取几个)
        limitBy 取几个  从哪开始
        filterBy    过滤数据
        filterBy ‘谁’
        orderBy    排序
        orderBy 谁 1/-1
            1  -> 正序
            2  -> 倒序

    自定义过滤器:  model ->过滤 -> view

        Vue.filter(name,function(input){

        });

    时间转化器
    过滤html标记
    双向过滤器:*


    Vue.filter('filterHtml',{
                read:function(input){ //model-view
                    return input.replace(/<[^<+]>/g,'');
                },
                write:function(val){ //view -> model
                    return val;
                }
    });
14、vue交互
 如果vue想做交互
 引入: vue-resouce
this.$http({
        url:地址
        data:给后台提交数据,
        method:'get'/post/jsonp
        jsonp:'cb' //cbName
    });

    get:
        获取一个普通文本数据:
        this.$http.get('aa.txt').then(function(res){
            alert(res.data);
        },function(res){
            alert(res.status);
        });

        给服务发送数据:√
        this.$http.get('get.php',{
            a:1,
            b:2
        }).then(function(res){
            alert(res.data);
        },function(res){
            alert(res.status);
        });

    post:
        this.$http.post('post.php',{
            a:1,
            b:20
        },{
            emulateJSON:true
        }).then(function(res){
            alert(res.data);
        },function(res){
            alert(res.status);
        });

    jsonp:
        https://sug.so.360.cn/suggest?callback=suggest_so&word=a

        https://sp0.baidu.com/5a1Fazu8AA54nxGko9WTAnF6hhy/su?wd=a&cb=jshow

        this.$http.jsonp('https://sp0.baidu.com/5a1Fazu8AA54nxGko9WTAnF6hhy/su',{
            wd:'a'
        },{
            jsonp:'cb'    //callback名字,默认名字就是"callback"
        }).then(function(res){
            alert(res.data.s);
        },function(res){
            alert(res.status);
        });
15、vue生命周期
	钩子函数:
	created	        ->   实例已经创建	√
	beforeCompile	->   编译之前
	compiled	->   编译之后
	ready		->   插入到文档中	√
	beforeDestroy	->   销毁之前
	destroyed	->   销毁之后
16、vue防止闪烁
      用户会看到花括号标记:
      v-cloak    防止闪烁, 比较大段落
17、vue计算属性的使用
    computed:{
        b:function(){    //默认调用get
            return 值
        }
    }

----------------------------------------------------------------------
    computed:{
        b:{
            get:
            set:
        }
    }

    * computed里面可以放置一些业务逻辑代码,一定记得return
18、vue实例简单方法
    vm.$el         ->  获取元素
    vm.$data       ->  获取data
    vm.$mount      ->  手动挂在vue程序
    vm.$options    ->  获取自定义属性
    vm.$destroy    ->  销毁对象
    vm.$log()      ->  查看现在数据的状态
19、vue循环
    v-for="value in data"
    会有重复数据?
    track-by='索引'    提高循环性能
    track-by='$index/uid'
20、vue自定义指令
   语法:
    Vue.directive(指令名称,function(参数){
        this.el    -> 原生DOM元素
    });
    <div v-red="参数"></div>
    指令名称:     v-red  ->  red

    * 注意: 必须以 v-开头

自定义元素指令:
    Vue.elementDirective('v-red',{
        bind:function(){
            this.el.style.background='red';
        }
    });
21、vue自定义键盘信息
    Vue.directive('on').keyCodes.ctrl=17;
    Vue.directive('on').keyCodes.myenter=13;
22、vue数据监听变化
    vm.$el/$mount/$options/....
    vm.$watch(name,fnCb);  //浅度
    vm.$watch(name,fnCb,{deep:true});  //深度监视
23、vue过渡(动画)
    本质走的css3: transtion ,animation
    <div id="div1" v-show="bSign" transition="fade"></div>
    动画:
        .fade-transition{
        }
        进入:
        .fade-enter{
            opacity: 0;
        }
        离开:
        .fade-leave{
            opacity: 0;
            transform: translateX(200px);
        }
24、Vue组件
组件: 一个大对象

定义一个组件:
1. 全局组件
var Aaa=Vue.extend({
    template:'<h3>我是标题3</h3>'
});
Vue.component('aaa',Aaa);
    *组件里面放数据:
        data必须是函数的形式,函数必须返回一个对象(json)

2. 局部组件
    放到某个组件内部
var vm=new Vue({
    el:'#box',
    data:{
        bSign:true
    },
    components:{ //局部组件
        aaa:Aaa
    }
});
------------------------------------
另一种编写方式:
    Vue.component('my-aaa',{
        template:'<strong>好</strong>'
    });

    var vm=new Vue({
        el:'#box',
        components:{
            'my-aaa':{
                template:'<h2>标题2</h2>'
            }
        }
    });
-----------------------------------
配合模板:
    1. template:'<h2 @click="change">标题2->{{msg}}</h2>'

    2. 单独放到某个地方
        a). <script type="x-template" id="aaa">
            <h2 @click="change">标题2->{{msg}}</h2>
        </script>
        b). <template id="aaa">
            <h1>标题1</h1>
            <ul>
                <li v-for="val in arr">
                    {{val}}
                </li>
            </ul>
        </template>
-----------------------------------
动态组件:
    <component :is="组件名称"></component>
--------------------------------------------
vue-devtools    ->  调试工具
    https://chrome.google.com/webstore/detail/vuejs-devtools/nhdogjmejiglipccpnnnanhbledajbpd
--------------------------------------------
vue默认情况下,子组件也没法访问父组件数据
组件数据传递:    √
1. 子组件就想获取父组件data
    在调用子组件:
        <bbb :m="数据"></bbb>

    子组件之内:
        props:['m','myMsg']
        props:{
            'm':String,
            'myMsg':Number
        }
2. 父级获取子级数据
    *子组件把自己的数据,发送到父级
    vm.$emit(事件名,数据);
    v-on: @
--------------------------------------------
    vm.$dispatch(事件名,数据)     子级向父级发送数据
    vm.$broadcast(事件名,数据)    父级向子级广播数据
    配合: event:{}
    在vue2.0里面已经,报废了
25、Vue slot
    位置、槽口
    作用: 占个位置
    类似ng里面 transclude  (指令)
26、Vue路由
 如果vue想做路由
 引入: vue-router
html:
    <a v-link="{path:'/home'}">主页</a>    跳转链接

    展示内容:
    <router-view></router-view>
js:
    //1. 准备一个根组件
    var App=Vue.extend();

    //2. Home News组件都准备
    var Home=Vue.extend({
        template:'<h3>我是主页</h3>'
    });

    var News=Vue.extend({
        template:'<h3>我是新闻</h3>'
    });

    //3. 准备路由
    var router=new VueRouter();

    //4. 关联
    router.map({
        'home':{
            component:Home
        },
        'news':{
            component:News
        }
    });

    //5. 启动路由
    router.start(App,'#box');

跳转:
    router.redirect({
        ‘/’:'/home'
    });
--------------------------------------
路由嵌套(多层路由):

    主页    home
            登录    home/login
            注册    home/reg
    新闻页   news

    subRoutes:{
        'login':{
            component:{
                template:'<strong>我是登录信息</strong>'
            }
        },
        'reg':{
            component:{
                template:'<strong>我是注册信息</strong>'
            }
        }
    }
路由其他信息:
    /detail/:id/age/:age
    {{$route.params | json}}    ->  当前参数
    {{$route.path}}             ->  当前路径
    {{$route.query | json}}     ->  数据
27、Vue加载器
 如果vue加载vue文件
 引入:vue-loader
vue-loader:
    其他loader ->  css-loader、url-loader、html-loader.....
    后台: nodeJs    ->  require  exports
    broserify  模块加载,只能加载js
    webpack   模块加载器, 一切东西都是模块, 最后打包到一块了
    require('style.css');    ->   css-loader、style-loader
    vue-loader基于webpack
28、.Vue文件
        放置的是vue组件代码
        <template>
            html
        </template>

        <style>
            css
        </style>

        <script>
            js    (平时代码、ES6)    babel-loader
        </script>
29、Vue项目简单的目录结构
	|-index.html
	|-main.js	入口文件
	|-App.vue	vue文件,官方推荐命名法
	|-package.json	工程文件(项目依赖、名称、配置)
		npm init --yes 生成
	|-webpack.config.js	webpack配置文件
30、Vue中ES6模块化开发
    导出模块:
        export default {}
    引入模块:
        import 模块名 from 地址
31、Vue脚手架
vue-cli——vue脚手架
     帮你提供好基本项目结构

本身集成很多项目模板:
    simple     个人觉得一点用都没有
    webpack    可以使用(大型项目)
               Eslint 检查代码规范,
               单元测试
    webpack-simple    个人推荐使用, 没有代码检查    √

基本使用流程:
1. npm install vue-cli -g    安装 vue命令环境
    验证安装ok?
        vue --version
2. 生成项目模板
    vue init <模板名> 本地文件夹名称
3. 进入到生成目录里面
    cd xxx
    npm install
4. npm run dev