1. sysbench 介绍
sysbench是一个模块化的、跨平台、多线程基准测试工具,主要用于评估测试各种不同系统参数 下的数据库负载情况。
它主要包括以下几种方式的测试:
- cpu性能
- 磁盘io性能
- 调度程序性能
- 内存分配及传输速度
- POSIX线程性能
- 数据库性能(OLTP基准测试)
目前sysbench主要支持MySQL,Pgsql和Oracle这3种数据库。
2、开始测试
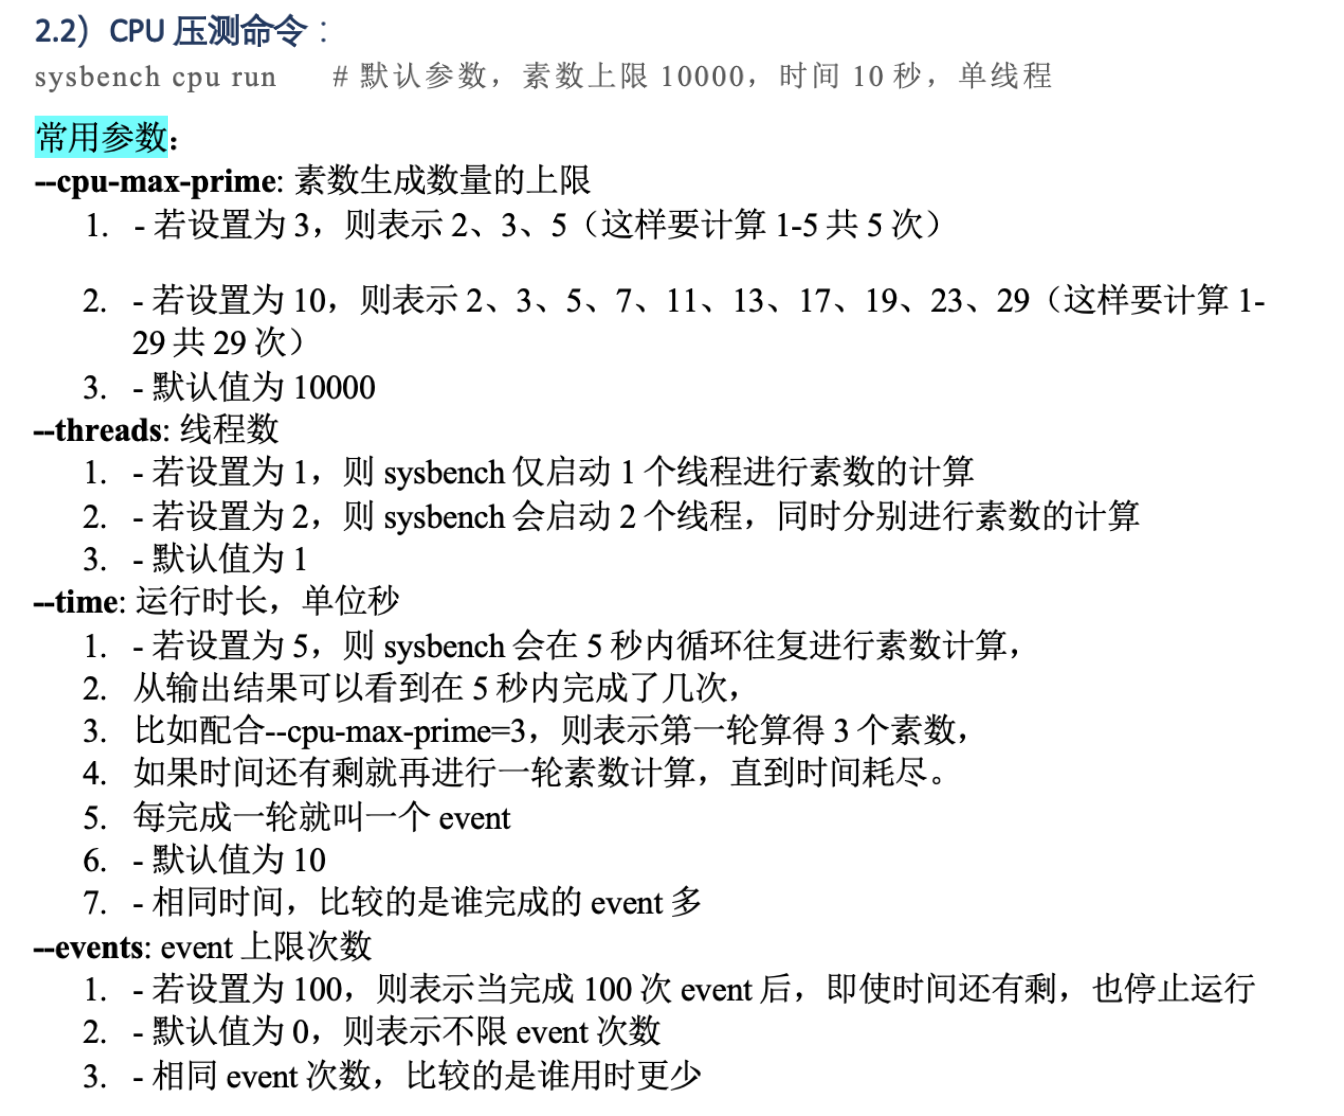
2.1 CPU性能测试
根据官网的介绍可知:CPU测试使用64位整数,测试计算素数直到某个最大值所需要的时间。
sysbench --test=cpu --cpu-max-prime=20000 run
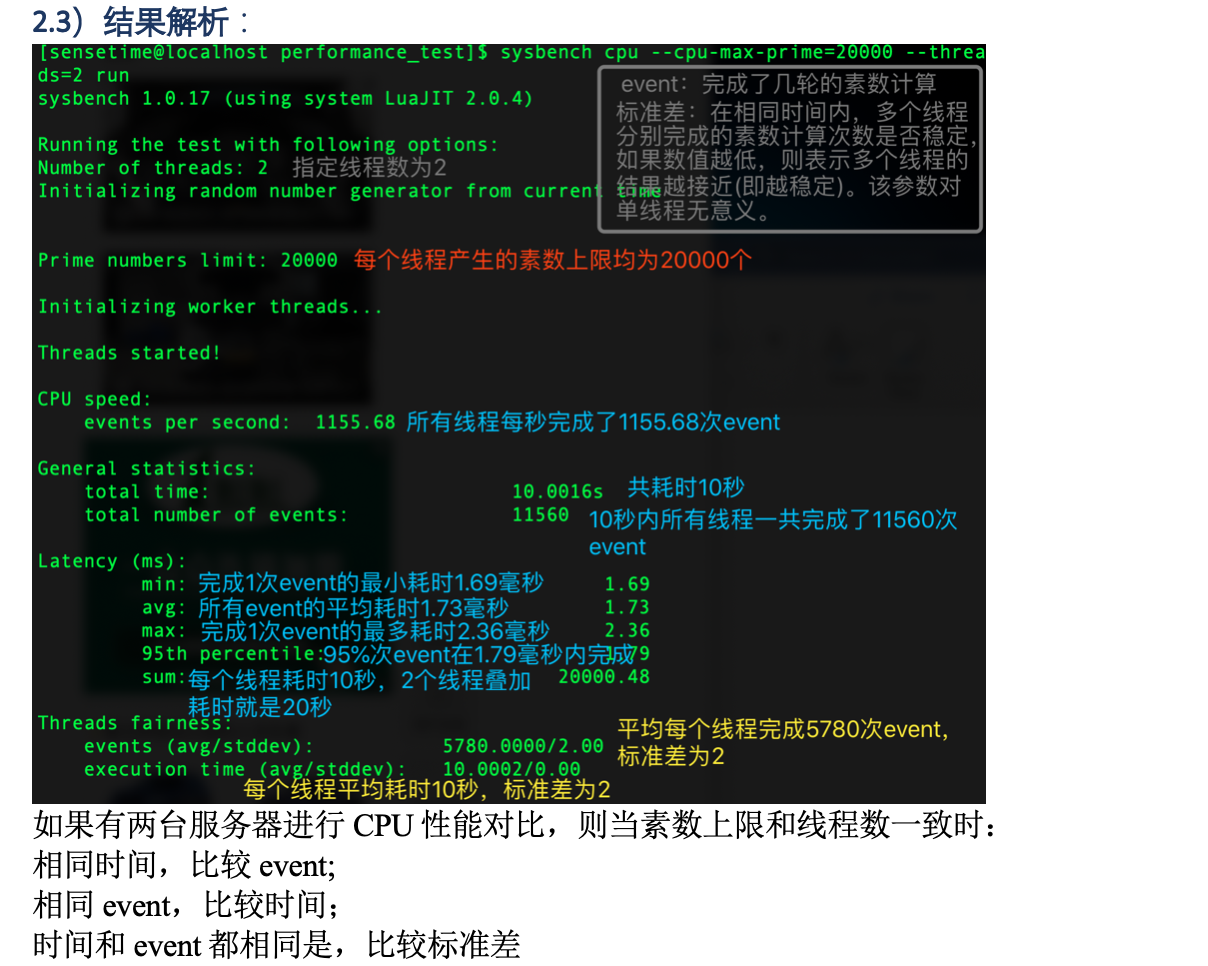
输出如下:
Maximum prime number checked in CPU test: 200000


Test execution summary:
    total time:                          286.5703s
    total number of events:              10000
    total time taken by event execution: 285197.4463
    per-request statistics:
         min:                                109.67ms
         avg:                              28519.74ms
         max:                              36760.02ms
         approx.  95 percentile:           31751.56ms

Threads fairness:
    events (avg/stddev):           9.7656/0.81
    execution time (avg/stddev):   278.5131/6.05
我们只需要关心测试的总时间(total time)即可。
CPU性能测试有一个需要注意的地方,上面的测试只使用了一个线程,如果在两个cpu processor不同的电脑上做比较,这是不公平的。公平的做法是指定合理的线程数,如下所示:
sysbench --test=cpu --num-threads=`grep "processor" /proc/cpuinfo | wc -l` --cpu-max-prime=200000 run
补充知识:
查看CPU核数的方法:
1、查看物理cpu个数
grep "physical id" /proc/cpuinfo | sort -u | wc -l
2、查看核心数量
grep "core id" /proc/cpuinfo | sort -u | wc -l
3、查看线程数量
grep "processor" /proc/cpuinfo | sort -u | wc -l
在sysbench的测试中,--num-threads取值为"线程数量"即可,再大的值没有什么意义,对测试结果也没有什么影响。
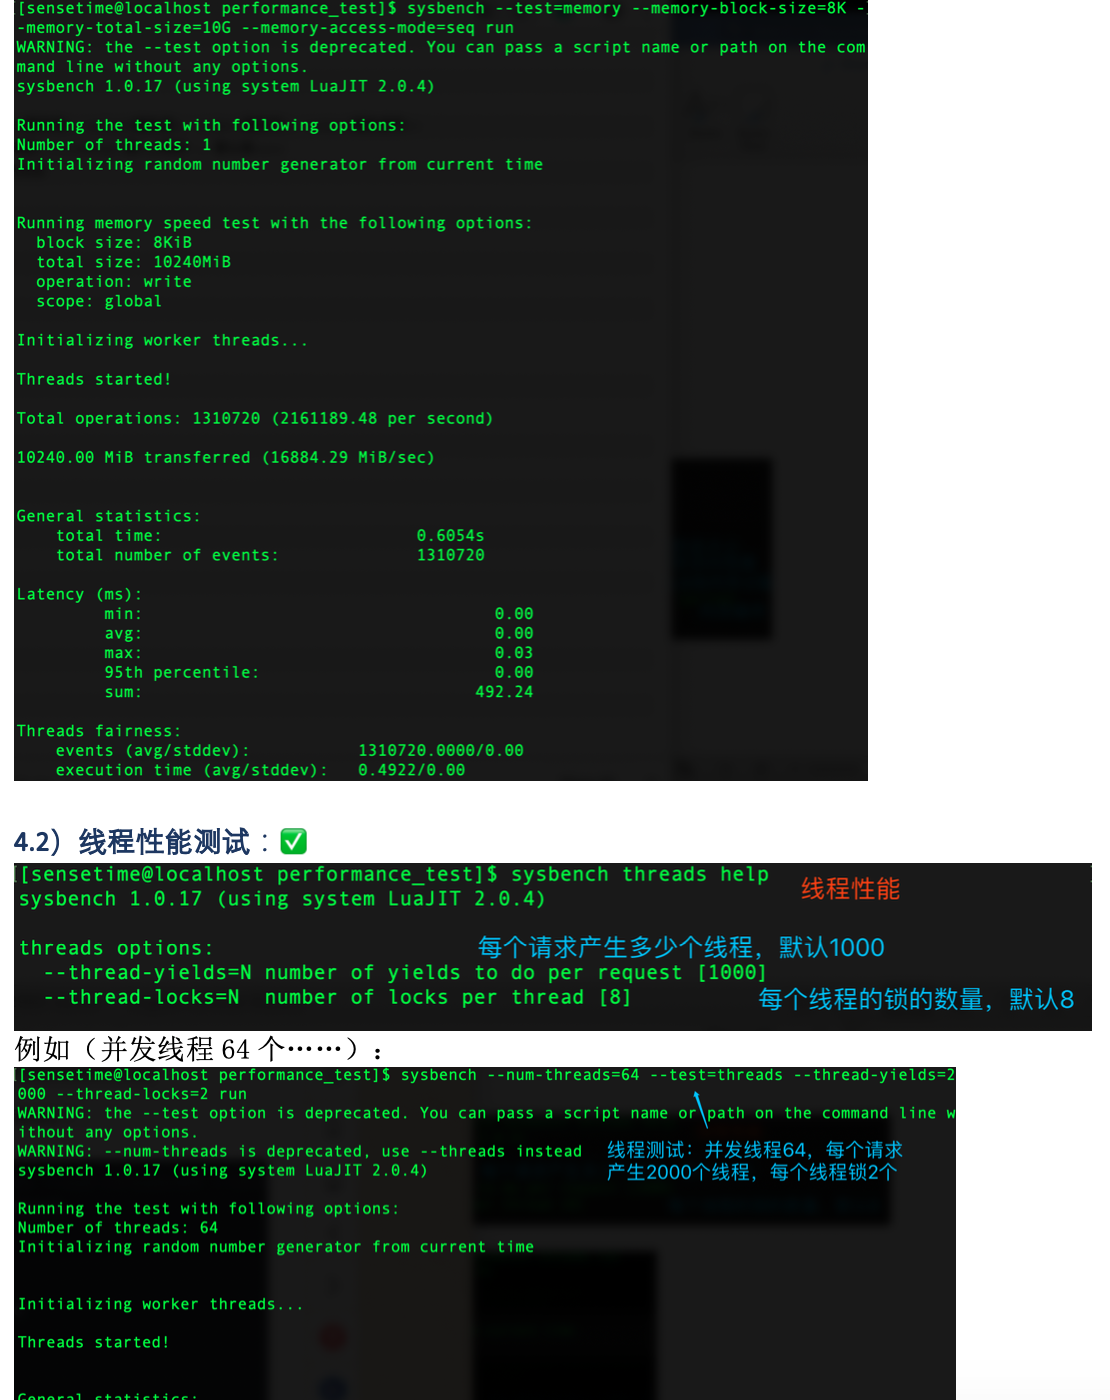
2.2 线程(thread)测试
测试线程调度器的性能。对于高负载情况下测试线程调度器的行为非常有用。
sysbench --test=threads --num-threads=64 run
下面是输出结果:
Number of threads: 64

Doing thread subsystem performance test
Thread yields per test: 1000 Locks used: 8
Threads started!
Done.


Test execution summary:
    total time:                          4.5845s
    total number of events:              10000
    total time taken by event execution: 291.9995
    per-request statistics:
         min:                                  0.76ms
         avg:                                 29.20ms
         max:                                152.71ms
         approx.  95 percentile:              71.11ms

Threads fairness:
    events (avg/stddev):           156.2500/5.81
    execution time (avg/stddev):   4.5625/0.02
说实话,我也不怎么会分析这个测试结果,网上搜了半天也没有搜到,几乎所有的资料都是简单的罗列出测试结果, 也不告诉我们应该怎么分析,实在是太不照顾新手了。 我自己是通过(total time:)判断线程调度的性能的,下面是我在服务器上运行这个测试的输出:
Number of threads: 64

Doing thread subsystem performance test
Thread yields per test: 1000 Locks used: 8
Threads started!
Done.


Test execution summary:
    total time:                          2.4829s
    total number of events:              10000
    total time taken by event execution: 157.3468
    per-request statistics:
         min:                                  0.21ms
         avg:                                 15.73ms
         max:                                166.69ms
         approx.  95 percentile:             119.14ms

Threads fairness:
    events (avg/stddev):           156.2500/22.25
    execution time (avg/stddev):   2.4585/0.02
可以看到total time 比在我自己电脑上少了一半,服务器的线程调度肯定比普通电脑快多了。
2.3 互斥锁(mutex)
测试互斥锁的性能,方式是模拟所有线程在同一时刻并发运行,并都短暂请求互斥锁。
sysbench --test=mutex --num-threads=16 --mutex-num=2048 --mutex-locks=1000000 --mutex-loops=5000 run
输出结果如下:
Number of threads: 16

Doing mutex performance test
Threads started!
Done.


Test execution summary:
    total time:                          3.6123s
    total number of events:              16
    total time taken by event execution: 57.6636
    per-request statistics:
         min:                               3580.79ms
         avg:                               3603.98ms
         max:                               3610.94ms
         approx.  95 percentile:         10000000.00ms

Threads fairness:
    events (avg/stddev):           1.0000/0.00
    execution time (avg/stddev):   3.6040/0.01
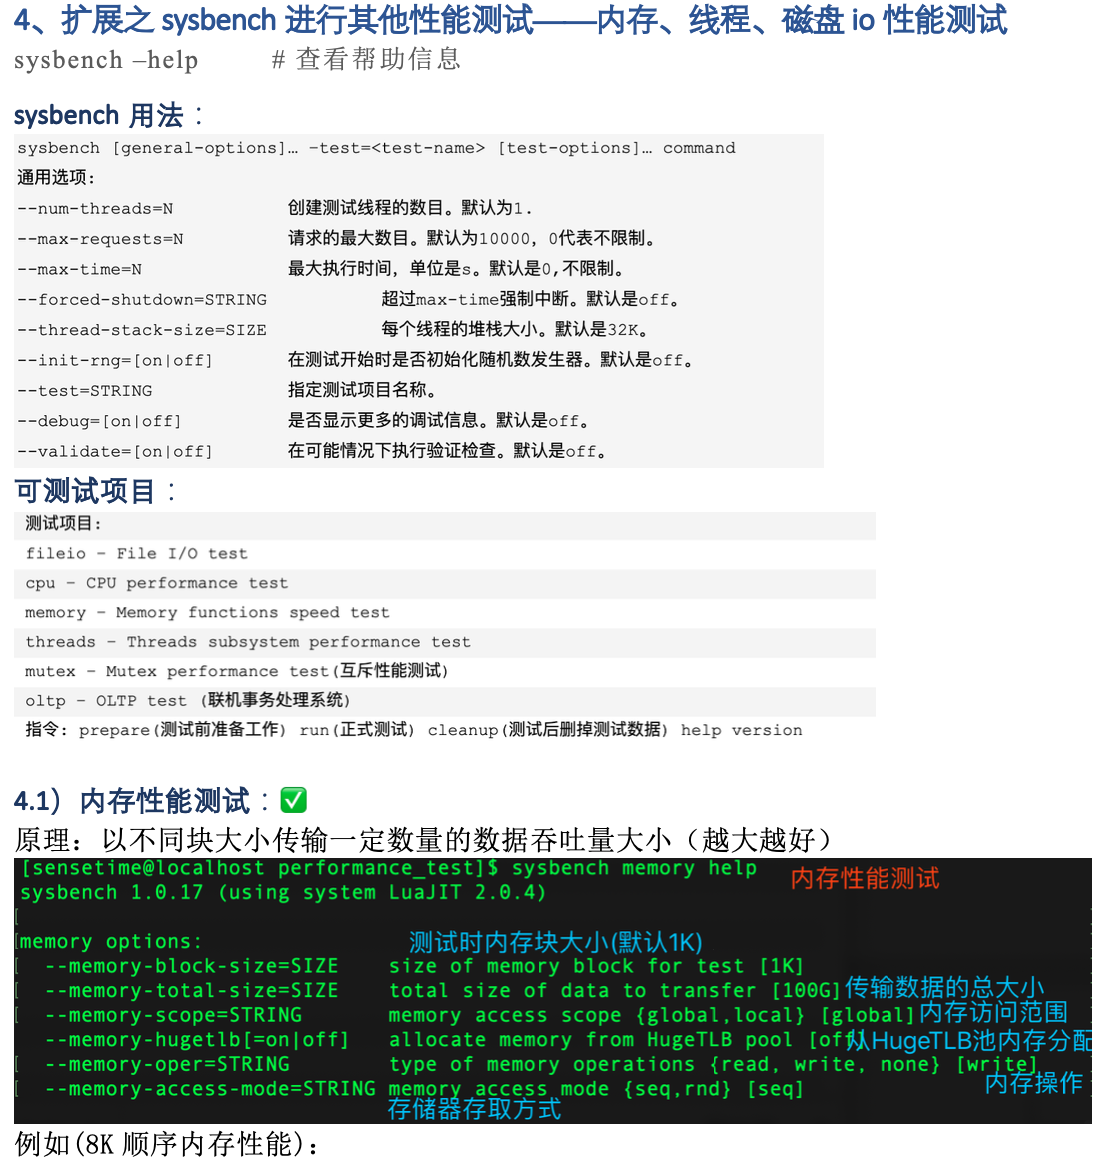
2.4 内存测试
内存测试测试了内存的连续读写性能。
sysbench --test=memory --memory-block-size=8K --memory-total-size=2G --num-threads=16 run
上面这条语句指定了整个测试过程中,传输2G的数据量,每个block的大小为8K(大写的K)。 测试结果如下所示,我们最关心的是吞吐量(8030.45MB/sec),和后面的磁盘io 测试结果比较可知,内存的连续读写比磁盘的连续读写快十几倍。
Number of threads: 16

Doing memory operations speed test
Memory block size: 8K

Memory transfer size: 2048M

Memory operations type: write
Memory scope type: global
Threads started!
Done.

Operations performed: 262144 (1027897.89 ops/sec)

2048.00 MB transferred (8030.45 MB/sec)


Test execution summary:
    total time:                          0.2550s
    total number of events:              262144
    total time taken by event execution: 3.1911
    per-request statistics:
         min:                                  0.00ms
         avg:                                  0.01ms
         max:                                 29.55ms
         approx.  95 percentile:               0.00ms

Threads fairness:
    events (avg/stddev):           16384.0000/926.14
    execution time (avg/stddev):   0.1994/0.02
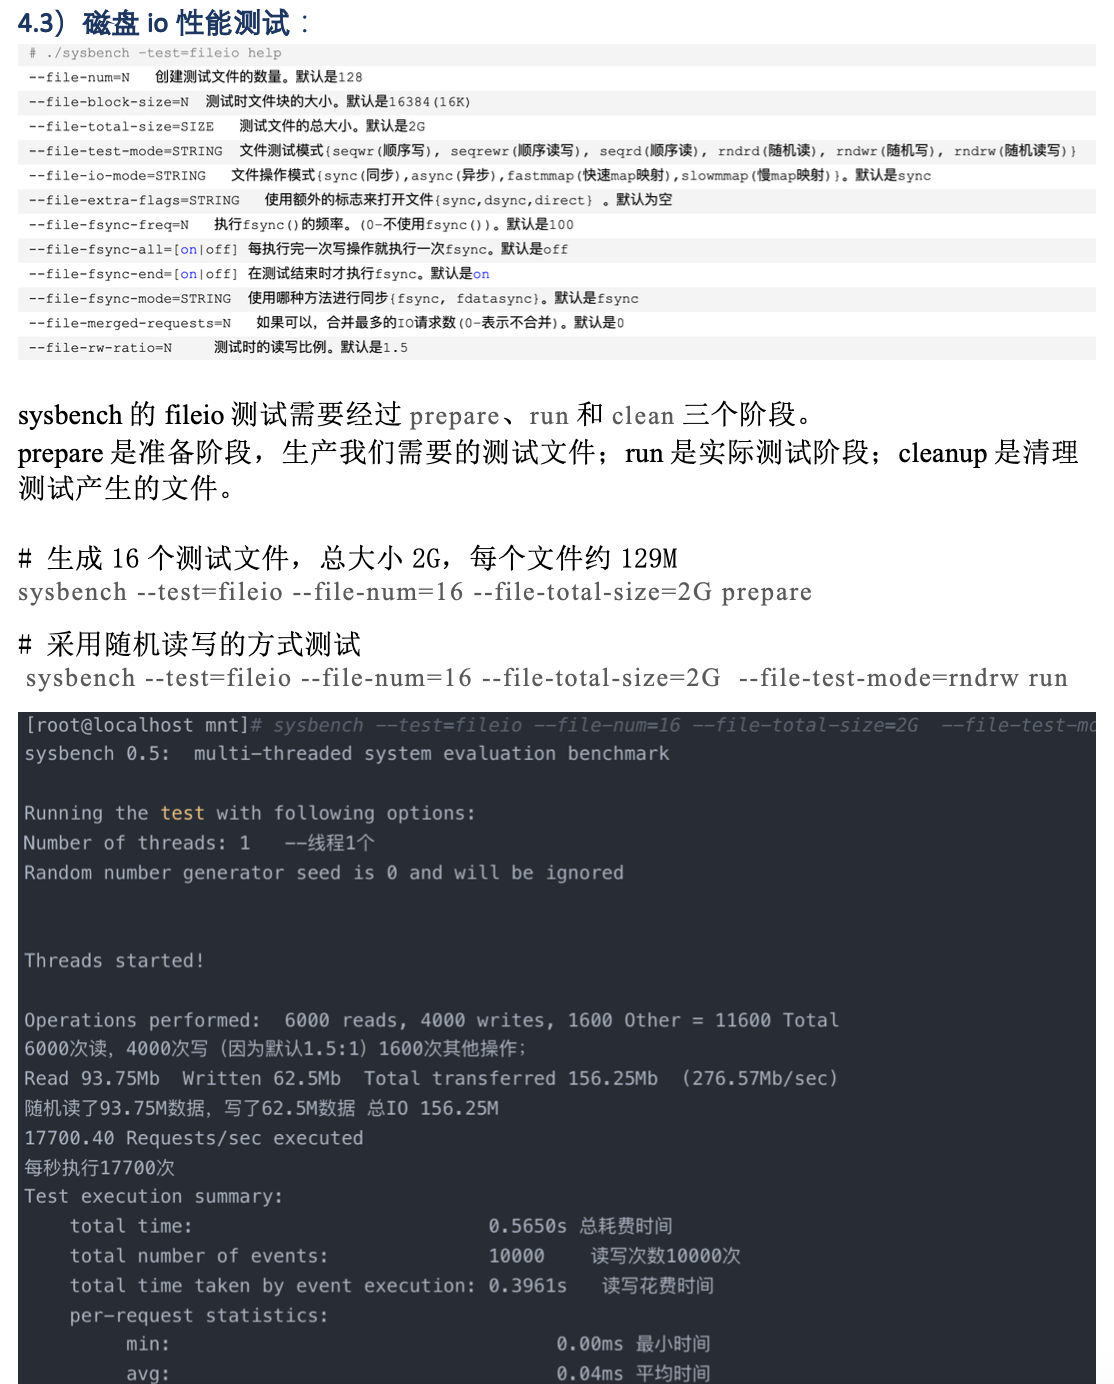
2.5 文件IO基准测试
文件IO(fileio)基准测试可以测试系统在不同IO负载下的性能。这对于比较不同的硬盘驱动器,不同的RAID 卡,不同的RAID 模式,都很有帮助。可以根据测试结果调整IO子系统。文件IO基准测试模拟了很多InnoDB 的IO特性。
测试的第一步是准备(Prepare)阶段,生成测试用到的数据文件,生成的数据文件至少要比内存大。 如果文件中的数据能完全放入内存中,则操作系统 缓存大部分的数据,导致测试结果无法体现IO密集型的工作负载。首先通过下面的命令创建一个数据集:
sysbench --test=fileio --file-total-size=40G prepare
这个命令会在当前工作目录下创建测试文件,后续的运行(run)阶段将通过读写这些文件进行测试。 第二步就是运行(run)阶段,针对不同的IO 类型有不同的测试选项:
- seqwr 顺序写入
- seqrewr 顺序重写
- seqrd 顺序读取
- rndrd 随机读取
- rndwr 随机写入
- rndrw 混合随机读/写
下面的命令运行文件I/O混合随机读/写基准测试:
sysbench --test=fileio --file-total-size=40G --file-test-mode=rndrw --init-rng=on --max-time=300 --max-requests=0 run
结果如下:
Extra file open flags: 0
128 files, 240Mb each
30Gb total file size
Block size 16Kb
Number of random requests for random IO: 0
Read/Write ratio for combined random IO test: 1.50
Periodic FSYNC enabled, calling fsync() each 100 requests.
Calling fsync() at the end of test, Enabled.
Using synchronous I/O mode
Doing random r/w test
Threads started!
Time limit exceeded, exiting...
Done.

Operations performed:  15900 Read, 10600 Write, 33842 Other = 60342 Total
Read 248.44Mb  Written 165.62Mb  Total transferred 414.06Mb  (1.3802Mb/sec)
   88.33 Requests/sec executed

Test execution summary:
    total time:                          300.0074s
    total number of events:              26500
    total time taken by event execution: 164.1563
    per-request statistics:
         min:                                  0.01ms
         avg:                                  6.19ms
         max:                                315.51ms
         approx.  95 percentile:              15.83ms

Threads fairness:
    events (avg/stddev):           26500.0000/0.00
    execution time (avg/stddev):   164.1563/0.00
输出结果中包含了大量的信息。和IO子系统密切相关的包括每秒请求数和总吞吐量。在上述例子中, 每秒请求数是88.33 Requests/sec , 吞吐量是1.3802Mb/sec 。另外,时间信息也非常有用, 尤其是大约95%的时间分布。这些数据对于评估磁盘性能十分有用。
测试完成以后,运行清除(cleanup)操作删除第一步生成的测试文件。
sysbench --test=fileio --fil-total-size=30G cleanup
2.6 oltp
下面来看最重要也是最复杂的测试————oltp。oltp 基准测试模拟了一个简单的事物处理系统的工作负载。 下面的例子使用的是一张超过百万行记录的表,第一步是先生成这张表:
sysbench --test=oltp --oltp-table-size=1000000 --mysql-db=test --mysql-user=root prepare
生成数据只需要上面这条简单的命令即可。这条命令在test 数据库中新建了一个表(sbtest),并在表中插入了1000000条记录。
对于非默认安装的mysql,需要指定连接到msyql服务器的socket(my.cnf中的socket值),如下所示:
sysbench --test=oltp --oltp-table-size=1000000 --mysql-user=root
--mysql-db=test --mysql-socket=/data/ntse/lmx/sysbench/var/mysqld.sock
prepare
数据加载完成以后就可以开始测试了,这个例子采用了16个线程,测试时长为720秒:
sysbench --test=oltp --oltp-table-size=1000000 --mysql-db=test
                --mysql-user=root --max-time=720 --max-requests=0
                --num-threads=16 --oltp-test-mode=complex run
与插入记录时一样,如果mysql是非默认安装,还需要指定--mysql-socket的值。
Number of threads: 16

Doing OLTP test.
Running mixed OLTP test
Using Special distribution (12 iterations,  1 pct of values are returned in 75 pct cases)
Using "BEGIN" for starting transactions
Using auto_inc on the id column
Threads started!
Time limit exceeded, exiting...
(last message repeated 15 times)
Done.

OLTP test statistics:
    queries performed:
        read:                            26225724
        write:                           9366330
        other:                           3746532
        total:                           39338586
    transactions:                        1873266 (2601.71 per sec.)
    deadlocks:                           0      (0.00 per sec.)
    read/write requests:                 35592054 (49432.47 per sec.)
    other operations:                    3746532 (5203.42 per sec.)

Test execution summary:
    total time:                          720.0136s
    total number of events:              1873266
    total time taken by event execution: 11506.8251
    per-request statistics:
         min:                                  2.37ms
         avg:                                  6.14ms
         max:                                400.48ms
         approx.  95 percentile:              14.90ms

Threads fairness:
    events (avg/stddev):           117079.1250/275.62
    execution time (avg/stddev):   719.1766/0.01
如上所示,结果中包含了相当多的信息。其中最有价值的信息如下;
- 总的事务数
- 每秒事务数
- 时间统计信息(最小,平均,最大响应时间,以及95%百分比响应时间)
- 线程公平性统计信息
最最重要的当然是每秒事务数(2601.71 per sec.)。
oltp 测试注意事项:
1、--max-requests --max-requests 默认值为10000 ,如果设置了--max-requests 或者使用默认值 ,分析结果的时候主要查看运行时间(total time),一般情况下,都将--max-requests 赋值为0 ,即不限制请求数量,通过--max-time 来指定测试时长,然后查看系统的每秒事务数。
2、--oltp-test-mode
--oltp-test-mode用以指定测试模式,取值有(simeple,complex,nontrx),默认是complex。不同模式会执行不同的语句。 具体执行语句如下所示:
1)Simple 这种模式只是简单的执行selec语句。
SELECT c FROM sbtest WHERE id=N
2)complex(Advanced transactional) 在事务中,可能包含下列语句。
Point queries:
SELECT c FROM sbtest WHERE id=N
Range queries:
SELECT c FROM sbtest WHERE id BETWEEN N AND M
Range SUM() queries:
SELECT SUM(K) FROM sbtest WHERE id BETWEEN N and M
Range ORDER BY queries:
SELECT c FROM sbtest WHERE id between N and M ORDER BY c
Range DISTINCT queries:
SELECT DISTINCT c FROM sbtest WHERE id BETWEEN N and M ORDER BY c
UPDATEs on index column:
UPDATE sbtest SET k=k+1 WHERE id=N
UPDATEs on non-index column:
UPDATE sbtest SET c=N WHERE id=M
DELETE queries:
DELETE FROM sbtest WHERE id=N
INSERT queries:
INSERT INTO sbtest VALUES (...)
3)nontrx(Non-transactional) 这种模式包含下列SQL语句。
Point queries:
SELECT pad FROM sbtest WHERE id=N
UPDATEs on index column:
UPDATE sbtest SET k=k+1 WHERE id=N
UPDATEs on non-index column:
UPDATE sbtest SET c=N WHERE id=M
DELETE queries:
DELETE FROM sbtest WHERE id=N
INSERT queries:
NSERT INTO sbtest (k, c, pad) VALUES(N, M, S)
3、simple 与 --oltp-read-only 的区别
simple模式和在complex模式下开启read-only选项都只包含select语句。但是 simple 模式只包含最简单的select语句,相反地,complex 模式中,如果我们开启read-only 选项,即--oltp-read-only=on,则会包含复杂的SQL语句。如:
SELECT SUM(K) FROM sbtest WHERE id BETWEEN N and M
SELECT DISTINCT c FROM sbtest WHERE id BETWEEN N and M ORDER BY c
4、测试自有的存储引擎
测试自有的存储引擎需要告诉sysbench,这个存储引擎是否支持事务。
如下所示:
1)准备:
sysbench --test=oltp --mysql-table-engine=tnt --mysql-engine-trx=yes
                  --oltp-table-size=100000 --mysql-user=root --mysql-db=test
                  --mysql-socket=/data/ntse/lmx/sysbench/var/mysqld.sock
                  prepare
2)测试:
sysbench --test=oltp --mysql-table-engine=tnt --mysql-engine-trx=yes
                  --oltp-table-size=100000 --mysql-user=root --mysql-db=test
                  --mysql-socket=/data/ntse/lmx/sysbench/var/mysqld.sock
                  --oltp-test-mode=complex --num-threads=16 --max-time=720
                  --max-requests=0 run
3)清除:
sysbench --test=oltp --mysql-table-engine=tnt --mysql-engine-trx=yes
                  --oltp-table-size=100000 --mysql-user=root --mysql-db=test
                  --mysql-socket=/data/ntse/lmx/sysbench/var/mysqld.sock
                  clean
3. sysbench 0.5
1)下载:
bzr branch lp:sysbench
2)安装依赖库:
sudo apt-get install libtool
3)安装:
tar -zxvf sysbench.tar.gz
 cd sysbench
 ./autogen.sh
 ./configure
 make
 #make install #可选
4)开始测试:
cd sysbench/sysbench
 ./sysbench --test=./tests/db/oltp.lua
 --debug=yes
 --mysql-host=localhost
 --mysql-socket=PATH/mysqld.sock
 --mysql-db=test
 --mysql-table-engine=innodb
 --mysql-engine-trx=yes
 --mysql-user=root
 --max-requests=0
 --max-time=60
 --num-threads=16
 --oltp-table-size=100000
 --report-interval=10 [prepare|run|cleanup]
5)解释:
--debug 参数用以打印更加详细的调试信息
--report-interval 用以打印中间结果
除了测试oltp,sysbench 0.5还可以进行插入操作的性能测试(insert.lua),选择操作的性能测试(select.lua)等。
6)sysbench原生命令输出:
Missing required command argument.
Usage:
  sysbench [general-options]... --test=<test-name> [test-options]... command

General options:
  --num-threads=N             number of threads to use [1]
  --max-requests=N            limit for total number of requests [10000]
  --max-time=N                limit for total execution time in seconds [0]
  --forced-shutdown=STRING    amount of time to wait after --max-time before forcing shutdown [off]
  --thread-stack-size=SIZE    size of stack per thread [64K]
  --tx-rate=N                 target transaction rate (tps) [0]
  --report-interval=N         periodically report intermediate statistics with a specified interval in seconds. 0 disables intermediate reports [0]
  --report-checkpoints=[LIST,...]dump full statistics and reset all counters at specified points in time. The argument is a list of comma-separated values representing the amount of time in seconds elapsed from start of test when report checkpoint(s) must be performed. Report checkpoints are off by default. []
  --test=STRING               test to run
  --debug=[on|off]            print more debugging info [off]
  --validate=[on|off]         perform validation checks where possible [off]
  --help=[on|off]             print help and exit
  --version=[on|off]          print version and exit [off]
  --rand-init=[on|off]        initialize random number generator [off]
  --rand-type=STRING          random numbers distribution {uniform,gaussian,special,pareto} [special]
  --rand-spec-iter=N          number of iterations used for numbers generation [12]
  --rand-spec-pct=N           percentage of values to be treated as 'special' (for special distribution) [1]
  --rand-spec-res=N           percentage of 'special' values to use (for special distribution) [75]
  --rand-seed=N               seed for random number generator, ignored when 0 [0]
  --rand-pareto-h=N           parameter h for pareto distibution [0.2]

Log options:
  --verbosity=N      verbosity level {5 - debug, 0 - only critical messages} [3]

  --percentile=N      percentile rank of query response times to count [95]

Compiled-in tests:
  fileio - File I/O test
  cpu - CPU performance test
  memory - Memory functions speed test
  threads - Threads subsystem performance test
  mutex - Mutex performance test

Commands: prepare run cleanup help version

See 'sysbench --test=<name> help' for a list of options for each test.
4、输出结果详解:
1)CPU
2)内存Memory
3)磁盘io
