安装环境:
jdk1.7
apache-activemq-5.11.1-bin.tar.gz
VM虚拟机redhat6.5-x64:192.168.1.200
Xshell4
部署方案:
| 主机IP | 集群通信端口 | 消息端口 | 控制台端口 | 节点目录 |
| 192.168.1.200 | 62621 | 51511 | 8161 | /usr/local/activemq-cluster/node1/ |
| 192.168.1.200 | 62622 | 51512 | 8162 | /usr/local/activemq-cluster/node2/ |
| 192.168.1.200 | 62623 | 51513 | 8163 | /usr/local/activemq-cluster/node3/ |
安装步骤:
第一步:解压压缩包到三个节点目录
[root@200 activemq-cluster]# tar -zxvf apache-activemq-5.11.1-bin.tar.gz -C /usr/local/activemq-cluster/
...

[root@200 activemq-cluster]# ll
总用量 12
drwxr-xr-x. 10 root root 4096 2月  14 2015 node1
drwxr-xr-x. 10 root root 4096 2月  14 2015 node2
drwxr-xr-x. 10 root root 4096 2月  14 2015 node3
第二步:配置activemq
配置一:修改控制台端口(8161、8162、8163),配置文件 /usr/local/activemq-cluster/node1/conf/jetty.xml
vim /usr/local/activemq-cluster/node1/conf/jetty.xml
 <bean id="jettyPort" class="org.apache.activemq.web.WebConsolePort" init-method="start">
             <!-- the default port number for the web console -->
        <property name="host" value="0.0.0.0"/>
        <property name="port" value="8161"/>
    </bean>
配置二:集群配置文件修改:在mq安装路径下的conf/activemq.xml进行修改其中的持久化适配器,修改其中的bind、zkAddress、hostname、zkPath。
然后也需要修改mq的brokerName,并且每个节点名称都必须相同。
vim /usr/local/activemq-cluster/node1/conf/activemq.xml
<!--brokerName 三个节点都一样--> <broker xmlns="http://activemq.apache.org/schema/core" brokerName="activemq-cluster" dataDirectory="${activemq.data}">
...
<!--持久化使用google levelDB--> <persistenceAdapter> <!--kahaDB directory="${activemq.data}/kahadb"/ --> <replicatedLevelDB directory="${activemq.data}/leveldb" replicas="3" bind="tcp://0.0.0.0:62621" zkAddress="192.168.1.200:2181,192.168.1.201:2181,192.168.1.202:2181" hostname="200" zkPath="/activemq/leveldb-stores"/> </persistenceAdapter>
...
<!--修改java程序连接消息端口51511、51512、51513--> <transportConnector name="openwire" uri="tcp://0.0.0.0:51511?maximumConnections=1000&wireFormat.maxFrameSize=104857600"/>
第三步:启动集群
第一步:启动zookeeper集群,命令:zkServer.sh start
第二步:启动mq集群:顺序启动mq:命令如下:
/usr/local/activemq-cluster/node1/bin/activemq start(关闭stop)
/usr/local/activemq-cluster/node2/bin/activemq start(关闭stop)
/usr/local/activemq-cluster/node3/bin/activemq start(关闭stop)
第三步:查看日志信息:
tail -f /usr/local/activemq-cluster/node1/data/activemq.log
tail -f /usr/local/activemq-cluster/node2/data/activemq.log
tail -f /usr/local/activemq-cluster/node3/data/activemq.log
如果不报错,我们的集群启动成功,可以使用控制台查看!
第四步:监控器群
方式一:myeclipse插件

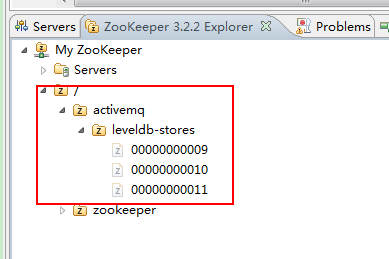

方式二:ZooInspector 连接任意一个节点即可 刷新


第五步:测试集群
package mq.cluster;

import javax.jms.Connection;
import javax.jms.ConnectionFactory;
import javax.jms.DeliveryMode;
import javax.jms.Destination;
import javax.jms.MessageProducer;
import javax.jms.Session;
import javax.jms.TextMessage;

import org.apache.activemq.ActiveMQConnectionFactory;

public class Sender {

    public static void main(String[] args) {
        try {
            //第一步:建立ConnectionFactory工厂对象,需要填入用户名、密码、以及要连接的地址,均使用默认即可,默认端口为"tcp://localhost:61616"
            ConnectionFactory connectionFactory = new ActiveMQConnectionFactory(
                    ActiveMQConnectionFactory.DEFAULT_USER,
                    ActiveMQConnectionFactory.DEFAULT_PASSWORD,
                    "failover:(tcp://192.168.1.200:51511,tcp://192.168.1.200:51512,tcp://192.168.1.200:51513)?Randomize=false");

            //第二步:通过ConnectionFactory工厂对象我们创建一个Connection连接,并且调用Connection的start方法开启连接,Connection默认是关闭的。
            Connection connection = connectionFactory.createConnection();
            connection.start();

            //第三步:通过Connection对象创建Session会话(上下文环境对象),用于接收消息,参数配置1为是否启用是事务,参数配置2为签收模式,一般我们设置自动签收。
            Session session = connection.createSession(Boolean.FALSE, Session.AUTO_ACKNOWLEDGE);

            //第四步:通过Session创建Destination对象,指的是一个客户端用来指定生产消息目标和消费消息来源的对象,在PTP模式中,Destination被称作Queue即队列;在Pub/Sub模式,Destination被称作Topic即主题。在程序中可以使用多个Queue和Topic。
            Destination destination = session.createQueue("first");

            //第五步:我们需要通过Session对象创建消息的发送和接收对象(生产者和消费者)MessageProducer/MessageConsumer。
            MessageProducer producer = session.createProducer(null);

            //第六步:我们可以使用MessageProducer的setDeliveryMode方法为其设置持久化特性和非持久化特性(DeliveryMode),我们稍后详细介绍。
            //producer.setDeliveryMode(DeliveryMode.NON_PERSISTENT);

            //第七步:最后我们使用JMS规范的TextMessage形式创建数据(通过Session对象),并用MessageProducer的send方法发送数据。同理客户端使用receive方法进行接收数据。最后不要忘记关闭Connection连接。

            for(int i = 0 ; i < 500000 ; i ++){
                TextMessage msg = session.createTextMessage("我是消息内容" + i);
                // 第一个参数目标地址
                // 第二个参数 具体的数据信息
                // 第三个参数 传送数据的模式
                // 第四个参数 优先级
                // 第五个参数 消息的过期时间
                producer.send(destination, msg, DeliveryMode.NON_PERSISTENT, 0 , 1000L);
                System.out.println("发送消息:" + msg.getText());
                Thread.sleep(1000);

            }

            if(connection != null){
                connection.close();
            }
        } catch (Exception e) {
            e.printStackTrace();
        }

    }
}
package mq.cluster;

import javax.jms.Connection;
import javax.jms.ConnectionFactory;
import javax.jms.Destination;
import javax.jms.MapMessage;
import javax.jms.Message;
import javax.jms.MessageConsumer;
import javax.jms.Session;
import javax.jms.TextMessage;

import org.apache.activemq.ActiveMQConnectionFactory;

public class Receiver {

    public static void main(String[] args)  {
        try {
            //第一步:建立ConnectionFactory工厂对象,需要填入用户名、密码、以及要连接的地址,均使用默认即可,默认端口为"tcp://localhost:61616"
            ConnectionFactory connectionFactory = new ActiveMQConnectionFactory(
                    ActiveMQConnectionFactory.DEFAULT_USER,
                    ActiveMQConnectionFactory.DEFAULT_PASSWORD,
                    "failover:(tcp://192.168.1.200:51511,tcp://192.168.1.200:51512,tcp://192.168.1.200:51513)?Randomize=false");

            //第二步:通过ConnectionFactory工厂对象我们创建一个Connection连接,并且调用Connection的start方法开启连接,Connection默认是关闭的。
            Connection connection = connectionFactory.createConnection();
            connection.start();

            //第三步:通过Connection对象创建Session会话(上下文环境对象),用于接收消息,参数配置1为是否启用是事务,参数配置2为签收模式,一般我们设置自动签收。
            Session session = connection.createSession(Boolean.FALSE, Session.AUTO_ACKNOWLEDGE);

            //第四步:通过Session创建Destination对象,指的是一个客户端用来指定生产消息目标和消费消息来源的对象,在PTP模式中,Destination被称作Queue即队列;在Pub/Sub模式,Destination被称作Topic即主题。在程序中可以使用多个Queue和Topic。
            Destination destination = session.createQueue("first");
            //第五步:通过Session创建MessageConsumer
            MessageConsumer consumer = session.createConsumer(destination);

            while(true){
                TextMessage msg = (TextMessage)consumer.receive();
                if(msg == null) break;
                System.out.println("收到的内容:" + msg.getText());
            }
        } catch (Exception e) {
            e.printStackTrace();
        }


    }
}