Harbor简介
在说harbor之前,我们首先说一说直接使用docker registry的一些缺陷:
- 缺少认证机制,任何人都可以随意拉取及上传镜像,安全性缺失
- 缺乏镜像清理机制,镜像可以push却不能删除,日积月累,占用空间会越来越大
- 缺乏相应的扩展机制
鉴于以上缺点,我们通常在生产环境中,不会直接使用docker registry来实现提供镜像服务。而Harbor正好解决了上述所有的问题。
Harbor是一个用于存储和分发Docker镜像的企业级Registry服务器,通过添加一些企业必需的功能特性,例如安全、标识和管理等,扩展了开源Docker Distribution。作为一个企业级私有Registry服务器,Harbor提供了更好的性能和安全。提升用户使用Registry构建和运行环境传输镜像的效率。Harbor支持安装在多个Registry节点的镜像资源复制,镜像全部保存在私有Registry中,确保数据和知识产权在公司内部网络中管控。另外,Harbor也提供了高级的安全特性,诸如用户管理,访问控制和活动审计等。
Harbor官方网站:http://vmware.github.io/harbor/
Harbor源码地址:https://github.com/vmware/harbor
harbor的二进制包同时提供online和offline版本,我们这里直接使用online版本。
配置
架构图
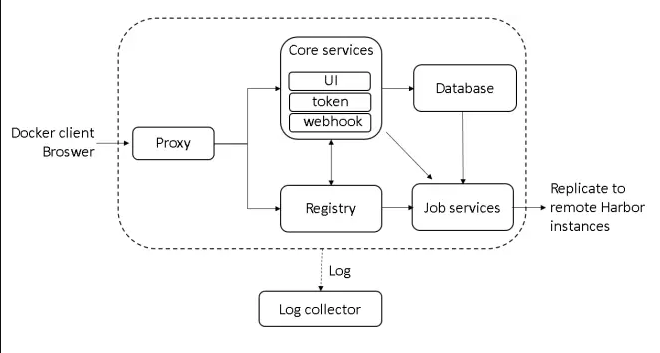
如上图所示,harbor由6大模块级成:
- Proxy: Harbor的registry、UI、token services等组件,都处在一个反向代理后边。该代理将来自浏览器、docker clients的请求转发到后端服务上。
- Registry: 负责存储Docker镜像,以及处理Docker push/pull请求。因为Harbor强制要求对镜像的访问做权限控制, 在每一次push/pull请求时,Registry会强制要求客户端从token service那里获得一个有效的token。
- Core services: Harbor的核心功能,主要包括如下3个服务:
- UI: 作为Registry Webhook, 以图像用户界面的方式辅助用户管理镜像。1) WebHook是在registry中配置的一种机制, 当registry中镜像发生改变时,就可以通知到Harbor的webhook endpoint。Harbor使用webhook来更新日志、初始化同步job等。 2) Token service会根据该用户在一个工程中的角色,为每一次的push/pull请求分配对应的token。假如相应的请求并没有包含token的话,registry会将该请求重定向到token service。 3) Database 用于存放工程元数据、用户数据、角色数据、同步策略以及镜像元数据。
- Job services: 主要用于镜像复制,本地镜像可以被同步到远程Harbor实例上。
- Log collector: 负责收集其他模块的日志到一个地方
组件说明
需要说明的是,harbor的每个组件都是以Docker容器的形式构建的,可以使用Docker Compose来进行部署,当然,如果你的环境中使用了kubernetes,harbor也提供了kubernetes的配置文件。
harbor共有8个容器组成:
- ui:harbor的核心服务。
- log:运行着rsyslog的容器,进行日志收集。
- mysql:由官方mysql镜像构成的数据库容器
- nginx:使用Nginx做反向代理
- registry:官方的Docker registry
- adminserver:harbor的配置数据管理器
- jobservice:Harbor的任务管理服务。
- redis:用于存储session
下面我们所有的配置都以harbor 1.5.2版本作配置说明。
harbor可以支持http和https,建议使用https,https证书最好是受信任的ca颁发的证书,这样,在配置docker的时候,就不需要添加"insecure-registries"配置项。我们这里就直接使用自签名证书。
生成证书:
openssl genrsa -des3 -out server.key 1024
openssl rsa -in server.key -out server.key    #去除server.key的加密口令
openssl req -new -key server.key -out server.csr
openssl x509 -req -days 365 -in server.csr -signkey server.key -out server.crt
将证书放入/data/certs/目录下:
cp server.crt server.key /data/certs
harbor.cfg配置文件示例
harbor的核心配置文件是harbor.cfg,路径在源码目录下的make目录下,示例配置如下:
_version = 1.5.0

# harbor的访问地址
hostname = hub.dz11.com

# 使用https协议
ui_url_protocol = https

# harbor的数据库密码
db_password = xxxxx

max_job_workers = 50
customize_crt = on

# 证书相关路径
ssl_cert = /data/certs/dz11.com.crt
ssl_cert_key = /data/certs/dz11.com.key
secretkey_path = /data

admiral_url = NA

# 定义日志滚动
log_rotate_count = 50
log_rotate_size = 200M

http_proxy =
https_proxy =
no_proxy = 127.0.0.1,localhost,ui

# email相关配置
email_identity =
email_server = smtp.163.com
email_server_port = 25
email_username = yan_ruo_gu@163.com
email_password = yan_ruo_gu0711
email_from = admin <yan_ruo_gu@163.com>
email_ssl = false

# 登录harbor的管理员密码
harbor_admin_password = xxxxxx

# harbor的验证方式,支持db_auth和ldap_auth,这里使用的是ldap_auth,如果使用db_auth的话,直接将auth_mode修改为db_auth即可,ldap的配置不再需要。
auth_mode = ldap_auth
ldap_url = ldap://10.1.1.1:389
ldap_searchdn = CN=jenkins,OU=LDAP,OU=Dev-wh.xxx.com,DC=dev-wh,DC=xxx,DC=com
ldap_search_pwd = xxxx
ldap_basedn = OU=Dev-wh.xxx.com,DC=dev-wh,DC=xxx,DC=com
ldap_filter = (objectClass=person)
ldap_uid = 0
ldap_scope = 2
ldap_timeout = 5

self_registration = on
token_expiration = 30
project_creation_restriction = everyone
verify_remote_cert = on

# 数据库相关配置,默认如果不需要使用自建的数据库,这些配置就都不需要
db_host = mysql
db_password = root123
db_port = 3306
db_user = root
redis_url = redis:6379
clair_db_host = postgres
clair_db_password = password
clair_db_port = 5432
clair_db_username = postgres
clair_db = postgres
uaa_endpoint = uaa.mydomain.org
uaa_clientid = id
uaa_clientsecret = secret
uaa_verify_cert = true
uaa_ca_cert = /path/to/ca.pem
registry_storage_provider_name = filesystem
registry_storage_provider_config =
部署harbor
harbor支持docker-compose和kubernetes的部署方式,默认采用docker-compose作单机部署。
先执行./prepare,然后执行./install.sh进行启动。执行./install.sh的时候,即调用了docker-compose运行了当前目录下的docker-compose.yml文件。
在执行.prepare的时候抛出如下异常:
root@ubuntu:~/harbor# ./prepare
Generated and saved secret to file: /data/secretkey
Generated configuration file: ./common/config/nginx/nginx.conf
Generated configuration file: ./common/config/adminserver/env
Generated configuration file: ./common/config/ui/env
Generated configuration file: ./common/config/registry/config.yml
Generated configuration file: ./common/config/db/env
Generated configuration file: ./common/config/jobservice/env
Generated configuration file: ./common/config/jobservice/config.yml
Generated configuration file: ./common/config/log/logrotate.conf
Generated configuration file: ./common/config/jobservice/config.yml
Generated configuration file: ./common/config/ui/app.conf
Fail to generate key file: ./common/config/ui/private_key.pem, cert file: ./common/config/registry/root.crt
需要修改prepare文件,将第498行:
empty_subj = "/C=/ST=/L=/O=/CN=/"
修改如下:
empty_subj = "/C=US/ST=California/L=Palo Alto/O=VMware, Inc./OU=Harbor/CN=notarysigner"
在实际启动过程中,出现过registry启动失败的情况,/var/log/harbor/registry.log输出如下:
May 30 21:06:00 172.18.0.1 registry[3218]: panic: unable to configure authorization (token): unable to open token auth root certificate bundle file "/etc/registry/root.crt": open /etc/registry/root.crt: permission denied
May 30 21:06:00 172.18.0.1 registry[3218]:
May 30 21:06:00 172.18.0.1 registry[3218]: goroutine 1 [running]:
May 30 21:06:00 172.18.0.1 registry[3218]: panic(0xb4cd40, 0xc4203ae160)
May 30 21:06:00 172.18.0.1 registry[3218]: #011/usr/local/go/src/runtime/panic.go:500 +0x1a1
May 30 21:06:00 172.18.0.1 registry[3218]: github.com/docker/distribution/registry/handlers.NewApp(0x1067820, 0xc4203a8630, 0xc4202df180, 0x1067820)
May 30 21:06:00 172.18.0.1 registry[3218]: #011/go/src/github.com/docker/distribution/registry/handlers/app.go:302 +0x1b6a
May 30 21:06:00 172.18.0.1 registry[3218]: github.com/docker/distribution/registry.NewRegistry(0x7fcfa30dd198, 0xc4203a8630, 0xc4202df180, 0xe, 0x0, 0x0)
May 30 21:06:00 172.18.0.1 registry[3218]: #011/go/src/github.com/docker/distribution/registry/registry.go:86 +0x213
May 30 21:06:00 172.18.0.1 registry[3218]: github.com/docker/distribution/registry.glob..func1(0x108f1a0, 0xc42036d240, 0x1, 0x1)
May 30 21:06:00 172.18.0.1 registry[3218]: #011/go/src/github.com/docker/distribution/registry/registry.go:55 +0x106
May 30 21:06:00 172.18.0.1 registry[3218]: github.com/docker/distribution/vendor/github.com/spf13/cobra.(*Command).execute(0x108f1a0, 0xc42036d1f0, 0x1, 0x1, 0x108f1a0, 0xc42036d1f0)
May 30 21:06:00 172.18.0.1 registry[3218]: #011/go/src/github.com/docker/distribution/vendor/github.com/spf13/cobra/command.go:495 +0x190
May 30 21:06:00 172.18.0.1 registry[3218]: github.com/docker/distribution/vendor/github.com/spf13/cobra.(*Command).Execute(0x108f340, 0xc4201d7f40, 0xc4200001a0)
May 30 21:06:00 172.18.0.1 registry[3218]: #011/go/src/github.com/docker/distribution/vendor/github.com/spf13/cobra/command.go:560 +0x3c3
May 30 21:06:00 172.18.0.1 registry[3218]: main.main()
May 30 21:06:00 172.18.0.1 registry[3218]: #011/go/src/github.com/docker/distribution/cmd/registry/main.go:24 +0x2d
这是因为registry容器没有/etc/registry/root.crt的访问权限导致。这个文件默认是挂载的./common/config/registry/root.crt这个文件,所以我们需要对这个文件作授权。
通过观察可知,harbor的容器启动用户非root身份,而是以一个uid和gid都为10000的用户。所以只需要为该用户授权即可:
chown 10000.10000 ./common/config/registry/root.crt
正常启动之后,配置完成。
可以通过如下方式访问: https://hub.dz11.com
注意事项
需要说明的是,harbor支持http和https,但如果使用http的话,在拉取镜像的时候,会抛出仓库不受信任的异常。需要在所有的docker客户端的docker配置文件/etc/docker/daemon.json中添加如下配置:
{
    "insecure-registries": ["https://hub.dz11.com"],
}
如果使用自签名的https证书,仍然会提示证书不受信任的问题。需要将自签名的ca证书发送到所有的docker客户端的指定目录。
关于使用自签名证书配置harbor的具体过程可以参考:https://github.com/WingkaiHo/docker-calico/blob/master/harbor/README.md