CSharpGL(13)用GLSL实现点光源(point light)和平行光源(directional light)的漫反射(diffuse reflection)
2016-08-13
由于CSharpGL一直在更新,现在这个教程已经不适用最新的代码了。CSharpGL源码中包含10多个独立的Demo,更适合入门参考。
为了尽可能提升渲染效率,CSharpGL是面向Shader的,因此稍有难度。

光源
如何用GLSL实现点光源和平行光源等各类光源的效果?这个问题我查找资料、思考了很久,今天终于解决了一部分。
漫反射(diffuse reflection)是粗糙表面的反射效果。理论上的粗糙表面,对各个方向的反射效果都完全相同。本篇就分别实现点光源(point light)和平行光源(directional light)照射到粗糙表面时产生的漫反射效果。
下载
这个示例是CSharpGL的一部分,CSharpGL已在GitHub开源,欢迎对OpenGL有兴趣的同学加入(https://github.com/bitzhuwei/CSharpGL)
点光源(point light)
讲GLSL当然要从shader开始说起。
Vertex shader
 1 #version 150 core
 2
 3 in vec3 in_Position;
 4 in vec3 in_Normal;
 5 out vec4 pass_Position;
 6 out vec4 pass_Color;
 7 uniform mat4 modelMatrix;
 8 uniform mat4 viewMatrix;
 9 uniform mat4 projectionMatrix;
10 uniform vec3 lightPosition;
11 uniform vec3 lightColor;
12 uniform vec3 globalAmbient;
13 uniform float Kd;
14
15 void main(void)
16 {
17     gl_Position = projectionMatrix * viewMatrix * modelMatrix * vec4(in_Position, 1.0f);
18     vec3 worldPos = (viewMatrix * modelMatrix * vec4(in_Position, 1.0f)).xyz;
19     vec3 N = (transpose(inverse(viewMatrix * modelMatrix)) * vec4(in_Normal, 1.0f)).xyz;
20     N = normalize(N);
21     // light's direction
22     vec3 L = (viewMatrix * vec4(lightPosition, 1.0f)).xyz - worldPos;// point light
23     L = normalize(L);
24     // diffuse color from directional light
25     vec3 diffuseColor = Kd * lightColor * max(dot(N, L), 0);
26     // ambient color
27     vec3 ambientColor = Kd * globalAmbient;
28     pass_Color.xyz = diffuseColor + ambientColor;
29     pass_Color.w = 1;
30 }
首先, gl_Position 的计算是不用解释了。
要计算漫反射下的点光源照射物体的效果,需要知道物体的顶点的法线(normal)、顶点位置到光源的方向(light direction),两者夹角越小,那么光照越强。 max(dot(N, L), 0) 就是在计算光照强度。
为了避免全黑,我们加个环境光(ambient light)。环境光,就是那些综合起来的光照因素,不好准确计算,就简单地用一个 vec3 globalAmbient; 来描述了。
重要知识点
MVP的含义(projection * view * model)
那三个矩阵变换里,每个都有各自的意义。其中,modelMatrix是在物体坐标系旋转缩放平移模型。就好比父母在家里打扮自己的宝宝。ViewMatrix是把物体放到世界坐标系下,让摄像机为原点(0,0,0),来观察模型。就好比把各家各户的宝宝放到幼儿园拍合影。ProjectionMatrix就是宝宝们的合影照片。
所以, (viewMatrix * modelMatrix * vec4(in_Position, 1.0f)).xyz 就是物体的顶点在世界坐标系的位置。也就是在场景中的位置。(不是在3dmax里的位置)
法线(normal)
但是,不能以此类推世界坐标系里的法线(normal)。法线从3dmax中的值变换到场景中后,它的值应该是 (transpose(inverse(viewMatrix * modelMatrix)) * vec4(in_Normal, 1.0f)).xyz (就是要求逆然后转置),而不是 (viewMatrix * modelMatrix * vec4(in_Normal, 1.0f)).xyz 。具体原因可参考这里(http://blog.csdn.net/racehorse/article/details/6664775)。或者

Normals are funny.  They're vec3's, since you don't want perspective on normals.   And they don't actually scale quite right--a 45 degree surface with a 45 degree normal, scaled by glScalef(1,0.1,1), drops the surface down to near 0 degrees, but actually tilts the normal *up*, in the opposite direction from the surface, to near 90 degrees.

Mathematically, if between two points a and b on the surface, dot(n,b-a)==0, then after applying a matrix M to the points, you want the normal to still be perpendicular.  The question is, what matrix N do you have to apply to the normal to make this happen?  In other words, find N such that
    dot( N * n , M * a - M * b) == 0

We can solve this by noting that dot product can be expresed as matrix multiplication--dot(x,y) = transpose(x) * y, where we treat an ordinary column-vector as a little matrix, and flip it horizontally.  So
   transpose(N * n) * (M*a - M*b) == 0         (as above, but write using transpose and matrix multiplication)
   transpose(N * n) * M * (a-b) == 0              (collect both copies of M)
   transpose(n) * transpose(N) * M * (a-b) == 0    (transpose-of-product is product-of-transposes in opposite order)

OK.  This is really similar to our assumption that the original normal was perpendicular to the surface--that dot(n,b-a) == transpose(n) * (a-b) == 0.  In fact, the only difference is the new matrices wedged in the middle.  If we pick N to make the term in the middle the identity, then our new normal will be perpendicular to the surface too:
    transpose(N) * M == I   (the identity matrix)
This is the definition for matrix inverses, so the "normal matrix" N = transpose(inverse(M)).

If you look up the GLSL definition for "gl_NormalMatrix", it's defined as "the transpose of the inverse of the gl_ModelViewMatrix".  Now you know why!
光源的位置
由于模型受到viewMatrix的影响,所以摄像机的改变也会改变模型的顶点位置,而点光源的位置如果不变,就会出现不同的光照结果。这不合实际。所以点光源也要按viewMatrix做变换。
Fragment shader
极其简单。
1 #version 150 core
2
3 in vec4 pass_Color;
4 out vec4 out_Color;
5
6 void main(void)
7 {
8     out_Color = pass_Color;
9 }
平行光源(directional light)
评选光源与之类似。至于为何在计算平行光源的方向时要用 (transpose(inverse(viewMatrix * modelMatrix)) * vec4(in_Normal, 1.0f)).xyz 这种复杂的步骤,原理在上文的法线(normal)中科院找到。(提示:都是为了让摄像机对模型和对光源方向产生同样的变换,从而使得摄像机的移动不会改变光照效果。)
 1 #version 150 core
 2
 3 in vec3 in_Position;
 4 in vec3 in_Normal;
 5 out vec4 pass_Position;
 6 out vec4 pass_Color;
 7 uniform mat4 modelMatrix;
 8 uniform mat4 viewMatrix;
 9 uniform mat4 projectionMatrix;
10 uniform vec3 lightPosition;
11 uniform vec3 lightColor;
12 uniform vec3 globalAmbient;
13 uniform float Kd;
14
15 void main(void)
16 {
17     gl_Position = projectionMatrix * viewMatrix * modelMatrix * vec4(in_Position, 1.0f);
18     vec3 worldPos = (viewMatrix * modelMatrix * vec4(in_Position, 1.0f)).xyz;
19     vec3 N = (transpose(inverse(viewMatrix * modelMatrix)) * vec4(in_Normal, 1.0f)).xyz;
20     N = normalize(N);
21     // light's direction
22     vec3 L = (transpose(inverse(viewMatrix)) * vec4(lightPosition, 1.0f)).xyz;// directional light
23     L = normalize(L);
24     // diffuse color from directional light
25     vec3 diffuseColor = Kd * lightColor * max(dot(N, L), 0);
26     // ambient color
27     vec3 ambientColor = Kd * globalAmbient;
28     pass_Color.xyz = diffuseColor + ambientColor;
29     pass_Color.w = 1;
30 }
Fragment shader与上文的相同。
试验
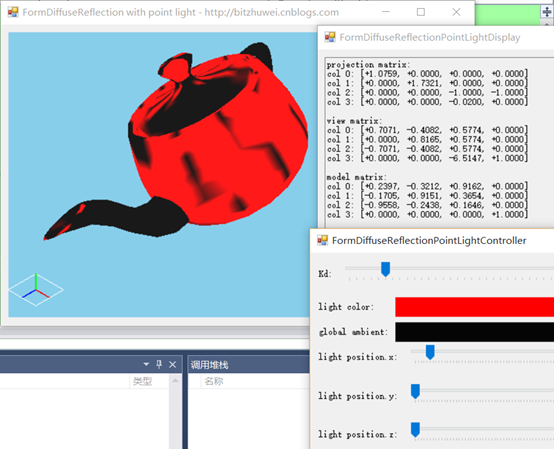
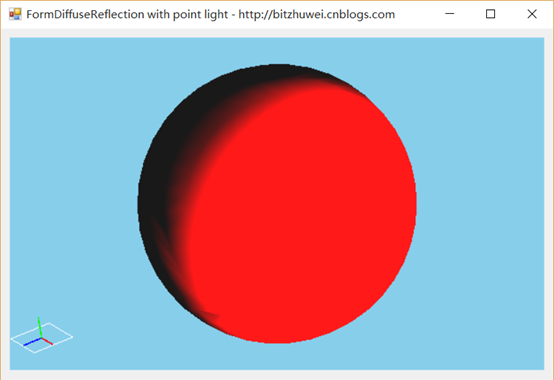
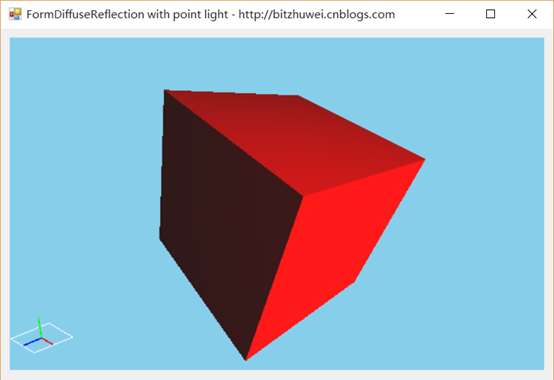
在一个场景中,一个点光源照射到物体上。如果物体旋转,那么光照效果会改变。如果光源位置改变,那么光照效果会改变。但是,如果摄像机改变位置,却不会改变漫反射的效果。(漫反射,反射到各个角度的光效是相同的,所以与摄像机位置无关。)
您可以下载此示例(https://github.com/bitzhuwei/CSharpGL)试验,鼠标左键旋转模型,光效会改变。鼠标右键旋转摄像机,光效是不变的。


总结
今后将继续整合一些镜面反射等类型的光照效果,为更多更强的shader效果做准备。
不得不说线性代数在计算机3D效果方面的应用彻底证明了它的强大。
学OpenGL有2年了,从NEHE到SharpGL,从《3D Math Primer for Graphics and Game Development》到《OpenGL Programming Guide》,算是对OpenGL有了初级的认识。最近我纠集整理了SharpGL,GLM,SharpFont等开源库,想做一个更好用的纯C#版OpenGL。欢迎对OpenGL有兴趣的同学加入(https://github.com/bitzhuwei/CSharpGL)
