Docker 安装
如何安装 docker 详见官网: installation 或者 中文指南.
不过 linux 上我推荐用 curl 安装,因为 apt-get 中源要么没有 docker,要么版本较低。
$ sudo apt-get install curl
$ sudo curl -sSL https://get.docker.com/ | sh
$ sudo docker run hello-world- 1
- 2
- 3
最后一个命令成功的话说明 docker 可以正常运行。
然而因为中国显而易见的国情原因,推荐还是使用 DaoCloud 服务安装吧:
# curl -sSL https://get.daocloud.io/docker | sh- 1
好了之后最好配置一下 DaoCloud 的加速服务(加速器),即设置 mirror:
$ echo "DOCKER_OPTS="$DOCKER_OPTS --registry-mirror=http://f9495414.m.daocloud.io"" | sudo tee -a /etc/default/docker
$ sudo service docker restart- 1
- 2
Image 命令
Image 是 docker 的基石,命令的介绍可以直接看官方文档: doc
常用命令有:
$ # 列出所有镜像
$ sudo docker images
$ # pull 新镜像
$ sudo docker pull hello-world
$ # tag 一个镜像,tag 对于一个镜像就像引用计数一样
$ sudo docker tag hello-world myname/hello-world
$ # push 镜像到 docker hub
$ sudo docker push myname/hello-world
$ # 在 docker hub 搜索镜像
$ sudo docker search ubuntu
$ # 删除一个镜像
$ sudo docker rmi hello-world
$ # 删除名字为 <none> 的镜像(可能在构建过程或 pull 过程不成功留下的中间镜像)
$ sudo docker images | grep "<none>" | tr -s ' ' | cut -f3 -d " " | sudo parallel docker rmi {}- 1
- 2
- 3
- 4
- 5
- 6
- 7
- 8
- 9
- 10
- 11
- 12
- 13
- 14
Image 组成
Image 是一个可运行的基本单元,那么当我们运行 docker images 时,显示出来的一个个 image 究竟是什么?
Image 里面是一层层文件系统,叫做 Union FS,联合文件系统,可以将几层目录挂载到一起,成为同一个虚拟文件系统。文件系统的目录结构就像普通 linux 的目录结构一样,docker 通过这些文件与宿主机的内核提供了一个 linux 的虚拟环境。每一层文件系统我们叫做一层 layer,联合文件系统可以对每一层文件系统设置三种权限,只读(readonly)、读写(readwrite)和写出(whiteout-able),但是 docker 镜像中每一层文件系统都是只读的。
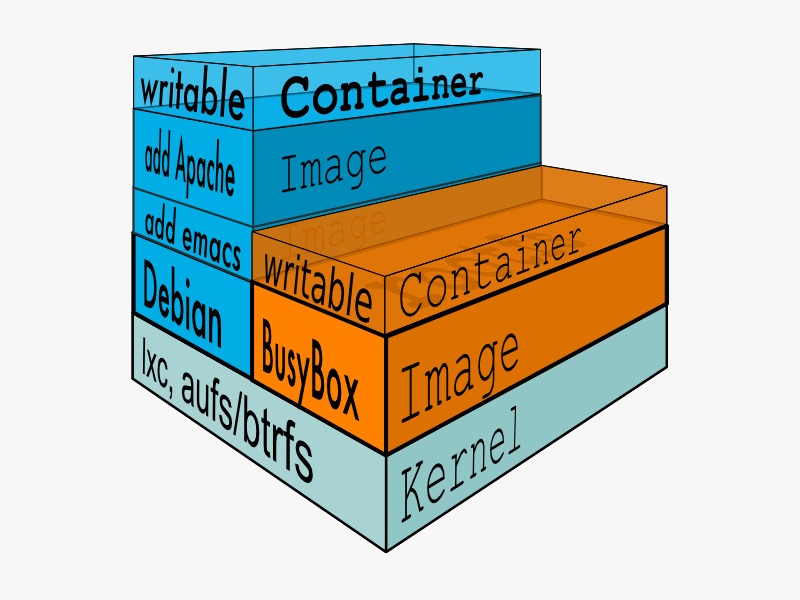
构建镜像的时候,从一个最基本的操作系统开始,每个构建的操作都相当于做一层修改,增加了一层文件系统,一层层往上叠加,上层的修改会覆盖底层该位置的可见性,这也很容易理解,就像上层把底层遮住了一样。当你使用的时候,你只会看到一个完全的整体,你不知道里面有几层,也不清楚每一层所做的修改是什么。结构类似这样:
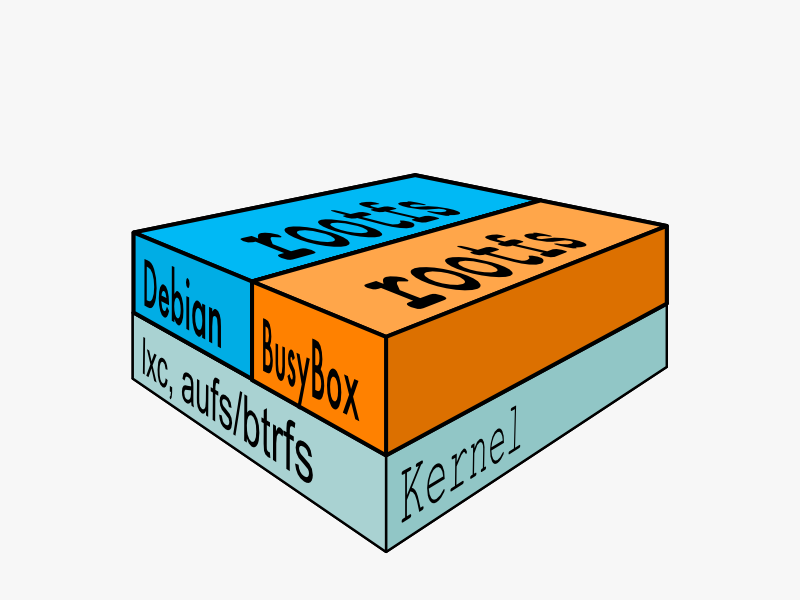
从基本的看起,一个典型的 Linux 文件系统由 bootfs 和 rootfs 两部分组成,bootfs(boot file system) 主要包含 bootloader 和 kernel,bootloader 主要用于引导加载 kernel,当 kernel 被加载到内存中后 bootfs 会被 umount 掉。 rootfs (root file system) 包含的就是典型 Linux 系统中的/dev,/proc,/bin,/etc 等标准目录和文件。见下图,就是 docker image 中最基础的两层结构:

不同的 linux 发行版(如 ubuntu 和 CentOS ) 在 rootfs 这一层会有所区别,体现发行版本的差异性:
传统的 Linux 加载 bootfs 时会先将 rootfs 设为 read-only,然后在系统自检之后将 rootfs 从 read-only 改为 read-write,然后我们就可以在 rootfs 上进行读写操作了。但 Docker 在 bootfs 自检完毕之后并不会把 rootfs 的 read-only 改为 read-write,而是利用 union mount(UnionFS 的一种挂载机制)将 image 中的其他的 layer 加载到之前的 read-only 的 rootfs 层之上,每一层 layer 都是 rootfs 的结构,并且是read-only 的。所以,我们是无法修改一个已有镜像里面的 layer 的!只有当我们创建一个容器,也就是将 Docker 镜像进行实例化,系统会分配一层空的 read-write 的 rootfs ,用于保存我们做的修改。一层 layer 所保存的修改是增量式的,就像 git 一样。
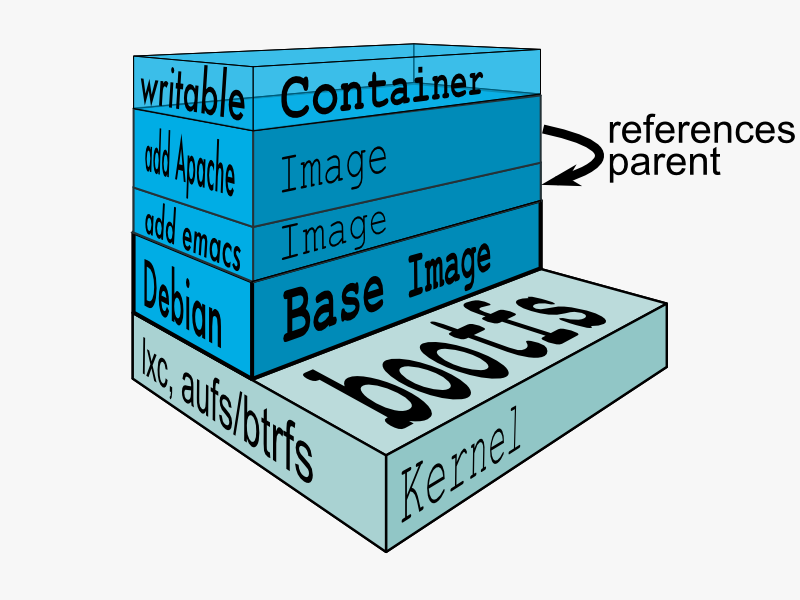
Image 结构
假如我们有一个 ubuntu:14.04 的镜像,那么我们可以把它保存成 tar 文件,观察一下:
➜ ~ sudo docker save -o ubuntu_image.tar ubuntu:14.04
➜  ~  tar -tf ubuntu_image.tar
428b411c28f0c33e561a95400a729552db578aee0553f87053b96fc0008cca6a/
428b411c28f0c33e561a95400a729552db578aee0553f87053b96fc0008cca6a/VERSION
428b411c28f0c33e561a95400a729552db578aee0553f87053b96fc0008cca6a/json
428b411c28f0c33e561a95400a729552db578aee0553f87053b96fc0008cca6a/layer.tar
435050075b3f881611b0f4c141bb723f38603caacd31a13a185c1a38acfb4ade/
435050075b3f881611b0f4c141bb723f38603caacd31a13a185c1a38acfb4ade/VERSION
435050075b3f881611b0f4c141bb723f38603caacd31a13a185c1a38acfb4ade/json
435050075b3f881611b0f4c141bb723f38603caacd31a13a185c1a38acfb4ade/layer.tar
6d4946999d4fb403f40e151ecbd13cb866da125431eb1df0cdfd4dc72674e3c6/
6d4946999d4fb403f40e151ecbd13cb866da125431eb1df0cdfd4dc72674e3c6/VERSION
6d4946999d4fb403f40e151ecbd13cb866da125431eb1df0cdfd4dc72674e3c6/json
6d4946999d4fb403f40e151ecbd13cb866da125431eb1df0cdfd4dc72674e3c6/layer.tar
9fd3c8c9af32dddb1793ccb5f6535e12d735eacae16f8f8c4214f42f33fe3d29/
9fd3c8c9af32dddb1793ccb5f6535e12d735eacae16f8f8c4214f42f33fe3d29/VERSION
9fd3c8c9af32dddb1793ccb5f6535e12d735eacae16f8f8c4214f42f33fe3d29/json
9fd3c8c9af32dddb1793ccb5f6535e12d735eacae16f8f8c4214f42f33fe3d29/layer.tar
repositories- 1
- 2
- 3
- 4
- 5
- 6
- 7
- 8
- 9
- 10
- 11
- 12
- 13
- 14
- 15
- 16
- 17
- 18
- 19
我们可以看到,实际上 ubuntu 里的镜像是一个压缩文件,里面有 4 个文件夹,其实就是 4 个 layer, 每个 layer 一个文件夹,还有一个 repositories 的文件。更直观一点,可以解压到文件夹中,用 tree 命令查看:
➜ ubuntu:14.04 tree
.
├── 428b411c28f0c33e561a95400a729552db578aee0553f87053b96fc0008cca6a
│   ├── json
│   ├── layer.tar
│   └── VERSION
├── 435050075b3f881611b0f4c141bb723f38603caacd31a13a185c1a38acfb4ade
│   ├── json
│   ├── layer.tar
│   └── VERSION
├── 6d4946999d4fb403f40e151ecbd13cb866da125431eb1df0cdfd4dc72674e3c6
│   ├── json
│   ├── layer.tar
│   └── VERSION
├── 9fd3c8c9af32dddb1793ccb5f6535e12d735eacae16f8f8c4214f42f33fe3d29
│   ├── json
│   ├── layer.tar
│   └── VERSION
└── repositories

4 directories, 13 files- 1
- 2
- 3
- 4
- 5
- 6
- 7
- 8
- 9
- 10
- 11
- 12
- 13
- 14
- 15
- 16
- 17
- 18
- 19
- 20
- 21
可以说,每个文件夹的结构都是一样的,这意味着每一层 layer 的组织方式也一样,由 json、layer.tar、VERSION 表示。我们先看 repositories 文件,里面是一个 JSON 定义,保存了三个信息:镜像名字、tag、tag 对应的 layer(这个 layer 是 ubuntu:14.04 的最上层 layer 的摘要)。
➜  ~  cat repositories
{"ubuntu":{"14.04":"6d4946999d4fb403f40e151ecbd13cb866da125431eb1df0cdfd4dc72674e3c6"}}- 1
- 2
进入某个文件夹,查看 json 文件,是一份保存了很多信息的 json 定义,主要是关于镜像的配置信息,简要结构如下:

而 layer.tar 也是一份打包文件,通过下面可以看到,里面是一个类 Linux 文件目录的结构,保存着这个 layer 所做的修改:
➜  435050075b3f881611b0f4c141bb723f38603caacd31a13a185c1a38acfb4ade  tar -tf layer.tar
etc/
etc/apt/
etc/apt/apt.conf.d/
etc/apt/apt.conf.d/docker-clean
etc/apt/apt.conf.d/docker-gzip-indexes
etc/apt/apt.conf.d/docker-no-languages
etc/dpkg/
etc/dpkg/dpkg.cfg.d/
etc/dpkg/dpkg.cfg.d/docker-apt-speedup
sbin/
sbin/initctl
sbin/initctl.distrib
usr/
usr/sbin/
usr/sbin/policy-rc.d
var/
var/lib/
var/lib/dpkg/
var/lib/dpkg/diversions
var/lib/dpkg/diversions-old- 1
- 2
- 3
- 4
- 5
- 6
- 7
- 8
- 9
- 10
- 11
- 12
- 13
- 14
- 15
- 16
- 17
- 18
- 19
- 20
- 21
最后,要注意的是 layer 在镜像间是共享的,不同镜像间,对于摘要一样的 layer 只会保存一份,以树的形式进行继承,可以用 docker images -tree查看:
➜  ~  sudo docker images -tree
Warning: '-tree' is deprecated, it will be removed soon. See usage.
..... #略
├─428b411c28f0 Virtual Size: 188.1 MB
│ └─435050075b3f Virtual Size: 188.3 MB
│   └─9fd3c8c9af32 Virtual Size: 188.3 MB
│     └─6d4946999d4f Virtual Size: 188.3 MB Tags: ubuntu:latest, ubuntu:14.04
│       └─cf73ddbcb12b Virtual Size: 375.1 MB
│         └─7cb6f45e653d Virtual Size: 377.6 MB
│           └─c624e1a476d0 Virtual Size: 377.6 MB
│             └─4b087f2af755 Virtual Size: 389.1 MB
│               └─6940f969b4ed Virtual Size: 413.9 MB
│                 └─1bc2ae3e600b Virtual Size: 414 MB
│                   └─c35a7b3ee359 Virtual Size: 414 MB
│                     └─b4696f4e4d61 Virtual Size: 414 MB
│                       └─7413e661f075 Virtual Size: 414 MB
│                         └─9a2409206c78 Virtual Size: 414 MB Tags: registry:latest
..... #略- 1
- 2
- 3
- 4
- 5
- 6
- 7
- 8
- 9
- 10
- 11
- 12
- 13
- 14
- 15
- 16
- 17
- 18