1、Java本身提供了JavaMail标准以实现邮件的处理,同时用户也可以搭建属于自己的邮件服务器或者直接使用各个邮箱系统实现邮件的发送处理。这里使用QQ邮箱系统进行服务整合。
登录QQ邮箱,进入邮箱设置页面,找到邮件服务配置项,如下所示: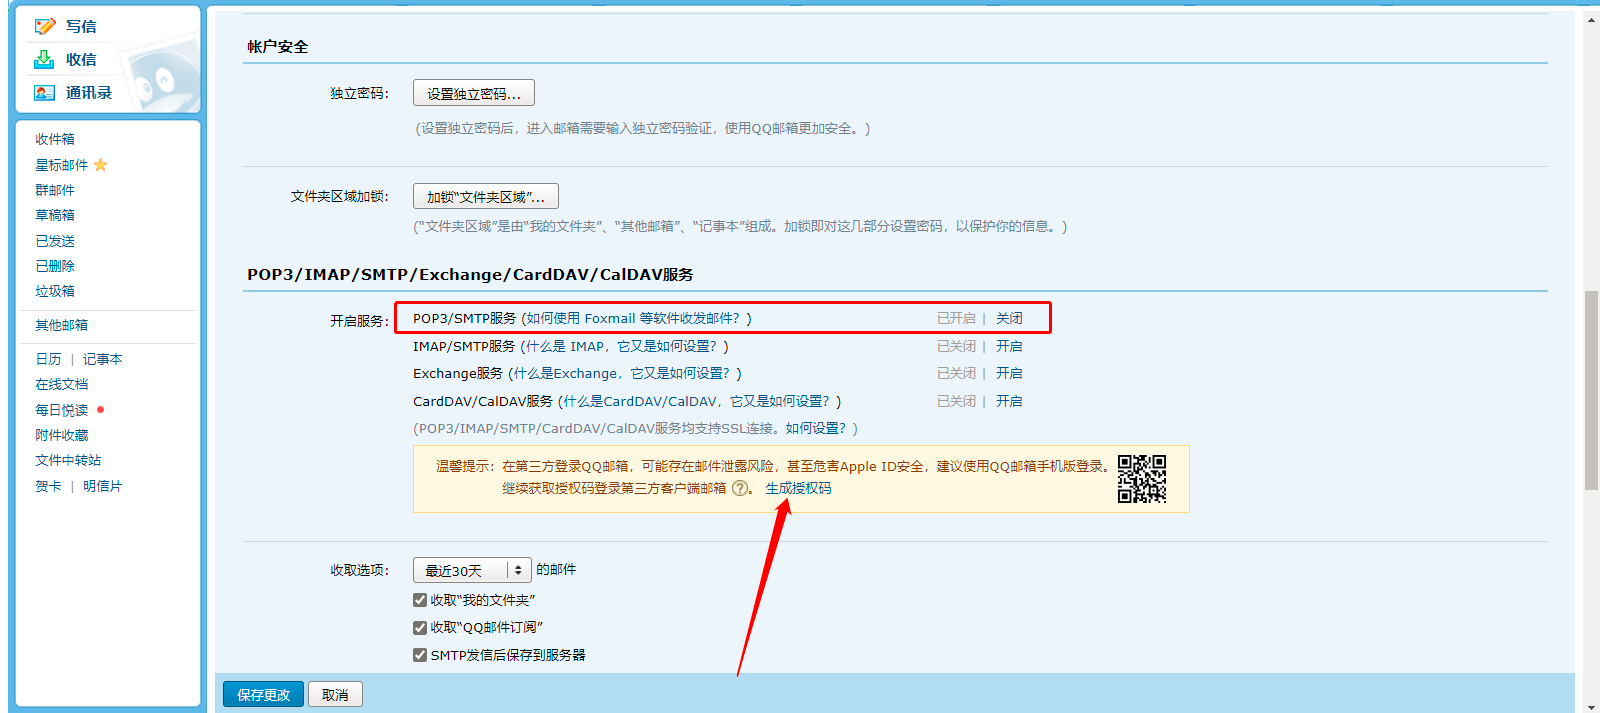
修改pom.xml配置文件,引入依赖库,如下所示;
  1 <?xml version="1.0" encoding="UTF-8"?>
  2 <project xmlns="http://maven.apache.org/POM/4.0.0"
  3     xmlns:xsi="http://www.w3.org/2001/XMLSchema-instance"
  4     xsi:schemaLocation="http://maven.apache.org/POM/4.0.0
  5     https://maven.apache.org/xsd/maven-4.0.0.xsd">
  6     <modelVersion>4.0.0</modelVersion>
  7     <parent>
  8         <groupId>org.springframework.boot</groupId>
  9         <artifactId>spring-boot-starter-parent</artifactId>
 10         <version>2.3.5.RELEASE</version>
 11         <relativePath /> <!-- lookup parent from repository -->
 12     </parent>
 13     <groupId>com.example</groupId>
 14     <artifactId>demo</artifactId>
 15     <version>0.0.1-SNAPSHOT</version>
 16     <name>demo</name>
 17     <description>Demo project for Spring Boot</description>
 18
 19     <properties>
 20         <java.version>1.8</java.version>
 21         <maven-jar-plugin.version>3.1.1</maven-jar-plugin.version>
 22     </properties>
 23
 24     <dependencies>
 25         <dependency>
 26             <groupId>org.springframework.boot</groupId>
 27             <artifactId>spring-boot-starter-web</artifactId>
 28         </dependency>
 29
 30         <dependency>
 31             <groupId>org.springframework.boot</groupId>
 32             <artifactId>spring-boot-starter-test</artifactId>
 33             <scope>test</scope>
 34             <exclusions>
 35                 <exclusion>
 36                     <groupId>org.junit.vintage</groupId>
 37                     <artifactId>junit-vintage-engine</artifactId>
 38                 </exclusion>
 39             </exclusions>
 40         </dependency>
 41
 42         <!-- mysql驱动包 -->
 43         <dependency>
 44             <groupId>mysql</groupId>
 45             <artifactId>mysql-connector-java</artifactId>
 46         </dependency>
 47
 48         <!-- druid连接池 -->
 49         <dependency>
 50             <groupId>com.alibaba</groupId>
 51             <artifactId>druid</artifactId>
 52             <version>1.1.10</version>
 53         </dependency>
 54
 55         <dependency>
 56             <groupId>org.springframework.boot</groupId>
 57             <artifactId>spring-boot-starter-data-jpa</artifactId>
 58         </dependency>
 59         <dependency>
 60             <groupId>org.springframework.boot</groupId>
 61             <artifactId>spring-boot-starter-cache</artifactId>
 62         </dependency>
 63         <dependency>
 64             <groupId>org.hibernate</groupId>
 65             <artifactId>hibernate-ehcache</artifactId>
 66         </dependency>
 67
 68         <!-- activeMQ -->
 69         <dependency>
 70             <groupId>org.springframework.boot</groupId>
 71             <artifactId>spring-boot-starter-activemq</artifactId>
 72         </dependency>
 73
 74         <!-- rabbitMQ -->
 75         <dependency>
 76             <groupId>org.springframework.boot</groupId>
 77             <artifactId>spring-boot-starter-amqp</artifactId>
 78         </dependency>
 79
 80         <!-- kafka -->
 81         <dependency>
 82             <groupId>org.springframework.kafka</groupId>
 83             <artifactId>spring-kafka</artifactId>
 84         </dependency>
 85
 86         <dependency>
 87             <groupId>org.springframework.boot</groupId>
 88             <artifactId>spring-boot-starter-mail</artifactId>
 89         </dependency>
 90     </dependencies>
 91
 92     <build>
 93         <plugins>
 94             <plugin>
 95                 <groupId>org.springframework.boot</groupId>
 96                 <artifactId>spring-boot-maven-plugin</artifactId>
 97             </plugin>
 98         </plugins>
 99         <resources>
100             <resource>
101                 <directory>src/main/resources</directory>
102                 <includes>
103                     <include>**/*.properties</include>
104                     <include>**/*.yml</include>
105                     <include>**/*.xml</include>
106                     <include>**/*.p12</include>
107                     <include>**/*.html</include>
108                     <include>**/*.jpg</include>
109                     <include>**/*.png</include>
110                 </includes>
111             </resource>
112         </resources>
113     </build>
114
115 </project>
修改application.yml配置文件,实现邮件配置,如下所示:
 1 # 邮箱服务器
 2 spring.mail.host=smtp.qq.com
 3 # 用户名
 4 spring.mail.username=xxx@qq.com
 5 # 授权码
 6 spring.mail.password=xxxx
 7 # stmp授权开启
 8 spring.mail.properties.mail.smtp.auth=true
 9 # 启动tls服务
10 spring.mail.properties.mail.smtp.starttls.enable=true
11 # 启动tls支持
12 spring.mail.properties.mail.smtp.starttls.required=true
由于SpringBoot中已经进行了大量的简化配置,所以此时的程序只需要注入JavaMailSender对象,并设置好邮件内容,就可以实现邮件信息的发送。
 1 package com.demo.controller;
 2
 3 import org.springframework.beans.factory.annotation.Autowired;
 4 import org.springframework.mail.SimpleMailMessage;
 5 import org.springframework.mail.javamail.JavaMailSender;
 6 import org.springframework.stereotype.Controller;
 7 import org.springframework.web.bind.annotation.RequestMapping;
 8 import org.springframework.web.bind.annotation.ResponseBody;
 9
10 @Controller
11 public class SpringBootController {
12
13     @Autowired
14     private JavaMailSender javaMailSender;
15
16     @RequestMapping(value = "/sendMail")
17     @ResponseBody
18     public String sendMail() {
19         // 要发送的消息内容
20         SimpleMailMessage message = new SimpleMailMessage();
21         // 发送者
22         message.setFrom("xxx@qq.com");
23         // 接收者
24         message.setTo("xxx@qq.com");
25         // 邮件主题
26         message.setSubject("感谢主题");
27         // 邮件内容
28         message.setText("感谢内容");
29
30         // 发送邮件
31         this.javaMailSender.send(message);
32         return "success";
33     }
34
35 }