注解的方式使用缓存:
第一步:导入jar包
(1)spring-context-support-4.2.4.RELEASE.jar包
提供了平台缓存管理器相关class。
引入:
(2)导入spring-framework-3.0.2.RELEASE-dependencies et.sourceforge.ehcachecom.springsource.net.sf.ehcache1.6.2com.springsource.net.sf.ehcache-1.6.2.jar
第二步:引入ehcache.xml文件:
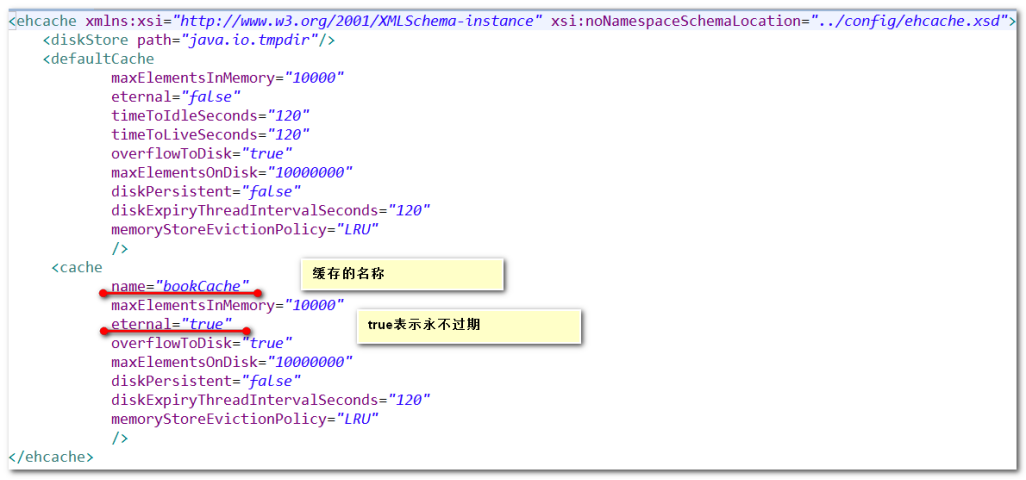
第三步:引入头信息(和上面一样)
<beans xmlns="http://www.springframework.org/schema/beans"

       xmlns:xsi="http://www.w3.org/2001/XMLSchema-instance"

       xmlns:p="http://www.springframework.org/schema/p"

       xmlns:context="http://www.springframework.org/schema/context"

       xmlns:aop="http://www.springframework.org/schema/aop"

       xmlns:tx="http://www.springframework.org/schema/tx"

       xmlns:cache="http://www.springframework.org/schema/cache"

       xsi:schemaLocation="http://www.springframework.org/schema/beans

                           http://www.springframework.org/schema/beans/spring-beans.xsd

                           http://www.springframework.org/schema/context

                           http://www.springframework.org/schema/context/spring-context.xsd

                           http://www.springframework.org/schema/aop

                           http://www.springframework.org/schema/aop/spring-aop.xsd

                           http://www.springframework.org/schema/tx

                           http://www.springframework.org/schema/tx/spring-tx.xsd

                           http://www.springframework.org/schema/cache

                           http://www.springframework.org/schema/cache/spring-cache.xsd">
第四步:编写applicationContext.xml,使用注解方式:
<!-- 使用注解的方式配置缓存 -->

<!-- 第一步:定义ehcache的对象EhCacheManager:spring提供了工厂,专业来new对象 -->

<bean id="ehCacheManager" class="org.springframework.cache.ehcache.EhCacheManagerFactoryBean">

<!-- 注入ehcache的核心配置文件

通过源代码发现,这里即使不配置,默认就到classpath中寻找ehcache.xml

 -->

<property name="configLocation" value="classpath:ehcache.xml"/>

</bean>

<!-- 第二步:具体平台缓存管理器:整合ehcache的实现,需要导入jar -->

<bean id="cacheManager" class="org.springframework.cache.ehcache.EhCacheCacheManager">

<!-- 注入ehcache的缓存对象 -->

<property name="cacheManager" ref="ehCacheManager"/>

</bean>

<!-- 第三步:配置缓存注解驱动 -->

<cache:annotation-driven cache-manager="cacheManager"/>
第五步:使用缓存的bean的类型的方法上,加两个注解:
在cn.itcast.ssh.service包中的类BookServiceImpl.java中添加缓存的注解
//图书业务层

@Service("bookService")

@Transactional(readOnly=true)//事务(类级别的事务,一般定义成只读,方法级别的事务定义成可写)

public class BookServiceImpl implements IBookService{

//注入dao层

@Autowired

private IBookDao bookDao;


//保存图书

@Transactional(readOnly=false)//事务(方法级别的事务,覆盖类级别的事务)

@CacheEvict(value="bookCache",allEntries=true)

public void saveBook(Book book){

//调用dao层

bookDao.save(book);

}


//查询:复杂条件查询,根据书名模糊查询

@Cacheable(value="bookCache")//value:echache缓存区域的名字

public List<Book> findBookListByNameLike(String name){

//1.qbn

return bookDao.findByNamedQuery("Book.findBookListByNameLike", "%"+name+"%");


//2.qbc

// DetachedCriteria criteria =DetachedCriteria.forClass(Book.class);//root对象类型

// criteria.add(Restrictions.like("name",  "%"+name+"%"));

// return bookDao.findByCriteria(criteria);

  }

}
第六步:测试代码:在cn.itcast.ssh.test包中创建BookServiceTest进行测试
@RunWith(SpringJUnit4ClassRunner.class)

@ContextConfiguration(locations="classpath:applicationContext.xml")

public class BookServiceTest {

//注入service

@Autowired

private IBookService bookService;


@Test

public void testSaveBook() {

Book book = new Book();

book.setName("葵花宝典233");

book.setPrice(998d);

bookService.saveBook(book);

}


@Test

public void testFindBookListByNameLike() {

List<Book> list = bookService.findBookListByNameLike("星");

System.out.println(list);

List<Book> list2 = bookService.findBookListByNameLike("星");

System.out.println(list2);

Book book = new Book();

book.setName("葵花宝典2");

book.setPrice(998d);

bookService.saveBook(book);

List<Book> list3 = bookService.findBookListByNameLike("星");

System.out.println(list3);

List<Book> list4 = bookService.findBookListByNameLike("星");

System.out.println(list4);

  }

}
查看测试结果,控制台中输出:
第一次查询数据库,第二次从缓存中查询!
小结:推荐是用注解,简单,xml配置麻烦。