这里记录一下Spring+Ehcache的结合使用
1、添加依赖
<dependency>
  <groupId>org.springframework</groupId>
  <artifactId>spring-context-support</artifactId>
  <version>4.3.0.RELEASE</version>
</dependency>

<dependency>
  <groupId>net.sf.ehcache</groupId>
  <artifactId>ehcache</artifactId>
  <version>2.10.3</version>
</dependency>
2、配置文件
ehcache.xml:
<?xml version="1.0" encoding="UTF-8"?>
<ehcache xmlns:xsi="http://www.w3.org/2001/XMLSchema-instance"
       xsi:noNamespaceSchemaLocation="http://ehcache.org/ehcache.xsd">

  <!-- 磁盘缓存位置 -->
  <diskStore path="/Users/fengzp/Documents/ehcache"/>

  <!-- 默认缓存 -->
  <defaultCache
          maxEntriesLocalHeap="10000"
          eternal="false"
          timeToIdleSeconds="120"
          timeToLiveSeconds="120"
          maxEntriesLocalDisk="10000000"
          diskExpiryThreadIntervalSeconds="120"
          memoryStoreEvictionPolicy="LRU"/>

  <!-- cachetest缓存 缓存时间为5秒 -->
  <cache name="cachetest"
         maxElementsInMemory="1000"
         eternal="false"
         timeToIdleSeconds="5"
         timeToLiveSeconds="5"
         overflowToDisk="false"
         memoryStoreEvictionPolicy="LRU"/>
</ehcache>
spring.xml:
<?xml version="1.0" encoding="UTF-8"?>
<beans xmlns="http://www.springframework.org/schema/beans"
     xmlns:xsi="http://www.w3.org/2001/XMLSchema-instance"
     xmlns:context="http://www.springframework.org/schema/context"
     xmlns:cache="http://www.springframework.org/schema/cache"
     xsi:schemaLocation="http://www.springframework.org/schema/beans http://www.springframework.org/schema/beans/spring-beans.xsd http://www.springframework.org/schema/context http://www.springframework.org/schema/context/spring-context.xsd http://www.springframework.org/schema/cache http://www.springframework.org/schema/cache/spring-cache.xsd">

  <context:component-scan base-package="com.yitop.feng" />

  <cache:annotation-driven cache-manager="cacheManager" />

  <bean id="cacheManager" class="org.springframework.cache.ehcache.EhCacheCacheManager">
      <property name="cacheManager" ref="ehcache"></property>
  </bean>

  <bean id="ehcache" class="org.springframework.cache.ehcache.EhCacheManagerFactoryBean">
      <property name="configLocation" value="classpath:ehcache.xml"></property>
  </bean>

</beans>
3、测试使用
随便写个接口
/**
 * @author fengzp
 * @date 17/3/1下午2:16
 * @email fengzp@gzyitop.com
 * @company 广州易站通计算机科技有限公司
 */
public interface EhcacheTestService {

    String getName(String name);
}

/**
 * @author fengzp
 * @date 17/3/1下午2:17
 * @email fengzp@gzyitop.com
 * @company 广州易站通计算机科技有限公司
 */
@Service
public class EhcacheTestServiceImpl implements EhcacheTestService {

    //这里的cachetest和配置文件的一样,key=#name表示缓存使用参数name作为key
    @Cacheable(value = "cachetest", key = "#name")
    public String getName(String name) {
        return String.valueOf(System.currentTimeMillis());
    }
}
测试
/**
* @author fengzp
* @date 17/3/1下午2:19
* @email fengzp@gzyitop.com
* @company 广州易站通计算机科技有限公司
*/
@RunWith(SpringJUnit4ClassRunner.class)
@ContextConfiguration(locations = {"classpath:spring.xml"})
public class EhcacheTest {
@Autowired
private EhcacheTestService ehcacheTestService;
@Test
public void test() throws InterruptedException {
String name = "feng";
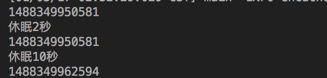
System.out.println(ehcacheTestService.getName(name));
System.out.println("休眠2秒");
Thread.sleep(2000);
System.out.println(ehcacheTestService.getName(name));
System.out.println("休眠10秒");
Thread.sleep(10000);
System.out.println(ehcacheTestService.getName(name));
}
}
运行结果
4、缓存配置参数详解
1. <diskStore> 当内存缓存中对象数量超过maxElementsInMemory时,将缓存对象写到磁盘缓存中(需对象实现序列化接口)

2. <diskStore path=""> 用来配置磁盘缓存使用的物理路径,Ehcache磁盘缓存使用的文件后缀名是*.data和*.index

3. name 缓存名称,cache的唯一标识(ehcache会把这个cache放到HashMap里)

4. maxElementsOnDisk 磁盘缓存中最多可以存放的元素数量,0表示无穷大

5. maxElementsInMemory内存缓存中最多可以存放的元素数量,若放入Cache中的元素超过这个数值,则有以下两种情况
  1)若overflowToDisk=true,则会将Cache中多出的元素放入磁盘文件中
    2)若overflowToDisk=false,则根据memoryStoreEvictionPolicy策略替换Cache中原有的元素

6. eternal 缓存中对象是否永久有效,即是否永驻内存,true时将忽略timeToIdleSeconds和timeToLiveSeconds

7. timeToIdleSeconds 缓存数据在失效前的允许闲置时间(单位:秒),仅当eternal=false时使用,默认值是0表示可闲置时间无穷大,此为可选属性,即访问这个cache中元素的最大间隔时间,若超过这个时间没有访问此Cache中的某个元素,那么此元素将被从Cache中清除

8. timeToLiveSeconds 缓存数据在失效前的允许存活时间(单位:秒),仅当eternal=false时使用,默认值是0表示可存活时间无穷大,即Cache中的某元素从创建到清除的生存时间,也就是说从创建开始计时,当超过这个时间时,此元素将从Cache中清除

9. overflowToDisk 内存不足时,是否启用磁盘缓存(即内存中对象数量达到maxElementsInMemory时,Ehcache会将对象写到磁盘中)会根据标签中path值查找对应的属性值,写入磁盘的文件会放在path文件夹下,文件的名称是cache的名称,后缀名是data

10. diskPersistent 是否持久化磁盘缓存,当这个属性的值为true时,系统在初始化时会在磁盘中查找文件名为cache名称,后缀名为index的文件,这个文件中存放了已经持久化在磁盘中的cache的index,找到后会把cache加载到内存,要想把cache真正持久化到磁盘,写程序时注意执行net.sf.ehcache.Cache.put(Element element)后要调用flush()方法

11. diskExpiryThreadIntervalSeconds 磁盘缓存的清理线程运行间隔,默认是120秒

12. diskSpoolBufferSizeMB 设置DiskStore(磁盘缓存)的缓存区大小,默认是30MB

13. memoryStoreEvictionPolicy 内存存储与释放策略,即达到maxElementsInMemory限制时,Ehcache会根据指定策略清理内存,共有三种策略,分别为LRU(最近最少使用)、LFU(最常用的)、FIFO(先进先出)
5、springboot引入ehcache
springboot使用ehcache,spring.xml里面不需要写下面这3个东西
  <cache:annotation-driven cache-manager="cacheManager" />

  <bean id="cacheManager" class="org.springframework.cache.ehcache.EhCacheCacheManager">
      <property name="cacheManager" ref="ehcache"></property>
  </bean>

  <bean id="ehcache" class="org.springframework.cache.ehcache.EhCacheManagerFactoryBean">
      <property name="configLocation" value="classpath:ehcache.xml"></property>
  </bean>
只需要在启动上添加 @EnableCaching,并且在application.properties中加上spring.cache.ehcache.config=classpath:ehcache.xml指定ehcache配置文件,springboot就会自动加载ehcache,其他和spring上一样。