前情提要:
通用方法和特定方法
比如:查找某个元素的方法 def find(locator),只要传入locator,就可以调用该函数,可以通用的---一般放在common中,例如:selenium_handler.py
对于登录操作,需要先定位元素,每个项目中定位元素的方式可能是不一样的,所以对于登录操作,应该是项目的特定方法.
8046min
1.basepage的实现
1).项目架构:
------selenium_handler.py放在common中,在selenium_handler实现封装
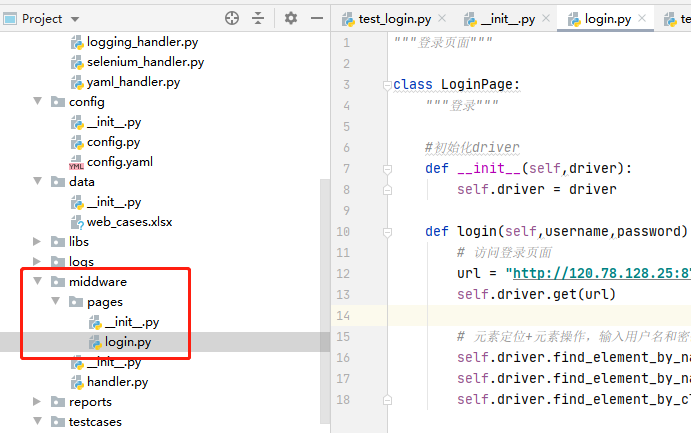
-------middleware中新建pages 包(表示:页面操作) ----比如:登录操作,就属于页面的行为;登录页面有:免费注册、忘记密码、联系我们等操作行为
在pages中可以有login.py操作
2).实现login.py登录操作的封装
将前面的测试用例test_login中登录部分的代码直接拿过来进行封装;
-----用户名、密码进行参数化。
-----driver对象在很多页面都需要用到,所以定义为类属性,方便调用
class LoginPage:
    """登录"""

    #初始化driver
    def __init__(self,driver):
        self.driver = driver

    def login(self,username,password):
        # 访问登录页面
        url = "http://120.78.128.25:8765/Index/login.html"
        self.driver.get(url)

        # 元素定位+元素操作,输入用户名和密码,点击登录进行提交
        self.driver.find_element_by_name("phone").send_keys(username)
        self.driver.find_element_by_name("password").send_keys(password)
        self.driver.find_element_by_class_name("btn-special").click()
架构:

login.py封装完成,在测试用例中test_login.py中如何去调用呢------在test_login.py中直接调用即可。
import pytest
from middware.handler import HandlerMiddle
from middware.pages.login import LoginPage

#获取excel中login数据
data = HandlerMiddle.excel.read_data("login")

class TestLogin():
    """登录功能的测试类"""
    @pytest.mark.smoke
    @pytest.mark.error
    @pytest.mark.parametrize("test_info",data)
    def test_login_error(self,test_info,driver):
        """登录失败测试步骤
        1.打开浏览器
        2.访问登录页面
        3.元素定位+元素操作,输入用户名和密码,点击登录
        4.通过获取页面内容得到实际结果,进行断言
        :return:
        """

        #访问登录页面
        LoginPage(driver).login(username=eval(test_info["data"])["username"],
                                password=eval(test_info["data"])["password"])


        #通过获取页面内容得到实际结果,进行断言
        #实际结果是在页面上的提示,再次进行定位
        actual_result = driver.find_element_by_class_name("form-error-info").text
        expected_result = test_info["expected_result"]
        #断言
        assert actual_result in expected_result
运行run.py, test_login.py中的方法test_login_error()中的driver去conftest文件中找fixture中的函数名(driver),访问登录页面调用LoginPage(driver),到此逻辑基本理顺了。
总结:
1)登录操作封装成类,初始化LoginPage()对象---->测试代码和页面操作分开。
-----这么做的好处:前端工程师修改页面,就不需要修改test_login.py测试用例。
测试逻辑改了,那么LoginPage是不需要修改的。
2)pytest测试框架的特性
①用例标记Mark
--pytest.ini文件,注册标签名
--打标签pytest.mark.tagname 测试类或者测试方法上
--运行 pytest -m "tagname" 标记的组合 and 、or、 not (tagnameA ang not tagnameB)
②断言 直接用python的内置关键字 assert
③测试报告 --html =report.html
④使用脚本方式运算:pytest.main(["--html={}report.html".format(ts), "-m error"])
⑤测试顺序:从上到下
⑥数据驱动:pytest.mark.parametrize("test_info",data)
def test_login(self,test_info):
pass
数据驱动注意事项: 使用pytest.mark.parametrize("test_info",data)时,pytest与unittest不兼容:即使用pytest的数据驱动,测试类不能继承unittest.TestCase;用unittest框架就继承,且使用ddt数据驱动。
①测试夹具---生成器generator(含有yield关键字)
---本质是:普通函数
---@pytest.fixture()申明这是一个测试夹具
---把函数中的return改为yield: yield前:前置条件;yield后:后置清理
3)pytest与unittest共用:
unittest编写用例:
---ddt、setUp、testDown、self.assertTrue()
pytest运行用例:
---自动收集、用例筛选用例、测试报告、测试插件
4)为什么用pytest?有什么优势;unittest有什么优势?
① unittest是Python的标准库,pytest是第三方库 (unittest不需要安装,pytest需要安装)
---标准库不存在 和Python版本不兼容的问题
②pytest更加智能,上面2)所述