1.上一节内容补充:
1.1将字符串转换成数字:


var s1='ass';
var n1=parseInt(s1); //将字符串转换成数字
var s2='2334';
var n2=parseInt(s2);//将字符串转换成数字
console.log(n1);
console.log(n2);
结果为
NaN
01内容补充.js:9 2334
1.2regexp中没有提到的坑:如果test中没有传值,就默认传undefined;
var n1=/^[a-zA-z][a-zA-Z]{3,8}/;
var n2=n1.test();
console.log(n2);
结果为
true
1.3第二种创建类的方法:自定义一个类:
var n1=new Object();
n1.name='alecx';
n1.age=134;
console.log(n1);
{name: "alecx", age: 134}
1.4如果想显示自定义时间和格式可以使用如下方法:
var t1=new Date('2004-1-2');
var t2= t1.toLocaleString();  不仅显示列的数据还显示时间
var t3=t1.toLocaleDateString();  只显示所列举的数据
console.log(t2);
console.log(t3);
结果:
2004/1/2 上午12:00:00
01内容补充.js:21 2004/1/2
2
2.1.BOM(Browser object Model)指的是浏览器对象模型,它使javascript有能力与浏览器进行对话;
2.2DOM(document object model)指的是文档对象类型,通过它,可以访问html文档的所有元素。
2.3window对象是客户端JavaScript最高的对象之一,由于windows对象事其他大部分对象的共同祖先,在调用windows对象的方法和属性时,可以省略windows对象的应用,类如window.document.write()可以简写成:document.write().
var name='小强';
undefined
window.name;
"小强"
3.window的一些操作方法(只做了解)
window.open();(打开一个新的网页)
Window {parent: Window, opener: Window, top: Window, length: 0, frames: Window, …};
2.window.innerHeight;  显示网页高度;
3.window.innerWidth;  显示网页宽度;
window.open();(打开一个新的网页)
Window {parent: Window, opener: Window, top: Window, length: 0, frames: Window, …};
2.window.innerHeight;  显示网页高度;
3.window.innerWidth;  显示网页宽度;
4.histoty对象的一些方法:
history.back
ƒ back() { [native code] }
history.forward;
ƒ forward() { [native code] }
5.location的一些属性:
5.1显示当前浏览网页的url;
location.href;
"https://www.bing.com/?mkt=zh-CN&mkt=zh-CN"
5.2跳转到指定页面:
location.href='http://www.baidu.com';
6.打开网页时出现弹窗的操作:
6.1alert操作:
alert('hello');
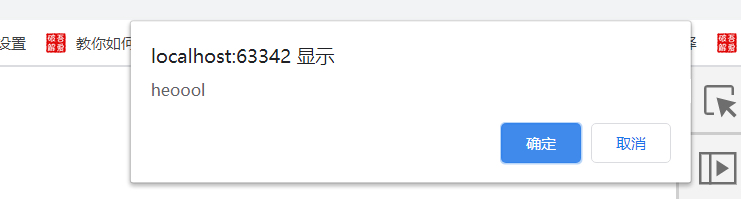
6.2confirm:认证操作:如果选择确认返回true,翻则取消返回false;
confirm('heoool');
6.3prompt(在文本框中输入内容并返回)
var n=prompt('请输入内容');
console.log(n);
7.计时相关的操作:
7.1setTimeout(js语句,秒数);当时间到了以后就可以执行js的语句:注js语句要放到引号中:
setTimeout("alert('hello')",3000);
function foo(){
    console.log('hehe');
}
setTimeout(foo(),10000);
(下面这一个有问题)
7,2cleartimeout()请输时间的格式:
var n1=setTimeout("alert('hello')",3000);
console.log(n1);
var n1=setTimeout("alert('hello')",3000);
console.log(n1);
clearTimeout(2);
console.log(n1);
7。3每隔一定时间执行一次js代码:
function foo(){
    console.log('hehe');
}
var t=setInterval('foo()',10000);
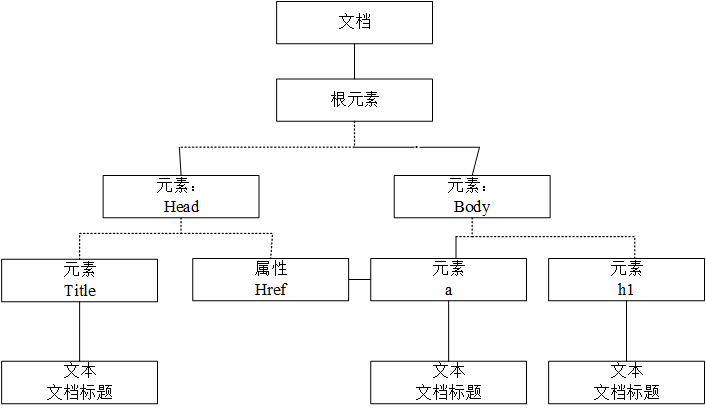
8.DOM
8.1DOM是一套对文档的内容进行抽象和概念化的方法。
8.2当网页被加载时,浏览器会创建页面的文档对象模型(document object model)。
8.3html dom 模型被构造为对象的数。
9 html dom
10JavaScript 可以通过DOM来创建·动态的html
1.JavaScript能够改变页面中所有的html元素
2.JavaScript能够改变html中所有的html属性
3.JavaScript能够改变页面中所有css样式
4.JavaScript能够对页面中所有事件做出反应。
11.DOM操作:
11.1获取某个元素的id
var d2=document.getElementById("d2");
11.2获取某个元素的类:
document.getElementsByClassName('c1');
HTMLCollection(2) [div#d1.c1, div#d2.c1, d1: div#d1.c1, d2: div#d2.c1]
11.3通过标签来进行查找:
document.getElementsByTagName('div');
HTMLCollection(3) [div#d1.c1, div#d2.c1, div, d1: div#d1.c1, d2: div#d2.c1]
12.进行间接查找:
1.查找父类标签:
var d4Ele=document.getElementById('d4'); undefined userscript.html?id=3743f8e2-9258-415a-8a6b-6f0849b54fb6:12105 SpeedyPlay Info: waiting... d4Ele.parentElement; <div id="d3">…</div>
2,查找所有子标签:
var d3Ele=document.getElementById('d3');
undefined
7userscript.html?id=3743f8e2-9258-415a-8a6b-6f0849b54fb6:12105  SpeedyPlay Info: waiting...
d3Ele.children;
HTMLCollection(4) [div#d4, div#dt, div#d55, div#fff, d4: div#d4, dt: div#dt, d55: div#d55, fff: div#fff]
3.查找第一子标签元素:
d3Ele.firstElementChild; <div id="d4">fjinljj</div>
4.查找最后一个子标签元素:
d3Ele.lastElementChild;
5.查找上一个兄弟标签:
dtEle.previousElementSibling; <div id="d4">fjinljj</div>
6.查找下一个标签:
dtEle.nextElementSibling; <div id="d55">fjdkjf</div>
13.进行元素的创建和属性的添加:
1.进行元素的创建:
var imgEle=document.createElement('img');
undefined
2.追加一个子节点:(放到最后面):
d3Ele.appendChild(imgEle);
<img>
4.吧增加的节点放到某个节点的前面:(插入创建的元素时不需要加引号,而且左边放入插入的元素,右边放入插入对象的前面)
var p1Ele=document.createElement('p'); undefined var d4Ele=document.getElementById('d4'); undefined d3Ele.insertBefore(p1Ele,d4Ele); <p></p>
5.给创键的对象添加文本和链接:
aEle.innerText='s搜房';
"s搜房"
aEle.href='http://www.baidu.com';
"http://www.baidu.com"
6.删除某个子节点:
var dtEle=document.getElementById('dt'); undefined d3Ele.removeChild(dtEle); <div id="dt">jfj</div>
7.节点之间的替换:
var a1Ele=document.createElement('a'); undefined var d55Ele=document.getElementById('d55'); undefined d3Ele.replaceChild(a1Ele,d55); <div id="d55">fjdkjf</div>
8类的一些操作方法:
var divEle=document.getElementsByTagName('div'); undefined divEle HTMLCollection [div.c1.c2.c3] divEle[0] <div class="c1 c2 c3">ffff</div> divEle[0].className "c1 c2 c3" var divList=divEle[0].classList; undefined divList.remove('c1'); undefined divList DOMTokenList(2) ["c2", "c3", value: "c2 c3"] divList.append('c99'); VM1981:1 Uncaught TypeError: divList.append is not a function at <anonymous>:1:9 (anonymous) @ VM1981:1 divList.add('c99'); undefined
9.classList.contians(cls)存在返回true,否则返会false;
divList.contains('c1');
false
divList.contains('c2');
true
10.classList.toggle(cls)存在就删除,不存在就进行添加;
<style>
        .c1{
            height: 200px;
            200px;
            border-radius:50%;
            background-color:yellow;
        }
        .c2{
            background-color:red;
        }
    </style>
    <script>

    </script>
    <title>内容补充</title>
</head>
<body>
<form action="">
    <label for="i1">用户名
        <input id="i1" name="username" type="text">
    </label>
    <label for="i2">男
        <input id ='i2' name="gener" vaule="0" type="radio">
    </label>
    <label for="i3">女
        <input id="i3" name="gener" value="1" type="radio">
    </label>
    <label for="i4">
        <select name="from" id="i4">
            <option value="011">北京</option>
            <option value="012">南京</option>
            <option value="013">上海</option>
            <option value=""014>苏州</option>
        </select>
        <label for="i5">
            <textarea name="meno" id="i5" cols="30" rows="10">

            </textarea>
        </label>
    </label>
    <div class="c1 c2 "onclick="change(this)"></div>
    <script>
        function change(ths){
            ths.classList.toggle('c2');
        }
    </script>
14.获取操作的值:适用于input 、select、textarea;
<form action="">
    <label for="i1">用户名
        <input id="i1" name="username" type="text">
    </label>
    <label for="i2">男
        <input id ='i2' name="gener" vaule="0" type="radio">
    </label>
    <label for="i3">女
        <input id="i3" name="gener" value="1" type="radio">
    </label>
    <label for="i4">
        <select name="from" id="i4">
            <option value="011">北京</option>
            <option value="012">南京</option>
            <option value="013">上海</option>
            <option value=""014>苏州</option>
        </select>
        <label for="i5">
            <textarea name="meno" id="i5" cols="30" rows="10">

            </textarea>
        </label>
    </label>
1获取输入的值:使用value进行获取值
liEle.value;
15.对于含有横线的css属性2,将中间的横线后面的第一个字母换成大写即可:
1obj.sytle.marginTOP
2.obj.style.fontFamily;
16.事件的绑定操作:’
1:一般会进行3个步骤:1用户可以在浏览器上点击标签,然后标签会触发一个点击的事件,事件需要函数来进行处理。
1.onclick 当用户点击某个对象时调用事件的句柄:
2.看下面程序,并且看怎么进行修改:
<div class="c1 c2 "onclick="change(this)"></div>
    <div class="c1 c2 "onclick="change(this)"></div>
    <div class="c1 c2 "onclick="change(this)"></div>
    <div class="c1 c2 "onclick="change(this)"></div>
    <script>
        function change(ths){
            ths.classList.toggle('c2');
        }
    </script>
2.修改过后的程序:(当点击道哪一个元素的时候this就代表哪一个元素)当鼠标·点击此标签时,this就会链接到此标签上
 <div class="c1 c2 "></div>
    <div class="c1 c2 "></div>
    <div class="c1 c2"></div>
    <div class="c1 c2"></div>
    <script>
        var divEle = document.getElementsByTagName('div');
        for (var i = 0; i < divEle.length; i++) {
            divEle[i].onclick = function () {
                ths.classList.toggle('c2');
            }
        }

    </script>
3文本输入框定时器的问题:
4.文本输入框输入内容的问题;onfocus(元素获取焦点 元素失去焦点)
<script>
     var ilEle=document.getElementById('i1');
        ilEle.onfocus=function(){
            this.value='';
        }
        ilEle.onblur=function(){
            if (!this.value.trim()){
                this.value='水井坊';
            }
        }
5.select中选择一个城市之后可以进行下面城镇的选择:(域内容发生改变的时候)
<head>
    <script src="01内容补充.js"></script>
    <meta charset="UTF-8">
    <style>
        .c1 {
            height: 200px;
             200px;
            border-radius: 50%;
            background-color: yellow;
        }

        .c2 {
            background-color: red;
        }
    </style>
    <script>

    </script>
    <title>内容补充</title>
</head>
<body>

<form action="">
    <label for="i1">用户名
        <input id="i1" name="username" type="text" value="水井坊">
        <input id="start" type="button" value="开始">
        <input id="stop" type="button" value="结束">
    </label>
    <label for="i2">男
        <input id='i2' name="gener" vaule="0" type="radio">
    </label>
    <label for="i3">女
        <input id="i3" name="gener" value="1" type="radio">
    </label>

    <label for="i4">
        <select name="from" id="i4">
            <option value="1">北京</option>
            <option value="2">南京</option>
            <option value="013">上海</option>
            <option value="" 014>苏州</option>
        </select>
        <select name="" id="i42">

        </select>
        <label for="i5">
            <textarea name="meno" id="i5" cols="30" rows="10">

            </textarea>
        </label>
    </label>
    <div class="c1 c2 "></div>
    <div class="c1 c2 "></div>
    <div class="c1 c2"></div>
    <div class="c1 c2"></div>
    <script>
        var dic1 = {1:['清华','北大','北航'], 2: ['南师','南大']}
        var se1Ele = document.getElementById('i4');
        se1Ele.onchange = function () {
            var selValue = this.value;
            var dicValue = dic1[selValue];
            console.log(selValue);
            console.log(dicValue);
            var se2Ele = document.getElementById('i42');
            se2Ele.innerHTML = '';
            for (var i = 0; i < dicValue.length; i++) {
                var optionEle = document.createElement('option');
                optionEle.innerText = dicValue[i];
                se2Ele.appendChild(optionEle);
            }
        }


    </script>
</form>
</div>
</body>