后处理bean,如果是返回bean,那么什么都不做直接把这个类原封不动地给你返回回去。
在它执行一些逻辑方法的时候对它进行逻辑增强,比如说进行时间监控,权限管理,日志的记录等等。
要做肯定是对正常的类增强才可以,因为正常你就调用这个类的add或者find()方法了。
增强的方法:继承、装饰者模式、动态代理。
装饰者的缺点是:如果你的接口中的方法太多,而你只需要增强其中的某一个方法,那你这个类里面就得写特别特别多的方法。而且其他的方法都是原封不动地给人家返回的。
动态代理:最灵活。对这个类生成一个代理类,Proxy.newProxyInstance()对bean这个类生成代理。
public Object postProcessAfterInitialization(final Object bean, String beanName){
//不是对所有的类都增强,如果想对所有的类都增强,直接在这里生成代理类即可。
//如果只想对某个类增强,判断这个类的名字是不是我们在Spring中注册的那个customerService.
//Spring可能配置了非常多的类,但是我只增强customerService.如果你配置了b1、b2、b3,那么b1、b2、b3正常也会执行我们的后处理bean.
//调用业务的任何一个方法(调用add()或者是find())都相当于执行InvocationHandler的invoke()方法.那就可以在它执行之前或者是之后做一些事情.
//不管怎么做都会生成一个customerService的代理类.代理类才有增强的代码,不是代理类就没有增强的代码.所以判断,如果这个类是customerService,返回代理类;如果不是customerService,把没有增强的类返回.
//通过后处理bean对某些类进行增强.
}
其实Spring AOP的思想的有一部分是基于后处理bean。
package cn.itcast.spring3.demo5;

import org.junit.Test;
import org.springframework.context.ApplicationContext;
import org.springframework.context.support.ClassPathXmlApplicationContext;

public class SpringTest5 {


    @Test
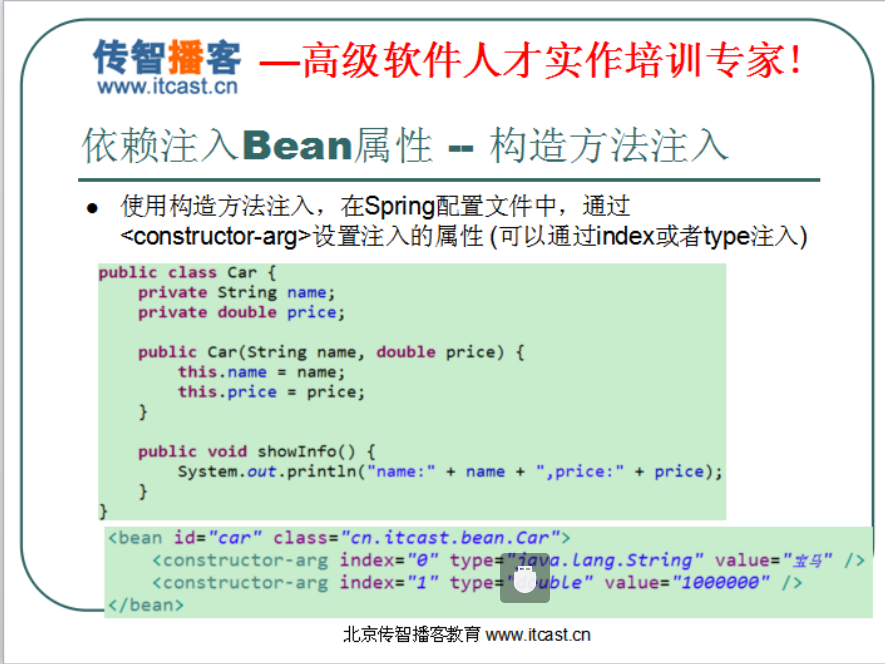
    public void demo5(){//Spring注入属性的两种方式:一种是构造器的注入
    ApplicationContext applicationContext = new ClassPathXmlApplicationContext("applicationContext.xml");
    Car car = (Car) applicationContext.getBean("car");
    System.out.println(car);

    }
    @Test
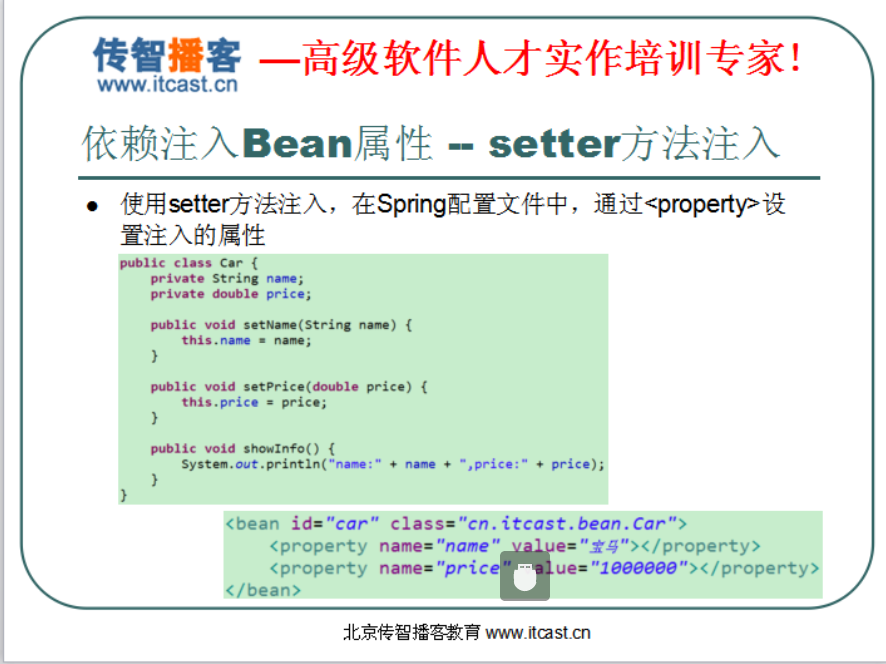
    public void demo6(){//还有一种是setter方法的注入
        ApplicationContext applicationContext = new ClassPathXmlApplicationContext("applicationContext.xml");
        Car2 car2 = (Car2) applicationContext.getBean("car2");
        System.out.println(car2);

    }


}
package cn.itcast.spring3.demo5;

public class Car2 {
  private String name;
  private String price;
public String getName() {
    return name;
}
public void setName(String name) {
    this.name = name;
}
public String getPrice() {
    return price;
}
public void setPrice(String price) {
    this.price = price;
}
@Override
public String toString() {
    return "Car2 [name=" + name + ", price=" + price + "]";
}


}
package cn.itcast.spring3.demo5;

public class Car {
     private String name;
     private Double price;


    public Car() {
        super();

    }


    public Car(String name, Double price) {
        super();
        this.name = name;
        this.price = price;
    }


    @Override
    public String toString() {
        return "Car [name=" + name + ", price=" + price + "]";
    }


}
<?xml version="1.0" encoding="UTF-8"?>
<!-- 别去schema,schema是文件,本地的文件,你得引那个头 -->

<beans xmlns="http://www.springframework.org/schema/beans"
       xmlns:xsi="http://www.w3.org/2001/XMLSchema-instance"
       xsi:schemaLocation="
http://www.springframework.org/schema/beans http://www.springframework.org/schema/beans/spring-beans.xsd">
<!-- demo1快速入门================================================= -->
<!-- 把接口和实现类在这个配置文件中配置,有了实现类的全路径之后到时候才能用工厂反射 -->

   <!-- 通过一个<bean>标签来设置类的信息,通过id属性为类起个标识. -->
    <!-- 接口,实现类,配置文件也都有了 -->
    <!-- 现在有一个工厂Spring为我们提供好了,其实就是解析这个XML文件 -->
    <!-- 这个工厂你自己写会不会写?你用dom4j找里面的bean标签,找到class的属性值,然后就可以Class.forName()反射生成类的实例.其实Spring
         也是这么做的,只不过工厂由Spring提供好了
     -->
    <bean id="helloService" class="cn.itcast.spring3.demo1.HelloServiceImpl">
         <!-- 使用<property>标签注入属性
         value指的是普通值
         ref指的是对象
         -->
    <property name="info"  value="传智播客"></property>
    </bean>
    <!-- demo1快速入门 -->
    <!-- demo2Bean的实例化 -->
    <!-- 默认情况下使用的就是无参数的构造方法. -->
    <!--
    <bean id="bean1" class="cn.itcast.spring3.demo2.Bean1"></bean>
    -->
    <!--
    <bean name="bean1" class="cn.itcast.spring3.demo2.Bean1"></bean>
    -->
    <!-- 第二种使用静态工厂实例化 不能写class了,因为现在不是由Spring直接帮你创建对象了-->
    <!--
    <bean id="bean2" class="cn.itcast.spring3.demo2.Bean2Factory" factory-method="getBean2"></bean>
    -->
    <!-- 第三种使用实例工厂实例化 -->
    <!--
    <bean id="bean3" factory-bean="bean3Factory" factory-method="getBean3"></bean>
    -->
    <!-- 要先把Bean3Factory实例化 -->
    <!--
    <bean id="bean3Factory" class="cn.itcast.spring3.demo2.Bean3Factory"></bean>
    -->
    <!-- demo2Bean的实例化======================  end-->

    <!-- demo3Bean的作用范围======================= -->
    <!--
    <bean id="customer" class="cn.itcast.spring3.demo3.Customer" scope="prototype"></bean>
    -->
    <!--
    <bean id="product" class="cn.itcast.spring3.demo3.Product" init-method="setup" destroy-method="teardown" scope="singleton">
       <property name="name" value="空调">-->
       <!-- 把Product类的属性name注入进来 -->
       <!--
       </property>
    </bean>
 -->

       <!-- demo4Bean的生命周期======================= -->
       <bean id="customerService" class="cn.itcast.spring3.demo4.CustomerServiceImpl" init-method="setup"  destroy-method="teardown">

          <property name="name" value="itcast"></property>
       </bean>
       <!-- 后处理Bean是由Spring容器自动调用不用你管,我们起个id是为了我们在程序中去获得它。但是这个类不用由我们获得, 由Spring自动调用。cn.itcast.spring3.demo4.MyBeanPostProcessor是后处理Bean-->
        <bean class="cn.itcast.spring3.demo4.MyBeanPostProcessor"></bean>
       <!-- demo5Bean的属性注入=====================================================================================================================================-->
       <!-- 构造方法的注入 -->
       <bean id="car" class="cn.itcast.spring3.demo5.Car">
       <!--
        <constructor-arg name="name" value="宝马"></constructor-arg>
        -->
        <!-- 通过这个标签为类注入属性 -->
        <!--
        <constructor-arg name="price" value="1000000"></constructor-arg>
        -->
        <!-- 通过这个标签为类注入属性 -->
        <constructor-arg index="0" type="java.lang.String" value="奔驰"></constructor-arg><!-- 通过这个标签为类注入属性 -->
        <constructor-arg index="1" type="java.lang.Double" value="2000000"></constructor-arg><!-- 通过这个标签为类注入属性 -->

       </bean>

       <bean id="car2" class="cn.itcast.spring3.demo5.Car2">
       <!-- <property>标签中name就是属性名称,value是普通属性的值,ref:引用其他的对象 -->
       <property name="name" value="保时捷"></property>
       <property name="price" value="5000000"></property>
       </bean>


</beans>


