让我们从一个简单的项目(遥控器)了解命令模式,然后再给出他的定义:
此项目地址:
实现命令接口:
首先,让所有的命令对象实现相同的包含一个方法的接口。我们暂且使用一贯的名称execute()。
这就是命令接口(Command.java):
1 public interface Command {
2     public void execute();  //简单,只须一个方法 execute()
3 }
实现一个打开电灯的命令:
现在,假设想实现一个打开电灯的命令。有已知我们的Light类有两个方法:on()和off()。下面是如
何将它实现成一个命令(LightOnCommand.java):
 1 //这是一个命令,所以要实现Command接口
 2 public class LightOnCommand implements Command{
 3     Light light;
 4
 5 //    构造器被传入某个电灯(比如客厅的电灯),以便让这
 6 //    个命令控制。一旦调用execute(),就有这个电灯对象
 7 //    成为接收者。负责接收请求。
 8     public LightOnCommand(Light light){
 9         this.light = light;
10     }
11
12 //    这个execute()方法调用接收对象(我们正在控制的电灯)的on()方法
13     public void execute(){
14         light.on();
15     }
16 }
现在有了LightOnCommand类,接下来让我们看一下如何使用它(SimpleRemoteController.java):
 1 public class SimpleRemoteControl {
 2     //有一个插槽持有命令,而这个命令控制着一个装置
 3     Command slot;
 4
 5     public SimpleRemoteControl(){};
 6
 7     //这个方法用来设置插槽控制的命令。如果想改变遥
 8     // 控器按钮的行为,可以多次调用这个方法
 9     public void setCommand(Command command){
10         slot = command;
11     }
12
13     //当按下按钮时,这个方法就会被调用,使得当前命
14     // 令衔接插槽,并调用方法execute()
15     public void buttonWasPressed(){
16         slot.execute();
17     }
18 }
现在让我们测试一下(Main.java):
 1 public class Main {
 2
 3     public static void main(String[] args) {
 4         SimpleRemoteControl remote = new SimpleRemoteControl();
 5         Light light = new Light();
 6         LightOnCommand lightOn = new LightOnCommand(light);
 7
 8         remote.setCommand(lightOn);
 9         remote.buttonWasPressed();
10     }
11 }
结果:
好啦!通过如上例子,现在我们该给出命令模式的定义了:
命令模式:将“请求”封装成对象,以便使用不同的请求、队列或者日志来参数化其他对象。命令
模式也支持撤销的操作。
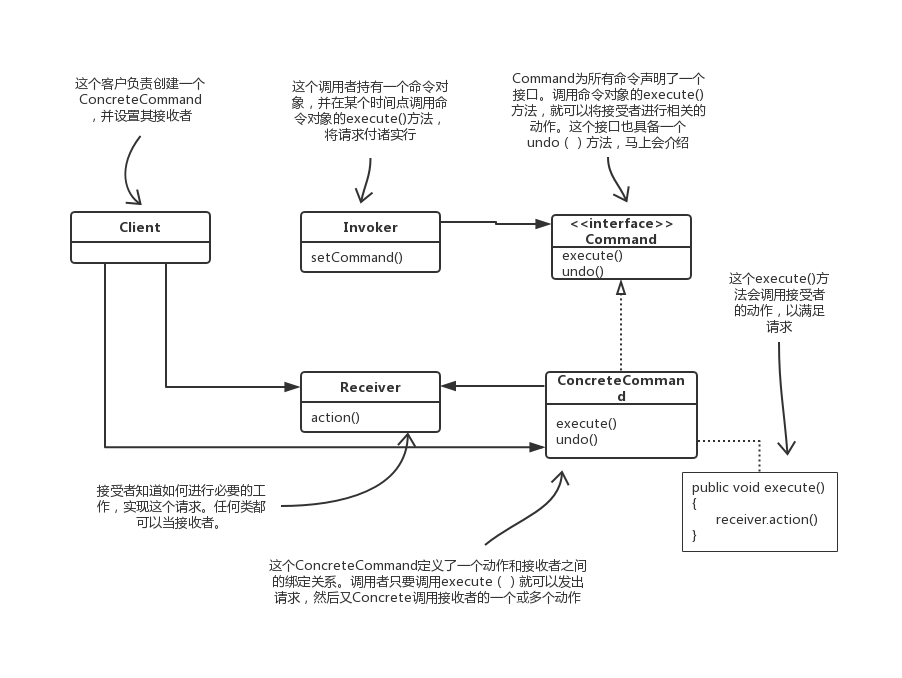
来看看他的类图:
上面完成了简单遥控,但是要知道,一个遥控器可不止有一个插槽(每个插槽都具备了“开”和“关”
按钮),所以我们现在就要用到数组,作如下工作:
1 onCommand[0] = onCommand;
2 offCommand[0] = offCommand;
实现遥控器(RemoteController.java):
 1 public class RemoteControl {
 2     //这时候,遥控器要处理7个开宇关的命令,使用相应的数组记录这些命令
 3     Command[] onCommands;
 4     Command[] offCommands;
 5
 6     public RemoteControl() {
 7         //在构造器中,只需实例化并初始化这两个开与关的数组
 8         onCommands = new Command[7];
 9         offCommands = new Command[7];
10
11         Command noCommand = new NoCommand();
12         for (int i = 0; i < 7; i++) {
13             onCommands[i] = noCommand;
14             offCommands[i] = noCommand;
15         }
16     }
17
18     //这个方法需要有3个参数,分别是插槽的位置,开的命令、关的命令。这些命令将记录
19     // 在开关数组中对应的插槽位置、以供稍后使用
20     public void setCommand(int slot, Command onCommand, Command offCommand) {
21         onCommands[slot] = onCommand;
22         offCommands[slot] = offCommand;
23     }
24
25     //当按下开或关的按钮,硬件就会负责调用相应的方法,也就是onButtonWasPushed
26     // 或offButtonWasPushed
27     public void onButtonWasPushed(int slot) {
28         onCommands[slot].execute();
29     }
30
31     public void offButtonWasPushed(int slot) {
32         offCommands[slot].execute();
33     }
34
35     public String toString() {
36         StringBuffer stringBuff = new StringBuffer();
37         stringBuff.append("
------ Remote Control -------
");
38         for (int i = 0; i < onCommands.length; i++) {
39             stringBuff.append("[slot " + i + "] " + onCommands[i].getClass().getName()
40                 + "    " + offCommands[i].getClass().getName() + "
");
41         }
42         return stringBuff.toString();
43     }
44 }
实现命令:
LightOffCommand.java:
 1 public class LightOffCommand implements Command {
 2     Light light;
 3
 4     public LightOffCommand(Light light) {
 5         this.light = light;
 6     }
 7
 8     public void execute() {
 9         light.off();
10     }
11 }
还有很多命令就不一一列举了,原理都一样,相当于很多机械操作。
开始测试遥控器:
 1 public class RemoteLoader {
 2
 3     public static void main(String[] args) {
 4         RemoteControl remoteControl = new RemoteControl();
 5
 6         Light livingRoomLight = new Light("Living Room");
 7         Light kitchenLight = new Light("Kitchen");
 8         CeilingFan ceilingFan= new CeilingFan("Living Room");
 9         GarageDoor garageDoor = new GarageDoor("");
10         Stereo stereo = new Stereo("Living Room");
11
12         LightOnCommand livingRoomLightOn = new LightOnCommand(livingRoomLight);
13         LightOffCommand livingRoomLightOff = new LightOffCommand(livingRoomLight);
14         LightOnCommand kitchenLightOn = new LightOnCommand(kitchenLight);
15         LightOffCommand kitchenLightOff = new LightOffCommand(kitchenLight);
16
17         CeilingFanOnCommand ceilingFanOn = new CeilingFanOnCommand(ceilingFan);
18         CeilingFanOffCommand ceilingFanOff = new CeilingFanOffCommand(ceilingFan);
19
20         GarageDoorUpCommand garageDoorUp = new GarageDoorUpCommand(garageDoor);
21         GarageDoorDownCommand garageDoorDown = new GarageDoorDownCommand(garageDoor);
22
23         StereoOnWithCDCommand stereoOnWithCD = new StereoOnWithCDCommand(stereo);
24         StereoOffCommand  stereoOff = new StereoOffCommand(stereo);
25
26         remoteControl.setCommand(0, livingRoomLightOn, livingRoomLightOff);
27         remoteControl.setCommand(1, kitchenLightOn, kitchenLightOff);
28         remoteControl.setCommand(2, ceilingFanOn, ceilingFanOff);
29         remoteControl.setCommand(3, stereoOnWithCD, stereoOff);
30
31         System.out.println(remoteControl);
32
33         remoteControl.onButtonWasPushed(0);
34         remoteControl.offButtonWasPushed(0);
35         remoteControl.onButtonWasPushed(1);
36         remoteControl.offButtonWasPushed(1);
37         remoteControl.onButtonWasPushed(2);
38         remoteControl.offButtonWasPushed(2);
39         remoteControl.onButtonWasPushed(3);
40         remoteControl.offButtonWasPushed(3);
41     }
42 }
注:在遥控器中,我们不想每次都检查是否某个插槽都加载了命令。比方说,在这个onButtonWasP-
ushed()方法中,我们可能需要这样的代码:
1 public void onButtonWasPushed(int slot){
2       if(onCommands[slot] != null){
3             onCommands[slot].execute();
4       }
5 }
So,为了避免上述做法,我们实现一个不做事前的命令:
1 public class NoCommand implements Command {
2     public void execute() { }
3 }
这么一来,在RemoteControl构造器中,我们将个每个插槽都预先制定或NoCommand对象,以便
确定每个插槽永远都有名命令对象。
1         Command noCommand = new NoCommand();
2         for (int i = 0; i < 7; i++) {
3             onCommands[i] = noCommand;
4             offCommands[i] = noCommand;
5         }
所以在测试的输出中,没有被明确指定命令的插槽,其命令将是默认的NoCommand对象。
第二个项目代码地址:
https://github.com/Stray-Kite/Design-Pattern/tree/master/src/headfirst/designpatterns/command/remote
还记得我们之前说的undo操作嘛?现在我们来实现它:
代码地址:https://github.com/Stray-Kite/Design-Pattern/tree/master/src/headfirst/designpatterns/command/undo
我们只需要在Command.java,我们只需加上第三行代码就好:
1 public interface Command {
2     public void execute();
3     public void undo();
4 }
然后再从LightOnCommand开始下手:
 1 public class LightOnCommand implements Command {
 2     Light light;
 3     int level;
 4     public LightOnCommand(Light light) {
 5         this.light = light;
 6     }
 7
 8     public void execute() {
 9         level = light.getLevel();
10         light.on();
11     }
12
13     //加上
14     public void undo() {
15         light.dim(level);
16     }
17 }
最后是RemoteControllerWithUndo.java:
 1 public class RemoteControlWithUndo {
 2     Command[] onCommands;
 3     Command[] offCommands;
 4     Command undoCommand;
 5
 6     public RemoteControlWithUndo() {
 7         onCommands = new Command[7];
 8         offCommands = new Command[7];
 9
10         Command noCommand = new NoCommand();
11         for(int i=0;i<7;i++) {
12             onCommands[i] = noCommand;
13             offCommands[i] = noCommand;
14         }
15         undoCommand = noCommand;
16     }
17
18     public void setCommand(int slot, Command onCommand, Command offCommand) {
19         onCommands[slot] = onCommand;
20         offCommands[slot] = offCommand;
21     }
22
23     public void onButtonWasPushed(int slot) {
24         onCommands[slot].execute();
25         undoCommand = onCommands[slot];
26     }
27
28     public void offButtonWasPushed(int slot) {
29         offCommands[slot].execute();
30         undoCommand = offCommands[slot];
31     }
32
33     public void undoButtonWasPushed() {
34         undoCommand.undo();
35     }
36
37     public String toString() {
38         StringBuffer stringBuff = new StringBuffer();
39         stringBuff.append("
------ Remote Control -------
");
40         for (int i = 0; i < onCommands.length; i++) {
41             stringBuff.append("[slot " + i + "] " + onCommands[i].getClass().getName()
42                 + "    " + offCommands[i].getClass().getName() + "
");
43         }
44         stringBuff.append("[undo] " + undoCommand.getClass().getName() + "
");
45         return stringBuff.toString();
46     }
47 }
测试类(RemoteLoader.java):
 1 public class RemoteLoader {
 2
 3     public static void main(String[] args) {
 4         RemoteControlWithUndo remoteControl = new RemoteControlWithUndo();
 5
 6         Light livingRoomLight = new Light("Living Room");
 7
 8         LightOnCommand livingRoomLightOn = new LightOnCommand(livingRoomLight);
 9         LightOffCommand livingRoomLightOff = new LightOffCommand(livingRoomLight);
10
11         remoteControl.setCommand(0, livingRoomLightOn, livingRoomLightOff);
12
13         remoteControl.onButtonWasPushed(0);
14         remoteControl.offButtonWasPushed(0);
15         System.out.println(remoteControl);
16         remoteControl.undoButtonWasPushed();
17         remoteControl.offButtonWasPushed(0);
18         remoteControl.onButtonWasPushed(0);
19         System.out.println(remoteControl);
20         remoteControl.undoButtonWasPushed();
21 22     }
23 }
好了,实现电灯的撤销很简单。但是,通常,想要实现撤销的功能,需要记录一些状态。让我们是一个更有
趣的例子,比方说厂商类中的天花板的吊扇。吊扇允许有多种转动速度,当然也允许被关闭。
吊扇源码如下:
 1 public class CeilingFan {
 2     public static final int HIGH = 3;
 3     public static final int MEDIUM = 2;
 4     public static final int LOW = 1;
 5     public static final int OFF = 0;
 6     String location;
 7     int speed;
 8
 9     public CeilingFan(String location) {
10         this.location = location;
11         speed = OFF;
12     }
13
14     public void high() {
15         speed = HIGH;
16         System.out.println(location + " ceiling fan is on high");
17     }
18
19     public void medium() {
20         speed = MEDIUM;
21         System.out.println(location + " ceiling fan is on medium");
22     }
23
24     public void low() {
25         speed = LOW;
26         System.out.println(location + " ceiling fan is on low");
27     }
28
29     public void off() {
30         speed = OFF;
31         System.out.println(location + " ceiling fan is off");
32     }
33
34     public int getSpeed() {
35         return speed;
36     }
37 }
加入撤销到吊扇的命令类(CeilingFanHighCommand.java):
 1 public class CeilingFanHighCommand implements Command {
 2     CeilingFan ceilingFan;
 3     int prevSpeed;
 4
 5     public CeilingFanHighCommand(CeilingFan ceilingFan) {
 6         this.ceilingFan = ceilingFan;
 7     }
 8
 9     public void execute() {
10         prevSpeed = ceilingFan.getSpeed();
11         ceilingFan.high();
12     }
13
14     public void undo() {
15         if (prevSpeed == CeilingFan.HIGH) {
16             ceilingFan.high();
17         } else if (prevSpeed == CeilingFan.MEDIUM) {
18             ceilingFan.medium();
19         } else if (prevSpeed == CeilingFan.LOW) {
20             ceilingFan.low();
21         } else if (prevSpeed == CeilingFan.OFF) {
22             ceilingFan.off();
23         }
24     }
25 }
添加测试类(RemoteLoader.java):
 1 public class RemoteLoader {
 2
 3     public static void main(String[] args) {
 4         CeilingFan ceilingFan = new CeilingFan("Living Room");
 5
 6         CeilingFanMediumCommand ceilingFanMedium = new CeilingFanMediumCommand(ceilingFan);
 7         CeilingFanHighCommand ceilingFanHigh = new CeilingFanHighCommand(ceilingFan);
 8         CeilingFanOffCommand ceilingFanOff = new CeilingFanOffCommand(ceilingFan);
 9
10         remoteControl.setCommand(0, ceilingFanMedium, ceilingFanOff);
11         remoteControl.setCommand(1, ceilingFanHigh, ceilingFanOff);
12
13         remoteControl.onButtonWasPushed(0);
14         remoteControl.offButtonWasPushed(0);
15         System.out.println(remoteControl);
16         remoteControl.undoButtonWasPushed();
17
18         remoteControl.onButtonWasPushed(1);
19         System.out.println(remoteControl);
20         remoteControl.undoButtonWasPushed();
21     }
22 }
最后,我们相同时弄暗灯光、打开音响和电视、设置好DVD,并让热水器开始加温:
代码地址: https://github.com/Stray-Kite/Design-Pattern/tree/master/src/headfirst/designpatterns/command/party
MacroCommand.java:
 1 public class MacroCommand implements Command {
 2     Command[] commands;
 3
 4     public MacroCommand(Command[] commands) {
 5         this.commands = commands;
 6     }
 7
 8     public void execute() {
 9         for (int i = 0; i < commands.length; i++) {
10             commands[i].execute();
11         }
12     }
13
14     public void undo() {
15         for (int i = commands.length -1; i >= 0; i--) {
16             commands[i].undo();
17         }
18     }
19 }
使用宏命令(RemoteLoader.java):
 1 public class RemoteLoader {
 2
 3     public static void main(String[] args) {
 4
 5         RemoteControl remoteControl = new RemoteControl();
 6
 7         //首先创建想要进入宏的命令集合
 8         Light light = new Light("Living Room");
 9         TV tv = new TV("Living Room");
10         Stereo stereo = new Stereo("Living Room");
11         Hottub hottub = new Hottub();
12
13         LightOnCommand lightOn = new LightOnCommand(light);
14         StereoOnCommand stereoOn = new StereoOnCommand(stereo);
15         TVOnCommand tvOn = new TVOnCommand(tv);
16         HottubOnCommand hottubOn = new HottubOnCommand(hottub);
17         LightOffCommand lightOff = new LightOffCommand(light);
18         StereoOffCommand stereoOff = new StereoOffCommand(stereo);
19         TVOffCommand tvOff = new TVOffCommand(tv);
20         HottubOffCommand hottubOff = new HottubOffCommand(hottub);
21
22         //接下来创建两个数组,其中一个用来记录开启命令,另一个用来记录关闭命令,并在数组内放入对应的命令
23         Command[] partyOn = { lightOn, stereoOn, tvOn, hottubOn};
24         Command[] partyOff = { lightOff, stereoOff, tvOff, hottubOff};
25
26         MacroCommand partyOnMacro = new MacroCommand(partyOn);
27         MacroCommand partyOffMacro = new MacroCommand(partyOff);
28
29         //然后将宏命令指定给我们所希望的按钮
30         remoteControl.setCommand(0, partyOnMacro, partyOffMacro);
31
32         //最后,按一按按钮,测试一下
33         System.out.println(remoteControl);
34         System.out.println("--- Pushing Macro On---");
35         remoteControl.onButtonWasPushed(0);
36         System.out.println("--- Pushing Macro Off---");
37         remoteControl.offButtonWasPushed(0);
38     }
39 }