首先是使用WSDL协议实现:这里使用XFire,XFire一个免费、开源的SOAP框架,它构建了POJO和SOA之间的桥梁,主要特性就是支持将POJO通过非常简单的方式发布成Web服务,其原理是以接口反射机制自动取得远程方法的
什么是wsdl? 参考: http://blog.csdn.net/sunchaohuang/archive/2008/10/14/3076375.aspx
下面开始介绍如何使用XFire:
一:首先创建一个Maven项目,在pom.xml中引入依赖jar包
  <!-- XFire所依赖的jar包 -->
<dependency>
    <groupId>org.codehaus.xfire</groupId>
    <artifactId>xfire-all</artifactId>
    <version>1.2.6</version>
</dependency>
如果项目中本来就引入了spring的jar包,由于xfire-all-1.2.6.jar包中是会引起jar包冲突,所以需要去掉依赖的jar包:
<dependency>
    <groupId>org.codehaus.xfire</groupId>
    <artifactId>xfire-all</artifactId>
    <version>1.2.6</version>
    <exclusions>
        <exclusion>
            <groupId>org.springframework</groupId>
            <artifactId>spring</artifactId>
            <version>1.2.6</version>
        </exclusion>
    </exclusions>
</dependency>
二:把XFire加载到系统中来,增加web.xml的配置信息
<servlet>
        <servlet-name>XFireServlet</servlet-name>
        <servlet-class>org.codehaus.xfire.transport.http.XFireConfigurableServlet</servlet-class>
        <load-on-startup>1</load-on-startup>
</servlet>
<servlet-mapping>
        <servlet-name>XFireServlet</servlet-name>
        <url-pattern>/services/*</url-pattern>
</servlet-mapping>
三:创建一个model类
package com.ws.xfire.model;


public class TestModel {
    private String name ;
    private Integer age;

    public TestModel(){

    };

    public TestModel(Integer age, String name){
        this.age = age;
        this.name = name;
    }

    public String getName() {
        return name;
    }

    public void setName(String name) {
        this.name = name;
    }

    public Integer getAge() {
        return age;
    }

    public void setAge(Integer age) {
        this.age = age;
    }

}
四:创建web服务接口,声明该Web服务对外暴露的接口
package com.ws.xfire.impl;
import java.util.List;
import com.ws.xfire.model.TestModel;

public interface ITestService {
    public String getTestString(String str);
    public TestModel getTestObject(TestModel model);
    public List getTestList();
}
五:创建web服务实现类,提供接口的实现
package com.ws.xfire.impl;

import java.util.ArrayList;
import java.util.List;

import com.ws.xfire.model.TestModel;


public class TestServiceImpl implements ITestService{

    @Override
    public String getTestString(String str) {
        return "TestString:" + str;
    }

    @Override
    public TestModel getTestObject(TestModel model) {
        model.setAge(21);
        model.setName("小明");
        return model;
    }

    @Override
    public List<TestModel> getTestList() {
        List<TestModel> modelList = new ArrayList<TestModel>();
        Integer[] ageArr = new Integer[]{21,22,22};
        String[] nameArr = new String[]{"小明","小红","小亮"};

        for(int i=0; i<3; i++){
            modelList.add(new TestModel(ageArr[i],nameArr[i]));
        }

        return modelList;
    }

}
六:在src的目录下新建一个META-INF/xfire/services.xml文件,该文件是XFire框架的服务发布文件。
<?xml version="1.0" encoding="UTF-8"?>
<!-- 服务发布文件 -->
<beans xmlns="http://xfire.codehaus.org/config/1.0">
<!-- service标签和它所包含的xml内容为发布成Web服务的POJO提供完整的描述 -->
    <service>
        <!-- Web服务被发布时所采用的唯一名称 ,调用时需要指定这个-->
        <name>TestService</name>
        <!-- Web服务发布时所使用的命名空间 -->
        <namespace>http://test/TestService</namespace>
        <!-- Web服务接口类的全名 -->
        <serviceClass>com.ws.xfire.impl.ITestService</serviceClass>
        <!-- Web服务实现类的全名 -->
        <implementationClass>com.ws.xfire.impl.TestServiceImpl</implementationClass>

        <!-- 不需要接口时,把业务写在serviceClass标签中 -->
    </service>
</beans>
七:注意:当用到List这些集合类时,需要定义Mapping关系,必须与接口同名后缀.aegis.xml,而且要与接口同一位置。
<mappings xmlns:xsi="http://www.w3.org/2001/XMLSchema-instance"
  xsi:schemaLocation="http://xfire.codehaus.org/schemas/1.0/mapping.xsd">
    <!-- XFire可以支持基本类型,但针对集合类型时需要特殊配置 -->
    <mapping>
        <!-- 需要配置的方法名 -->
         <method name="getTestList">
            <!-- index="0"代表方法的参数的序号0即第一个参数,componentType属性代表集合参数内包含的类型,没有参数可不写-->
            <!-- <parameter index="0" componentType="java.lang.String" /> -->

            <!-- 配置返回类型,componentType属性代表返回的集合中所包含的类 -->
            <return-type componentType="com.ws.xfire.model.TestModel" />
        </method>

         <method name="getTestObject">
           <parameter index="0" componentType="com.ws.xfire.model.TestModel" />
            <return-type componentType="com.ws.xfire.model.TestModel" />
        </method>

   </mapping>
</mappings>

八:上面以外完成了服务端的基本配置,可以进行测试下,部署项目,启动Tomcat,我的端口号是80。访 问http://localhost:80/xFireDemo/services/TestService?wsdl,出现对应的wsdl文件即说明成功。

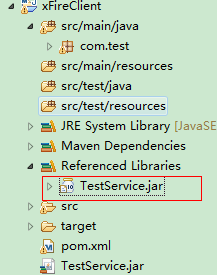
九:现在建立客户端项目,新建一个Maven项目xFireClient,并且导入相应的xfire的jar包,如第一步。客 户端类Client来进行测试,一般客户端测试需要把服务器端的接口和实体打成jar包给客户端引用,或者根 据wsdl生产客户端。
这里我们只需要将服务端中的ItestService接口和参数类TestModel打成jar包并引入到客户端项目中

十:接下去编写Client类:
package com.test;

import java.net.MalformedURLException;
import java.util.List;

import org.codehaus.xfire.XFire;
import org.codehaus.xfire.XFireFactory;
import org.codehaus.xfire.client.XFireProxyFactory;
import org.codehaus.xfire.service.Service;
import org.codehaus.xfire.service.binding.ObjectServiceFactory;

import com.ws.xfire.impl.ITestService;
import com.ws.xfire.model.TestModel;


public class Client {

    public static void main(String[] args) {
        //这里是创建一个service,需要传入一个接口类,因为我们后面必须调用相应的接口方法
         Service serviceModel = new ObjectServiceFactory().create(ITestService.class);

         //代理工厂,这里是为了后面创建相应的接口类
         //XFireProxyFactory factory = new XFireProxyFactory(XFireFactory.newInstance().getXFire());
         XFire xfire = XFireFactory.newInstance().getXFire();
         XFireProxyFactory factory = new XFireProxyFactory(xfire);

         String serviceUrl = "http://localhost:80/xFireDemo/services/TestService";
         ITestService client = null;
         try{
             client = (ITestService)factory.create(serviceModel,serviceUrl);
         }catch(MalformedURLException e){
             e.printStackTrace();
         }

         //测试获得服务器的getTestString方法
         String str = client.getTestString("Client");
         System.out.println("-----getTestString-------");
         System.out.println(str);
         System.out.println();

         //测试getTestObject方法
         TestModel model = new TestModel();
         model = client.getTestObject(model);
         System.out.println("-----getTestObject-------");
         System.out.println("name:" + model.getName() + ",age:" + model.getAge());
         System.out.println();

         //测试getTestList方法
         List<TestModel> list = client.getTestList();
         System.out.println("-----getTestList-------");
         for(TestModel item : list){
             System.out.println("name:" + item.getName() + ",age:" + item.getAge());
         }

    }

}
十一:编写好Client测试类后,还需要将xFireDemo中的aegis.xml文件放到客户端项目xFireClient里 面,位置和Client一致。

最后将服务器运行起来,然后在Client进行测试,结果如下:
