总结:
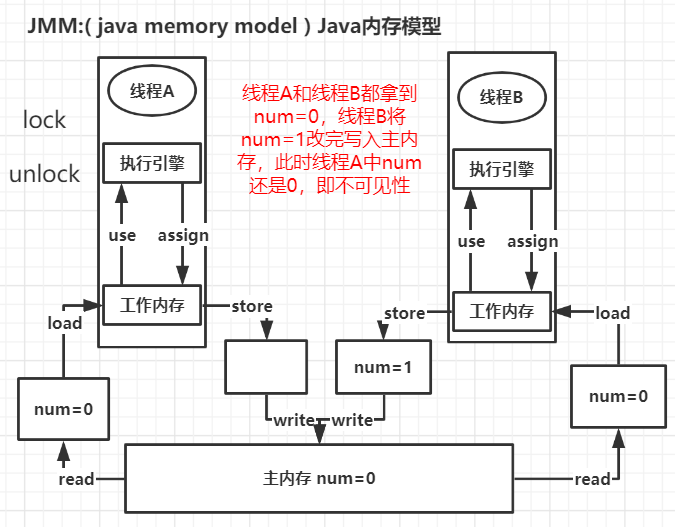
1、保证可见性(JMM)
2、不保证原子性 (核心难点:原子类)
3、禁止指令重排 (核心难点:说出单例模式。说出CAS。说出CPU原语)
 1 // 验证volatile 可见性
 2 public class JmmDemo {
 3     private volatile static int num = 0; // 不加volatile,程序会一直运行
 4     public static void main(String[] args) throws InterruptedException {
 5         new Thread(() -> {
 6             while (num==0){
 7
 8             }
 9         }).start();
10         TimeUnit.SECONDS.sleep(1L); // 睡眠一秒钟,保证进入while循环
11         num = 1;
12         System.out.println(Thread.currentThread().getName()+num);
13     }
14 }
 1 // 验证volatile 不保证原子性
 2 public class JmmDemo2 {
 3     // 不用synchronized lock锁来保证原子性
 4     // 使用AtomicInteger原子类
 5     private static AtomicInteger num = new AtomicInteger();
 6
 7     public static void add() {
 8         num.getAndIncrement(); // 相当于num++
 9     }
10
11     /*
12     // 验证volatile 不保证原子性
13     private static  int num = 0;
14     // synchronized
15     public synchronized static void add() {
16         num++;
17     }
18 */
19     public static void main(String[] args) {
20         // 期望 num 最终是2万
21         for (int i = 0; i < 20; i++) {
22             new Thread(() ->{
23                 for (int j = 0; j < 1000; j++) {
24                     add();
25                 }
26             }).start();
27         }
28
29         // 判断活着的线程
30         while (Thread.activeCount() > 2) {
31             Thread.yield();
32         }
33
34         System.out.println(Thread.currentThread().getName()+ num);
35     }
36 }
 1 // 指令重排理论
 2 // int x = 1;  // 1
 3 // int y = 1;  // 2
 4 // x = x + 5;  // 3
 5 // y = x * x;  // 4
 6 // 可重排 1234 1324 2134 2314 3124 3214
 7 // 4可能开头吗? 如4312.
 8 // 不可能  因为处理器在重排的时候也会考虑指令间的依赖性
 9
10 // 尝试理解多线程下的指令重排问题:
11 // int x,y,a,b = 0;
12 // 线程A              线程B
13 // x = a;           y = b;
14 // b = 1;           a = 2;
15 // 理想的结果下x = 0, y = 0
16
17 // 指令重排后
18 // 线程A              线程B
19 // b = 1;           a = 2;
20 // x = a;           y = b;
21 // 重排后的结果:x = 2,y = 1
22
23 // volatile可以禁止指令重排
24 // 内存屏障 :CPU指令 两个作用:
25 // 1、保证特定的执行顺序
26 // 2、保证某些变量的内存可见性
27
28 //         普通写
29 //         普通读
30 // ---------------------内存屏障,禁止上面普通写与volatile读指令重排
31 //         volatile读
32 // ---------------------内存屏障,禁止下面普通写与volatile读指令重排
33 //         普通写
34 //         普通读
35 // 指令重排的最经典应用 DCL单例模式   DCL双重检测锁
36 // 单例的思想: 构造器私有
37 // 单例之所以安全,是因为构造器私有的!
单例模式:
 1 // 单例的思想: 构造器私有
 2 // 饿汉式
 3 public class Hungry {
 4     // 浪费空间
 5     private byte[] data = new byte[10*1024*1024];
 6
 7     private Hungry(){}
 8
 9     private final static Hungry HUNGRY = new Hungry();
10
11     public static Hungry getInstance() {
12         return HUNGRY;
13     }
14 }
 1 // 懒汉式 (基础的)
 2 public class LazyMan {
 3     private LazyMan(){
 4         System.out.println(Thread.currentThread().getName()+"__测试");
 5     }
 6
 7     private static LazyMan lazyMan;
 8
 9     public static LazyMan getInstance(){
10         if (lazyMan == null) {
11             lazyMan = new LazyMan();
12         }
13         return lazyMan;
14     }
15
16     public static void main(String[] args) {
17         new Thread(() -> {
18             LazyMan.getInstance();
19         }).start();
20
21         // 多线程下单例失效
22         /*for (int i = 0; i < 10; i++) {
23             new Thread(() -> {
24                 LazyMan.getInstance();
25             }).start();
26         }*/
27     }
28 }
 1 // DCL懒汉式
 2 public class DclLazyMan {
 3
 4     // 防止反射破环单例
 5     private static boolean ahsdkhaskhdkahksh = false;
 6     private DclLazyMan() {
 7         synchronized (DclLazyMan.class){
 8             if (ahsdkhaskhdkahksh == false) {
 9                 ahsdkhaskhdkahksh = true;
10             } else {
11                 throw new RuntimeException("不要想破坏我的单例");
12             }
13         }
14     }
15     private volatile static DclLazyMan dclLazyMan;
16
17     public static DclLazyMan getInstance() {
18         if (dclLazyMan == null) {
19             synchronized (DclLazyMan.class) {
20                 if (dclLazyMan == null) {
21                     dclLazyMan = new DclLazyMan();// 这个操作是不是原子性的? 不是
22                     // java创建一个对象
23                     // 1、分配内存空间
24                     // 2、执行构造方法,创建对象
25                     // 3、将对象指向空间
26
27                     // A  先执行13,这个时候对象还没有完成初始化!
28                     // B  发现对象为空,B线程拿到的对象就不是完整的
29                 }
30             }
31         }
32         return dclLazyMan;
33     }
34
35     public static void main(String[] args) throws NoSuchMethodException, IllegalAccessException, InvocationTargetException, InstantiationException, NoSuchFieldException {
36         /*
37         // 经过构造器
38         DclLazyMan dclLazyMan1 = DclLazyMan.getInstance();
39
40         // 利用反射,不经过构造器破坏单例
41         Constructor<DclLazyMan> constructor = DclLazyMan.class.getDeclaredConstructor();
42         DclLazyMan dclLazyMan2 = constructor.newInstance();
43
44         System.out.println(dclLazyMan1.hashCode());
45         System.out.println(dclLazyMan2.hashCode());
46         */
47
48         Constructor<DclLazyMan> constructor = DclLazyMan.class.getDeclaredConstructor();
49         constructor.setAccessible(true);
50         DclLazyMan dclLazyMan2 = constructor.newInstance();// 创建对象
51
52         // 利用编译的.class文件拿到ahsdkhaskhdkahksh
53         // 单例再次被破坏
54         Field ahsdkhaskhdkahksh = DclLazyMan.class.getDeclaredField("ahsdkhaskhdkahksh");
55         ahsdkhaskhdkahksh.setAccessible(true);
56         ahsdkhaskhdkahksh.set(dclLazyMan2,false);
57
58         System.out.println(dclLazyMan2.hashCode());
59
60     }
61 }
 1 // enum类型
 2 public enum SingleEnum {
 3     INSTANCE;
 4     public SingleEnum getInstance(){
 5         return INSTANCE;
 6     }
 7 }
 8 // 至少在做一个普通的JVM时候,jdk源码没有被修改的时候,枚举就是安全的!
 9 class Demo{
10     public static void main(String[] args) throws NoSuchMethodException, IllegalAccessException,
11             InvocationTargetException, InstantiationException, InvocationTargetException {
12
13         // String.class,int.class
14         // 利用jad.exe反编译.class文件,发现反编译出的.java文件中没有无参构造器
15         Constructor<SingleEnum> declaredConstructor = SingleEnum.class.getDeclaredConstructor(String.class,int.class);
16         declaredConstructor.setAccessible(true);
17         // throw new IllegalArgumentException("Cannot reflectively create enum objects");
18         SingleEnum singleEnum1 = declaredConstructor.newInstance();
19         SingleEnum singleEnum2 = declaredConstructor.newInstance();
20         System.out.println(singleEnum1.hashCode());
21         System.out.println(singleEnum2.hashCode());
22
23         // 这里面没有无参构造! JVM 才是王道!
24         // "main" java.lang.NoSuchMethodException: com.coding.single.SingleEnum.<init>()
25     }
26 }
CAS :(Compare and swap) 比较并交换
缺点:
- 循环开销很大
- 内存操作,每次只能保证一个共享变量的原子性
- 出现ABA问题
 1 // CAS :(Compare and swap) 比较并交换
 2 public class CAS_Demo {
 3     public static void main(String[] args) {
 4         // 默认值为0
 5         AtomicInteger atomicInteger = new AtomicInteger(5);
 6
 7         // 期望值5,改为20
 8         System.out.println(atomicInteger.compareAndSet(5, 20));
 9         System.out.println(atomicInteger.get());
10
11         // 期望值为5,改为6
12         System.out.println(atomicInteger.compareAndSet(5, 6));
13         System.out.println(atomicInteger.get());
14     }
15
16 //----------------------------------------------------------------
17
18 //    private static AtomicInteger num = new AtomicInteger();
19 //    public static void add() {
20 //        num.getAndIncrement(); // 相当于num++
21 //    }
22
23 // 以getAndIncrement()分析理解 CAS
24
25 // 源码
26 //    public final int getAndIncrement() {
27         // unsafe 可以直接操作内存
28             // this 调用的对象
29             // valueOffset 当前这个对象的值内存地址偏移值
30             // 1  +1
31 //        return unsafe.getAndAddInt(this, valueOffset, 1);
32 //    }
33 //
34 //    public final int getAndAddInt(Object var1, long var2, int var4) {
35 //        int var5; //?
36 //        do { // 自旋锁(就是一只判断!)
37                 // var5 = 获得当前对象的内存地址中的值!
38                 // var1 等于上面的this
39                 // var2 等于上面的valueOffset
40 //            var5 = this.getIntVolatile(var1, var2);
41                 // compareAndSwapInt 比较并交换
42                 // 比较当前的值var1 对象的var2 地址中的值是不是var5,如果是,则更新为var5+1(var4)
43                 // 如果是期望的值,就交换,否则就不交换
44 //        } while(!this.compareAndSwapInt(var1, var2, var5, var5 + var4));
45 //
46 //        return var5;
47 //    }
48 }
原子引用----解决ABA问题
 1 // 原子引用----解决ABA问题
 2 // 通过增加一个版本号来解决,和乐观锁一模一样
 3
 4 // ABA问题描述:
 5 // T1 将A 改为 B 再改为 A  数据已经被修改过两次
 6 // T2 再来操作A 但是A不是当初的A了  因为数据被改过了两次
 7 public class ABA_Demo {
 8     // 设置初始版本为1
 9     static AtomicStampedReference<Integer> asf = new AtomicStampedReference<>(100,1);
10
11     public static void main(String[] args) {
12         // 线程T1
13         new Thread(() -> {
14             // 获得当前版本
15             int stamp = asf.getStamp();
16             System.out.println("T1当前版本:"+stamp);
17             try {
18                 // 睡眠1秒 待T2拿到stamp
19                 TimeUnit.SECONDS.sleep(1L);
20             } catch (InterruptedException e) {
21                 e.printStackTrace();
22             }
23             // 即 A 改为 B
24             asf.compareAndSet(100,101,asf.getStamp(),asf.getStamp()+1);
25             System.out.println("T1 当前版本:"+asf.getStamp());
26             System.out.println("T1 当前获得的最新值:"+asf.getReference());
27             // 即 B 改为 A
28             asf.compareAndSet(101,100,asf.getStamp(),asf.getStamp()+1);
29             System.out.println("T1 当前版本:"+asf.getStamp());
30             System.out.println("T1 当前获得的最新值:"+asf.getReference());
31
32         },"T1").start();
33
34         // 线程T2
35         new Thread(() -> {
36             // 获得当前版本
37             int stamp = asf.getStamp();
38             System.out.println("T2当前版本:"+stamp);
39             try {
40                 // 睡眠2秒,待T1执行完
41                 TimeUnit.SECONDS.sleep(2L);
42             } catch (InterruptedException e) {
43                 e.printStackTrace();
44             }
45             // 即 A 改为 B
46             boolean result = asf.compareAndSet(100, 101, stamp, stamp + 1);
47             System.out.println(Thread.currentThread().getName()+"是否修改成功:"+result);
48             System.out.println("T2 当前版本:"+asf.getStamp());
49             System.out.println("T2 当前获得的最新值:"+asf.getReference());
50         },"T2").start();
51     }
52 }