makefile
makefile和make的关系
makefile:makefile类似脚本,其中记录了编译C++工程的方法
make:make是命令执行工具,用来执行makefile文件
*打个比方,makefile就行计划书,而make则是执行该计划的人
makefile文件的书写格式
target: prerequisites
      command
...
其中target为目标文件, prerequisites为一个或多个依赖文件,command为shell命令;当prerequisites比target新时,command命令则会执行。
举例:目前假设有三个文件a.h a.cpp main.cpp(a.cpp 和 main.cpp 包含有a.h), 则makefile文件可编写为:
learn: main.o a.o
      g++ main.o a.o -o learn
main.o: main.cpp a.h
      g++ main.cpp -c
a.o: a.cpp a.h
      g++ a.cpp -c
clean:
      rm main.o a.o
makefile的变量
加入prerequisites中文件很多,并且多次出现,那么编写makefile文件就慢,有没有改进的方法的呢?那就是使用变量
变量的定义: 变量名=文件1 文件2 ... 文件n
变量的使用: $(变量名)
举例:还是上面的例子,但是我们引入了变量,则makefile文件可编写为:
object=main.o a.cpp
learn: $(object)
      g++ $(object)
main.o: main.cpp a.h
      g++ main.cpp -c
a.o: a.cpp a.h
      g++ a.cpp a.h
clean:
      rm $(object)
可以看到,makefile中的变量类似于C语言中的宏
makefile的隐晦规则
a.o: a.cpp a1.h a2.h ... an.h
      g++ a.cpp -c
可以简化为:
a.o: a1.h a2.h ... an.h
这就是makefile的隐晦规则,使得makefile更为简洁
举例:对于上面的例子,makefile可以编写为:
object = main.o a.o
learn: $(object)
main.o: a.h
a.o: a.h
clean:
      rm learn $(object)
makefile中的clean
我们可以从上面的makefile都存在
clean:
      rm learn $(object)
它的作用在于清理掉编译链接过程中产生的文件,我们可以通过make clean命令来执行
注意:不要把clean放在文件开头,不然make命令会执行clean的指令
引用
引用1
C语言中的输入输出
C语言中把一切设备看作文件,所以无论是对终端设备的读写还是队磁盘的读写,都是一致的
文件的读写
文件的读写分为三个部分:文件的打开,对文件的操作,文件的关闭
文件的打开
文件打开的函数为:
FILE *fopen( const char * filename, const char * mode );
其中mode为文件格式,文件可分类为输入文件和输出文件(输出文件也可分为写入和追加),文本文件和二进制文件, 详细内容可点击这里
文件的操作
文本文件写操作
(1)int fputs(int c, FILE *fp); 向fp指向文件中写入字符,写入成功则返回写入字符,写入失败则返回EOF;
char c = '@';
fputc(c, fp);
(2)int fputs(char *s, FILE *fp); 向fp指向文件中写入字符串,写入成功返回非负值,写入失败返回EOF
fputs("I like sports!", fp);
(3)int fprintf(FILE *fp, char *format, ...); 向fp中写入格式化字符串
fprintf(fp, "今天的气温为%d度-%d度", 19, 28);
文本文件读操作
(1)int fgetc(FILE * fp) 从fp指向的文件中读取一个字符并返回改字符,如果出错,则返回EOF(-1)
char c = fgetc(fp);
(2)char * fgets(char * buf, int n, FILE * fp) 从fp指向的文件中读取n-1个字符 + � 置于字符数组buf中,如果读取过程中提前遇到EOF或者 ,则会提前结束读取( 也会读取); 正常情况下返回读取的字符串的首地址, 异常情况下返回NULL
char str[100];
char * str2;
str2 = fgets(str, 20, fp);
printf("string=%s", str);
printf("string2=%s", str2);
(3)int fscanf(FILE * fp, const char * format, ...) 从fp指向的文件中读取格式化字符串;如果正确读取,则返回变量的总个数,如果出现错误,则返回出错的索引号。
int a;
float b;
char c;
char s[10];
fscanf(fp, "%d%f%s%c", &a, &b, s, &c);
printf("a=%d
b=%f
s=%s
c=%c
", a, b, s, c);
二进制文件写操作
size_t fwrite(const void *ptr, size_t size_of_elements,
size_t number_of_elements, FILE *a_file);
ptr: 存储区的首地址
size_of_elements: 数据项类型大小
number_of_elements: 数据项的数目
file: 写入的二进制文件
fp = fopen("ofile", "wb");
struct Word{
    char token[10];
    char pos[10];
}word[2];
strcpy(word[0].token, "Mark");
strcpy(word[0].pos, "N");
strcpy(word[1].token, "like");
strcpy(word[1].pos, "V");
fwrite(word, sizeof(struct Word), 2, fp);
fclose(fp);
二进制文件读操作
size_t fread(const void *ptr, size_t size_of_elements, size_t number_of_elements, FILE *a_file);
fp = fopen("ofile", "rb");
fread(word, sizeof(struct Word), 2, fp);
for(int i=0; i<2; ++i){
    printf("[%s, %s]
", word[i].token, word[i].pos);
}
fclose(fp);
文件的关闭
int fclose(FILE * fp);
标准输入输出
因为终端是用户最常用的输入输出,如果每次对终端的读写都需要用户自己去定义文件的打开和关闭,就会很不方便。于是,人们就把键盘文件,屏幕文件单独现在stdio.h中定义好,分别为stdin,stdout,再创建与文件读写操作相似的函数(去掉f,比如fprintf变成printf),来方便用户的使用。由于和上面的基本一直,就不再赘述。
引用
引用1
引用2
枚举类型的输出
C/C++中枚举类型本质上是一个int类型的数字,类似与宏。所以输出枚举类型的变量时得到的是int类型的数字。
#include <stdio.h>

typedef enum{
    RED, BULE, YELLOW
}Color;

int main(){
    Color c = RED;
    printf("Color c = %d (本质int)", c);
}
C语言动态内存的分配和释放
分配: void * malloc(size_t size);
分配size个字节的内存空间, 并返回内存空间的首地址
释放: void free(void *p)
释放p指向的动态内存空间
举例
#include <stdio.h>
#include <stdlib.h>
#include <string.h>

struct Word{
    char token[10];
    char pos[10];
};

int main(){
    //动态分配对象并释放
    Word * w = (Word *)malloc(sizeof(struct Word));
    free(w);
    //动态分配数组并释放
    strcpy(w->token, "Mark");
    strcpy(w->pos, "nr");
    printf("word=(%s, %s)
", w->token, w->pos);
    free(w);
    //动态分配数组
    int *p = (int *)malloc(sizeof(int)*5);
    for(int i=0; i<5; ++i){
        p[i] = i;
    }
    for(int i=0; i<5; ++i){
        printf("%d
", p[i]);
    }
    free(p);
}
疑问:释放内存空间是必要的吗,操作系统会帮我们完成吗?
答:好的操作系统会在main结束后自动释放动态内存。释放内存空间是否必要看具体环境,如果你在程序中动态分配的内存占总内存比例很大,那么不及时释放内存可能会减慢系统运行速度甚至崩溃,反之可以不用手动释放。
C++中的文件读写
C++的文件读写思想和C一致,即一切设备看成文件。不同是C++采用面向对象的方法,可以说istream/ifstream对象是封装了scanf/fscanf方法的对象,ostream/ofstream对象是封装了printf/fprintf的对象。
其中文件的读写包括3个步骤,文件打开,文件操作,文件关闭
文本文件的读写
#include <iostream>
#include <fstream>
#include <string>
using namespace std;

int main(){
    string str;
    ifstream in("input", ios::in);
    if(!in){
        cerr << "打开input文件失败" << endl;
    }
    ofstream out("output", ios::out);
    if(!out){
        cerr << "打开output文件失败" << endl;
    }
    in >> str;
    out << str;
    in.close();
    out.close();
}
标准输入输出就是对文本文件输入输出的特殊形式,省略了程序员自己定义文件流和关闭文件流的时间,这和C中专门设置标准文件的输入输出函数的思想是一致的。
二进制文件的读写
C++动态内存的分配和释放
#include <iostream>
using namespace std;

int main(){
//动态对象的分配和释放
    int * p = new int{5};
    cout << *p << endl;
    delete p;
//动态数组的分配和释放
    p = new int[4]{1, 2, 3, 4};
    for(int i=0; i<4; ++i)
        cout << p[i] << " ";
}
C++类
下面通过例子来讲解
#include <iostream>
#include <fstream>
#include <string>
using namespace std;

//类声明部分
class Box{
private:
    //普通属性
    double length; //长
    double breadth; //宽
    double height; //高
    //静态属性
    static string name; //名字

public:
    //一般构造函数
    Box(double l = 1, double b = 1, double h = 1);
    //复制构造函数
    Box(const Box &box);
    //析构函数
    ~Box();
    //静态成员函数
    static string getName();
    //普通成员函数
    double getVolume();

};

//类定义部分
string Box::name = "Box";

Box::Box(double l, double b, double h):
length(l), breadth(b), height(h){
    cout << "Object is being created" << endl;
}

Box::Box(const Box &box){
    length = box.length;
    breadth = box.breadth;
    height = box.height;
}

Box::~Box(){
    cout << "Object is being deleted" << endl;
}

string Box::getName(){
    return name;
}

double Box::getVolume(void){
    return length * breadth * height;
}

int main(){
//Box类
    Box box(1, 2, 3);
    cout << box.getName() << endl;
    cout << Box::getName() << endl;
    cout << box.getVolume() << endl;
    Box *bp = new Box(box);
    cout << box.getVolume() << endl;
}
C++类的一般组成部分
属性
double length;
double breadth;
double height;
这是普通属性,即每个对象都拥有自己的一套属性,就像一个班的人都拥有属于自己的名字和学号
static string name;
这是静态属性,即该类的所有对象共同拥有,就像一个班的人共同使用唯一一个篮球
成员函数
//声明部分
double getVolume();

//定义部分
double Box::getVolume(void){
    return length * breadth * height;
}
这是普通成员函数,有this指针,能访问对象的普通成员
//声明部分
static string getName();

//定义部分
string Box::getName(){
    return name;
}
这是静态成员函数,由于没有this指针, 只能访问类的静态属性
构造函数和析构函数
//声明部分
Box(double l=1, double b=1, double h=1);

//定义部分
Box::Box(double l, double b, double h):
length(l), breadth(b), height(h){
    cout << "Object is being created" << endl;
}
这是一般的构造函数, 负责普通属性的初始化,会在类对象创建时隐式调用
//声明部分
Box(const Box &box);

//类定义部分
Box::Box(const Box &box){
    length = box.length;
    breadth = box.breadth;
    height = box.height;
}
这是复制构造函数,使得创建出和被复制对象一模一样的新对象
//声明部分
~Box();

//类定义部分
Box::~Box(){
    cout << "Object is being deleted" << endl;
}
这是析构函数,会在对象结束生命周期前隐式调用
C++类的访问修饰符
成员的访问修饰符有三种:public protected private
C++类的有元(有元函数/有元类)
C++类的声明和定义(函数和静态属性)
我们可以看到上面的函数或静态属性,都采用了先声明后定义的形式,例如
//Box.h(声明)
class Box{
    static string name;
    double getVolume();
}
//Box.cpp(定义)
string Box:box name = "Box";
double Box::getVolume(){
    return length * breath * height;
}
我们往往会把声明部分放在头文件,定义部分访问源文件,这样的好处是使得类变得条例分明,便于阅读。
注意: 对与静态属性来说,一定需要声明后定义; 而对于函数来说,可以不需要声明,把类的定义写入class{}中即可。
C++类的创建
//第一种
Box box(1, 2, 3);
//第二种
Box * box = new Box(1, 2, 3);
C++类的使用
对于普通成员:采用对象.成员的形式,例如
box.getName();
对于静态成员:既可以采用对象名.成员的形式,也可以采用类::成员的形式,例如
box.getName();
Box::getName();
C++类对象的返回
C++ 隐式构造函数和显式构造函数
先举个例子
#include <iostream>
using namespace std;

class A{
public:
    int data;
	A(int d){data = d;}
};

int main(){
	A a = 1;
	cout << "a.data = " << a.data << endl;
}
大家觉得上面的程序有问题吗?有人可能会说 A a = 1 这部分有问题,int类型怎么可以赋值给A对象呢?
但是,实际上面程序是可以正常运行的,因为类中的构造函数默认是隐式的,编译器通过构造函数会默认把int类型转换为A类型。这有时候很方便,有时候也可能出现一些问题(如果你不希望这种行为发生的话)。
要阻止这种隐式转换,我们在构造函数前面添加explicit即可
#include <iostream>
using namespace std;

class A{
public:
    int data;
	explicit A(int d){data = d;}
};

int main(){
	A a = 1;
	cout << "a.data = " << a.data << endl;
}
再次运行就会报错
C++类型转换
引用
引用1
C++之QT
最基本的QT程序
下面介绍就简单的QT程序,别看他简单,它可以作为其他一起QT程序的基本模板
#include <QApplication>
#include <QtWidgets>
#include <QLabel>

int main(int argc, char *argv[]){
    //应用程序抽象类
    QApplication app(argc, argv);
    //窗口
    QWidget w;
    //显示
    w.show();
    //进入消息循环,一直接受消息,直到窗口被关闭
    return app.exec();
}

QT的Hello World程序
下面我们来介绍更复杂一些的QT程序,即给窗口添加一些内容。
#include <QApplication>
#include <QtWidgets>
#include <QLabel>
int main(int argc, char *argv[]){
//应用程序抽象类
QApplication app(argc, argv);
//窗口
QWidget w;
//标签对象
QLabel textLabel;
textLabel.resize(100, 15);//设置宽高
textLabel.move(150, 170);//设置坐标位置(窗口左上角为坐标原点)
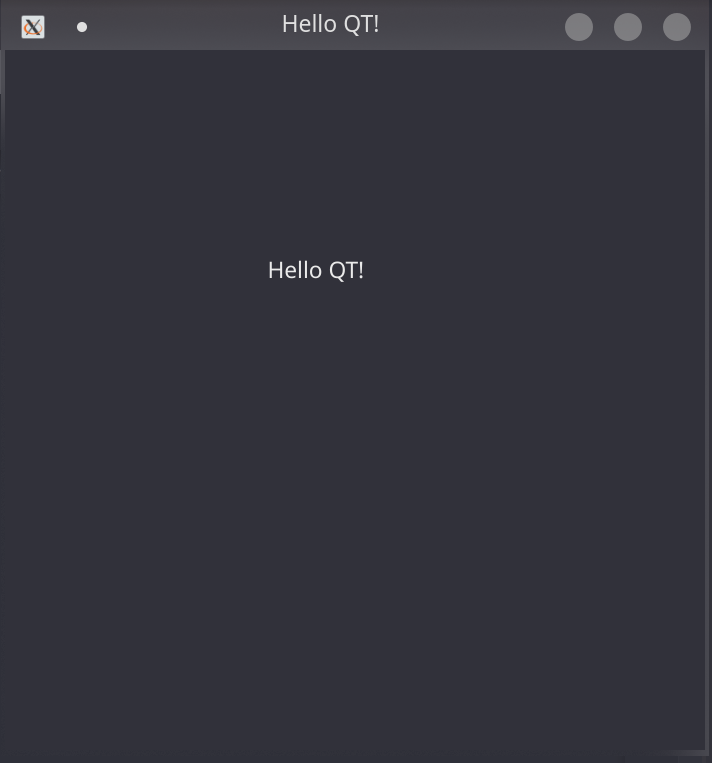
textLabel.setText("Hello QT!"); //设置内容
textLabel.setParent(&w);//设置父窗口
//设置窗口标题
w.setWindowTitle("Hello QT!");
//显示窗口
w.show();
//进入消息循环,一直接受消息,直到窗口被关闭
return app.exec();
}

QT中QWidget的子类
上面的程序把窗口中的内容写在main函数中,相较于最基本的QT程序而言,复杂了一些,我们可以通过定义QWidget的子类,是的部件的定义封装起来,让main函数看起来简洁。
mywidget.h
#ifndef _MYWIDGET_H_
#define _MYWIDGET_H_

#include <QWidget>
#include <QLabel>

class Mywidget : public QWidget{
    Q_OBJECT

public:
    explicit Mywidget(QWidget *parent = nullptr);

    QLabel* textLabel;

signals: //用来声明信号函数

public slots: //用来声明槽函数

};

#endif
mywidget.cpp
#include "mywidget.h"

Mywidget::Mywidget(QWidget * parent) : QWidget(parent){
//我们往往在构造函数完成对窗口的初始化工作
    //设置窗口大小
    resize(400, 400);
    //设置窗口标题
    setWindowTitle("Hello QT!");
    //初始化textLabel:文字为“Hello QT!", 父对象为Mywidget窗口对象
    textLabel = new QLabel("Hello QT!", this);
    //设置textLabel的位置和宽高
    textLabel->setGeometry(150, 100, 130, 50);
}
main.cpp
#include <QApplication>
#include "mywidget.h"

int main(int argc, char *argv[]){
    //应用程序抽象类
    QApplication app(argc, argv);
    //窗口
    Mywidget w;
    //显示
    w.show();
    //进入消息循环,一直接受消息,直到窗口被关闭
    return app.exec();
}
我们可以看到,效果和第二个程序相同,但是main函数如同第一个函数版简洁。
QT之布局
**使用reset函数和setGeometry函数
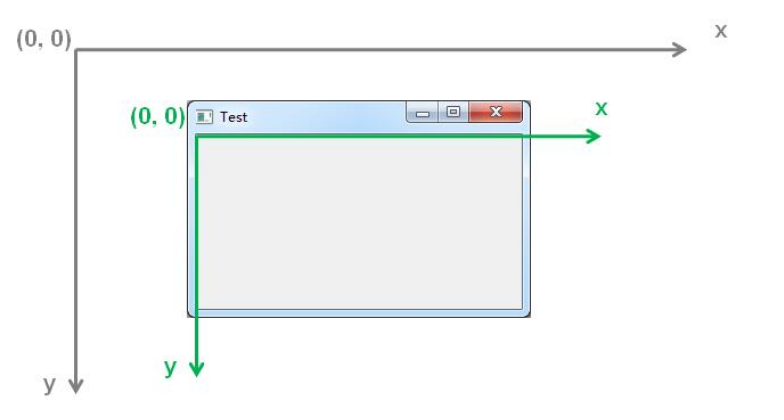
x为水平方向 y为数值方向
看下面的例子
Mywidget::Mywidget(QWidget * parent) : QWidget(parent){
//我们往往在构造函数完成对窗口的初始化工作
    //设置窗口大小
    resize(400, 400);
    //设置窗口标题
    setWindowTitle("Hello QT!");
    //初始化textLabel:文字为“Hello QT!", 父对象为Mywidget窗口对象
    textLabel = new QLabel("Hello QT!", this);
    textLabel->setGeometry(150, 100, 130, 50);
    //初始化button
    button = new QPushButton("change", this);
    button->setGeometry(150, 175, 130, 50);
}
reset(int x, int y)定义窗口的宽高
setGeometry(int x, int y, int x1, int y1)定义部件的左上角位于窗口的(x, y)坐标上,同时宽高为(x1, y1)
布局函数
水平布局
竖直布局
网格布局
表格布局
分组布局
QT之信号和槽
信号函数:信号函数用来发出信号,一般不需要用户定义,比如QPushButton对象就自带clicked信号函数
槽函数:槽函数用于接受信号并执行相应的行为, 需要用户自己定义
连接函数:函数原型为
Qbject::connect(Object * src, SIGNAL(src的信号函数), Object * obj, SLOT(obj的槽函数));
可以看到它是一个静态成员函数, 用来连接src对象的信号函数和obj对象的槽函数,可以使得当src发出信号时,obj接受并执行相应的操作。
下面举个例子
mywidget.h
#ifndef _MYWIDGET_H_
#define _MYWIDGET_H_

#include <QWidget>
#include <QLabel>
#include <QPushButton>

class Mywidget : public QWidget{
    Q_OBJECT

private:
    QPushButton * button;
    QLabel * label;

public:
    explicit Mywidget(QWidget *parent = nullptr);

signals: //用来声明信号函数

public slots: //用来声明槽函数
    void changeText();
};

#endif
mywidget.cpp
#include "mywidget.h"
Mywidget::Mywidget(QWidget * parent) : QWidget(parent){
//我们往往在构造函数完成对窗口的初始化工作
//设置窗口大小
resize(400, 400);
//初始化标签
label = new QLabel("Hello Qt!", this);
label->setGeometry(150, 150, 100, 50);
//初始化按钮
button = new QPushButton("change", this);
button->setGeometry(150, 250, 100, 50);
//信号槽连接
connect(button, SIGNAL(clicked()), this, SLOT(changeText()));
}
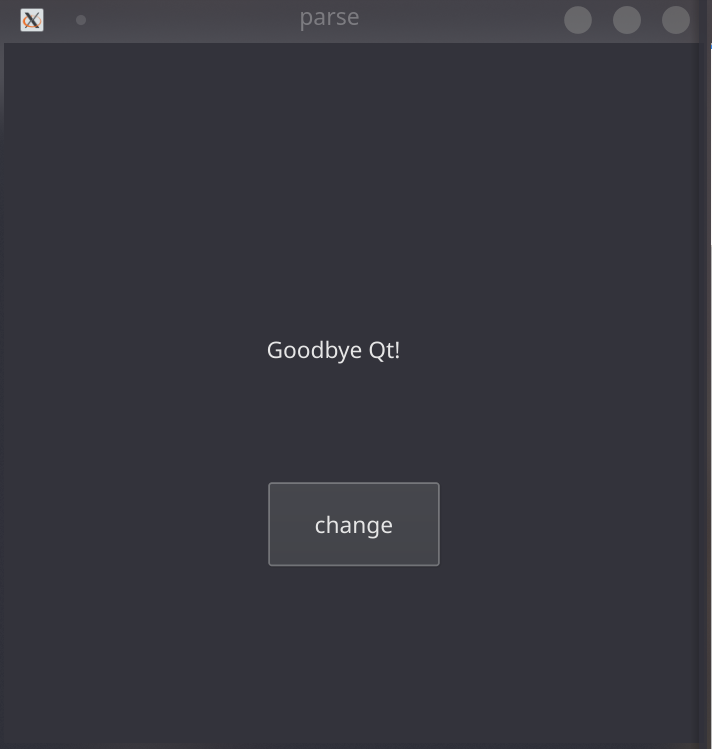
void Mywidget::changeText(){
label->setText("Goodbye Qt!");
}
main.cpp
#include <QApplication>
#include "mywidget.h"

int main(int argc, char *argv[]){
    //应用程序抽象类
    QApplication app(argc, argv);
    //窗口
    Mywidget w;
    //显示
    w.show();
    //进入消息循环,一直接受消息,直到窗口被关闭
    return app.exec();
}
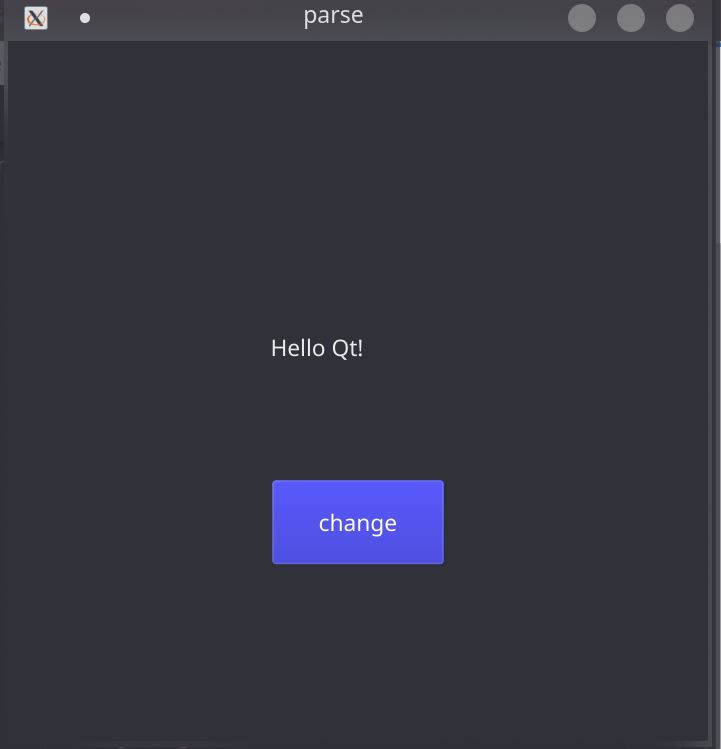
这里把按钮的信号函数clicked()和窗口的槽函数changeText()连接起来,使得点击按钮后,标签的文本会发生改变
点击前:
点击后:
Qt之QMainWindow
我们一般使用的软件都带有菜单栏,工具栏,停靠窗口等内容,比如vscode,而QWidget对象中显然不具有这些。所以我们来学习一中新的窗口类QMainWindow
简单的QmainWindow
#include <QApplication>
#include <QMainWindow>
#include <QMenuBar>
#include <QToolBar>

int main(int argc, char *argv[]){
    //应用程序抽象类
    QApplication app(argc, argv);
    //窗口
    QMainWindow w;
    //添加菜单
    w.menuBar()->addMenu(QObject::tr("&File"));
    //添加工具
    w.addToolBar(QObject::tr("$File"));
    //显示
    w.show();
    //进入消息循环,一直接受消息,直到窗口被关闭
    return app.exec();
}
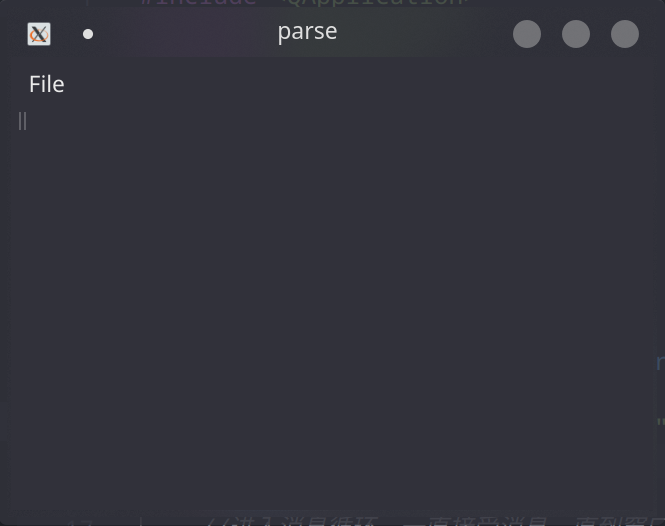
上面的窗口被分为几个部分:
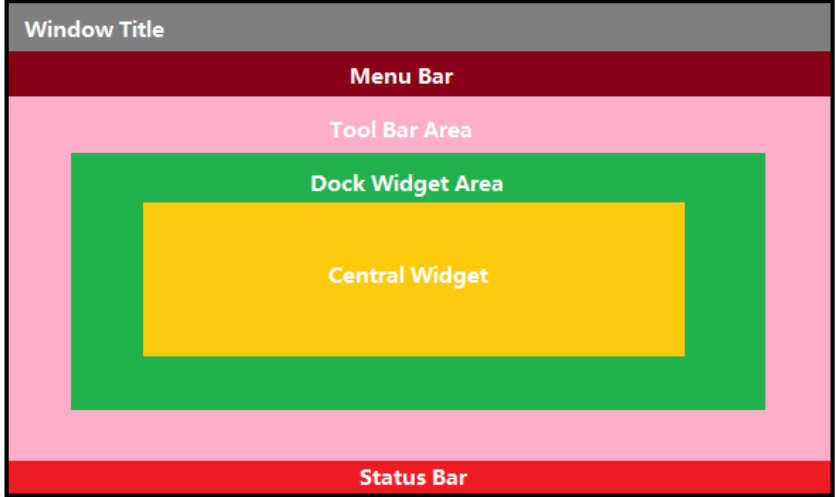
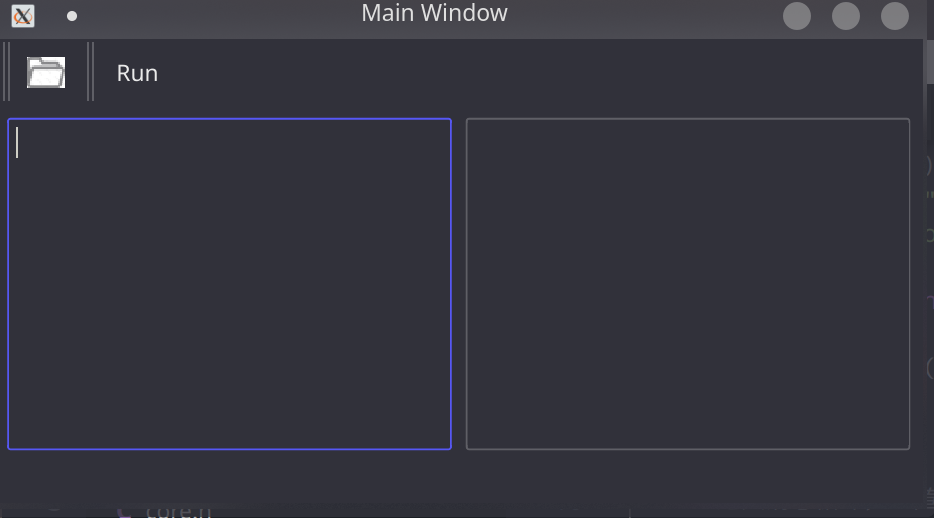
复杂的QMainWindow
mywindow.h
#ifndef _MYWINDOW_H_
#define _MYWINDOW_H_

#include <QMainWindow>
#include <QPlainTextEdit>

class Mywindow : public QMainWindow{
    Q_OBJECT

private:
    QPlainTextEdit * edit1, * edit2;
    QAction * openAction;
    QAction * runAction;

public:
    explicit Mywindow(QWidget *parent = nullptr);

signals: //用来声明信号函数

public slots: //用来声明槽函数
    void open();
    void run();
};

#endif
mywindow.cpp
#include "mywindow.h"
#include <QAction>
#include <QMenuBar>
#include <QToolBar>
#include <QHBoxLayout>
#include <iostream>
using namespace std;

Mywindow::Mywindow(QWidget * parent) : QMainWindow(parent){
    setWindowTitle(tr("Main Window"));
    //文本编辑框
    edit1 = new QPlainTextEdit(this);
    edit2 = new QPlainTextEdit(this);
    QWidget * cw = new QWidget();
    QHBoxLayout * layout = new QHBoxLayout(cw);
    layout->addWidget(edit1);
    layout->addWidget(edit2);
    setCentralWidget(cw);
    //动作
    openAction = new QAction(QIcon(":/images/open"), tr("&Open..."), this);
    openAction->setStatusTip(tr("Open a source file"));
    runAction = new QAction(QIcon(":/images/run"), tr("&Run..."), this);
    runAction->setStatusTip(tr("Run the program"));
    connect(openAction, SIGNAL(triggered()), this, SLOT(open()));
    connect(runAction, SIGNAL(triggered()), this, SLOT(run()));
    //工具栏
    QToolBar * openToolBar = addToolBar(tr("&Open"));
    openToolBar->addAction(openAction);
    QToolBar * runToolBar = addToolBar(tr("&Run"));
    runToolBar->addAction(runAction);
    //菜单栏

    //状态栏
    statusBar();
}

void Mywindow::open(){
    cout << "open发生" << endl;
}

void Mywindow::run(){
    cout << "run发生" << endl;
}
main.cpp
#include "mywindow.h"
#include <QApplication>

int main(int argc, char *argv[]){
    //应用程序抽象类
    QApplication app(argc, argv);
    //窗口
    Mywindow w;
    w.show();
    //进入消息循环,一直接受消息,直到窗口被关闭
    return app.exec();
}
res.qrc
<RCC>
    <qresource prefix="/images">
        <file alias="open">open.jpg</file>
    </qresource>
    <qresource prefix="/images/">
        <file alias="run">run.jpg</file>
    </qresource>
</RCC>
下面进行解释:
mywidget.h: 这里进行了自定义类的声明,它继承与QMainWindow类,继承该类的原因是我们可以使用该类所拥有的菜单栏,状态栏,工具栏等
mywidget.cpp: 这里是自定义类的定义
(1)首先我们定义了两个文本编辑框并将它们水平布局,最后将布局加入主窗口的CentralWidget上;
(2)然后我们创建两个QAction对象, QAction顾名思义是动作,可以作为信号发出源,然而动作并没有具体的实体,需要通过addAction(QAction * aciton)添加到具体的实体比如菜单项,工具等等。它的好处是一个动作可以被多个实体所包含,使其有一样的功能。
main.cpp: 相信大家都很熟悉
res.qrc: 这是一个资源文件,其中的open.jpg和run.jpg是用户自己加入工作目录中的文件, /images/open和/images/run是为open.jpg和run.jpg起得别名,我们可以在程序中通过":/images/open"和":/images/run"使用这些图片。
引用
引用
C++之string类
对象的构造
#include <iostream>
#include <string>
using namespace std;
int main(){
    string s1 = "string1"; //构造方法1
    string s2("string2");  //构造方法2
    cout << "s1 = " << s1 << endl;
    cout << "s2 = " << s2 << endl;
}
运行结果:
s1 = string1
s2 = string2
find函数
find函数可以求字符或者子串的开始字符
#include <iostream>
using namespace std;

int main(){
    string str = "S' -> S
S -> a";
    cout << "换行符所在位置为:" << str.find('
') << endl;
}
运行结果:
换行符所在位置为:7
substr函数
substr函数可以来求字符串的字串,其基本用法为
//求从from位置开始,大小为len的子串
substr(from, len)
//求从from下标开始,到字符串结束的子串
substr(from)
举个例子:
#include <iostream>
using namespace std;

int main(){
    string str = "abcdefg";
    cout << "求从下标3开始,长度为2的子串: " << str.substr(3, 2) << endl;
    cout << "求从下标4开始到末尾的子串: " <<  str.substr(4) << endl;
}
运行结果:
求从下标3开始,长度为2的子串: de
求从下标4开始到末尾的子串: efg
SLT容器
vector
Why:为什么要vector?
一维数组的一个特点就是定长。在非定长的存储任务中,如果开辟非常大的空间上限,容易造成空间的浪费; 如果开辟比较小的空间上限,容易出现数组溢出的问题。所以我们需要可变数组vector。
What:vector对象是一个可变数组。下面与一维数组进行对比:
| 数据结构 | 元素类型 | 指针 | 下标 |
|---|---|---|---|
| 一维数组 | 类型 数组名[数组长度] | 普通的指针,比如数组名就是头指针 | 下标为int数字 |
| vector对象 | Vector<类型> 对象名 | 迭代器(高级指针),和普通指针几乎有着一样的用法 | 下标为int数字 |
How:vector数据结构的实现可以基于数组也可以基于链表。下面来介绍具体的用法。
vector对象的创建
#include <iostream>
#include <string>
#include <vector>
using namespace std;

int main(){
    //创建元素类型为string的空vector对象v1
    vector<string> v1;
    //创建元素类型为string,有5个元素(元素值都为”aa")的vector对象v2
    vector<string> v2(5, "aa");
}
vector对象的迭代器(指针)
迭代器可以理解为指针,它指向vector对象中某一个元素
#include <iostream>
#include <string>
#include <vector>
using namespace std;

int main(){
    //创建vector对象
    vector<string> v(5, "aa");
    //定义迭代器
    vector<string>::iterator it;
    //获取头迭代器,该迭代器指向第一个元素: begin函数返回头迭代器
    it = v.begin();
    //获取尾迭代器,该迭代器指向结束,最后元素的下一个位置: end函数返回尾迭代器
    it = v.end();
    //迭代器的运算
    --it; //it指向的原来指向的前一个元素
}
vector对象中元素的访问
#include <iostream>
#include <string>
#include <vector>
using namespace std;

int main(){
    vector<string> v(5, "aa");
    //通过下标访问
    cout << "vector对象中第2个元素为: " << v[2] << endl;
    //通过迭代器访问
    cout << "vector对象中头迭代器指向的元素为: " << *v.begin() << endl;
}
vector对象的遍历
#include <iostream>
#include <string>
#include <vector>
using namespace std;

int main(){
    vector<string> v(5, "aa");
    //方式1:通过下标的方式
    for(int i=0; i<v.size(); ++i){
        cout << v[0] << " ";
    }
    cout << endl;
    //方式2:通过迭代器的方式
    for(vector<string>::iterator it=v.begin(); it!=v.end(); ++it){
        cout << *it << " ";
    }
    cout << endl;
}
增加元素
#include <iostream>
#include <string>
#include <vector>
using namespace std;

int main(){
    vector<string> v(5, "aa");
    cout << "原来的vector对象: ";
    for(vector<string>::iterator it=v.begin(); it!=v.end(); ++it){
        cout << *it << " ";
    }
    cout << endl;
    //push_back(元素):在vector对象最后插入元素
    cout << "正在使用push.back("bb")方法在vector对象最后插入元素..." << endl;
    v.push_back("bb");
    cout << "插入后的vector对象: ";
    for(vector<string>::iterator it=v.begin(); it!=v.end(); ++it){
        cout << *it << " ";
    }
    cout << endl;
    //insert(迭代器, 元素):在迭代器指向的元素前插入元素
    cout << "正在使用insert(v.begin(), "cc")方法在vector对象第一个元素前插入元素..." << endl;
    v.insert(v.begin(), "cc");
    cout << "插入后的vector对象: ";
    for(vector<string>::iterator it=v.begin(); it!=v.end(); ++it){
        cout << *it << " ";
    }
    cout << endl;
}
运行结果:
原来的vector对象: aa aa aa aa aa
正在使用push.back("bb")方法在vector对象最后插入元素...
插入后的vector对象: aa aa aa aa aa bb
正在使用insert(v.begin(), "cc")方法在vector对象第一个元素前插入元素...
插入后的vector对象: cc aa aa aa aa aa bb
删除元素
#include <iostream>
#include <string>
#include <vector>
using namespace std;

int main(){
    vector<string> v(5, "aa");
    cout << "原来的vector对象: ";
    for(vector<string>::iterator it=v.begin(); it!=v.end(); ++it){
        cout << *it << " ";
    }
    cout << endl;
    //pop_back():删除最后的元素
    cout << "正在使用pop_back()方法删除vector对象的最后一个元素..." << endl;
    v.pop_back();
    cout << "删除后的vector对象: ";
    for(vector<string>::iterator it=v.begin(); it!=v.end(); ++it){
        cout << *it << " ";
    }
    cout << endl;
    //erase(迭代器):删除迭代器指向的元素
    cout << "正在使用erase(v.begin()+1)方法删除第2个元素..." << endl;
    cout << "删除后的vector对象: ";
    v.erase(v.begin()+1);
    for(vector<string>::iterator it=v.begin(); it!=v.end(); ++it){
        cout << *it << " ";
    }
    cout << endl;
}
运行结果:
原来的vector对象: aa aa aa aa aa
正在使用pop_back()方法删除vector对象的最后一个元素...
删除后的vector对象: aa aa aa aa
正在使用erase(v.begin()+1)方法删除第2个元素...
删除后的vector对象: aa aa aa
map
Why:我们会遇到这样一种存储场景,要求存储一组键值对, 比如('a':1 'b':2...)。有人会说,那么先构造这样一个结构体struct D{char a, b;},再用该结构体数组来存储不就可以了吗?但是这样有一个问题,比如我们想找到'a'所对应的值是什么,就需要遍历整个数组,当数据量庞大的时候,时间消耗很大。还有另一个问题,我们知道一个key只能唯一确定一个value,但是我们很可能存储多个含有相同key的键值对在数组中。所以,为了解决上面的问题,我们可以使用map类。
What:map对象是字典,它存储着键值对(key, value),我们可以根据key快速查找到对应的value。
How:对于map类如何实现我还不清楚。下面来介绍map的具体用法
map的创建
# include <iostream>
# include <map>
using namespace std;

int main(){
    map<char, int> dict{{'a',1}, {'b',2}, {'c',3}};
    cout << "key: " << "value" << endl;
    for(auto& x: dict){
        cout << x.first << ": " << x.second << endl;
    }
}
运行结果:
key: value
a: 1
b: 2
c: 3
map的迭代器
map<char, int>::iterator it;
    it = dict.begin(); //返回第一个元素的迭代器
    it = dict.end(); //返回容器结束的迭代器
    it = dict.find('c'); //返回指向key所在元素的迭代器
map的元素
map元素为pair对象,该对象的first就是key,second就是value
# include <iostream>
# include <map>
# include <typeinfo>
using namespace std;

int main(){
    map<char, int> dict{{'a',1}, {'b',2}, {'c',3}};
    cout << "map元素的类型为(std::pair): " << typeid(dict.begin()).name() << endl;
    cout << "第一个元素为pair(" << dict.begin()->first << ", " << dict.begin()->second << ")" << endl;
}
运行结果:
map元素的类型为(std::pair): St17_Rb_tree_iteratorISt4pairIKciEE
第一个元素为pair(a, 1)
补充:map元素的排列有一个特点——会按照key值从小到大排列
map访问key对应的value
# include <iostream>
# include <map>
using namespace std;

int main(){
    map<char, int> dict{{'a',1}, {'b',2}, {'c',3}};
    //通过operator[]
    cout << "key:" << 'a' << "对应的value:" << dict['a'] << endl;
    //通过at函数
    cout << "key:" << 'b' << "对应的value:" << dict.at('b') << endl;
}
运行结果:
key:a对应的value:1
key:b对应的value:2
插入
(1)insert插入
# include <iostream>
# include <map>
using namespace std;

int main(){
    map<char, int> dict{{'a',1}, {'b',2}, {'c',3}};
    cout << "插入前dict=" << endl;
    for(auto& x: dict){
        cout << x.first << ": " << x.second << endl;
    }
    cout << "正在插入pair<char, int>('d', 4)..." << endl;
    dict.insert(pair<char, int>('d', 4));
    cout << "插入后dict=" << endl;
    for(auto& x: dict){
        cout << x.first << ": " << x.second << endl;
    }
}
运行结果:
插入前dict=
a: 1
b: 2
c: 3
正在插入pair<char, int>('d', 4)...
插入后dict=
a: 1
b: 2
c: 3
d: 4
(2)operator[]插入
# include <iostream>
# include <map>
using namespace std;

int main(){
    map<char, int> dict{{'a',1}, {'b',2}, {'c',3}};
    cout << "插入前dict=" << endl;
    for(auto& x: dict){
        cout << x.first << ": " << x.second << endl;
    }
    cout << "正在插入pair<char, int>('d', 4)..." << endl;
    dict['d'] = 4;
    cout << "插入后dict=" << endl;
    for(auto& x: dict){
        cout << x.first << ": " << x.second << endl;
    }
}
运行结果:
插入前dict=
a: 1
b: 2
c: 3
正在插入pair<char, int>('d', 4)...
插入后dict=
a: 1
b: 2
c: 3
d: 4
访问
(1)operator[]
#include <iostream>
#include <string>
#include <map>

int main(){
    map<int, string> m{{1, "a"}, {2, "b"}};
    //访问成功返回key对应的值
    cout << m[1] << endl;
    //访问失败返回value类型的空对象
    cout << (m[3]=="") << endl;
}
运行结果:
a
1
可以看到访问不存在的键值对时会返回空对象
(2)at
#include <iostream>
#include <string>
#include <map>

int main(){
    map<int, string> m{{1, "a"}, {2, "b"}};
    //访问成功返回key对应的值
    cout << m.at(1) << endl;
    //访问失败抛出异常
    m.at(3);
}
运行结果:
a
terminate called after throwing an instance of 'std::out_of_range'
  what():  map::at
可以看到访问不存在的键值对会抛出异常
删除
# include <iostream>
# include <map>
using namespace std;

int main(){
    map<char, int> dict{{'a',1}, {'b',2}, {'c',3}};
    cout << "删除前dict=" << endl;
    for(auto& x: dict){
        cout << x.first << ": " << x.second << endl;
    }
    cout << "正在删除'b'所对应的键值对..." << endl;
    dict.erase('b');
    cout << "删除后dict=" << endl;
    for(auto& x: dict){
        cout << x.first << ": " << x.second << endl;
    }
}
运行结果:
删除前dict=
a: 1
b: 2
c: 3
正在删除'b'所对应的键值对...
删除后dict=
a: 1
c: 3
查询
查询map有无key关键字有两种方法
(1)find:查询成功返回对应的迭代器,查询失败返回end迭代器
#include <iostream>
#include <map>

int main(){
    map<int, char> m{{1, 'a'}, {2, 'b'}};
    cout << (m.find(1) != m.end()) << endl;
    cout << (m.find(3) == m.end()) << endl;
}
运行结果:
1
1
(2)count:返回key的数量,当然因为key的唯一性,所以只可能返回0或1
#include <iostream>
#include <map>

int main(){
    map<int, char> m{{1, 'a'}, {2, 'b'}};
    cout << m.count(1) << endl;
    cout << m.count(3) << endl;
}
运行结果:
1
0
set
创建
#include <iostream>
#include <set>

int main(){
    set<int> s{1, 2, 3};
    cout << "集合=";
    for(auto &x: s){
        cout << x << " ";
    }
}
运行结果:
集合=1 2 3
插入
#include <iostream>
#include <set>

int main(){
    set<int> s{1, 2, 3};
    cout << "插入前集合=";
    for(auto &x: s){
        cout << x << " ";
    }
    cout << endl;
    cout << "正在调用insert(4)函数插入元素4..." << endl;
    s.insert(4);
    cout << "插入后集合=";
    for(auto &x: s){
        cout << x << " ";
    }
    cout << endl;
}
运行结果:
插入前集合=1 2 3
正在调用insert(4)函数插入元素4...
插入后集合=1 2 3 4
删除
#include <iostream>
#include <set>

int main(){
    set<int> s{1, 2, 3};
    cout << "删除前集合=";
    for(auto &x: s){
        cout << x << " ";
    }
    cout << endl;
    cout << "正在调用erase(3)函数删除元素3..." << endl;
    s.erase(3);
    cout << "删除后集合=";
    for(auto &x: s){
        cout << x << " ";
    }
    cout << endl;
}
运行结果:
删除前集合=1 2 3
正在调用erase(3)函数删除元素3...
删除后集合=1 2
查找
#include <iostream>
#include <set>

int main(){
    set<int> s{1, 2, 3};
    cout << "对于集合s=";
    for(auto &x: s){
        cout << x << " ";
    }
    cout << endl;
    if(s.find(3) == s.end()){
        cout << "3查找失败" << endl;
    }
    else{
        cout << "3查找成功" << endl;
    }
    if(s.find(4) == s.end()){
        cout << "4查找失败" << endl;
    }
    else{
        cout << "4查找成功" << endl;
    }
}
运行结果:
对于集合s=1 2 3
3查找成功
4查找失败
集合运算
#include <iostream>
#include <set>

int main(){
    set<int> s1{1, 2};
    set<int> s2{2, 3};
    set<int> result;
    //交运算
    set_intersection(s1.begin(), s1.end(), s2.begin(), s2.end(), inserter(result, result.begin()));
    cout << "s1 交 s2 = ";
    for(auto &x: result){
        cout << x << " ";
    }
    cout << endl;
    //并运算
    result.clear();
    set_union(s1.begin(), s1.end(), s2.begin(), s2.end(), inserter(result, result.begin()));
    cout << "s1 并 s2 = ";
    for(auto &x: result){
        cout << x << " ";
    }
    cout << endl;
    //差运算
    result.clear();
    set_difference(s1.begin(), s1.end(), s2.begin(), s2.end(), inserter(result, result.begin()));
    cout << "s1 差 s2 = ";
    for(auto &x: result){
        cout << x << " ";
    }
    cout << endl;
}
s1 交 s2 = 2
s1 并 s2 = 1 2 3
s1 差 s2 = 1
queue
创建
queue对象初始化的方法比较奇怪,不能使用初始化列表,但是可以用其它容器来初始化
#include <iostream>
#include <queue>

int main(){
    deque<int> values{1, 2, 3};
    queue<int> q(values);
    cout << "队列=";
    while(!q.empty()){
        cout << q.front() << " ";
        q.pop();
    }
}
运行结果:
队列=1 2 3
插入
队列只能插入队尾
#include <iostream>
#include <queue>

int main(){
    //创建并初始化
    deque<int> values{1, 2, 3};
    queue<int> q(values);
    //插入
    q.push(4);
    //展示
    cout << "插入后队列=";
    while(!q.empty()){
        cout << q.front() << " ";
        q.pop();
    }
}
运行结果:
插入后队列=1 2 3 4
删除
队列只能删除队首元素
#include <iostream>
#include <queue>

int main(){
    //创建并初始化
    deque<int> values{1, 2, 3};
    queue<int> q(values);
    //插入
    q.pop();
    //展示
    cout << "删除后队列=";
    while(!q.empty()){
        cout << q.front() << " ";
        q.pop();
    }
}
运行结果:
删除后队列=2 3
查看
#include <iostream>
#include <queue>

int main(){
    //创建并初始化
    deque<int> values{1, 2, 3};
    queue<int> q(values);
    //查看队首
    cout << "队首元素为:" << q.front() << endl;
    //查看队尾
    cout << "队尾元素为:" << q.back() << endl;
}
运行结果:
队首元素为:1
队尾元素为:3
遍历
因为队列没有迭代器,所以队列的遍历只能是一种方式,一边查看队首,一边删除队首,直至为空。
#include <iostream>
#include <queue>

int main(){
    //创建并初始化
    deque<int> values{1, 2, 3};
    queue<int> q(values);
    //遍历
    cout << "队列=";
    while(!q.empty()){
        cout << q.front() << " ";
        q.pop();
    }
}
运行结果:
/shuojia/code/C++/compiler/parse2/"learn
队列=1 2 3
stack
创建
stack的初始化不能用初始化列表,需要用其它容器来初始化
#include <iostream>
#include <stack>

int main(){
    //创建并初始化
    deque<int> values{1, 2, 3};
    stack<int> s(values);
    //展示
    cout << "栈=";
    while(!s.empty()){
        cout << s.top() << " ";
        s.pop();
    }
}
运行结果:
栈=3 2 1
插入
栈的插入是栈顶插入
#include <iostream>
#include <stack>

int main(){
    //创建并初始化
    deque<int> values{1, 2, 3};
    stack<int> s(values);
    //插入
    s.push(4);
    //展示
    cout << "插入后的栈=";
    while(!s.empty()){
        cout << s.top() << " ";
        s.pop();
    }
}
运行结果:
插入后的栈=4 3 2 1
删除
栈的删除是栈顶删除
#include <iostream>
#include <stack>

int main(){
    //创建并初始化
    deque<int> values{1, 2, 3};
    stack<int> s(values);
    //删除
    s.pop();
    //展示
    cout << "删除后的栈=";
    while(!s.empty()){
        cout << s.top() << " ";
        s.pop();
    }
}
运行结果:
删除后的栈=2 1
查看
#include <iostream>
#include <stack>

int main(){
    //创建并初始化
    deque<int> values{1, 2, 3};
    stack<int> s(values);
    cout << "栈顶元素为:" << s.top();
}
运行结果:
栈顶元素为:3
遍历
因为stack没有迭代器,只用使用查看栈顶,删除栈顶,直到stack为空为止
#include <iostream>
#include <stack>

int main(){
    //创建并初始化
    deque<int> values{1, 2, 3};
    stack<int> s(values);;
    //展示
    cout << "栈=";
    while(!s.empty()){
        cout << s.top() << " ";
        s.pop();
    }
}
运行结果:
栈=3 2 1