一、angular2实现文件上传前端
Angular2使用ng2-file-upload上传文件,Angular2中有两个比较好用的上传文件的第三方库,一个是ng2-file-upload,一个是ng2-uploader。ng2-uploader是一个轻便的上传文件的支持库,功能较弱,而ng2-file-upload是一个功能比较全面的上传文件的支持库。这里主要介绍一下ng2-file-upload的使用。
1 下载相关模块
进入到项目根目录执行 npm install ng2-file-upload --save
坑01:有时候利用npm下载不成功
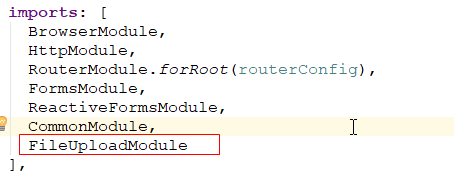
2 在主模块中导入上传模块

技巧01:一般都是在共享模块中导入再导出,然后在需要的模块中导入共享模块就可以啦
3 编写上传文件组件

import { Component, OnInit } from '@angular/core';
import {FileUploader} from 'ng2-file-upload';

@Component({
  selector: 'app-test-upload-file',
  templateUrl: './test-upload-file.component.html',
  styleUrls: ['./test-upload-file.component.css']
})
export class TestUploadFileComponent implements OnInit {
  private uploader: FileUploader = new FileUploader({
    url: '/devProject/uploadClient',
    method: 'POST',
    itemAlias: 'file'
  });

  constructor() { }

  ngOnInit() {
  }

  /**
   * 上传文件内容变化时执行的方法
   * @param event
   */
  selectedFileOnChanged(event: any) {
    // 这里是文件选择完成后的操作处理
    // alert('上传文件改变啦');
    console.log(event.target.value);
    console.log(event);
  }

  /**
   * 上传文件方法
   */
  uploadFile() {
    alert('执行上传文件');
    // 上传
    this.uploader.queue[0].onSuccess = function (response, status, headers) {
      // 上传文件成功
      if (status == 200) {
        // 上传文件后获取服务器返回的数据
        const tempRes = response;
        alert(response);
      } else {
        // 上传文件后获取服务器返回的数据错误
        alert('上传失败');
      }
    };
    // onSuccessItem(item: FileItem, response: string, status: number, headers: ParsedResponseHeaders): any;
    this.uploader.queue[0].upload(); // 开始上传
    // this.uploader.queue[0].onSuccess()
    alert('上传之后');
  }
}
4 HTML文件
<p>
  test-upload-file works!
</p>
<hr style="border: 1px solid blue;" />


<input type="file" ng2FileSelect [uploader]="uploader" (change)="selectedFileOnChanged($event)" />
<button (click)="uploadFile()">点击上传</button>
详情请参见:点击前往
二、SpringBoot实现后台功能

    /**
     * 上传客户EXCEL表格
     * @param file
     * @return 上传成功信息
     * @throws IOException
     */
    @PostMapping("/uploadClient")
    public String testUpload(@RequestParam("file") MultipartFile file) throws IOException {
//        System.out.println("后台文件上传函数");
//        System.out.println("获取到的文件名称为:" + file);
        String filePath = file.getOriginalFilename(); // 获取文件的名称
        filePath = "asset/" + filePath; // 这是文件的保存路径,如果不设置就会保存到项目的根目录

        BufferedOutputStream outputStream = new BufferedOutputStream(new FileOutputStream(filePath));

        outputStream.write(file.getBytes());
        outputStream.flush();
        outputStream.close();
        return "客户资料上传成功";
    }
坑01:文件上传时会出现跨域问题,最简单的方法就是在后台配置一个跨域配置,就是编写一个类,然后在需要跨域的类中继承这个类就可以啦
参考博文:点击前往

package cn.xiangxu.cq8x.configure;

import org.springframework.context.annotation.Configuration;
import org.springframework.web.servlet.config.annotation.CorsRegistry;
import org.springframework.web.servlet.config.annotation.WebMvcConfigurerAdapter;

/**
 * @author 王杨帅
 * @create 2018-03-22 15:51
 * @desc 跨域配置
 **/
@Configuration
public class CorsConfigure extends WebMvcConfigurerAdapter {
    @Override
    public void addCorsMappings(CorsRegistry registry) {
        registry.addMapping("/**")
                .allowedOrigins("*")
                .allowedMethods("GET", "POST", "PUT", "OPTIONS", "DELETE", "PATCH")
                .allowCredentials(true).maxAge(3600);
    }
}

package cn.xiangxu.cq8x.controller;

import cn.xiangxu.cq8x.configure.CorsConfigure;
import cn.xiangxu.cq8x.dao.ClientDao;
import cn.xiangxu.cq8x.model.dataModel.ClientInfoModel;
import cn.xiangxu.cq8x.model.viewModel.ResultViewModel;
import cn.xiangxu.cq8x.service.ClientService;
import cn.xiangxu.cq8x.util.ResultViewUtil;
import org.springframework.beans.factory.annotation.Autowired;
import org.springframework.data.domain.PageRequest;
import org.springframework.data.domain.Pageable;
import org.springframework.web.bind.annotation.*;
import org.springframework.web.multipart.MultipartFile;

import javax.annotation.Resource;
import java.io.BufferedOutputStream;
import java.io.FileOutputStream;
import java.io.IOException;

/**
 * @author 王杨帅
 * @create 2018-03-06 20:36
 * @desc 客户信息控制层接口
 **/
@RestController
@RequestMapping(value = "/client")
@CrossOrigin
public class ClientController extends CorsConfigure {

    @Resource(name = "clientService")
    private ClientService clientService;

    /**
     * 查询所有的客户信息
     * @return
     */
    @GetMapping(value = "/findAll")
    public ResultViewModel findAll(
            @RequestParam(value = "page", required = false, defaultValue = "0") Integer page,
            @RequestParam(value = "size", required = false, defaultValue = "3") Integer size
    ) {
        Pageable pageable = PageRequest.of(page, size);
        System.out.println(pageable);
        return ResultViewUtil.success(clientService.findAll(pageable));
    }

    /**
     * 根据姓名查询客户信息
     * @param name 从路径中获取参数
     * @return
     */
    @GetMapping(value = "/findByName02/{name}")
    public ResultViewModel findByName02(
            @PathVariable("name") String name
    ) {
        System.out.println("前端传过来的目标客户姓名为:" + name);
        return ResultViewUtil.success(clientService.findByName(name));
    }

    /**
     * 根据姓名查询客户信息
     * @param name 从query中获取参数
     * @return
     */
    @GetMapping(value = "/findByName")
    public ResultViewModel findByName(
            @RequestParam("name") String name
    ) {
        System.out.println("从前端获取到的参数为:" + name);
        return ResultViewUtil.success(clientService.findByName(name));
    }

    /**
     * 根据姓名进行模糊查询
     * @param name
     * @return
     */
    @GetMapping(value = "/findByNameLike/{name}")
    public ResultViewModel findByNameLike(
            @PathVariable("name") String name
    ) {
        System.out.println("前端传过来的模糊查询信息为 :" + name);
        return ResultViewUtil.success(clientService.findByNameLike(name));
    }

    /**
     * 根据idcard查询客户信息
     * @param idcard 从路径中获取参数
     * @return
     */
    @GetMapping(value = "/findByIdcard02/{idcard}")
    public ResultViewModel findByIdcard02(
            @PathVariable("idcard") String idcard
    ) {
        System.out.println("前端传过来的客户证件号码为:" + idcard);
        return ResultViewUtil.success(clientService.findByIdcard(idcard));
    }

    /**
     * 根据idcard查询客户信息
     * @param idcard 从query中获取参数
     * @return
     */
    @GetMapping(value = "/findByIdcard")
    public ResultViewModel findByIdcard(
            @RequestParam("idcard") String idcard
    ) {
        System.out.println("从前端获取到的参数为:" + idcard);
        return ResultViewUtil.success(this.clientService.findByIdcard(idcard));
    }

    /**
     * 新增客户
     * @param clientInfoModel
     * @return
     */
    @PostMapping(value = "/create")
    public ResultViewModel create(
            @RequestBody ClientInfoModel clientInfoModel
    ) {
        return ResultViewUtil.success(this.clientService.createNewClient(clientInfoModel));
    }

    @PutMapping(value = "/update")
    public ResultViewModel update(
            @RequestBody ClientInfoModel clientInfoModel
    ) {
        System.out.println(clientInfoModel);
        return ResultViewUtil.success(this.clientService.updateClient(clientInfoModel));
    }

    @CrossOrigin
    @PostMapping(value = "/upload")
    public String upload(@RequestParam("file") MultipartFile file) throws IOException {
//        System.out.println("后台文件上传函数");
        System.out.println("获取到的文件名称为:" + file);
        String filePath = file.getOriginalFilename(); // 获取文件的名称
        filePath = "G:/" + filePath; // 这是文件的保存路径,如果不设置就会保存到项目的根目录

        BufferedOutputStream outputStream = new BufferedOutputStream(new FileOutputStream(filePath));

        outputStream.write(file.getBytes());
        outputStream.flush();
        outputStream.close();

        return "客户资料上传成功";
    }


    @GetMapping(value = "/test")
    public ResultViewModel test(
            @RequestParam("id") Integer id
    ) {
        return ResultViewUtil.success("这是一个测试接口");
    }

    @PutMapping(value = "/test02")
    public ResultViewModel test02(
            @RequestParam(value = "page", required = false, defaultValue = "0") Integer page,
            @RequestParam(value = "size", required = false, defaultValue = "3") Integer size
    ) {
        System.out.println("获取到的参数page为:" + page);
        System.out.println("获取到的参数size为:" + size);
        return ResultViewUtil.success("PUT方法的参数问题");
    }


}
·下面是我的公众号二维码,欢迎关注·
尋渝記

微信号:xyj_fury
