本项目的笔记和资料的Download,请点击这一句话自行获取。
day01-springboot(理论篇) ;day01-springboot(实践篇)
day02-springcloud(理论篇一) ;day02-springcloud(理论篇二) ;day02-springcloud(理论篇三) ;day02-springcloud(理论篇四) ;
day03-springcloud(Hystix,Feign) ;day03-springcloud(Zuul网关)
day04-项目搭建(一) ; day04-项目搭建(二); day04-ES6语法入门
day05-Vue入门学习
14 微服务电商【黑马乐优商城】:day04-项目搭建(二)
0.学习目标
- 了解乐优商城项目结构
- 能独立搭建项目基本框架
- 能参考使用ES6的新语法
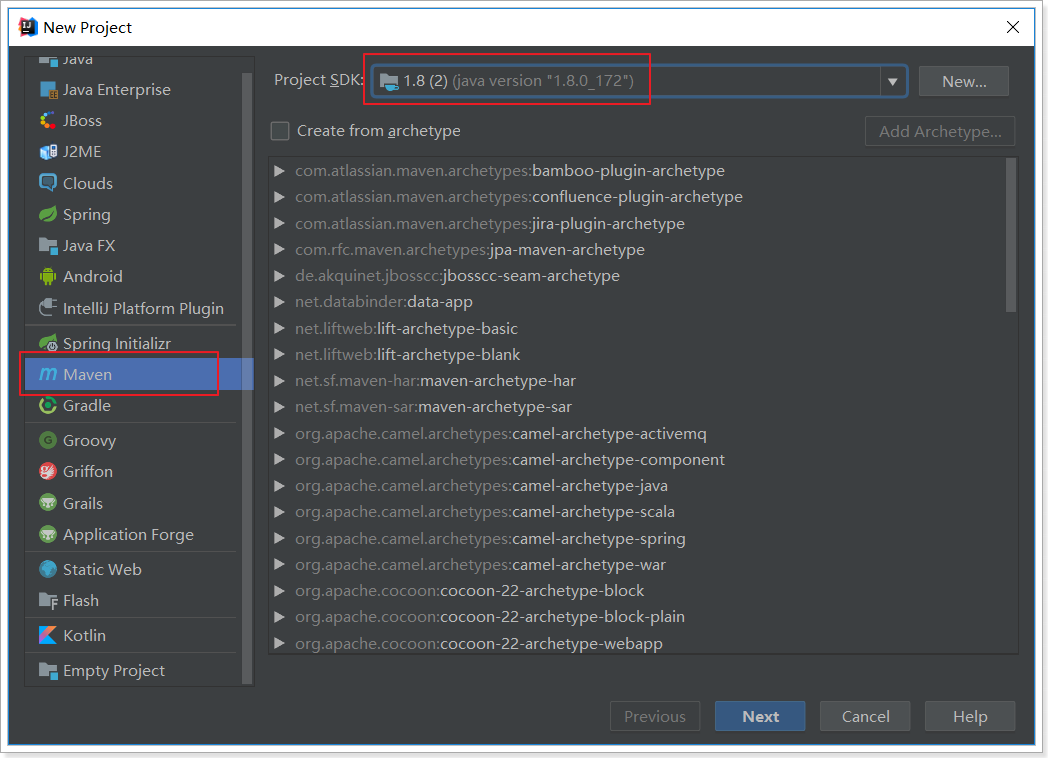
3.4.创建父工程
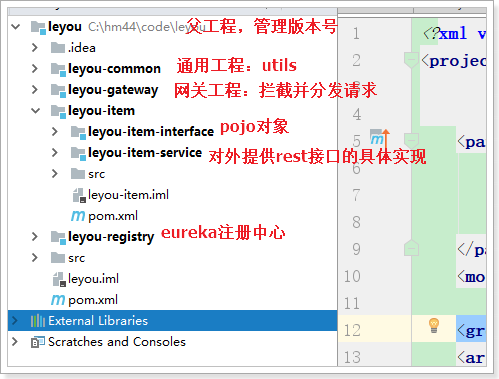
创建统一的父工程:leyou,用来管理依赖及其版本,注意是创建project,而不是module
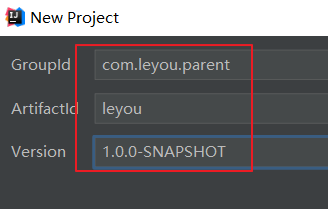
填写项目信息:
然后将pom文件修改成我这个样子:
<?xml version="1.0" encoding="UTF-8"?>
<project xmlns="http://maven.apache.org/POM/4.0.0"
         xmlns:xsi="http://www.w3.org/2001/XMLSchema-instance"
         xsi:schemaLocation="http://maven.apache.org/POM/4.0.0 http://maven.apache.org/xsd/maven-4.0.0.xsd">
    <modelVersion>4.0.0</modelVersion>
    <!--
        子模块天生继承父工程,可以使用父工程所有资源。
        子模块之间天生是没有任何关系的。

        父子工程直接不用建立关系,继承关系是先天的,不需要手动建立。
        平级直接的引用叫依赖,依赖不是先天的,依赖是需要后天建立的。
        -->
    <groupId>com.leyou.parent</groupId>
    <artifactId>leyou</artifactId>
    <version>1.0-SNAPSHOT</version>
    <packaging>pom</packaging>

    <parent>
        <groupId>org.springframework.boot</groupId>
        <artifactId>spring-boot-starter-parent</artifactId>
        <version>2.0.8.RELEASE</version>
        <relativePath/> <!-- lookup parent from repository -->
    </parent>

    <properties>
        <project.build.sourceEncoding>UTF-8</project.build.sourceEncoding>
        <project.reporting.outputEncoding>UTF-8</project.reporting.outputEncoding>
        <java.version>1.8</java.version>
        <spring-cloud.version>Finchley.SR4</spring-cloud.version>
        <mybatis.starter.version>1.3.5</mybatis.starter.version>
        <mapper.starter.version>2.1.15</mapper.starter.version>
        <pageHelper.starter.version>1.2.12</pageHelper.starter.version>
        <druid.starter.version>1.1.10</druid.starter.version>
        <mysql.version>5.1.45</mysql.version>
        <leyou.latest.version>1.0.0-SNAPSHOT</leyou.latest.version>
        <fastDFS.client.version>1.26.1-RELEASE</fastDFS.client.version>
    </properties>

    <dependencyManagement>
        <dependencies>
            <!-- springCloud -->
            <dependency>
                <groupId>org.springframework.cloud</groupId>
                <artifactId>spring-cloud-dependencies</artifactId>
                <version>${spring-cloud.version}</version>
                <type>pom</type>
                <scope>import</scope>
            </dependency>
            <!-- mybatis启动器 -->
            <dependency>
                <groupId>org.mybatis.spring.boot</groupId>
                <artifactId>mybatis-spring-boot-starter</artifactId>
                <version>${mybatis.starter.version}</version>
            </dependency>
            <!-- 通用Mapper启动器 -->
            <dependency>
                <groupId>tk.mybatis</groupId>
                <artifactId>mapper-spring-boot-starter</artifactId>
                <version>${mapper.starter.version}</version>
            </dependency>
            <!-- 分页助手启动器 -->
            <dependency>
                <groupId>com.github.pagehelper</groupId>
                <artifactId>pagehelper-spring-boot-starter</artifactId>
                <version>${pageHelper.starter.version}</version>
            </dependency>
            <!-- mysql驱动 -->
            <dependency>
                <groupId>mysql</groupId>
                <artifactId>mysql-connector-java</artifactId>
                <version>${mysql.version}</version>
            </dependency>
            <!--FastDFS客户端-->
            <dependency>
                <groupId>com.github.tobato</groupId>
                <artifactId>fastdfs-client</artifactId>
                <version>${fastDFS.client.version}</version>
            </dependency>
        </dependencies>
    </dependencyManagement>

    <build>
        <plugins>
            <plugin>
                <groupId>org.springframework.boot</groupId>
                <artifactId>spring-boot-maven-plugin</artifactId>
            </plugin>
        </plugins>
    </build>
</project>
在父工程中引入了SpringCloud等,很多以后需要用到的依赖,以后创建的子工程就不需要自己引入了。
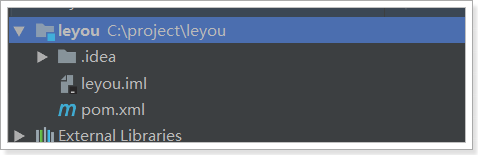
可以删除src目录,工程结构如下:
3.5.创建EurekaServer
3.5.1.创建工程
我们的注册中心,起名为:leyou-registry
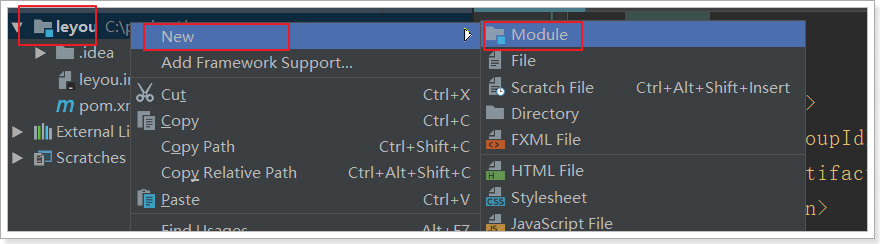
选择新建module:
然后填写项目坐标,我们的项目名称为 leyou-registry
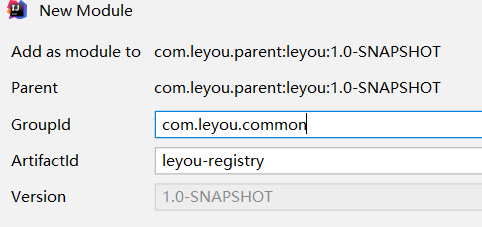
选择安装目录,因为是聚合项目,目录应该是在父工程leyou的下面。
3.5.2.添加依赖
添加EurekaServer的依赖:
    <dependencies>
        <dependency>
            <groupId>org.springframework.cloud</groupId>
            <artifactId>spring-cloud-starter-netflix-eureka-server</artifactId>
        </dependency>

    </dependencies>
3.5.3.编写启动类
com.leyou.LeyouRegistryApplication
@SpringBootApplication
@EnableEurekaServer
public class LeyouRegistryApplication {

    public static void main(String[] args) {
        SpringApplication.run(LeyouRegistryApplication.class, args);
    }
}
3.5.4.配置文件
#tomcat服务器端口
server:
 port: 10086
#服务名称
spring:
  application:
    name: leyou-registry
#注册中心
eureka:
  client:
    service-url:
      defaultZone: http://127.0.0.1:${server.port}/eureka
    register-with-eureka: false # 把自己注册到eureka服务列表
    fetch-registry: false # 拉取eureka服务信息
  server:
    enable-self-preservation: false # 关闭自我保护
    eviction-interval-timer-in-ms: 5000 # 每隔5秒钟,进行一次服务列表的清理
3.6.创建Zuul网关
3.6.1.创建工程
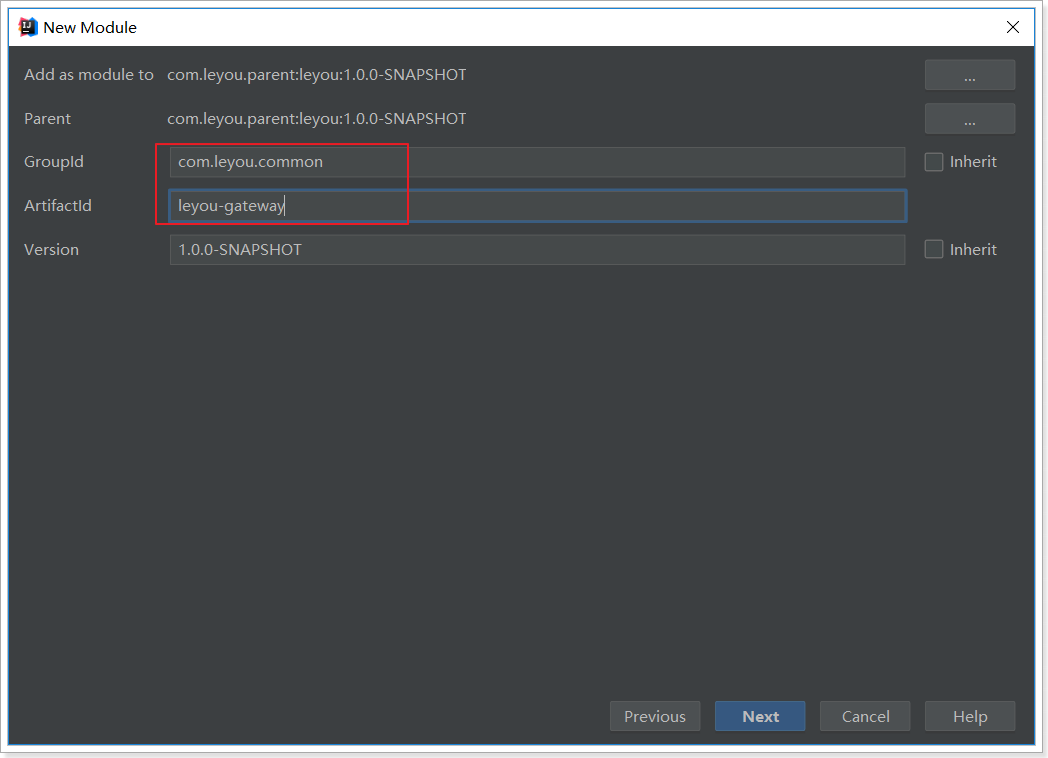
与上面类似,选择maven方式创建Module,然后填写项目名称,我们命名为:leyou-gateway
3.6.2.添加依赖
这里我们需要添加Zuul和EurekaClient的依赖:
    <dependencies>
        <!--Zuul网关的依赖启动器-->
        <dependency>
            <groupId>org.springframework.cloud</groupId>
            <artifactId>spring-cloud-starter-netflix-zuul</artifactId>
        </dependency>
        <!--eureka-client的依赖-->
        <dependency>
            <groupId>org.springframework.cloud</groupId>
            <artifactId>spring-cloud-starter-netflix-eureka-client</artifactId>
        </dependency>
        <!-- springboot提供微服务检测接口,默认对外提供几个接口 -->
        <dependency>
            <groupId>org.springframework.boot</groupId>
            <artifactId>spring-boot-starter-actuator</artifactId>
        </dependency>
    </dependencies>
3.6.3.编写启动类
com.leyou.LeyouGatewayApplication
@SpringBootApplication
@EnableDiscoveryClient
@EnableZuulProxy
public class LeyouGatewayApplication {
    public static void main(String[] args) {
        SpringApplication.run(LeyouGatewayApplication.class, args);
    }
}
3.6.4.配置文件
#tomcat服务端口
server:
 port: 10010
#服务名称
spring:
  application:
    name: leyou-gateway

#注册中心的客户端配置
eureka:
  client:
    service-url:
      defaultZone: http://127.0.0.1:10086/eureka
    registry-fetch-interval-seconds: 5 #拉取eureka服务信息的时间间隔
#zuul网关的配置项
zuul:
  prefix: /api # 添加路由前缀
  routes:
    item-service: /item/** # 商品微服务的映射路径

#熔断器的配置
hystrix:
  command:
    default:
      execution:
        isolation:
          thread:
            timeoutInMilliseconds: 5000 # 熔断超时时长:5000ms

#负载均衡
ribbon:
  ConnectTimeout: 1000 # ribbon链接超时时长
  ReadTimeout: 3500 # ribbon读取超时时长
  MaxAutoRetries: 0  # 当前服务重试次数
  MaxAutoRetriesNextServer: 0  # 切换服务重试次数
3.6.5.项目结构
目前,leyou下有两个子模块:
- leyou-registry:服务的注册中心(EurekaServer)
- leyou-gateway:服务网关(Zuul)
截止到这里,我们已经把基础服务搭建完毕,为了便于开发,统一配置中心(ConfigServer)我们留待以后添加。
3.7.创建商品微服务
既然是一个全品类的电商购物平台,那么核心自然就是商品。因此我们要搭建的第一个服务,就是商品微服务。其中会包含对于商品相关的一系列内容的管理,包括:
- 商品分类管理
- 品牌管理
- 商品规格参数管理
- 商品管理
- 库存管理
3.7.1.微服务的结构
因为与商品的品类相关,我们的工程命名为leyou-item.
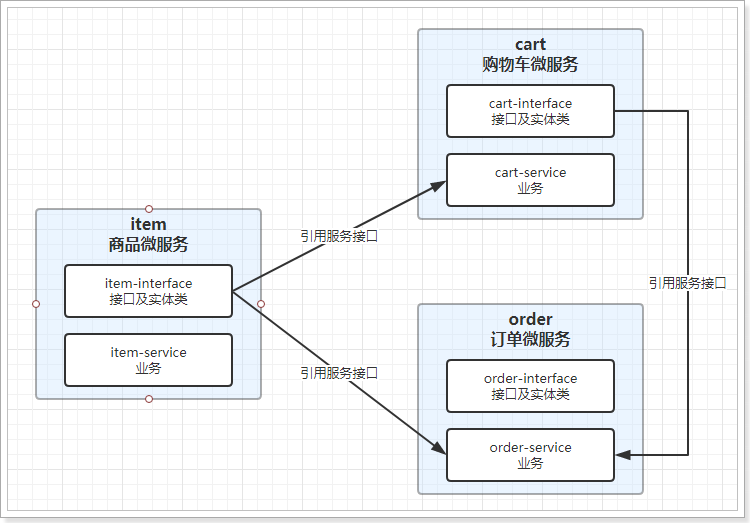
需要注意的是,我们的leyou-item是一个微服务,那么将来肯定会有其它系统需要来调用服务中提供的接口,获取的接口数据,也需要对应的实体类来封装,因此肯定也会使用到接口中关联的实体类。
因此这里我们需要使用聚合工程,将要提供的接口及相关实体类放到独立子工程中,以后别人引用的时候,只需要知道坐标即可。
我们会在leyou-item中创建两个子工程:
- leyou-item-interface:主要是对外暴露的接口及相关实体类
- leyou-item-service:所有业务逻辑及内部使用接口
调用关系如图所示:
3.7.2.leyou-item
依然是使用maven构建:
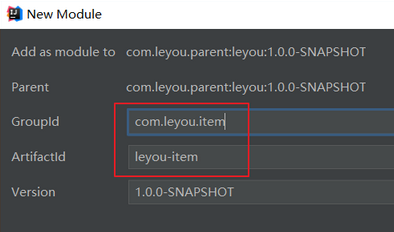
因为是聚合工程,所以把项目打包方式设置为pom
    <!-- 因为是聚合工程,所以打包方式为pom -->
    <packaging>pom</packaging>
3.7.3.leyou-item-interface
在leyou-item工程上点击右键,选择new --> module:
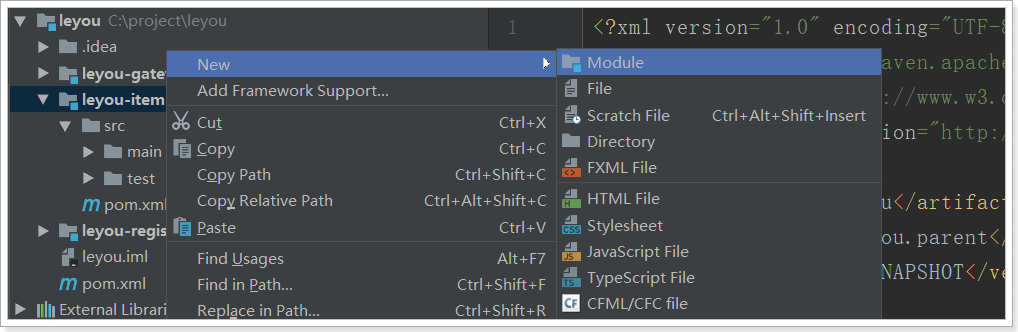
依然是使用maven构建,注意父工程是leyou-item:
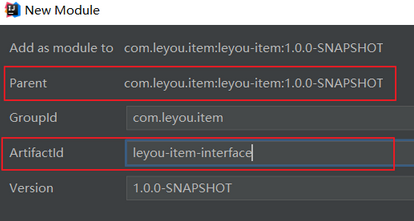
注意:目录结构,保存到leyou-item下的leyou-item-interface目录中。
3.7.4.leyou-item-service
与leyou-item-interface类似,我们选择在leyou-item上右键,新建module,然后填写项目信息:

3.7.5.整个微服务结构
如图所示:
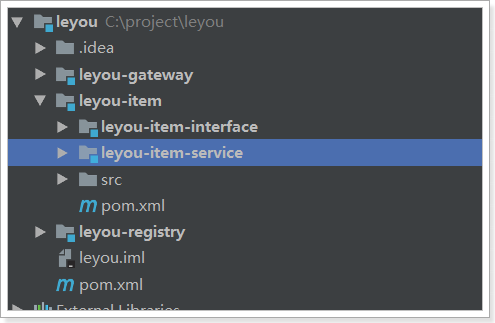
我们打开leyou-item的pom查看,会发现leyou-item-interface和leyou-item-service都已经成为module了:
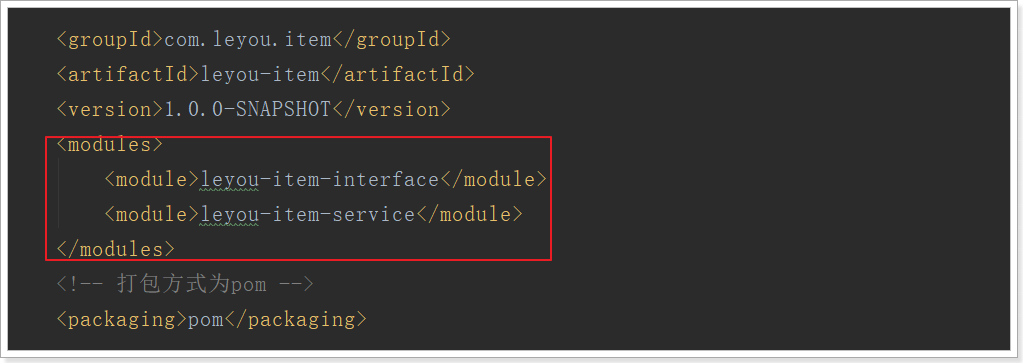
可以删除leyou-item工程的src目录
3.7.6.添加依赖
接下来我们给leyou-item-service中添加依赖:
思考一下我们需要什么?
- Eureka客户端
- web启动器
- mybatis启动器
- 通用mapper启动器
- 分页助手启动器
- 连接池,我们用默认的Hykira
- mysql驱动
- 千万不能忘了,我们自己也需要
ly-item-interface中的实体类
这些依赖,我们在顶级父工程:leyou中已经添加好了。所以直接引入即可:
<?xml version="1.0" encoding="UTF-8"?>
<project xmlns="http://maven.apache.org/POM/4.0.0"
         xmlns:xsi="http://www.w3.org/2001/XMLSchema-instance"
         xsi:schemaLocation="http://maven.apache.org/POM/4.0.0 http://maven.apache.org/xsd/maven-4.0.0.xsd">
    <parent>
        <artifactId>leyou-item</artifactId>
        <groupId>com.leyou.item</groupId>
        <version>1.0.0-SNAPSHOT</version>
    </parent>
    <modelVersion>4.0.0</modelVersion>

    <groupId>com.leyou.item</groupId>
    <artifactId>leyou-item-service</artifactId>

    <dependencies>
        <!-- web启动器 -->
        <dependency>
            <groupId>org.springframework.boot</groupId>
            <artifactId>spring-boot-starter-web</artifactId>
        </dependency>
        <!-- eureka客户端 -->
        <dependency>
            <groupId>org.springframework.cloud</groupId>
            <artifactId>spring-cloud-starter-netflix-eureka-client</artifactId>
        </dependency>
         <!--mybatis的启动器-->
        <dependency>
            <groupId>org.mybatis.spring.boot</groupId>
            <artifactId>mybatis-spring-boot-starter</artifactId>
        </dependency>
        <!-- 通用mapper启动器 -->
        <dependency>
            <groupId>tk.mybatis</groupId>
            <artifactId>mapper-spring-boot-starter</artifactId>
        </dependency>
        <!--分页助手启动器-->
        <dependency>
            <groupId>com.github.pagehelper</groupId>
            <artifactId>pagehelper-spring-boot-starter</artifactId>
        </dependency>
        <!-- mysql驱动 -->
        <dependency>
            <groupId>mysql</groupId>
            <artifactId>mysql-connector-java</artifactId>
        </dependency>
        <!--平级的模块之间调用要手动导依赖坐标-->
        <dependency>
            <groupId>com.leyou.item</groupId>
            <artifactId>leyou-item-interface</artifactId>
            <version>1.0.0-SNAPSHOT</version>
        </dependency>
        <!-- springboot检测服务启动器 -->
        <dependency>
            <groupId>org.springframework.boot</groupId>
            <artifactId>spring-boot-starter-actuator</artifactId>
        </dependency>
    </dependencies>

</project>
leyou-item-interface中需要什么我们暂时不清楚,所以先不管。以后需要什么依赖,再引入。
通用mapper的启动器内部自带引用 mybatis和jdbc的启动器。
3.7.7.编写启动和配置
在整个leyou-item工程中,只有leyou-item-service是需要启动的。因此在其中编写启动类即可:
@SpringBootApplication
@EnableDiscoveryClient
public class LeyouItemServiceApplication {

    public static void main(String[] args) {
        SpringApplication.run(LeyouItemServiceApplication.class, args);
    }
}
然后是全局属性application.yml文件:
#tomcat服务端口
server:
 port: 8081
#服务名称
spring:
  application:
    name: item-service
  datasource:
    url: jdbc:mysql://localhost:3306/leyou
    username: root
    password: root
    hikari:
      max-lifetime: 28830000 # 一个连接的生命时长(毫秒),超时而且没被使用则被释放(retired),缺省:30分钟,建议设置比数据库超时时长少30秒,参考MySQL wait_timeout参数(show variables like '%timeout%';)
      maximum-pool-size: 8 # 连接池中允许的最大连接数。缺省值:10;推荐的公式:((core_count * 2) + effective_spindle_count)
    driver-class-name: com.mysql.jdbc.Driver

#注册中心
eureka:
  client:
    service-url:
      defaultZone: http://127.0.0.1:10086/eureka
    #register-with-eureka: false # 把自己注册到eureka服务列表
    #fetch-registry: false # 拉取eureka服务信息
    instance:
      prefer-ip-addresss: true
      ip-address: 127.0.0.1
      lease-renewal-interval-in-seconds: 5 # 5秒钟发送一次心跳
      lease-expiration-duration-in-seconds: 10 # 10秒不发送就过期
3.8.添加商品微服务的路由规则
既然商品微服务已经创建,接下来肯定要添加路由规则到Zuul中,我们不使用默认的路由规则。
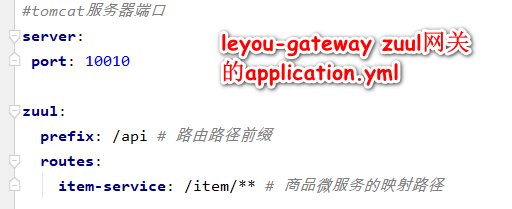
使用如下代码到leyou-gateway工程的application.yml配置文件:
zuul:
  prefix: /api # 路由路径前缀
  routes:
    item-service: /item/** # 商品微服务的映射路径
3.9.启动测试
我们按顺序分别启动:leyou-registry,leyou-gateway,leyou-item-service

查看Eureka面板:

3.10.测试路由规则
为了测试路由规则是否畅通,我们是不是需要在item-service中编写一个controller接口呢?
其实不需要,SpringBoot提供了一个依赖:actuator
只要我们添加了actuator的依赖,它就会为我们生成一系列的访问接口:
- /info
- /health
- /refresh
添加依赖:
<dependency>
    <groupId>org.springframework.boot</groupId>
    <artifactId>spring-boot-starter-actuator</artifactId>
</dependency>
重启后访问Eureka控制台:
鼠标悬停在item-service上,会显示一个地址:

这就是actuator提供的接口,我们点击访问:

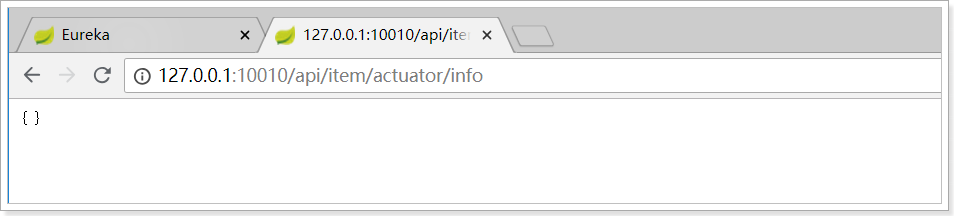
因为我们没有添加信息,所以是一个空的json,但是可以肯定的是:我们能够访问到item-service了。
接下来我们通过路由访问试试,根据路由规则,我们需要访问的地址是:
http://127.0.0.1:10010/api/item/actuator/info
3.11.通用工具模块
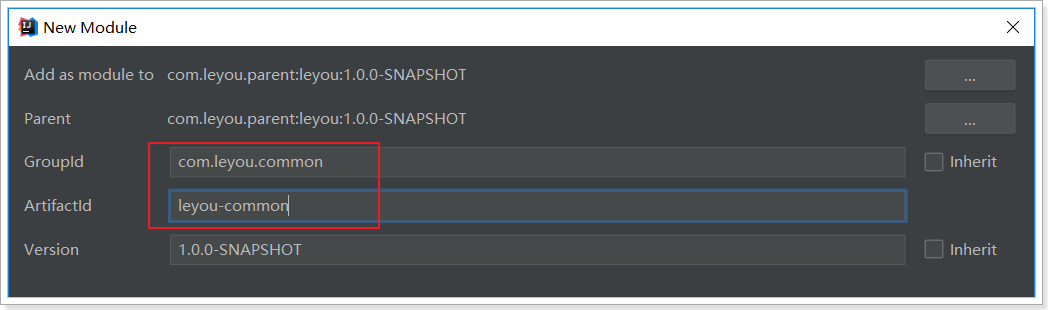
有些工具或通用的约定内容,我们希望各个服务共享,因此需要创建一个工具模块:leyou-common
右键leyou工程,使用maven来构建module:
工程结构:

目前还不需要自己写工具类,我们从课前资料里直接导入即可。
选中java目录,新建一个package:com.leyou.common.utils
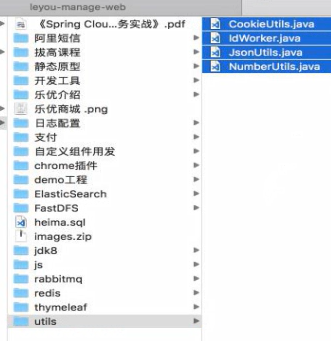
把资料里的4个工具类copy到刚才新建的utils目录里。
在leyou-common模块的pom.xml添加依赖坐标:
<?xml version="1.0" encoding="UTF-8"?>
<project xmlns="http://maven.apache.org/POM/4.0.0"
         xmlns:xsi="http://www.w3.org/2001/XMLSchema-instance"
         xsi:schemaLocation="http://maven.apache.org/POM/4.0.0 http://maven.apache.org/xsd/maven-4.0.0.xsd">
    <parent>
        <artifactId>leyou</artifactId>
        <groupId>com.leyou.parent</groupId>
        <version>1.0.0-SNAPSHOT</version>
    </parent>
    <modelVersion>4.0.0</modelVersion>

    <groupId>com.leyou.common</groupId>
    <artifactId>leyou-common</artifactId>


    <dependencies>
        <dependency> <!-- log日志启动器 -->
            <groupId>org.springframework.boot</groupId>
            <artifactId>spring-boot-starter-logging</artifactId>
        </dependency>
        <dependency>
            <groupId>org.apache.tomcat.embed</groupId>
            <artifactId>tomcat-embed-core</artifactId>
            <scope>provided</scope>
        </dependency>
        <dependency><!--springMVC的JSON反序列化把{}字符串转成对象-->
            <groupId>com.fasterxml.jackson.core</groupId>
            <artifactId>jackson-databind</artifactId>
            <version>2.9.9.3</version>
        </dependency>
        <dependency>
            <groupId>org.jetbrains</groupId>
            <artifactId>annotations</artifactId>
            <version>13.0</version>
            <scope>compile</scope>
        </dependency>
    </dependencies>

</project>
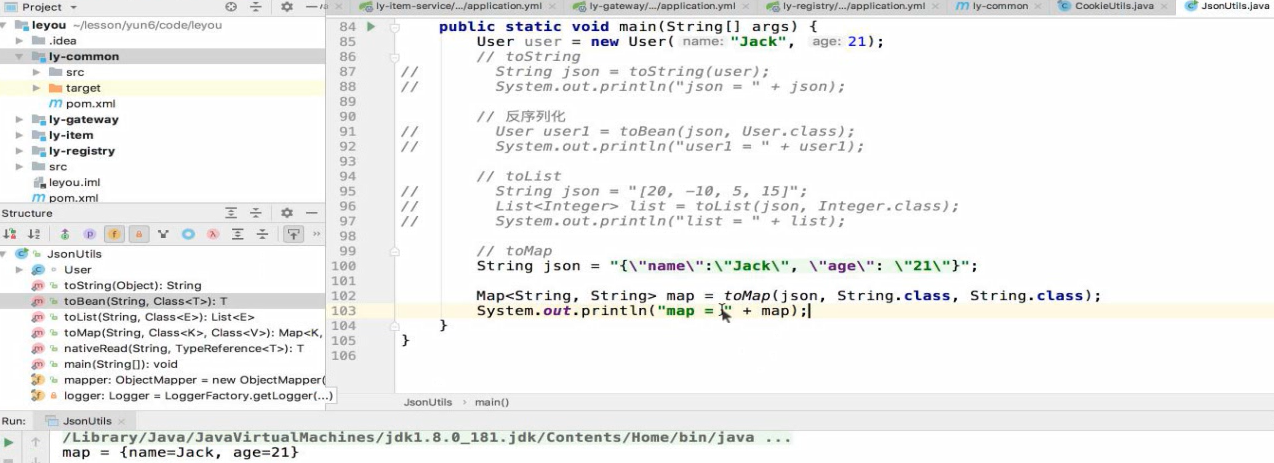
jackson的工具类JsonUtils的使用
5.通用异常处理

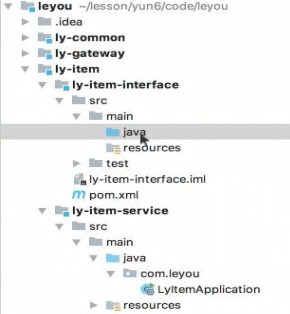
在上图interface的java目录下新建一个实体类:
com.leyou.item.pojo.Item
package com.leyou.item.pojo;

import lombok.Data;

@Data  //字节码阶段自动生成get/set/toString方法
public class Item {
    private Integer id;
    private String name;
    private Long price;
}

在商品服务模块下新建一个类:
com.leyou.item.service.ItemService
@Service
public class ItemService {
    public Item saveItem(Item item){
        //模拟商品新增
        int id = new Random().nextInt(100);  //产生随机数0~99
        item.setId(id);
        return item;
    }
}
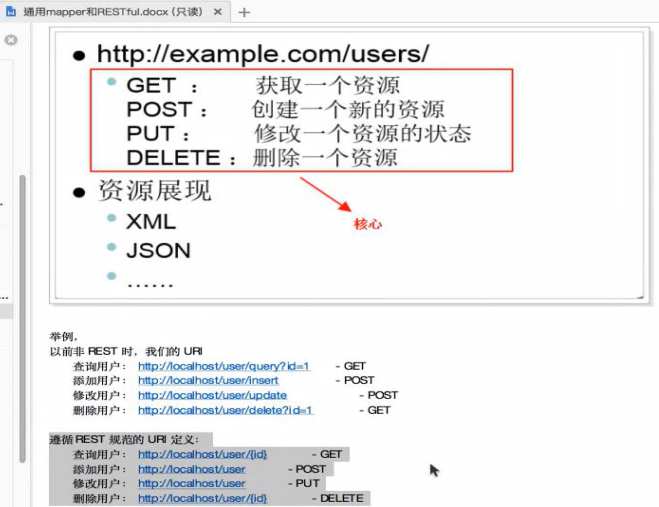
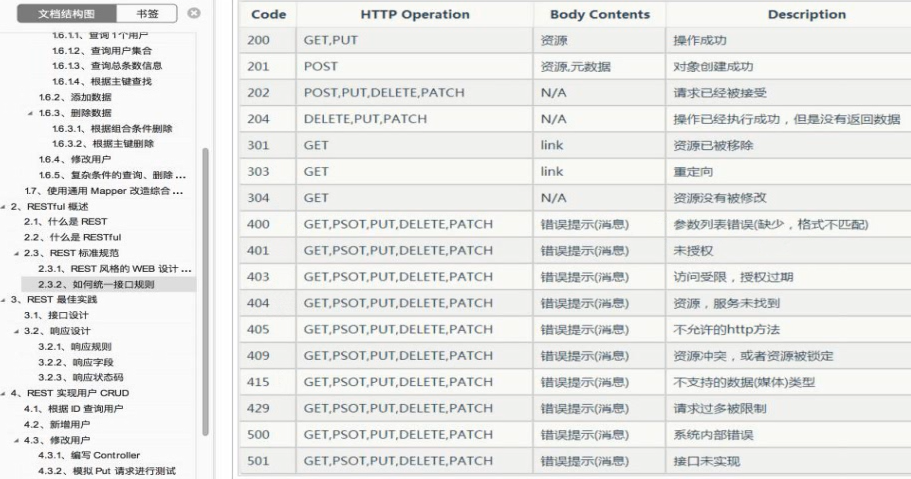
REST规范的URI定义
HTTP协议响应状态码
Insomnia.Setup.7.0.1.exe 下载该软件作为调试REST工具
https://www.insomnia.rest/
Debug APIs like a human, not a robot
Finally, a REST client you'll love
新建一个web层的Controller类
com.leyou.item.web.ItemController
@RestController
@RequestMapping("item")
public class ItemController {
    @Autowired
    private ItemService itemService;

    @PostMapping
    public ResponseEntity<Item> saveItem(Item item){
        //校验价格。如果价格为空,则抛出异常,返回400状态码
        if(item.getPrice() == null){
        return ResponseEntity.status(HttpStatus.BAD_REQUEST).body(null);
        }
        Item result = itemService.saveItem(item);
        return ResponseEntity.status(HttpStatus.CREATED).body(result);
    }
}
模拟客户端浏览器提交POST请求,需要使用一个REST Client作为测试工具。
https://github.com/wisdom-projects/rest-client
特点是使用方便,因为他只是一个jar包,双击执行(当然前提是你电脑上安装并配置环境变量jdk1.8版本)
5.2.3 使用springMVC提供的统一异常拦截器
我们先修改controller的代码,把异常抛出:
@RestController
@RequestMapping("item")
public class ItemController {
    @Autowired
    private ItemService itemService;

    @PostMapping
    public ResponseEntity<Item> saveItem(Item item){
        //校验价格。如果价格为空,则抛出异常,返回400状态码
        if(item.getPrice() == null){
        //return ResponseEntity.status(HttpStatus.BAD_REQUEST).body(null);
           throw new RuntimeException("价格不能为空");
        }
        Item result = itemService.saveItem(item);
        return ResponseEntity.status(HttpStatus.CREATED).body(result);
    }
}
然后在leyou-common工程下的pom.xml添加SpringMVC的依赖坐标
        <dependency>
            <groupId>org.springframework</groupId>
            <artifactId>spring-webmvc</artifactId>
        </dependency>
com.leyou.common.advice.CommonExceptionHandler
也可以叫作BasicExceptionHandler
@ControllerAdvice  //默认拦截所有加了@Controller注解的类
public class CommonExceptionHandler {

    @ExceptionHandler(RuntimeException.class)
    public ResponseEntity<String> handleException(RuntimeException e){
        return ResponseEntity.status(HttpStatus.BAD_REQUEST).body(e.getMessage());

    }
}

leyou-Item-service 的pom.xml添加引入leyou-common模块的依赖坐标:
        <dependency>
            <groupId>com.leyou.common</groupId>
            <artifactId>leyou-common</artifactId>
            <version>1.0.0-SNAPSHOT</version>
        </dependency>
5.2.4 自定义异常
返回至ly-common子模块,新建一个package
com.leyou.common.enums
新建一个枚举类(有固定实例化个数的Class)
package com.leyou.common.enums;

import lombok.AllArgsConstructor;
import lombok.Getter;
import lombok.NoArgsConstructor;

@Getter
@NoArgsConstructor
@AllArgsConstructor
public enum ExceptionEnum {

    PRICE_CANNOT_BE_NULL(400,"价格不能为空!")
    ;
    private int code;
    private String msg;

}
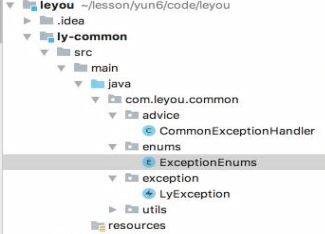
创建自定义异常类继承于 RuntimeException
package com.leyou.common.exception;

import com.leyou.common.enums.ExceptionEnum;
import lombok.AllArgsConstructor;
import lombok.Getter;
import lombok.NoArgsConstructor;

@NoArgsConstructor
@AllArgsConstructor
@Getter
public class LyException extends RuntimeException {
    private ExceptionEnum exceptionEnum;
    //1.自定义异常先继承 RuntimeException
    //2.把枚举类作为私有的成员变量
    //3.提供Getter方法
    //4.提供空参构造器和全参构造器
}
创建一个异常结果对象类,用来封装异常属性信息。
com.leyou.common.vo.ExceptionResult
package com.leyou.common.vo;

import com.leyou.common.enums.ExceptionEnum;
import lombok.Data;

@Data
public class ExceptionResult {
    private int status;
    private String message;
    private Long timestamp;

    public ExceptionResult(ExceptionEnum em){
        this.status = em.getCode();
        this.message = em.getMsg();
        this.timestamp = System.currentTimeMillis();
    }

}
最后返回到com.leyou.common.advice.CommonExceptionHandler 修改后的代码如下:
package com.leyou.common.advice;


import com.leyou.common.enums.ExceptionEnum;
import com.leyou.common.exception.LyException;
import com.leyou.common.vo.ExceptionResult;
import org.springframework.http.ResponseEntity;
import org.springframework.web.bind.annotation.ControllerAdvice;
import org.springframework.web.bind.annotation.ExceptionHandler;

@ControllerAdvice  //默认拦截所有加了@Controller注解的类
public class CommonExceptionHandler {

    @ExceptionHandler(LyException.class)
    public ResponseEntity<ExceptionResult> handleException(LyException e){
        //从被拦截的异常中取出枚举的成员变量
        ExceptionEnum em = e.getExceptionEnum();
        return ResponseEntity.status(em.getCode())
                .body(new ExceptionResult(e.getExceptionEnum()));

    }
}
com.leyou.item.web.ItemController
@RestController
@RequestMapping("item")
public class ItemController {
    @Autowired
    private ItemService itemService;

    @PostMapping
    public ResponseEntity<Item> saveItem(Item item){
        //校验价格。如果价格为空,则抛出异常,返回400状态码
        if(item.getPrice() == null){
        //return ResponseEntity.status(HttpStatus.BAD_REQUEST).body(null);
        //throw new RuntimeException("价格不能为空");
             throw new LyException(ExceptionEnum.PRICE_CANNOT_BE_NULL);
        }
        Item result = itemService.saveItem(item);
        return ResponseEntity.status(HttpStatus.CREATED).body(result);
    }
}
最后不要忘记在leyou-common工具类子模块的pom.xml添加以下打包插件的配置:
    <build>
        <plugins>
            <plugin>
                <groupId>org.springframework.boot</groupId>
                <artifactId>spring-boot-maven-plugin</artifactId>
                <executions><!--是为了解决Unable to find main class的问题-->
                    <execution>
                        <phase>none</phase>
                    </execution>
                </executions>
                <configuration><!--是为了解决install找不到依赖包的问题-->
                    <classifier>execute</classifier>
                </configuration>
            </plugin>
        </plugins>
    </build>
自定义异常处理返回de封装对象 HTTP RESTClient

=============================================
参考资料:
spring-boot-maven-plugin 插件 install时报错 程序包不存在以及找不到类的情况
end