1. 什么是进程
- 正在运行的程序, 是系统进行资源分配的基本单位
- 目前操作系统都是支持多进程, 可以同时执行多个进程, 通过进程ID区分
- 单核CPU在同一时刻, 只能运行一个进程; 宏观并行, 微观串行
2. 什么是线程
- 线程, 又称轻量级进程(Light Weight Process)
- 进程中的一条执行路径, 也是CPU的基本调度单位
- 一个进程由一个或多个线程组成, 彼此间完成不同的工作, 同时执行, 称为多线程
3. 进程和线程的区别
- 进程是操作系统资源分配的基本单位, 而线程是CPU的基本调度单位
- 一个程序运行后至少有一个进程
- 一个进程可以包含多个线程, 但是至少需要有一个线程, 否则这个进程是没有意义的
- 进程间不能共享数据段地址, 但同进程的线程之间可以
4. 线程的组成
- 任何一个线程都具有基本的组成部分:
- CPU时间片: 操作系统(OS)会为每个线程分配执行时间
- 运行数据:
- 堆空间: 存储线程需使用的对象, 多个线程可以共享堆中的对象
- 栈空间: 存储线程需使用的局部变量, 每个线程都拥有独立的栈
- 线程的逻辑代码
5. 线程的特点
- 线程抢占式执行
- 效率高
- 可防止单一线程长时间独占CPU
- 在单核CPU中, 宏观上同时执行, 微观上顺序执行
6. 创建线程
- 创建线程三种方式
- 继承Thread类, 重写run方法
- 实现Runnable接口
- 实现Callable接口
- 获取和修改线程名称
- 获取线程ID和线程名称
- 在Thread的子类中调用this.getId()和this.getName
- 使用Thread.currentThread().getId()和Thread.currentThread().getName()
- 修改线程名称
- 调用线程对象的setName()方法
- 使用线程子类的构造方法赋值
- 获取线程ID和线程名称
方式一: 继承Thread类, 重写run方法
package com.thread.demo01;

public class MyThread extends Thread {

    public MyThread() {
    }

    public MyThread(String name) {
        super(name);
    }

    @Override
    public void run() {
        for (int i = 0; i < 100; i++) {
            //方式一: this.getId()获取线程Id,this.getName()获取线程名称
            //System.out.println("线程id: " + this.getId() + " 线程名称: " + this.getName() + " 子线程:......" +i);
            //方式二(推荐): Thread.currentThread() 获取当前线程
            System.out.println("线程id: " + Thread.currentThread().getId() + " 线程名称: " + Thread.currentThread().getName() + " 子线程:......" + i);
        }
    }
}
启动多个线程
package com.thread.demo01;
public class TestThread {

    public static void main(String[] args) {

        //1. 创建线程对象
        MyThread myThread = new MyThread("我的子线程1");
        //2. 启动线程,不能用run()方法
        //myThread.setName("我的子线程1"); //启动线程前设置线程名称
        myThread.start();
        System.out.println(myThread.getId());

        MyThread myThread1 = new MyThread("我的子线程2);
        //myThread1.setName("我的子线程2"); //启动线程前设置线程名称
        myThread1.start();
        System.out.println(myThread1.getId());

        //主线程执行
        for (int i = 0; i < 50; i++) {
            System.out.println("主线程:......" + i);
        }
    }
}
案例一: 实现四个窗口同时各卖票100张
public class SellTicket extends Thread{

    public SellTicket() {
    }
    public SellTicket(String name){
        super(name);
    }

    private int ticket = 100;//票

    @Override
    public void run() {
        while (ticket > 0) {
            System.out.println(Thread.currentThread().getName() + "卖的第" + (101 - ticket) + "张票");
            ticket--;
        }
    }
}
public class TestTicket {

    public static void main(String[] args) {

        //1. 创建四个卖票窗口
        SellTicket st1 = new SellTicket("窗口一");
        SellTicket st2 = new SellTicket("窗口二");
        SellTicket st3 = new SellTicket("窗口三");
        SellTicket st4 = new SellTicket("窗口四");

        //2. 开启多线程
        st1.start();
        st2.start();
        st3.start();
        st4.start();


    }
}
方式二: 实现Runnable接口
Thread的构造方法,可传入Runnable target, String name ,即Runnable接口类型的对象和字符串类型的名称
private void init(ThreadGroup g, Runnable target, String name,
                  long stackSize, AccessControlContext acc,
                  boolean inheritThreadLocals)
public class MyRunnable implements Runnable{


    @Override
    public void run() {
        for (int i = 0; i < 100; i++) {
            System.out.println(Thread.currentThread().getName() + "子线程......" + i);
        }
    }
}
public class TestRunnable {

    public static void main(String[] args) {

        //创建MyRunnable对象, 表示线程要执行的功能
        MyRunnable runnable = new MyRunnable();

        //2. 创建线程对象
        Thread thread = new Thread(runnable, "我的线程一");
        Thread thread1 = new Thread(runnable, "我的线程二");

        //3. 启动多线程
        thread.start();
        thread1.start();

        for (int i = 0; i < 50; i++) {
            System.out.println("主线程" + i);
        }
    }
}
方式二优化: 使用匿名内部类
public class TestRunnable1 {

    public static void main(String[] args) {

        //1. 创建Runnable对象, 以及使用匿名内部类
        Runnable runnable = new Runnable() {
            @Override
            public void run() {
                for (int i = 0; i < 100; i++) {
                    System.out.println(Thread.currentThread().getName() + "子线程......" + i);
                }
            }
        };

        //2. 创建线程对象
        Thread thread = new Thread(runnable, "我的线程1");
        Thread thread1 = new Thread(runnable, "我的线程2");

        //3. 启动多线程
        thread.start();
        thread1.start();

        for (int i = 0; i < 50; i++) {
            System.out.println("主线程" + i);
        }

    }

}
案例二: 实现四个窗口共同卖票100张
public class Ticket implements Runnable{

    private int ticket = 100;


    @Override
    public void run() {
        while (ticket > 0){
            System.out.println(Thread.currentThread().getName() + "售出第" + (101-ticket) + "张票");
            ticket--;
        }

    }

}
public class TestTicket {

    public static void main(String[] args) {

        Ticket ticket = new Ticket();

        Thread wd1 = new Thread(ticket, "窗口一: ");
        Thread wd2 = new Thread(ticket, "窗口二: ");
        Thread wd3 = new Thread(ticket, "窗口三: ");
        Thread wd4 = new Thread(ticket, "窗口四: ");

        wd1.start();
        wd2.start();
        wd3.start();
        wd4.start();
    }
}
案例三: 实现两人共用一张银行卡, 一人存钱, 另一人取钱
public class BankCard {//创建银行卡类

    private double money;//余额

    public double getMoney() {
        return money;
    }

    public void setMoney(double money) {
        this.money = money;
    }
}
public class AddMoney implements Runnable{//创建存钱类, 实现Runnable接口

    private BankCard card;

    public AddMoney(BankCard card) {
        this.card = card;
    }

    @Override
    public void run() {
        for (int i = 0; i < 10; i++) {
            card.setMoney(card.getMoney() + 1000);
            System.out.println(Thread.currentThread().getName() + "存的第" + (i+1) + "笔钱,金额为1000元, 现卡上余额: " + card.getMoney() + "元");
        }

    }
}
public class SubMoney implements Runnable{//创建取钱类, 实现Runnable接口

    private BankCard card;

    public SubMoney(BankCard card) {
        this.card = card;
    }

    @Override
    public void run() {
        for (int i = 0; i < 10; i++) {
            if (card.getMoney() >= 1000){
                card.setMoney(card.getMoney() - 1000);
                System.out.println(Thread.currentThread().getName() + "取了第" + (i+1) + "笔钱,金额为1000元, 现卡上余额: " + card.getMoney() + "元");
            }else{
                System.out.println("余额不足...");
                i--;
            }
        }

    }
}
public class TestBankCard {

    public static void main(String[] args) {

        //1. 创建银行卡对象
        BankCard card = new BankCard();

        //2. 创建存钱对象
        AddMoney addMoney = new AddMoney(card);
        //3. 创建取钱对象
        SubMoney subMoney = new SubMoney(card);

        //4. 创建两个线程
        Thread boy = new Thread(addMoney, "男孩");
        Thread girl = new Thread(subMoney, "女孩");

        //5. 开启线程
        boy.start();
        girl.start();


    }
}
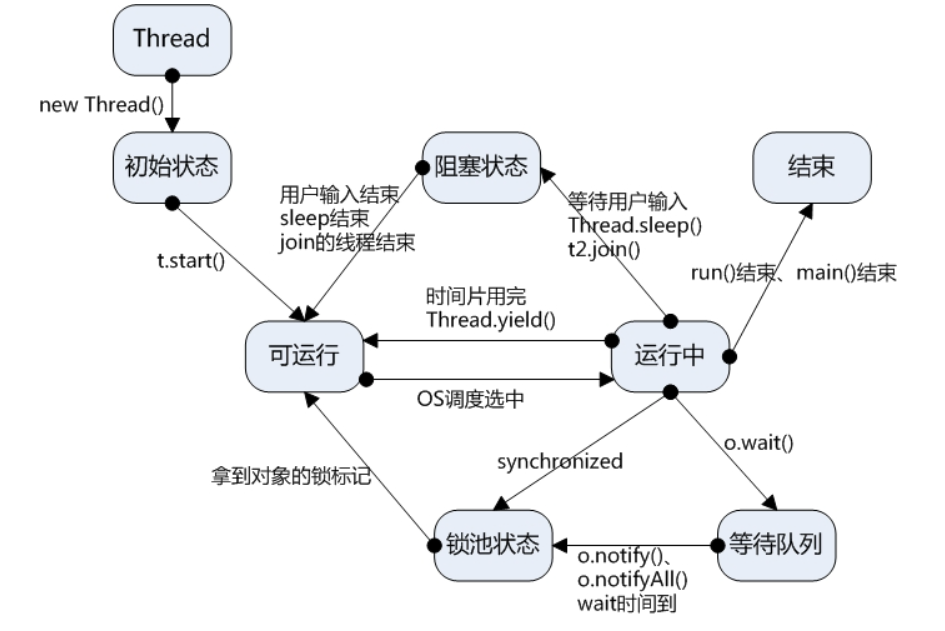
7. 线程的状态
(1) 基本
- New(新创建): 线程对象被创建, 即为新创建状态. 只在堆中开辟内存, 与常规对象无异
- Runnable(可运行): 调用start()后进入可运行状态, 等待被OS选中并分配时间片后开始运行, 时间片到期后又重新进入可运行状态,等待被OS选中
- Terminated(终止状态): 主线程main()或独立线程run()结束, 进入终止状态, 并释放持有的时间片
- 正常终止: run()方法正常退出
- 意外终止: 因为一个没有捕获的异常终止了run()方法
(2) 阻塞
- Blocked(阻塞): 当一个线程试图获取一个内部的对象锁,而该锁被其他线程持有, 则该线程进入阻塞状态. 当所有其他线程释放该锁, 并且线程调度器允许本线程持有它的时候, 该线程将变为非阻塞状态
- Waiting(等待): 当线程等待另一个线程通知调度器一个条件时, 它自己进入等待状态, 调用以下方法时会出现这种情况
- Object.wait
- Thread.join
- java.util.concurrent库中的Lock或Condition
- Timed Waiting(计时等待): 有几个方法有一个超时参数. 调用它们导致线程进入计时等待状态. 这一状态将一直保持到超时期满或者接收到适当的通知. 带有超时参数的方法有:
- Thread.sleep
- Object.wait
- Thread.join
- Lock.tryLock
- Condition.await的计时版
8. 常见方法
- 休眠
- public static void sleep(long millis)
- 当前线程主动休眠 millis 毫秒
- 放弃
- public static void yield()
- 当前线程主动放弃时间片, 回到就绪状态, 竞争下一次时间片
- 加入
- public final void join()
- 允许其它线程加入到当前线程中
- 优先级
- 线程对象.setPriority
- 线程优先级为1-10. 默认为5, 优先级越高, 表示获取CPU机会越多
- 守护线程
- 线程对象.setDaemon(true); 设置为守护线程
- 线程有两类: 用户线程(前台线程), 守护线程(后台线程)
- 如果程序中所有前台线程都执行完毕了, 后台线程会自动结束
- 垃圾回收器线程属于守护线程
(1)sleep()方法 休眠
public class SleepThread extends Thread{

    @Override
    public void run() {
        for (int i = 0; i < 10; i++) {
            System.out.println(Thread.currentThread().getName() + "--------------" + i);
            try {
                SleepThread.sleep(2000);//睡眠两秒钟
            } catch (InterruptedException e) {
                e.printStackTrace();
            }
        }
    }
}
public class TestSleep {

    public static void main(String[] args) {

        SleepThread s1 = new SleepThread();
        SleepThread s2 = new SleepThread();

        s1.start();
        s2.start();
    }
}
(2)yield()方法 让步
public class YieldThread extends Thread{

    @Override
    public void run() {
        for (int i = 0; i < 10; i++) {
            System.out.println(Thread.currentThread().getName() + "-------------" + i);
            //放弃CPU
            YieldThread.yield();
        }
    }
}
public class TestYield {

    public static void main(String[] args) {

        YieldThread y1 = new YieldThread();
        YieldThread y2 = new YieldThread();

        y1.start();
        y2.start();
    }
}
(3)join()方法 加入
public class JoinThread extends Thread{

    @Override
    public void run() {
        for (int i = 0; i < 20; i++) {
            System.out.println(Thread.currentThread().getName() + "子线程------------" + i);
            try {
                JoinThread.sleep(500);
            } catch (InterruptedException e) {
                e.printStackTrace();
            }
        }
    }
}
public class TestJoin {

    public static void main(String[] args) {

        JoinThread j1 = new JoinThread();
        j1.start();
        try {
            j1.join();//加入到当前线程main, 并阻塞当前线程main, 直到加入的线程j1执行完毕
        } catch (InterruptedException e) {
            e.printStackTrace();
        }

        //主线程
        for (int i = 0; i < 30; i++) {
            System.out.println(Thread.currentThread().getName() + "主线程: " + i);
            try {
                Thread.sleep(100);
            } catch (InterruptedException e) {
                e.printStackTrace();
            }
        }
    }
}
(4)优先级 Priority
public class PriorityThread extends Thread{

    @Override
    public void run() {
        for (int i = 0; i < 20; i++) {
            System.out.println(Thread.currentThread().getName() + "子线程:------ " + i);
        }
    }
}
public class TestPriority {

    public static void main(String[] args) {

        PriorityThread p1 = new PriorityThread();
        p1.setName("p1");
        PriorityThread p2 = new PriorityThread();
        p2.setName("p2");
        PriorityThread p3 = new PriorityThread();
        p3.setName("p3");
        p1.start();
        p2.start();
        p3.start();
        p1.setPriority(1);//优先级最低
        p2.setPriority(3);
        p3.setPriority(10);//优先级最高


        for (int i = 0; i < 20; i++) {
            System.out.println(Thread.currentThread().getName() + "主线程:------ " + i);
        }
    }
}
(5)守护线程 Daemon
public class DaemonThread extends Thread{

    @Override
    public void run() {
        for (int i = 0; i < 20; i++) {
            System.out.println("子线程: " + Thread.currentThread().getName() + "-----------" + i);
            try {
                Thread.sleep(500);
            } catch (InterruptedException e) {
                e.printStackTrace();
            }
        }
    }
}
public class TestDaemon {

    public static void main(String[] args) {

        //1. 创建线程(默认为前台线程)
        DaemonThread d1 = new DaemonThread();
        //2. 设置为守护线程(后台线程) 当主线程执行完毕后,守护线程(后台线程)会自动结束
        d1.setDaemon(true);
        d1.start();


        for (int i = 0; i < 10; i++) {
            System.out.println("主线程: " + Thread.currentThread().getName() + "-------" + i);
            try {
                Thread.sleep(200);
            } catch (InterruptedException e) {
                e.printStackTrace();
            }
        }
    }


}
9. 线程安全
- 多线程安全问题
- 当多线程并发访问临界资源时, 如果破坏原子操作, 可能会造成数据不一致
- 临界资源: 共享资源(同一个对象), 一次仅允许一个线程使用, 才可保持其正确性
- 原子操作: 不可分割的多步操作, 被视作一个整体, 其顺序和步骤不可打乱或缺省
(1) 同步方式1
-
同步代码块:
synchronized(临界资源对象){ //对临界资源对象加锁
//代码(原子操作)
}
注: 每个对象都有一个互斥锁标记, 用来分配给线程的. 只有拥有对象互斥锁标记的线程, 才能进入对该对象加锁的同步代码块.
线程退出同步代码块时, 会释放相应的互斥锁标记
import java.util.Arrays;

public class ThreadSafe {

    private static int index = 0;
    public static void main(String[] args) throws InterruptedException {

        //1. 创建数组
        String[] s = new String[5];

        //2. 创建两个操作
        Runnable runnableA = new Runnable() {
            @Override
            public void run() {
                //同步代码块
                synchronized (s){
                    s[index] = "hello";
                    index++;
                }
            }
        };
        Runnable runnableB = new Runnable() {
            @Override
            public void run() {
                //同步代码块
                synchronized (s){
                    s[index] = "world";
                    index++;
                }
            }
        };
        //3. 创建两个线程
        Thread thread1 = new Thread(runnableA, "A");
        Thread thread2 = new Thread(runnableB, "B");
        //4. 启动
        thread1.start();
        thread2.start();
        //5. 加入线程
        thread1.join();
        thread2.join();

        System.out.println(Arrays.toString(s));
    }
}
优化案例二(1): 使用同步代码块
实现四个窗口共同卖票100张, 不能出现四个窗口同时卖出一张票的情况
public class Ticket implements Runnable{

    private int ticket = 100;//票
    //创建锁
    //private Object obj = new Object();


    @Override
    public void run() {
        while (true){
            synchronized (this){//this---当前对象,这里放入obj和this都可以
                if (ticket <= 0){
                    break;
                }
                System.out.println(Thread.currentThread().getName() + "卖的第" + (101-ticket) + "张票");
                ticket--;
            }

        }
    }
}
public class TestSafeTicket {

    public static void main(String[] args) {

        //1. 创建票对象
        Ticket ticket = new Ticket();

        //2. 创建四个线程对象
        Thread win1 = new Thread(ticket, "窗口一");
        Thread win2 = new Thread(ticket, "窗口二");
        Thread win3 = new Thread(ticket, "窗口三");
        Thread win4 = new Thread(ticket, "窗口四");

        //3. 启动
        win1.start();
        win2.start();
        win3.start();
        win4.start();

    }
}
优化案例三: 使用同步代码块
两人用同一张银行卡,一人存钱,另一人取钱, 不能出现存钱后卡上没钱或卡上没钱还能取出的情况
public class BankCard {

    private double money;//余额

    public double getMoney() {
        return money;
    }

    public void setMoney(double money) {
        this.money = money;
    }
}
public class TestBank {

    public static void main(String[] args) {

        //1. 创建银行卡对象
        BankCard bankCard = new BankCard();

        //2. 创建存钱取钱操作
        Runnable addMoney = new Runnable() {
            @Override
            public void run() {
                for (int i = 1; i <= 10; i++) {
                    synchronized (bankCard){
                        bankCard.setMoney(bankCard.getMoney() + 1000);
                        System.out.println(Thread.currentThread().getName() + "第" + i + "次存了1000元" + "现卡上余额: " + bankCard.getMoney());
                    }

                }

            }
        };
        Runnable subMoney = new Runnable() {
            @Override
            public void run() {
                for (int i = 1; i <= 10; i++) {
                    synchronized (bankCard){
                        if (bankCard.getMoney() >= 1000){

                            bankCard.setMoney(bankCard.getMoney()-1000);
                            System.out.println(Thread.currentThread().getName() + "第" + i + "次取了1000元" + "现卡上余额: " + bankCard.getMoney());
                        }else{
                            System.out.println("余额不足...");
                            i--;
                        }
                    }

                }
            }
        };

        //3. 创建两个线程
        Thread boy = new Thread(addMoney, "jack");
        Thread girl = new Thread(subMoney, "rose");

        boy.start();
        girl.start();

    }
}
(2) 同步方式2
-
同步方法:
synchronized 返回值类型 方法名称(形参列表0) {//对当前对象(this)加锁
//代码(原子操作)
}
注:
只有拥有对象互斥锁标记的线程, 才能进入对该对象加锁的同步 方法中.
线程退出同步方法时, 会释放相应的互斥锁标记
优化案例二(2): 使用同步方法
public class Ticket1 implements Runnable{

    private int ticket1 = 100;


    @Override
    public void run() {
        while (true){
            if (!sell()){
                break;
            }
        }

    }

    public synchronized boolean sell(){//锁是this 代表当前对象ticket1, 如果是静态方法, 锁则是类Ticket1.class
        if (ticket1 > 0){
            System.out.println(Thread.currentThread().getName() + "卖的第" + (101-ticket1) + "张票");
            ticket1--;
        }
        return true;
    }
}
public class TestSafeTicket1 {

    public static void main(String[] args) {

        //1. 创建票对象
        Ticket1 ticket1 = new Ticket1();

        Thread w1 = new Thread(ticket1, "窗口1");
        Thread w2 = new Thread(ticket1, "窗口2");
        Thread w3 = new Thread(ticket1, "窗口3");
        Thread w4 = new Thread(ticket1, "窗口4");

        w1.start();
        w2.start();
        w3.start();
        w4.start();


    }
}
(3) 同步规则
- 注意:
- 只有在调用包含同步代码块的方法, 或同步方法时, 才需要对象的锁标记
- 如调用不包含同步代码块的方法, 或普通方法时,则不需要锁标记, 可直接调用
- 已知JDK中线程安全的类:
- StringBuffer
- Vector
- Hashtable
- 以上类中的公开方法, 均为synchronized修饰的同步方法
(4) 经典问题: 死锁
- 当第一个线程拥有A对象锁标记, 并等待B对象锁标记, 同时第二个线程拥有B对象锁标记, 并等待A对象锁标记时, 产生死锁
- 一个线程可以同时拥有多个对象的锁标记, 当线程阻塞时, 不会释放已经拥有的锁标记, 由此可能造成死锁
public class MyLock {

    //两个锁: 代表两根筷子,同时拿到这两根筷子才能吃饭
    public static Object lock1 = new Object();
    public static Object lock2 = new Object();

}
public class Boy extends Thread{

    @Override
    public void run() {
        synchronized (MyLock.lock1){
            System.out.println("男孩拿到了筷子A");
            synchronized (MyLock.lock2){
                System.out.println("男孩拿到了筷子B");
                System.out.println("男孩可以吃饭了");
            }
        }
    }
}
public class Girl extends Thread{

    @Override
    public void run() {
        synchronized (MyLock.lock2){
            System.out.println("女孩拿到了筷子B");
            synchronized (MyLock.lock1){
                System.out.println("女孩拿到了筷子A");
                System.out.println("女孩可以吃饭了");
            }
        }
    }
}
public class TestDeadLock {

    public static void main(String[] args) {

        //1. 创建两个线程对象男孩, 女孩
        Boy boy = new Boy();
        Girl girl = new Girl();

        //2. 女孩线程启动
        girl.start();
        //3. 休息0.5秒钟(如果他们两个同时启动就会造成死锁)
        try {
            Thread.sleep(500);
        } catch (InterruptedException e) {
            e.printStackTrace();
        }
        //4. 最后启动男孩线程
        boy.start();


    }
}
(5) 线程通信
-
等待
- public final void wait()
- public final void wait(long timeout)
- 必须在对obj加锁的同步代码块中. 在一个线程中, 调用obj.wait() 时, 此线程会释放其拥有的所有锁标记. 同时此线程阻塞在obj的等待队列中. 释放锁, 进入等待队列
-
通知
- public final void notify()
- public final void notifyAll()
-
多存多取问题分析: 线程被重新唤醒后没有对标记flag进行判断
- 解决: 只需把if语句改成while, 每次线程被唤醒后重新判断一下标记
-
全部等待问题分析: 唤醒出现问题. notify 只能随机唤醒一个线程
- 解决: notify改为notifyAll
银行卡类
public class BankCard {

    //余额
    private double money;
    //标记
    private boolean flag = false;//true 表示有钱可以取不能存, false表示没钱可以存不能取

    //存钱
    public synchronized void deposit(double m){//this
        while (flag){//有钱
            try {
                this.wait();//进入等待队列 调用wait()方法的对象一定是锁,this代表锁
            } catch (InterruptedException e) {
                e.printStackTrace();
            }
        }
        money = money + m;
        System.out.println(Thread.currentThread().getName() + "存了" + m + "元, 当前余额为: " + money);
        //修改标记
        flag = true;
        //唤醒取钱线程
        this.notifyAll();
    }
    //取钱
    public synchronized void draw(double m){//this
        while (!flag){
            try {
                this.wait();
            } catch (InterruptedException e) {
                e.printStackTrace();
            }
        }
        money = money - m;
        System.out.println(Thread.currentThread().getName() + "取了" + m + "元, 当前余额为: " + money);
        //修改标记
        flag = false;
        //唤醒存钱线程
        this.notifyAll();
    }
}
存钱
public class Deposit implements Runnable{

    private BankCard bankCard;
    public Deposit(BankCard bankCard){
        this.bankCard = bankCard;
    }

    @Override
    public void run() {
        for (int i = 1; i <= 10; i++) {
            bankCard.deposit(1000);
        }

    }
}
取钱
public class Draw implements Runnable{

    private BankCard bankCard;

    public Draw(BankCard bankCard){
        this.bankCard = bankCard;
    }

    @Override
    public void run() {
        for (int i = 1; i <= 10; i++) {
            bankCard.draw(1000);
        }
    }
}
(6) 经典问题: 生产者, 消费者
若干个生产者在生产产品, 这些产品将提供给若干个消费者去消费, 为了使生产者和消费者能并发执行, 在两者之间设置一个能存储多个产品的缓冲区, 生产者将生产的产品放入缓冲区中, 消费者从缓冲区中取走产品进行消费, 显然生产者和消费者之间必须保持同步, 即不允许消费者到一个空的缓冲区中取产品, 也不允许生产者向一个满的缓冲区中放入产品
面包类
public class Bread {

    private int id;//产品id
    private String productName;//产家名称

    public Bread(int id, String productName) {
        this.id = id;
        this.productName = productName;
    }

    public int getId() {
        return id;
    }

    public void setId(int id) {
        this.id = id;
    }

    public String getProductName() {
        return productName;
    }

    public void setProductName(String productName) {
        this.productName = productName;
    }
}
存放面包的容器
public class BreadCon {

    //存放面包的数组
    private Bread[] cons = new Bread[6];
    //存放面包的位置
    private int index = 0;

    //存放面包
    public synchronized void input(Bread b){ // 锁this
        //判断容器有没有满
        while (index >= 6){
            try {
                this.wait();
            } catch (InterruptedException e) {
                e.printStackTrace();
            }
        }
        cons[index] = b;
        System.out.println(Thread.currentThread().getName() + "生产了" + b.getId() + "号产品");
        index++;
        //唤醒
        this.notifyAll();

    }

    //取出面包
    public synchronized void output(){ // 锁this
        while (index <= 0){
            try {
                this.wait();
            } catch (InterruptedException e) {
                e.printStackTrace();
            }
        }
        index--;
        Bread b = cons[index];
        System.out.println(Thread.currentThread().getName() + "消费了" + b.getProductName() + "生产的" + b.getId() + "号产品");
        cons[index] = null;
        //唤醒
        this.notifyAll();
    }
}
生产类
public class Product implements Runnable{
    private BreadCon con;

    public Product(BreadCon con) {
        this.con = con;
    }

    @Override
    public void run() {
        for (int i = 0; i < 30; i++) {
            con.input(new Bread(i, Thread.currentThread().getName()));
        }
    }
}
消费类
public class Consume implements Runnable{
    private BreadCon con;

    public Consume(BreadCon con) {
        this.con = con;
    }

    @Override
    public void run() {
        for (int i = 0; i < 30; i++) {
            con.output();
        }
    }
}
测试
public class Test {

    public static void main(String[] args) {
        //容器
        BreadCon con = new BreadCon();

        //生产和消费
        Product product = new Product(con);
        Consume consume = new Consume(con);

        //创建线程对象
        Thread p1 = new Thread(product, "1号厂家");
        Thread c1 = new Thread(consume, "1号消费者");
        Thread p2 = new Thread(product, "2号厂家");
        Thread c2 = new Thread(consume, "2号消费者");

        //启动线程
        p1.start();
        c1.start();
        p2.start();
        c2.start();

    }
}
10. 线程池
- 问题:
- 线程是宝贵的内存资源, 单个线程约占1MB空间, 过多分配易造成内存溢出
- 频繁的创建及销毁线程会增加虚拟机回收频率, 资源开销, 造成程序性能下降
(1) 线程池
- 线程容器, 可设定线程分配的数量上限
- 将预先创建的线程对象存入池中, 并重用线程池中的线程对象
- 避免频繁的创建和销毁
(2) 线程池原理
- 将任务提交给线程池, 由线程池分配线程, 运行任务, 并在当前任务结束后复用线程
(3) 创建线程池
- 常用的线程池接口和类(所在包java.util.concurrent):
- Executor: 线程池的顶级接口
- ExecutorService: 线程池接口, 可通过submit(Runnable task)提交任务代码
- Executors工厂类: 通过此类可以获得一个线程池
- 通过newFixedThreadPool(int nThreads) 获取固定数量的线程池. 参数: 指定线程池中线程的数量
- 通过newCachedThreadPool() 获得动态数量的线程池, 如不够则创建新的, 没有上限
public class Demo01 {

    public static void main(String[] args) {
        //1. 创建线程池
        //1.1 创建固定线程个数的线程池
        //ExecutorService es = Executors.newFixedThreadPool(4);
        //1.2 创建缓存线程池, 线程个数由任务个数决定
        ExecutorService es = Executors.newCachedThreadPool();
        //1.3 创建单线程池
        //Executors.newSingleThreadExecutor();
        //1.4 创建调度线程池
        //Executors.newScheduledThreadPool(3);
        //2. 创建任务
        Runnable runnable = new Runnable() {
            private int ticket = 100;
            @Override
            public void run() {
                while (true){
                    if (ticket <= 0){
                        break;
                    }
                    System.out.println(Thread.currentThread().getName() + "卖的第" + (101-ticket) + "张票");
                    ticket--;
                }
            }
        };
        //3. 提交任务
        for (int i = 0; i < 4; i++) {
            es.submit(runnable);
        }
        //4. 关闭线程池
        es.shutdown();//等待所有任务执行完毕后才会结束,关闭线程池
        //es.shutdownNow();//试图停止所有正在执行的活动任务, 暂停处理正在等待的任务,并返回等待执行的任务列表

    }
}
(4) Callable接口
public interface Callable
public V call() throws Exception;
}
- JDK5加入, 与Runnable接口类似, 实现后代表一个线程任务
- Callable具有泛型返回值, 可以声明异常
使用Callable实现1-100的和
public class Demo02 {

    public static void main(String[] args) throws Exception{

        //功能需求: 使用Callable实现1-100的和
        //1. 创建Callable对象
        Callable<Integer> callable = new Callable<Integer>() {
            @Override
            public Integer call() throws Exception {
                System.out.println(Thread.currentThread().getName() + "开始计算: ");
                int sum = 0;
                for (int i = 1; i <= 100; i++) {
                    sum += i;
                }
                return sum;
            }
        };
        //2. 把Callable对象转成可执行的任务
        FutureTask<Integer> task = new FutureTask<>(callable);

        //3. 创建线程
        Thread thread = new Thread(task);

        //4. 启动线程
        thread.start();

        //5. 获取结果(等待call方法执行完毕,才会返回)
        Integer sum = task.get();
        System.out.println("结果是: " + sum);

    }
}
使用线程池计算1-100的和
public class Demo03 {

    public static void main(String[] args) throws Exception{

        //1. 创建线程池
        ExecutorService es = Executors.newFixedThreadPool(1);
        //2. 提交任务Future:表示将要执行完任务的结果
        Future<Integer> future = es.submit(new Callable<Integer>() {
            @Override
            public Integer call() throws Exception {
                System.out.println(Thread.currentThread().getName() + "开始计算: ");
                int sum = 0;
                for (int i = 1; i <= 100; i++) {
                    sum += i;
                    Thread.sleep(10);
                }
                return sum;
            }
        });
        //3. 获取任务结果,等待任务执行完毕才会返回
        System.out.println(future.get());

        //4. 关闭线程池
        es.shutdown();
    }
}
(5) Future接口
- Future: 表示将要完成任务的结果
- 表示ExecutorService.submit()所返回的状态结果, 就是call()的返回值
- 方法: V get() 以阻塞形式等待Future中的异步处理结果(call()的返回值)
- 需求: 使用两个线程, 并发计算1~50, 50~100的和,再进行汇总
public class Demo04 {

    public static void main(String[] args) throws Exception{

        //1. 创建线程池
        ExecutorService es = Executors.newFixedThreadPool(2);
        //2. 提交任务
        Future<Integer> future1 = es.submit(new Callable<Integer>() {
            @Override
            public Integer call() throws Exception {
                int sum = 0;
                for (int i = 1; i <= 50; i++) {
                    sum += i;
                }
                System.out.println("1~50计算完毕");
                return sum;
            }
        });
        Future<Integer> future2 = es.submit(new Callable<Integer>() {
            @Override
            public Integer call() throws Exception {
                int sum = 0;
                for (int i = 51; i <= 100; i++) {
                    sum += i;
                }
                System.out.println("51~100计算完毕");
                return sum;
            }
        });

        //3. 获取结果
        int sum = future1.get() + future2.get();
        System.out.println("结果是: " + sum);

        //4. 关闭线程池
        es.shutdown();

    }
}
(6) 线程的同步和异步
- 同步
- 形容一次方法调用, 同步一旦开始, 调用者必须等待该方法返回, 才能继续
- 注: 单条执行路径
- 异步
- 形容一次方法调用, 异步一旦开始, 像是一次消息传递, 调用者告知之后立刻返回. 二者竞争时间片, 并发执行
- 注: 多条执行路径
11. Lock接口
- JDK5加入, 与synchronized比较, 显示定义, 结构更灵活
- 提供更多实用性方法, 功能更强大, 性能更优越
- 常用方法:
- void lock() //获取锁, 如锁被占用, 则等待
- boolean tryLock() //尝试获取锁(成功返回true, 失败返回false, 不阻塞)
- void unlock() //释放锁
(1) 重入锁
- ReentrantLock: Lock接口的实现类, 与synchronized一样具有互斥锁功能
import java.util.concurrent.locks.Lock;
import java.util.concurrent.locks.ReentrantLock;

public class MyList {

    private Lock lock = new ReentrantLock();
    private String[] str = {"A", "B", "", "", ""};
    private int count = 2;

    public void add(String value){
        lock.lock();
        try{
            str[count] = value;
            try {
                Thread.sleep(1000);
            } catch (InterruptedException e) {
                e.printStackTrace();
            }
            count++;
        } finally {
            lock.unlock();
        }
    }

    public String[] getStr(){
        return str;
    }
}
public class TestMyList {

    public static void main(String[] args) throws Exception{

        MyList list = new MyList();
        Runnable runnable1 = new Runnable() {
            @Override
            public void run() {
                list.add("hello");
            }
        };
        Runnable runnable2 = new Runnable() {
            @Override
            public void run() {
                list.add("world");
            }
        };

        Thread t1 = new Thread(runnable1);
        Thread t2 = new Thread(runnable2);

        t1.start();
        t2.start();

        t1.join();
        t2.join();

        System.out.println(Arrays.toString(list.getStr()));
    }
}
使用重入锁实现4个窗口共同卖100张票
import java.util.concurrent.locks.Lock;
import java.util.concurrent.locks.ReentrantLock;

public class Ticket implements Runnable{

    private int ticket = 100;
    private Lock lock = new ReentrantLock();

    @Override
    public void run() {

        while (true){
            lock.lock();
            try {

                if (ticket <= 0){
                    break;
                }
                System.out.println(Thread.currentThread().getName() + "卖的第" + (101-ticket) + "张票");
                ticket--;

            } finally {
                lock.unlock();
            }
        }
    }
}
import java.util.concurrent.ExecutorService;
import java.util.concurrent.Executors;

public class TestTicket {

    public static void main(String[] args) {

        //1. 创建票对象
        Ticket ticket = new Ticket();

        //2. 创建线程池对象
        ExecutorService es = Executors.newFixedThreadPool(4);

        //3. 提交任务
        for (int i = 0; i < 4; i++) {
            es.submit(ticket);
        }
		//4. 关闭线程池
        es.shutdown();


    }
}
(2) 读写锁
- ReentrantReadWriteLock
- 一种支持一写多读的同步锁, 读写分离, 可分别分配读锁, 写锁
- 支持多次分配读锁, 使多个读操作可以并发执行
- 互斥规则
- 写-写: 互斥
- 读-写: 互斥, 读阻塞写, 写阻塞读
- 读-读: 不互斥, 不阻塞
- 在读操作远远高于写操作的环境中, 可在保障线程安全的情况下, 提高运行效率
import java.util.concurrent.locks.ReentrantReadWriteLock;
import java.util.concurrent.locks.ReentrantReadWriteLock.ReadLock;
import java.util.concurrent.locks.ReentrantReadWriteLock.WriteLock;

public class ReadWriteLock {

    //创建读写锁
    private ReentrantReadWriteLock rwl = new ReentrantReadWriteLock();
    //获取读锁
    private ReadLock readLock = rwl.readLock();
    //获取写锁
    private WriteLock writeLock = rwl.writeLock();

    private String value;

    //读取
    public String getValue(){
        //使用读锁上锁
        readLock.lock();

        try {
            try {
                Thread.sleep(1000);
            } catch (InterruptedException e) {
                e.printStackTrace();
            }
            System.out.println("读取: " + this.value);
            return this.value;
        } finally {
            readLock.unlock();
        }
    }

    //写入
    public void setValue(String value){
        //使用写锁上锁
        writeLock.lock();

        try {
            try {
                Thread.sleep(1000);
            } catch (InterruptedException e) {
                e.printStackTrace();
            }
            this.value = value;
            System.out.println("写入: " + value);
        } finally {
            writeLock.unlock();
        }
    }

}
import java.util.Random;
import java.util.concurrent.ExecutorService;
import java.util.concurrent.Executors;

public class TestReadWriteLock {

    public static void main(String[] args) {
        //1. 创建读写锁对象
        ReadWriteLock rwl = new ReadWriteLock();
        //2. 创建线程池
        ExecutorService es = Executors.newFixedThreadPool(20);
        //3. 创建写任务
        Runnable write = new Runnable() {
            @Override
            public void run() {
                rwl.setValue("张三: " + new Random().nextInt(100));
            }
        };
        //4. 创建读任务
        Runnable read = new Runnable() {
            @Override
            public void run() {
                rwl.getValue();
            }
        };
        Long start = System.currentTimeMillis();//获取系统此刻时间(开始)
        //5. 分配2个线程来 写任务
        for (int i = 0; i < 2; i++) {
            es.submit(write);
        }
        //6. 分配18个线程来 读任务
        for (int i = 0; i < 18; i++) {
            es.submit(read);
        }
        //7. 关闭
        es.shutdown();
        while (!es.isTerminated()) {//空转

        }
        Long end = System.currentTimeMillis();//获取系统此刻时间(结束)
        System.out.println("用时: " + (end - start));//3007  如果使用用互斥锁时间为: 20048
    }
}
12. 线程安全的集合
- Collection体系集合中, 除Vector以外的线程安全集合
- Map安全集合体系
(1)CopyOnWriteArrayList
- 线程安全的ArrayList, 加强版的读写分离
- 写有锁, 读无锁, 读写之间不阻塞, 优于读写锁
- 写入时, 先copy一个容器副本, 再添加新元素, 最后替换引用
- 使用方式和ArrayList无异
public class Demo02 {

    public static void main(String[] args) {

        //1. 创建集合
        CopyOnWriteArrayList<String> list = new CopyOnWriteArrayList<>();
        //2. 使用多线程操作
        ExecutorService es = Executors.newFixedThreadPool(5);
        //3. 提交任务
        for (int i = 0; i < 5; i++) {
            es.submit(new Runnable() {
                @Override
                public void run() {
                    for (int j = 0; j < 10; j++) {
                        list.add(Thread.currentThread().getName() + "---" + new Random().nextInt(1000));
                    }
                }
            });
        }
        //4. 关闭线程池
        es.shutdown();
        while (!es.isTerminated()){}
        //5. 打印结果
        System.out.println("元素个数: " + list.size());
        for (String s : list) {
            System.out.println(s);
        }

    }
}
(2)CopyOnWriteArraySet
- 线程安全的Set, 底层使用CopyOnWriteArrayList实现
- 唯一不同在于, 使用addIfAbsent() 添加元素, 会遍历数组
- 如存在元素, 则不添加(扔掉副本),重复依据 equals()方法
(3)Queue接口(队列)
- Collection的子接口, 表示队列FIFO(First In First Out)先进先出
- 常用方法:
- 抛出异常:
- boolean add(E e) //顺序添加一个元素(到达上限后, 再附加则会抛出异常)
- E remove() //获得第一个元素并移除(如果队列没有元素时, 则抛异常)
- E element() //获得第一个元素但不移除(如果队列没有元素时, 则抛异常)
- 返回特殊值: 推荐使用
- boolean offrt (E e) //顺序添加一个元素(到达上限后, 再添加则会返回false)
- E poll() //获得第一个元素并移除 (如果队列没有元素时,则返回null)
- E peek() //获得第一个元素但不移除(如果队列没有元素时, 则返回null)
- 抛出异常:
public class Demo04 {

    public static void main(String[] args) {

        //1. 创建队列
        Queue<String> queue = new LinkedList<>();// LinkedList是线程不安全的集合,不能使用多线程
        //2. 入队
        queue.offer("香蕉");
        queue.offer("苹果");
        queue.offer("橘子");
        queue.offer("橙子");
        System.out.println("入队完毕, 元素个数: " + queue.size());
        System.out.println(queue.peek());//获取队列第一个元素但不移除
        System.out.println("----------------------");
        //3. 出队
        int size = queue.size();
        for (int i = 0; i < size; i++) {
            System.out.println(queue.poll());//获得第一个元素并移除
        }
        System.out.println("出队完毕, 元素个数: " + queue.size());
    }
}
(4)ConcurrentLinkedQueue
- 线程安全, 可高效读写的队列, 高并发下性能最好的队列
- 无锁, CAS比较交换算法, 修改的方法包含三个核心参数(V,E,N)
- V: 要更新的变量, E: 预期值, N: 新值
- 只有当V=E时, V=N; 否则表示已被更新过, 则取消当前操作
public class Demo05 {

    public static void main(String[] args) throws Exception{
        //1. 创建线程安全集合
        ConcurrentLinkedQueue<Integer> queue = new ConcurrentLinkedQueue<>();
        //2. 入队操作
        Thread thread1 = new Thread(new Runnable() {
            @Override
            public void run() {
                for (int i = 0; i < 5; i++) {
                    queue.offer(i);
                }
            }
        });
        Thread thread2 = new Thread(new Runnable() {
            @Override
            public void run() {
                for (int i = 5; i < 10; i++) {
                    queue.offer(i);
                }
            }
        });
        //3. 启动线程
        thread1.start();
        thread2.start();

        thread1.join();
        thread2.join();
        //4. 出队操作
        int size = queue.size();
        for (int i = 0; i < size; i++) {
            System.out.println(queue.poll());
        }
        System.out.println("出队成功, 元素个数: " + queue.size());

    }
}
(5)BlockingQueue接口
- Queue的子接口, 阻塞的队列, 增加了两个线程状态为无限期等待的方法
- 方法:
- void put(E e) //将指定元素插入此队列中, 如果没有可用空间, 则等待
- E take() //获取并移除此队列头部元素, 如果没有可用元素, 则等待
- 可用于解决生产者, 消费者问题
(6)ArrayBlockingQueue
- 数据结构实现, 有界队列. (手工固定上限)
public class Demo06 {

    public static void main(String[] args) throws Exception{

        //1. 创建一个有界队列, 添加数据
        ArrayBlockingQueue<String> queue = new ArrayBlockingQueue<>(5);
        //2. 添加元素
        queue.put("aaa");
        queue.put("bbb");
        queue.put("ccc");
        queue.put("ddd");
        queue.put("eee");
        System.out.println("已经添加了5个元素");
        //queue.put("fff");//无法添加,因为队列此时满了
        //System.out.println("已经添加了6个元素");
        //3. 删除元素
        queue.take();//删除第一个
        System.out.println(queue.toString());


    }
}
使用阻塞队列实现生产者和消费者
public class Demo07 {

    public static void main(String[] args) {

        //1. 创建队列
        ArrayBlockingQueue<Integer> queue = new ArrayBlockingQueue<>(6);
        //2. 创建两个线程
        Thread t1 = new Thread(new Runnable() {
            @Override
            public void run() {
                for (int i = 0; i < 30; i++) {
                    try {
                        queue.put(i);
                        System.out.println(Thread.currentThread().getName() + "生产了第" + i + "个面包");
                    } catch (InterruptedException e) {
                        e.printStackTrace();
                    }
                }
            }
        }, "张三");
        Thread t2 = new Thread(new Runnable() {
            @Override
            public void run() {
                for (int i = 0; i < 30; i++) {
                    try {
                        queue.take();
                        System.out.println(Thread.currentThread().getName() + "消费了第" + i + "个面包");
                    } catch (InterruptedException e) {
                        e.printStackTrace();
                    }


                }
            }
        }, "李四");
        //3. 启动线程
        t1.start();
        t2.start();
    }
}
(7)LinkedBlockingQueue
链表结构实现, 有界队列. (默认上限Integer.MAX_VALUE)
(8)ConcurrentHashMap
- 初始容量默认为16段(Segment), 使用分段锁设计(JDK1.7之前), (JDK1.8之后使用无锁, CAS比较交换算法)
- 不对整个Map加锁, 而是为每个Segment加锁
- 当多个对象存入同一个Segment时, 才会互斥
- 最理想状态为16个对象分被存入16个Segment, 并行数量16
- 使用方式与HashMap无异
public class Demo08 {

    public static void main(String[] args) {

        //1. 创建集合
        ConcurrentHashMap<String, String> hashMap = new ConcurrentHashMap<>();
        //2. 使用多线程添加数据
        for (int i = 0; i < 5; i++) {
            new Thread(new Runnable() {
                @Override
                public void run() {
                    for (int j = 0; j < 10; j++) {
                        hashMap.put(Thread.currentThread().getName()+ "---" + j, j + "");
                        System.out.println(hashMap);
                    }
                }
            }).start();
        }
    }
}