一、集群相关概念简述
HA是High Available缩写,是双机集群系统简称,指高可用性集群,是保证业务连续性的有效解决方案,一般有两个或两个以上的节点,且分为活动节点及备用节点。
1、集群的分类:
- LB:负载均衡集群
- lvs负载均衡
- nginx反向代理
- HAProxy
- HA:高可用集群
- heartbeat
- keepalived
- redhat5 : cman + rgmanager , conga(WebGUI) --> RHCS(Cluster Suite)集群套件
- redhat6 : cman + rgmanager , corosync + pacemaker
- redhat7 : corosync + pacemaker
- HP:高性能集群
2、系统可用性的计算公式
A=MTBF/(MTBF+MTTR)
- A:高可用性,指标:95%, 99%, 99.5%, ...., 99.999%,99.9999%等
- MTBF:平均无故障时间
- MTTR:平均修复时间
二、keepalived相关概念
- vrrp协议:Virtual Redundant Routing Protocol 虚拟冗余路由协议
- Virtual Router:虚拟路由器
- VRID(0-255):虚拟路由器标识
- master:主设备,当前工作的设备
- backup:备用设备
- priority:优先级,优先级越大优先工作,具体情况示工作方式决定
- VIP:虚拟IP地址,正真向客户服务的IP地址
- VMAC:虚拟MAC地址(00-00-5e-00-01-VRID)
- 抢占式:如果有优先级高的节点上线,则将此节点转为master
- 非抢占式:即使有优先级高的节点上线,在当前master工作无故障的情况运行抢占;等到此master故障后重新按优先级选举master
- 心跳:master将自己的心跳信息通知集群内的所有主机,证明自己正常工作
- 安全认证机制:
- 无认证:任何主机都可成为集群内主机,强烈不推荐
- 简单的字符认证:使用简单的密码进行认证
- AH认证
- sync group:同步组,VIP和DIP配置到同一物理服务器上
- MULTICAST:组播,多播
- Failover:master故障,故障切换,故障转移
- Failback:故障节点重新上线,故障切回
三、keepalived
vrrp协议的软件实现,原生设计的目的为了高可用ipvs服务
- 基于vrrp协议完成地址流动;
- 为vip地址所在的节点生成ipvs规则(在配置文件中预先定义);
- 为ipvs集群的各RS做健康状态检测;
- 基于脚本调用接口通过执行脚本完成脚本中定义的功能,进而影响集群事务;
组件:

1、安装
# yum install keepalived
主配置文件:/etc/keepalived/keepalived.conf
主程序文件:/usr/sbin/keepalived
启动服务:systemctl start keepalived
Unit File的环境配置文件:/etc/sysconfig/keepalived
2、配置文件参数详解
全局配置段:
global_defs {
   notification_email {  #发送通知email,收件人
     acassen@firewall.loc
     failover@firewall.loc
     sysadmin@firewall.loc
   }
   notification_email_from Alexandre.Cassen@firewall.loc
   smtp_server 192.168.200.1  #邮件服务器地址
   smtp_connect_timeout 30  #超时时长
   router_id LVS_DEVEL  #路由器标识ID
   vrrp_skip_check_adv_addr  #跳过的检查地址
   vrrp_strict  #严格模式
   vrrp_garp_interval 0  #免费arp
   vrrp_gna_interval 0
}
虚拟路由实例段:
vrrp_instance <STRING> {
	state MASTER|BACKUP:#当前节点在此虚拟路由器上的初始状态;只能有一个是MASTER,余下的都应该为BACKUP;
	interface IFACE_NAME:#绑定为当前虚拟路由器使用的物理接口;
	virtual_router_id VRID:#当前虚拟路由器的惟一标识,范围是0-255;
	priority 100:#当前主机在此虚拟路径器中的优先级;范围1-254;
	advert_int 1:#vrrp通告的时间间隔;
	authentication {
		auth_type AH|PASS #pass为简单认证
		auth_pass <PASSWORD> #认证密码,8为密码
	}
	virtual_ipaddress {  #VIP配置
		<IPADDR>/<MASK> brd <IPADDR> dev <STRING> scope <SCOPE> label <LABEL>
		192.168.200.17/24 dev eth1
		192.168.200.18/24 dev eth2 label eth2:1
	}
	track_interface {  #配置要监控的网络接口,一旦接口出现故障,则转为FAULT状态;
		eth0
		eth1
		...
	}
	nopreempt:定义工作模式为非抢占模式;
	preempt_delay 300:抢占式模式下,节点上线后触发新选举操作的延迟时长;
	notify_master <STRING>|<QUOTED-STRING>:当前节点成为主节点时触发的脚本;
	notify_backup <STRING>|<QUOTED-STRING>:当前节点转为备节点时触发的脚本;
	notify_fault <STRING>|<QUOTED-STRING>:当前节点转为“失败”状态时触发的脚本;
	notify <STRING>|<QUOTED-STRING>:通用格式的通知触发机制,一个脚本可完成以上三种状态的转换时的通知;
}
虚拟服务器配置:
virtual_server IP port | virtual_server fwmark int {
	delay_loop <INT>:服务轮询的时间间隔;
	lb_algo rr|wrr|lc|wlc|lblc|sh|dh:定义调度方法;
	lb_kind NAT|DR|TUN:集群的类型;
	persistence_timeout <INT>:持久连接时长;
	protocol TCP:服务协议,仅支持TCP;
	sorry_server <IPADDR> <PORT>:备用服务器地址;
	real_server {
		weight <INT>
		notify_up <STRING>|<QUOTED-STRING>
		notify_down <STRING>|<QUOTED-STRING>
		HTTP_GET|SSL_GET|TCP_CHECK|SMTP_CHECK|MISC_CHECK { ... }:定义当前主机的健康状态检测方法;
	}
	HTTP_GET|SSL_GET:应用层检测
	HTTP_GET|SSL_GET {
		url {
			path <URL_PATH>:定义要监控的URL;
			status_code <INT>:判断上述检测机制为健康状态的响应码;
			digest <STRING>:判断上述检测机制为健康状态的响应的内容的校验码;
		}
		nb_get_retry <INT>:重试次数;
		delay_before_retry <INT>:重试之前的延迟时长;
		connect_ip <IP ADDRESS>:向当前RS的哪个IP地址发起健康状态检测请求
		connect_port <PORT>:向当前RS的哪个PORT发起健康状态检测请求
		bindto <IP ADDRESS>:发出健康状态检测请求时使用的源地址;
		bind_port <PORT>:发出健康状态检测请求时使用的源端口;
		connect_timeout <INTEGER>:连接请求的超时时长;
	}
	 TCP_CHECK {
		connect_ip <IP ADDRESS>:向当前RS的哪个IP地址发起健康状态检测请求
		connect_port <PORT>:向当前RS的哪个PORT发起健康状态检测请求
		bindto <IP ADDRESS>:发出健康状态检测请求时使用的源地址;
		bind_port <PORT>:发出健康状态检测请求时使用的源端口;
		connect_timeout <INTEGER>:连接请求的超时时长;
	}
}
脚本定义:
vrrp_script <SCRIPT_NAME> {
	script ""  #定义执行脚本
	interval INT  #多长时间检测一次
	weight -INT  #如果脚本的返回值为假,则执行权重减N的操作
	rise 2  #检测2次为真,则上线
	fall 3  #检测3次为假,则下线
}
vrrp_instance VI_1 {
	track_script {  #在虚拟路由实例中调用此脚本
		SCRIPT_NAME_1
		SCRIPT_NAME_2
		...
	}
}
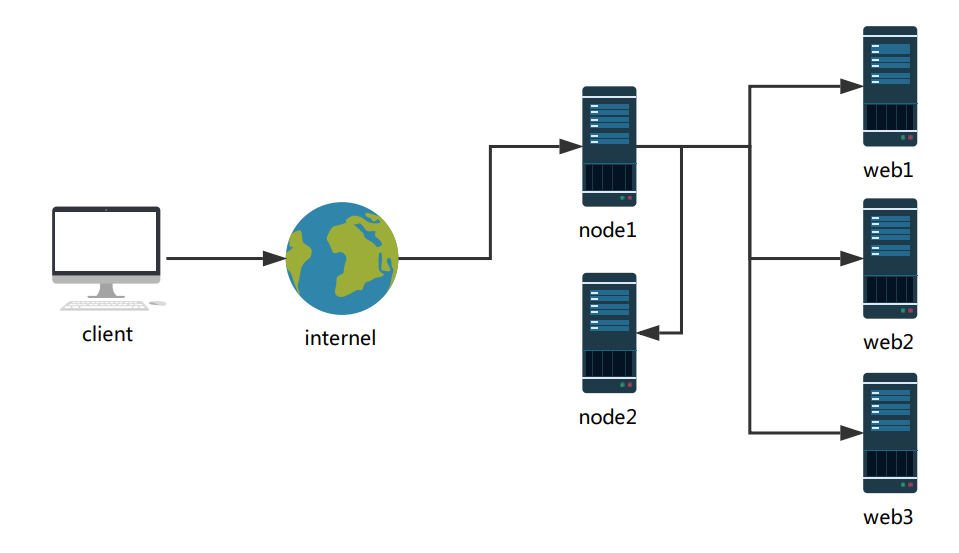
四、lvs + keepalived的单主模型实现
环境:
- 各节点时间必须同步;
- 确保iptables及selinux的正确配置;
- 各节点之间可通过主机名互相通信(对KA并非必须),建议使用/etc/hosts文件实现;
- 确保各节点的用于集群服务的接口支持MULTICAST通信;D类:224-239;
ip link set dev eth0 multicast off | on
node1配置:
[root@node1 ~]# yum install keepalied
[root@node1 ~]# vim /etc/keepalived/keepalived.conf
! Configuration File for keepalived
global_defs {
   notification_email {
     root@localhost #收件人
   }
   notification_email_from keepalived@localhoat #发件人
   smtp_server 127.0.0.1 #邮件服务器IP
   smtp_connect_timeout 30 #连接超时时长
   router_id node1
   vrrp_skip_check_adv_addr
   vrrp_strict
   vrrp_garp_interval 0
   vrrp_gna_interval 0
   vrrp_mcast_group4 224.0.111.111  #组播地址
   vrrp_iptables #禁止keepalived添加iptables规则
}
vrrp_instance VI_1 { #定义虚拟路由实例
    state MASTER #初始启动为主节点
    interface eth0 #IP属于的网卡
    virtual_router_id 51 #节点ID
    priority 100 #优先级
    advert_int 1 #每1秒检测一次
    authentication { #认证
        auth_type PASS #简单认证
        auth_pass fd57721a #认证密码
    }
    virtual_ipaddress { #vip绑定的网卡
        192.168.0.2/24 dev eth0
    }
}
virtual_server 192.168.0.2 80 { #ipvs规则定义
    delay_loop 2 #健康检测,2秒
    lb_algo rr #调度算法,轮询
    lb_kind DR #lvs模型,DR
    protocol TCP #tcp协议
    real_server 192.168.0.10 80 { #real-server配置
        weight 1 #权重为1
        HTTP_GET { #HTTP协议检测
            url {
              path / #检测主页
              status_code 200 #返回值为200为正常
            }
            connect_timeout 2 #超时时长
            nb_get_retry 3 #重连次数
            delay_before_retry 1 #重连间隔
        }
    }
    real_server 192.168.0.11 80 {
        weight 1
        HTTP_GET {
            url {
              path /
              status_code 200
            }
            connect_timeout 2
            nb_get_retry 3
            delay_before_retry 1
        }
    }
    real_server 192.168.0.12 80 {
        weight 1
        HTTP_GET {
            url {
              path /
              status_code 200
            }
            connect_timeout 2
            nb_get_retry 3
            delay_before_retry 1
        }
    }
}
[root@node1 ~]# systemctl start keepalived.service
node2配置:
[root@node2 ~]# yum install keepalied
[root@node2 ~]# vim /etc/keepalived/keepalived.conf
! Configuration File for keepalived
global_defs {
   notification_email {
     root@localhost
   }
   notification_email_from keepalived@localhoat
   smtp_server 127.0.0.1
   smtp_connect_timeout 30
   router_id node1
   vrrp_skip_check_adv_addr
   vrrp_strict
   vrrp_garp_interval 0
   vrrp_gna_interval 0
   vrrp_mcast_group4 224.0.111.111
   vrrp_iptables
}
vrrp_instance VI_1 {
    state BACKUP
    interface eth0
    virtual_router_id 51
    priority 98
    advert_int 1
    authentication {
        auth_type PASS
        auth_pass fd57721a
    }
    virtual_ipaddress {
        192.168.0.2/24 dev eth0
    }
        preempt_delay 300
}
virtual_server 192.168.0.2 80 {
    delay_loop 2
    lb_algo rr
    lb_kind DR
    protocol TCP

    real_server 192.168.0.10 80 {
        weight 1
        HTTP_GET {
            url {
              path /
              status_code 200
            }
            connect_timeout 2
            nb_get_retry 3
            delay_before_retry 1
        }
    }
    real_server 192.168.0.11 80 {
        weight 1
        HTTP_GET {
            url {
              path /
              status_code 200
            }
            connect_timeout 2
            nb_get_retry 3
            delay_before_retry 1
        }
    }
    real_server 192.168.0.12 80 {
        weight 1
        HTTP_GET {
            url {
              path /
              status_code 200
            }
            connect_timeout 2
            nb_get_retry 3
            delay_before_retry 1
        }
    }
}
[root@node2 ~]# systemctl start keepalived.service
web1/web2/web3:配置脚本
#!/bin/bash
#
vip="192.168.0.2/32"
iface="lo"
case $1 in
start)
        echo 1 > /proc/sys/net/ipv4/conf/all/arp_ignore
        echo 1 > /proc/sys/net/ipv4/conf/lo/arp_ignore
        echo 2 > /proc/sys/net/ipv4/conf/all/arp_announce
        echo 2 > /proc/sys/net/ipv4/conf/lo/arp_announce
        ip addr add $vip label $iface:0 broadcast ${vip%/*} dev $iface
        ip route add $vip dev $iface
        ;;
stop)
        ip addr flush dev $iface
        ip route flush dev $iface
        echo 0 > /proc/sys/net/ipv4/conf/all/arp_ignore
        echo 0 > /proc/sys/net/ipv4/conf/lo/arp_ignore
        echo 0 > /proc/sys/net/ipv4/conf/all/arp_announce
        echo 0 > /proc/sys/net/ipv4/conf/lo/arp_announce
        ;;
*)
        echo "Usage: `basename $0` start | stop" 1>&2
        ;;
esac
五、lvs + keepalived的双主模型实现
node1配置:
! Configuration File for keepalived
global_defs {
   notification_email {
     root@localhost
   }
   notification_email_from keepalived@localhoat
   smtp_server 127.0.0.1
   smtp_connect_timeout 30
   router_id node1
   vrrp_skip_check_adv_addr
   vrrp_strict
   vrrp_garp_interval 0
   vrrp_gna_interval 0
   vrrp_mcast_group4 224.0.111.111
   vrrp_iptables
}
vrrp_instance VI_1 {
    state MASTER
    interface eth0
    virtual_router_id 51
    priority 100
    advert_int 1
    authentication {
        auth_type PASS
        auth_pass fd57721a
    }
    virtual_ipaddress {
        192.168.0.2/24 dev eth0
    }
}
vrrp_instance VI_2 {
    state BACKUP
    interface eth0
    virtual_router_id 52
    priority 98
    advert_int 1
    authentication {
        auth_type PASS
        auth_pass 4a9a407a
    }
    virtual_ipaddress {
        192.168.0.3/24 dev eth0
    }
}
virtual_server 192.168.0.2 80 {
    delay_loop 2
    lb_algo rr
    lb_kind DR
    protocol TCP

    real_server 192.168.0.10 80 {
        weight 1
        HTTP_GET {
            url {
              path /
              status_code 200
            }
            connect_timeout 2
            nb_get_retry 3
            delay_before_retry 1
        }
    }
    real_server 192.168.0.11 80 {
        weight 1
        HTTP_GET {
            url {
              path /
              status_code 200
            }
            connect_timeout 2
            nb_get_retry 3
            delay_before_retry 1
        }
    }
    real_server 192.168.0.12 80 {
        weight 1
        HTTP_GET {
            url {
              path /
              status_code 200
            }
            connect_timeout 2
            nb_get_retry 3
            delay_before_retry 1
        }
    }
}
virtual_server 192.168.0.3 80 {
    delay_loop 2
    lb_algo rr
    lb_kind DR
    protocol TCP
    real_server 192.168.0.10 80 {
        weight 1
        HTTP_GET {
            url {
              path /
              status_code 200
            }
            connect_timeout 2
            nb_get_retry 3
            delay_before_retry 1
        }
    }
    real_server 192.168.0.11 80 {
        weight 1
        HTTP_GET {
            url {
              path /
              status_code 200
            }
            connect_timeout 2
            nb_get_retry 3
            delay_before_retry 1
        }
    }
    real_server 192.168.0.12 80 {
        weight 1
        HTTP_GET {
            url {
              path /
              status_code 200
            }
            connect_timeout 2
            nb_get_retry 3
            delay_before_retry 1
        }
    }
}
node2配置:
! Configuration File for keepalived
global_defs {
   notification_email {
     root@localhost
   }
   notification_email_from keepalived@localhoat
   smtp_server 127.0.0.1
   smtp_connect_timeout 30
   router_id node1
   vrrp_skip_check_adv_addr
   vrrp_strict
   vrrp_garp_interval 0
   vrrp_gna_interval 0
   vrrp_mcast_group4 224.0.111.111
   vrrp_iptables
}
vrrp_instance VI_1 {
    state BACKUP
    interface eth0
    virtual_router_id 51
    priority 98
    advert_int 1
    authentication {
        auth_type PASS
        auth_pass fd57721a
    }
    virtual_ipaddress {
        192.168.0.2/24 dev eth0
    }
}
vrrp_instance VI_2 {
    state MASTER
    interface eth0
    virtual_router_id 52
    priority 100
    advert_int 1
    authentication {
        auth_type PASS
        auth_pass 4a9a407a
    }
    virtual_ipaddress {
        192.168.0.3/24 dev eth0
    }
}
virtual_server 192.168.0.2 80 {
    delay_loop 2
    lb_algo rr
    lb_kind DR
    protocol TCP
    real_server 192.168.0.10 80 {
        weight 1
        HTTP_GET {
            url {
              path /
              status_code 200
            }
            connect_timeout 2
            nb_get_retry 3
            delay_before_retry 1
        }
    }
    real_server 192.168.0.11 80 {
        weight 1
        HTTP_GET {
            url {
              path /
              status_code 200
            }
            connect_timeout 2
            nb_get_retry 3
            delay_before_retry 1
        }
    }
    real_server 192.168.0.12 80 {
        weight 1
        HTTP_GET {
            url {
              path /
              status_code 200
            }
            connect_timeout 2
            nb_get_retry 3
            delay_before_retry 1
        }
    }
}
virtual_server 192.168.0.3 80 {
    delay_loop 2
    lb_algo rr
    lb_kind DR
    protocol TCP
    real_server 192.168.0.10 80 {
        weight 1
        HTTP_GET {
            url {
              path /
              status_code 200
            }
            connect_timeout 2
            nb_get_retry 3
            delay_before_retry 1
        }
    }
    real_server 192.168.0.11 80 {
        weight 1
        HTTP_GET {
            url {
              path /
              status_code 200
            }
            connect_timeout 2
            nb_get_retry 3
            delay_before_retry 1
        }
    }
    real_server 192.168.0.12 80 {
        weight 1
        HTTP_GET {
            url {
              path /
              status_code 200
            }
            connect_timeout 2
            nb_get_retry 3
            delay_before_retry 1
        }
    }
}
web1/web2/web3:配置脚本
#!/bin/bash
#
vip="192.168.0.2/32"
vip2="192.168.0.3/32"
iface="lo"
case $1 in
start)
        echo 1 > /proc/sys/net/ipv4/conf/all/arp_ignore
        echo 1 > /proc/sys/net/ipv4/conf/lo/arp_ignore
        echo 2 > /proc/sys/net/ipv4/conf/all/arp_announce
        echo 2 > /proc/sys/net/ipv4/conf/lo/arp_announce
        ip addr add $vip label $iface:0 broadcast ${vip%/*} dev $iface
        ip addr add $vip2 label $iface:1 broadcast ${vip2%/*} dev $iface
        ip route add $vip dev $iface
        ip route add $vip2 dev $iface
        ;;
stop)
        ip addr flush dev $iface
        ip route flush dev $iface
        echo 0 > /proc/sys/net/ipv4/conf/all/arp_ignore
        echo 0 > /proc/sys/net/ipv4/conf/lo/arp_ignore
        echo 0 > /proc/sys/net/ipv4/conf/all/arp_announce
        echo 0 > /proc/sys/net/ipv4/conf/lo/arp_announce
        ;;
*)
        echo "Usage: `basename $0` start | stop" 1>&2
        ;;
esac
六、通知脚本的实现
[root@node1 ~]# vim /etc/keepalived/notify.sh
#!/bin/bash
#
contact='root@localhost'
notify() {
    local mailsubject="$(hostname) to be $1, vip floating"
    local mailbody="$(date +'%F %T'): vrrp transition, $(hostname) changed to be $1"
    echo "$mailbody" | mail -s "$mailsubject" $contact
}
case $1 in
master) notify master;;
backup) notify backup;;
fault) notify fault;;
*) echo "Usage: $(basename $0) {master|backup|fault}"; exit 1;;
esac
[root@node1 ~]# vim /etc/keepalived/keepalived.conf
vrrp_instance VI_1 {
    state MASTER
    interface eth0
    virtual_router_id 51
    priority 100
    advert_int 1
    authentication {
        auth_type PASS
        auth_pass fd57721a
    }
    virtual_ipaddress {
        192.168.0.2/24 dev eth0
    }
    notify_master "/etc/keepalived/notify.sh master" #调用脚本发送通知邮件,当此节点转为master时
    notify_backup "/etc/keepalived/notify.sh backup"
    notify_fault "/etc/keepalived/notify.sh fault"
}
七、keepalived + haproxy 实现调度器的高可用
配置haproxy实现负载均衡的功能
[root@node1 ~]# vim /etc/haproxy/haproxy.cfg
frontend web *:80
    default_backend websrvs
backend websrvs
    balance roundrobin
    server srv1 192.168.0.10:80 check
    server srv2 192.168.0.11:80 check
    server srv3 192.168.0.12:80 check
配置keepalived实现高可用
[root@node1 ~]# vim /etc/keepalived/keepalived.conf
! Configuration File for keepalived
global_defs {
   notification_email {
     root@localhost
   }
   notification_email_from keepalived@localhoat
   smtp_server 127.0.0.1
   smtp_connect_timeout 30
   router_id node1
   vrrp_skip_check_adv_addr
   vrrp_strict
   vrrp_garp_interval 0
   vrrp_gna_interval 0
   vrrp_mcast_group4 224.0.111.111
   vrrp_iptables
}
vrrp_script chk_haproxy {
        script "killall -0 haproxy"  #监控haproxy进程
        interval 1
        weight -5
        fall 2
        rise 1
}
vrrp_instance VI_1 {
    state MASTER
    interface eth0
    virtual_router_id 51
    priority 100
    advert_int 1
    authentication {
        auth_type PASS
        auth_pass fd57721a
    }
    virtual_ipaddress {
        192.168.0.2/24 dev eth0
    }
    track_script {  #调用监控脚本
            chk_haproxy
    }
    notify_master "/etc/keepalived/notify.sh master"
    notify_backup "/etc/keepalived/notify.sh backup"
    notify_fault "/etc/keepalived/notify.sh fault"
}
八、利用脚本功能实现keepalived的维护模式
vrrp_script chk_down {
    script "/bin/bash -c '[[ -f /etc/keepalived/down ]]' && exit 1 || exit 0"  #在keepalived中要特别地指明作为bash的参数的运行
    interval 1
    weight -10
}
vrrp_instance VI_1 {
    state MASTER
    interface eth0
    virtual_router_id 51
    priority 100
    advert_int 1
    authentication {
        auth_type PASS
        auth_pass fd57721a
    }
    virtual_ipaddress {
        192.168.0.2/24 dev eth0
    }
    track_script {
        chk_down  #调用脚本
    }
    notify_master "/etc/keepalived/notify.sh master"
    notify_backup "/etc/keepalived/notify.sh backup"
    notify_fault "/etc/keepalived/notify.sh fault"
}
测试:创建down文件后使得降优先级,从而使得VIP漂移到node2,进入维护模式
[root@node1 ~]# touch /etc/keepalived/down
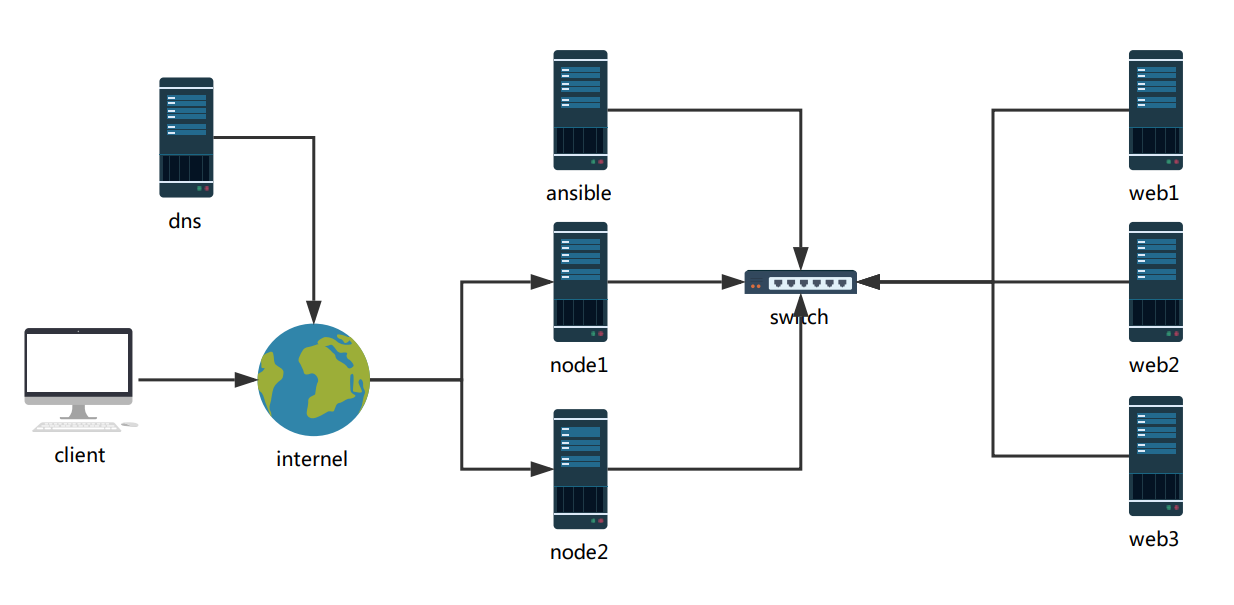
九、编写Ansible角色批量部署keepalived + nginx 实现双主模型下反向代理器的高可用
以下操作全部在ansible主机上操作
1、基于秘钥通信:
[root@ansible ~]# vim cpkey.sh
#!/bin/bash
rpm -q expect &>/dev/null || yum -q -y install expect
[ ! -e ~/.ssh/id_rsa ] && ssh-keygen -t rsa -P "" -f ~/.ssh/id_rsa &>/dev/null
read -p "Host_ip_list: " ip_list_file
read -p "Username: " username
read -s -p "Password: " password
[ ! -e "$ip_list_file" ] && echo "$ip_list_file not exist." && exit
[ -z "$ip_list_file" -o -z "$username" -o -z "$password" ] && echo "input error!" && exit
localhost_ip=`hostname -I |cut -d' ' -f1`
expect <<EOF
set timeout 10
spawn ssh-copy-id -i /root/.ssh/id_rsa.pub $localhost_ip
expect {
"yes/no" { send "yes
"; exp_continue}
"password" { send "$password
"}
}
expect eof
EOF
while read ipaddr1; do
expect <<EOF
set timeout 10
spawn ssh ${username}@${ipaddr1} ':'
expect {
"yes/no" { send "yes
"; exp_continue}
"password" { send "$password
"}
}
expect eof
EOF
done < "$ip_list_file"
while read ipaddr2; do
expect <<EOF
set timeout 10
spawn scp -pr .ssh/ ${username}@${ipaddr2}:
expect {
"yes/no" { send "yes
"; exp_continue}
"password" { send "$password
"}
}
expect eof
EOF
done < "$ip_list_file"
[root@ansible ~]# vim iplist.txt
192.168.0.8
192.168.0.9
192.168.0.11
192.168.0.12
192.168.0.13
[root@ansible ~]# ./cpkey.sh
Host_ip_list: iplist.txt  #指定IP地址列表文件
Username: root
Password: ******
2、配置内部主机基于主机名通信:
[root@ansible ~]# vim /etc/hosts
192.168.0.8 node1
192.168.0.9 node2
192.168.0.10	dns
192.168.0.11    web1
192.168.0.12    web2
192.168.0.13    web3
192.168.0.13    ansible
[root@ansible ~]# yum install ansible -y (epel源)
[root@ansible ~]# vim /etc/ansible/hosts
[node]
192.168.0.8
192.168.0.9
[web]
192.168.0.11
192.168.0.12
192.168.0.13
[dns]
192.168.0.10
[root@ansible ~]# ansible all -m copy -a 'src=/etc/hosts dest=/etc/hosts backup=yes'
3、编写角色,实现web服务的部署
[root@ansible ~]# mkdir -p ansible/roles/web/{tasks,templates,files,handlers}
[root@ansible ~]# cd ansible/
[root@ansible ansible]# vim roles/web/tasks/install.yml
- name: install httpd
  yum: name=httpd state=present
[root@ansible ansible]# vim roles/web/tasks/copy.yml
- name: copy config file
  template: src=httpd.conf.j2 dest=/etc/httpd/conf/httpd.conf
  notify: restart service
- name: copy index.html
  template: src=index.html.j2 dest=/var/www/html/index.html owner=apache
  notify: restart service
[root@ansible ansible]# vim roles/web/tasks/start.yml
- name: start httpd
  service: name=httpd state=started
[root@ansible ansible]# vim roles/web/tasks/main.yml
- include: install.yml
- include: copy.yml
- include: start.yml
[root@ansible ansible]# yum install httpd -y
[root@ansible ansible]# cp /etc/httpd/conf/httpd.conf roles/web/templates/httpd.conf.j2
[root@ansible ansible]# vim roles/web/templates/httpd.conf.j2
ServerName {{ ansible_fqdn }}
[root@ansible ansible]# vim roles/web/templates/index.html.j2
{{ ansible_fqdn }} test page.
[root@ansible ansible]# vim roles/web/handlers/main.yml
- name: restart service
  service: name=httpd state=restarted
[root@ansible ansible]# vim web.yml
---
- hosts: web
  remote_user: root
  roles:
    - web
...
[root@ansible ansible]# ansible-playbook web.yml
4、编写角色,实现nginx反向代理服务的部署
[root@ansible ansible]# mkdir -p roles/nginx_proxy/{files,handlers,tasks,templates}
[root@ansible ansible]# vim roles/nginx_proxy/tasks/install.yml
- name: install nginx
  yum: name=nginx state=present
[root@ansible ansible]# vim roles/nginx_proxy/tasks/copy.yml
- name: copy config file
  template: src=nginx.conf.j2 dest=/etc/nginx/nginx.conf
  notify: restart service
[root@ansible ansible]# vim roles/nginx_proxy/tasks/start.yml
- name: start nginx
  service: name=nginx state=started
[root@ansible ansible]# vim roles/nginx_proxy/tasks/main.yml
- include: install.yml
- include: copy.yml
- include: start.yml
[root@ansible ansible]# yum install nginx -y
[root@ansible ansible]# cp /etc/nginx/nginx.conf roles/nginx_proxy/templates/nginx.conf.j2
[root@ansible ansible]# vim roles/nginx_proxy/templates/nginx.conf.j2
http {
    upstream websrvs {  #后端web服务器的IP地址
        server 192.168.0.11;
        server 192.168.0.12;
        server 192.168.0.13;
    }
    server {
        listen       80 default_server;
        server_name  _;
            root /usr/share/nginx/html;
        location / {
            proxy_pass http://websrvs;
        }
    }
}
[root@ansible ansible]# vim roles/nginx_proxy/handlers/main.yml
- name: restart service
  service: name=nginx state=restarted
[root@ansible ansible]# vim nginx_proxy.yml
---
- hosts: node
  remote_user: root
  roles:
    - nginx_proxy
...
[root@ansible ansible]# ansible-playbook nginx_proxy.yml
5、编写角色,利用keepalived实现nginx反向代理服务的高可用
[root@ansible ansible]# ansible 192.168.0.8 -m hostname -a 'name=node1'
[root@ansible ansible]# ansible 192.168.0.9 -m hostname -a 'name=node2'
[root@ansible ansible]# mkdir -p roles/keepalived/{files,handlers,tasks,templates,vars}
[root@ansible ansible]# vim roles/keepalived/tasks/install.yml  #安装剧本
- name: install keepalived
  yum: name=keepalived state=present
[root@ansible ansible]# vim roles/keepalived/tasks/copy.yml  #复制配置文件剧本
- name: copy configure file
  template: src=keepalived.conf.j2 dest=/etc/keepalived/keepalived.conf
  notify: restart service
  when: ansible_fqdn == "node1"  #选择性复制,将第一套配置文件复制到node1上
- name: copy configure file2
  template: src=keepalived.conf2.j2 dest=/etc/keepalived/keepalived.conf
  notify: restart service
  when: ansible_fqdn == "node2"  #将第二套配置文件复制到node2上
[root@ansible ansible]# vim roles/keepalived/tasks/start.yml  #启动服务
- name: start keepalived
  service: name=keepalived state=started
[root@ansible ansible]# vim roles/keepalived/tasks/main.yml
- include: install.yml
- include: copy.yml
- include: start.yml
[root@ansible ansible]# vim roles/keepalived/vars/main.yml  #自定义变量
kepd_vrrp_mcast_group4: "224.0.111.222"  #组播地址
kepd_interface_1: "eth0"
kepd_virtual_router_id_1: "51"  #虚拟路由标识ID
kepd_priority_1: "100"  #优先级
kepd_auth_pass_1: "fd57721a"  #简单认证密码,8位
kepd_virtual_ipaddress_1: "192.168.0.2/24"  #VIP地址,此处应该为公网地址
kepd_interface_2: "eth0"
kepd_virtual_router_id_2: "52"
kepd_priority_2: "98"
kepd_auth_pass_2: "41af6acc"
kepd_virtual_ipaddress_2: "192.168.0.3/24"
[root@ansible ansible]# yum install keepalived -y
[root@ansible ansible]# cp /etc/keepalived/keepalived.conf roles/keepalived/templates/keepalived.conf.j2
[root@ansible ansible]# vim roles/keepalived/templates/keepalived.conf.j2  #编辑配置文件模板
! Configuration File for keepalived
global_defs {
   notification_email {
     root@localhost
   }
   notification_email_from keepalived@localhoat
   smtp_server 127.0.0.1
   smtp_connect_timeout 30
   router_id node1
   vrrp_skip_check_adv_addr
   vrrp_strict
   vrrp_garp_interval 0
   vrrp_gna_interval 0
   vrrp_mcast_group4 {{ kepd_vrrp_mcast_group4 }}
   vrrp_iptables
}
vrrp_script chk_nginx {
        script "killall -0 nginx"
        interval 1
        weight -5
        fall 2
        rise 1
}
vrrp_instance VI_1 {
    state MASTER
    interface {{ kepd_interface_1 }}
    virtual_router_id {{ kepd_virtual_router_id_1 }}
    priority {{ kepd_priority_1 }}
    advert_int 1
    authentication {
        auth_type PASS
        auth_pass {{ kepd_auth_pass_1 }}
    }
    virtual_ipaddress {
        {{ kepd_virtual_ipaddress_1 }}
    }
    track_script {
            chk_nginx
    }
}
vrrp_instance VI_2 {
    state BACKUP
    interface {{ kepd_interface_2 }}
    virtual_router_id {{ kepd_virtual_router_id_2 }}
    priority {{ kepd_priority_2 }}
    advert_int 1
    authentication {
        auth_type PASS
        auth_pass {{ kepd_auth_pass_2 }}
    }
    virtual_ipaddress {
        {{ kepd_virtual_ipaddress_2 }}
    }
    track_script {
            chk_nginx
    }
}
[root@ansible ansible]# cp roles/keepalived/templates/keepalived.conf.j2 roles/keepalived/templates/keepalived.conf2.j2
[root@ansible ansible]# vim roles/keepalived/templates/keepalived.conf2.j2  #编写第二套配置文件,和第一套不同的只有state和priority参数需要改
! Configuration File for keepalived
global_defs {
   notification_email {
     root@localhost
   }
   notification_email_from keepalived@localhoat
   smtp_server 127.0.0.1
   smtp_connect_timeout 30
   router_id node1
   vrrp_skip_check_adv_addr
   vrrp_strict
   vrrp_garp_interval 0
   vrrp_gna_interval 0
   vrrp_mcast_group4 {{ kepd_vrrp_mcast_group4 }}
   vrrp_iptables
}
vrrp_script chk_nginx {
        script "killall -0 nginx"
        interval 1
        weight -5
        fall 2
        rise 1
}
vrrp_instance VI_1 {
    state BACKUP
    interface {{ kepd_interface_1 }}
    virtual_router_id {{ kepd_virtual_router_id_1 }}
    priority {{ kepd_priority_2 }}
    advert_int 1
    authentication {
        auth_type PASS
        auth_pass {{ kepd_auth_pass_1 }}
    }
    virtual_ipaddress {
        {{ kepd_virtual_ipaddress_1 }}
    }
    track_script {
            chk_nginx
    }
}
vrrp_instance VI_2 {
    state MASTER
    interface {{ kepd_interface_2 }}
    virtual_router_id {{ kepd_virtual_router_id_2 }}
    priority {{ kepd_priority_1 }}
    advert_int 1
    authentication {
        auth_type PASS
        auth_pass {{ kepd_auth_pass_2 }}
    }
    virtual_ipaddress {
        {{ kepd_virtual_ipaddress_2 }}
    }
    track_script {
            chk_nginx
    }
}
[root@ansible ansible]# vim roles/keepalived/handlers/main.yml  #实现配置文件变动时触发重启服务操作
- name: restart service
  service: name=keepalived state=restarted
[root@ansible ansible]# vim keepalived.yml
---
- hosts: node
  remote_user: root
  roles:
    - keepalived
...
[root@ansible ansible]# ansible-playbook keepalived.yml
6、配置DNS
[root@dns ~]# yum install bind -y
[root@dns ~]# vim /etc/named.conf
[root@dns ~]# vim /etc/named.conf  #将以下参数注释
//listen-on port 53 { 127.0.0.1; };
//allow-query     { localhost; };
[root@dns ~]# vim /etc/named.rfc1912.zones
zone "dongfei.tech" {
    type master;
    file "dongfei.tech.zone";
};
[root@dns ~]# vim /var/named/dongfei.tech.zone
$TTL 1D
@ IN    SOA dns1.dongfei.tech. admin.dongfei.tech. ( 1 1D 1H 1W 3H )
        NS  dns1
dns1    A   192.168.0.10
www     A   192.168.0.2
www     A   192.168.0.3
[root@dns ~]# named-checkconf
[root@dns ~]# named-checkzone "dongfei.tech" /var/named/dongfei.tech.zone
OK
[root@dns ~]# systemctl start named
[root@dns ~]# dig www.dongfei.tech @192.168.0.10
;; QUESTION SECTION:
;www.dongfei.tech.              IN      A
;; ANSWER SECTION:
www.dongfei.tech.       86400   IN      A       192.168.0.3
www.dongfei.tech.       86400   IN      A       192.168.0.2
;; AUTHORITY SECTION:
dongfei.tech.           86400   IN      NS      dns1.dongfei.tech.
;; ADDITIONAL SECTION:
dns1.dongfei.tech.      86400   IN      A       192.168.0.10
;; SERVER: 192.168.0.10#53(192.168.0.10)
7、客户端模拟测试
[root@client ~]# vim /etc/resolv.conf
nameserver 192.168.0.10
[root@client ~]# for i in {1..3}; do curl www.dongfei.tech; done
web2 test page.
web2 test page.
web3 test page.
将node1停机再测试
[root@client ~]# for i in {1..3}; do curl www.dongfei.tech; done
web2 test page.
web3 test page.
web1 test page.
现在已经实现了负载均衡的高可用!
附ansible角色下载:https://files.cnblogs.com/files/L-dongf/web_lb_cluster.tar.gz
感谢阅读~