用你的webpack实现vue-cli
本文围绕前端工程化,用webpack从零搭建一个完整项目的过程
本文核心知识点:
- webpack的使用
- vue组件化思想
- Element-UI的使用
别走别走,迫不及待看结果了吧:

想学吗,来俺教你(献丑,哈哈)
实现步骤:
写在前面:此案例用于强化你的webpack使用(须对webpack有一定的了解),若本文有错误以及运行出错,欢迎随时来扰我这只:爱学习的小白
- 创建项目文件夹(vue_todo)
- 生成项目描述文件(npm init -y)
- 在项目根目录下创建index.html(代码后补)
- 在项目根目录下创建src文件夹(添加main.js和App.vue)
- main.js(涵盖全文)
//! 需要导入实例化vue根实例
import Vue from 'vue'
import ElementUI from 'element-ui';
import 'element-ui/lib/theme-chalk/index.css';
import App from './App.vue';

Vue.use(ElementUI);

new Vue({
    el: '#app',
    components: {
        App
    },
    template: '<App/>'
});
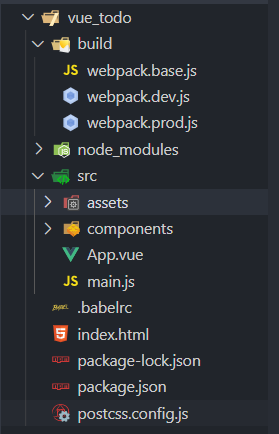
- 项目根目录下创建build文件夹(添加webpack配置文件),此处用于更好的区分开发环境和生产环境;也可不建,直接在根目录下建立webpack.config.js(名字唯一)
生成如下:
- 安装webpack,webpack-cli
- 在build文件夹下建立webpack.dev.js(进行webpack的配置),此处需了解webpack的基本使用webpack基本使用,一般配置有(entry:入口,output:出口,loader:加载器,plugins:插件)
本项目配置为:
写在前面:此处生产环境与开发环境代码冗余度过高,所以抽出公共部分(webpack.base.js)并用第三方模块(webpack-merge)进行合并,此处loader以及plugin的使用随着官网的更新,可能会发生变化,以官网为准,webpack官网
- webpack.base.js(注释含细节,其中路径相关项切记与自己文件路径保持一致)
// 引入路径处理模块
const path = require('path');

// 引入vue-loader插件(加载vue模板)
const VueloaderPlugin = require('vue-loader/lib/plugin');

// 引入html-webpack-plugin(生成预览的html页)
const HtmlWepackPlugin = require('html-webpack-plugin');

// 引入clean-wenpack-plugin(需进行解构)(每次打包前删除之前dist目录下的js文件)
const { CleanWebpackPlugin } = require('clean-webpack-plugin');

module.exports = {
    // 打包入口
    entry: './src/main.js',
    // 打包出口
    output: {
        filename: 'bundle.js',
        path: path.resolve(__dirname, '../dist')
    },
    // 配置打包规则
    module: {
        rules: [{
            test: /.vue$/,
            use: 'vue-loader'
        }, {
            test: /.(jpg|png|gif|bmp|eot|svg|woff|woff2|ttf)$/,
            use: [{
                loader: 'url-loader',
                query: {
                    name: '[name].[ext]'
                }
            }]
        }, {
            test: /.css$/,
            use: ['style-loader', 'css-loader']
        }, {
            test: /.styl(us)?$/,
            use: ['vue-style-loader', 'css-loader', 'postcss-loader', 'stylus-loader']
        }, {
            test: /.js$/,
            exclude: /node_modules/,
            loader: "babel-loader"
        }]
    },
    // 插件
    plugins: [
        new VueloaderPlugin(),
        new HtmlWepackPlugin({
            template: './index.html'
        }),
        new CleanWebpackPlugin()
    ],
    resolve: {
        alias: {
            'vue': 'vue/dist/vue.js'
        }
    },
    performance: {
        hints: false
    }
}
- webpack.dev.js
const baseConfig = require('./webpack.base.js');
const merge = require('webpack-merge');

// 引入webpack对象(实现热模块替换)
const webpack = require('webpack');
const devConfig = {
    mode: 'development',
    // devServer配置
    devServer: {
        contentBase: '../dist',
        // 打包完成自动打开
        open: true,
        // 模块热替换
        hot: true
    },
    //! 使打包后的js文件与源文件产生映射关系(增加纠错速度,错误定位),官网介绍详细
    //! eval一般应用于生产环境(production)
    //! devtool: 'eval',
    //vue脚手架一般配置(打包速度较慢)
    devtool: 'cheap-module-eval-source-map',
    // 插件
    plugins: [
        new webpack.HotModuleReplacementPlugin()
    ],
}

module.exports = merge(baseConfig, devConfig);
- webpack.prod.js
const baseConfig = require('./webpack.base.js');
const merge = require('webpack-merge');

const prodConfig = {
    mode: 'production'
}

module.exports = merge(baseConfig, prodConfig)
注意:此处的loader(postcss-loader,babel-loader)需要添加额外配置文件
passcss.config.js
module.exports = {
    plugins: [
        require('autoprefixer')
    ]
}
.babelrc
{
    "presets": ["@babel/preset-env"]
}
- 在项目描述(package.js)中写入脚本(script标签中写),用于打包项目(此处涵盖所有依赖项)
{
    "name": "vue_todo",
    "version": "1.0.0",
    "description": "",
    "main": "index.js",
    "scripts": {
        "dev": "webpack-dev-server --config ./build/webpack.dev.js",
        "build": "webpack --config ./build/webpack.prod.js"
    },
    "keywords": [],
    "author": "",
    "license": "ISC",
    "devDependencies": {
        "@babel/core": "^7.9.6",
        "@babel/preset-env": "^7.9.6",
        "autoprefixer": "^9.7.6",
        "babel-loader": "^8.1.0",
        "clean-webpack-plugin": "^3.0.0",
        "css-loader": "^3.5.3",
        "file-loader": "^6.0.0",
        "html-webpack-plugin": "^4.3.0",
        "postcss-loader": "^3.0.0",
        "style-loader": "^1.2.1",
        "stylus": "^0.54.7",
        "stylus-loader": "^3.0.2",
        "url-loader": "^4.1.0",
        "vue-loader": "^15.9.2",
        "vue-template-compiler": "^2.6.11",
        "webpack": "^4.43.0",
        "webpack-cli": "^3.3.11",
        "webpack-dev-server": "^3.11.0",
        "webpack-merge": "^4.2.2"
    },
    "dependencies": {
        "element-ui": "^2.13.1",
        "vue": "^2.6.11"
    }
}
配置完成,安心撸vue组件
写在前面:对于组件的认识,可以学习:vue组件化开发
- 对项目界面进行组件拆分:App(MainHeader,MainTodo(TodoItem,TodoInfo),MainFooter)
- 进行每个组件的编写(注意组件之间的数据传递)
- 进行组件样式的编写(此处除css样式外,还演示了stylus样式(未涉及可忽略))
- 进行子组件的挂载
- 在组件中使用Element-UI
奉上我的vue代码:
- App.vue
<template>
    <div>
        <!-- 调用组件时必须用短横线的方式写入标签 -->
        <main-header></main-header>
        <main-todo></main-todo>
        <main-footer></main-footer>
    </div>
</template>

<script>
//! 引入样式,格式为stylus
import './assets/styles/global.styl'
//! 导入子组件(头部)
import MainHeader from './components/MainHeader.vue'
//! 导入子组件(中间部分)
import MainTodo from './components/MainTodo/MainTodo.vue'
//! 导入子组件(底部)
import MainFooter from './components/MainFooter.vue'

export default {
    name:'App',
    components:{
        //! 组件名:组件对象(es6中键和值同名,可简写)
        MainHeader:MainHeader,
        MainTodo:MainTodo,
        MainFooter:MainFooter
    }
}
</script>

<style lang="css" scoped>

</style>
- MainHeader.vue
<template>
    <header>
        <h1>ToDoList</h1>
    </header>
</template>

<script>
export default {
    //todo 组件名尽量与文件名一致(思路容易捋顺)
    name:'MainHeader'
}
</script>

<style lang="stylus" scoped>
header {
    height 200px;
    width 100%;
    text-align center;
}
header h1{
    line-height 200px;
    font-size 100px;
    font-weight 100;
    color pink;
    text-shadow 1px 1px 1px pink,3px 3px 9px red;
}
</style>
- MainTodo
<template>
    <div class="main-todo">
        <input type="text" class="what-todo" placeholder="What do you want to do ?" autofocus @keyup.enter="addTodo" v-model="content">
        <todo-item v-for="(item,index) in filterData" :key="index" :todo="item" @delTodo="delThis($event)"></todo-item>
        <todo-info :unComplete="unComplete" :AllComplete="AllComplete" @toggleState="handleToggleState($event)" @delComplete="delComplete"></todo-info>
    </div>
</template>

<script>

//todo 导入TodoItem子组件
import TodoItem from './coms/TodoItem.vue'
//todo 导入TodoInfo子插件
import TodoInfo from './coms/TodoInfo.vue'


//todo 用id自加模拟计数器
let id = 0
export default {
    name:'MainTodo',
    data(){
        return{
            todos:[],
            content:'',
            filter:'all'
        }
    },
    methods:{
        addTodo(){
            //todo 如果输入框为空,直接返回
            if(this.content === '') return
            this.todos.unshift({
                id:id++,
                content:this.content,
                complete:true
            })
            this.content = ''
        },
        delThis(id){
            const index = this.todos.findIndex(item=>{
                return item.id == id
            })
            this.todos.splice(index,1)
        },
        handleToggleState(state){
           this.filter = state
        },
        delComplete(){
            this.todos =  this.todos.filter(item=>item.complete == true)
        }
    },
    computed:{
        unComplete(){
            const unDone = this.todos.filter(item=>{
                return item.complete == true
            })
            return unDone.length
        },
        AllComplete(){
            const Done = this.todos.filter(item=>{
                return item.complete == false
            })
            return Done.length
        },
        filterData(){
            switch(this.filter){
                case 'all':
                    return this.todos
                    break;
                case 'active':
                    return this.todos.filter(item=>item.complete == true)
                    break;
                 case 'complete':
                    return this.todos.filter(item=>item.complete == false)
                    break;
            }
        }
    },
    components:{
        TodoItem,
        TodoInfo,
    }
}
</script>

<style lang="stylus" scoped>
.main-todo{
    width 600px
    background-color rgba(0,0,0,.2)
    border-radius 18px 18px 0 0
    overflow hidden
    margin 0 auto
    box-sizing border-box
}
.what-todo{
    height 45px
    width 100%
    font-size 20px
    font-weight 300
    padding-left 16px
    border 0
    outline 0
    background-color rgba(0,0,0,.2)
    border-bottom 3px dashed pink
}
::placeholder{
    color #ccc
}
</style>
- MainTodo子组件TodoItem.vue
<template>
    <div class="box">
        <span class="switch"><el-switch v-model="todo.complete" active-color="#13ce66" inactive-color="#ff4949"></el-switch></span>
        <label :class="['todo',todo.complete?'':'complete']">{{todo.content}}</label>
        <button @click="$emit('delTodo',todo.id)"><i class="el-icon-delete active"></i></button>
    </div>
</template>

<script>
export default {
    name:'TodoItem',
    props:['todo'],
    data(){
        return{
            value:true
        }
    }
}
</script>

<style lang="stylus" scoped>
.box{
    width 600px
    height 40px
    display flex
    justify-content space-between
    border-top 1px dashed pink
}
.switch{
    padding 0px 9px
}
.box span,
.active{
    height 40px
    width 40px
    text-align center
    line-height 40px
}
.active{
    color red
    font-size 20px
    cursor pointer
}
.todo{
    flex 1
    height 100%
    font-size 20px
    color red
    line-height 40px
    padding-left 15px
}
.complete{
    color #ccc
    text-decoration line-through
}
button{
    outline none
    border none
    background-color rgba(0,0,0,0)
}
</style>
- MainTodo子组件TodoInfo
<template>
    <div class="todo-info">
        <span class="total" v-if="(state == 'all' | state == 'active')">{{unComplete}} item left</span>
        <span class="total" v-if="(state == 'complete')">{{AllComplete}} item left</span>
        <div class="tabs">
          <a :class="state == item ? 'active': ''" v-for="(item,index) in states" :key="index" @click="toggleState(item)">{{item}}</a>
        </div>
        <el-button type="success" @click="$emit('delComplete')">Clear Complete</el-button>
    </div>
</template>

<script>
export default {
    name:'TodoInfo',
    props:['unComplete','AllComplete'],
    data(){
        return{
            states:['all','active','complete'],
            state:'all'
        }
    },
    methods:{
        toggleState(state){
            this.state = state
            this.$emit('toggleState',state)
        }
    }
}
</script>

<style lang="css" scoped>
.todo-info{
    display: flex;
    justify-content: space-between;
    padding: 5px 10px;
    font-weight: 400;
    line-height: 30px;
}
.total{
    padding: 5px 0px;
    color: red;
    font-size: 16px;
    font-weight: 700;
}
.tabs{
    display: flex;
    justify-content: space-between;
     200px;
}
.tabs a{
    border: 1px solid palevioletred;
    padding: 5px 10px;
    border-radius: 12px;
    cursor: pointer;
}
.active{
    background-color: hotpink;
    color: #fff;
}
</style>
- MainFooter
<template>
    <footer>Written By A Seeker Of Knowladge</footer>
</template>

<script>
export default {
    name:'MainFooter'
}
</script>

<style lang="css" scoped>
footer{
    font-style: 24px;
    font-weight: 800;
    margin-top: 20px;
    text-align: center;
    color: pink;
    text-shadow: 1px 1px 1px black,3px 3px 9px hotpink;
}
</style>
快在终端输入:npm run dev 跑起来吧
Last:
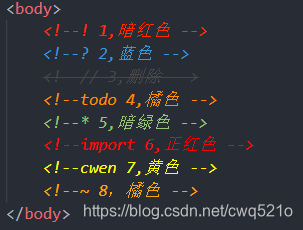
有小伙伴问我的怪癖,注释后为撒要写('!','?','todo','cwen'),今天统回复下,这是vscode的注释高亮插件。可以让你的注释也能像代码一样招人喜欢。最后附上插件名:Better Comments
- 安装插件
- 在settings.json里自定义自己的样式
- 预览效果
身体and灵魂必须一个在路上(共勉)