1.设备的安装与配置 https://wenku.baidu.com/view/fa172fd7482fb4daa48d4b44.html?from=search
2.接入SDK、实现简单示例场景、更换手柄模型、实现手柄投掷功能
导入SteamVR Plugin.unitypackage
实现头盔观看功能
更换手柄模型
要点
把物体拖到model同级目录,坐标归零
在运行状态下调整模型的大小坐标和旋转值
复制组件value,然后取消运行,粘贴value到物体上
实现手柄投掷功能
按下trigger键在手柄上生成一个物体,松开trigger键投掷出去
3.手柄脚本讲解
手柄上各按键的输入
扳机键:trigger
菜单键(三横)menu:
侧边键(两个一样):grip
圆盘(可点可触摸):touchpad
  1 using UnityEngine;
  2 using System.Collections;
  3 using Valve.VR;
  4 using UnityEngine.iOS;
  5 using System.Runtime.CompilerServices;
  6
  7 public delegate void VRHandle();
  8
  9
 10
 11 public class VRInput : MonoBehaviour
 12 {
 13
 14     SteamVR_TrackedObject trackedObject;//获取手柄对象
 15     SteamVR_Controller.Device device;//定义手柄信息对象
 16
 17     public VRHandle onTrigger;
 18     public VRHandle onTriggerDown;
 19     public VRHandle onTriggerUp;
 20
 21     void Start()
 22     {
 23         // 首先要获取响应按键的设备
 24         trackedObject = GetComponent<SteamVR_TrackedObject>();
 25         device = SteamVR_Controller.Input((int)trackedObject.index);
 26     }
 27
 28     Vector2 startPoint;
 29     Vector2 endPoint;
 30     //获取触摸偏移 ,旋转左手零件库,小部件什么的。
 31     public float GetTouchPadDeltaPos(SteamVR_Controller.Device device)
 32     {
 33         if (device.GetTouchDown(SteamVR_Controller.ButtonMask.Axis0))
 34         {
 35             endPoint = startPoint = device.GetAxis(EVRButtonId.k_EButton_SteamVR_Touchpad);
 36         }
 37
 38         //按下后滑动
 39         if (device.GetTouch(SteamVR_Controller.ButtonMask.Axis0))
 40         {
 41
 42             if ((device.GetAxis(EVRButtonId.k_EButton_SteamVR_Touchpad) - endPoint).sqrMagnitude > 0.01f)
 43             {
 44
 45                 startPoint = endPoint;
 46
 47                 endPoint = device.GetAxis(EVRButtonId.k_EButton_SteamVR_Touchpad);
 48
 49                 //Vector2 deltaVector = endPoint - startPoint;
 50                 //float deltaPosY = endPoint.y - startPoint.y;
 51
 52                 float deltaPosX = endPoint.x - startPoint.x;
 53
 54                 //使用delta
 55                 //device.TriggerHapticPulse (1000); // 用这个可以震动手柄
 56                 //target.Rotate (0, 0, deltaPosX * 100);
 57                 return deltaPosX;
 58             }
 59         }
 60         return 0f;
 61     }
 62
 63
 64
 65     void Update()
 66     {
 67
 68         // Press 和 Touch 除了圆盘,其他基本通用 Touch可以直接响应圆盘
 69         // GetPressDown 和 GetTouchDown
 70         // GetPress 和 GetTouch  ___  类似键盘的GetKey
 71         // GetPressUp 和 GetTouchUp
 72         //以下不全写了,没必要,就主要以GetTouch 试一下所有按钮
 73
 74         //按下圆盘
 75
 76         if (device.GetPress(SteamVR_Controller.ButtonMask.Touchpad))
 77         {
 78             //打印触摸的位置
 79             print(device.GetAxis(EVRButtonId.k_EButton_SteamVR_Touchpad));
 80         }
 81
 82         //  Trigger键
 83         if (device.GetTouch(SteamVR_Controller.ButtonMask.Trigger))
 84         {
 85             Debug.Log("我是手柄上的trigger键,保持按下状态");
 86             if (onTrigger!=null) {
 87                 onTrigger ();
 88             }
 89
 90         }
 91
 92         if (device.GetTouchDown(SteamVR_Controller.ButtonMask.Trigger))
 93         {
 94             Debug.Log("我是手柄上的trigger键,按下状态");
 95             if (onTriggerDown!=null) {
 96                 onTriggerDown ();
 97             }
 98
 99         }
100         if (device.GetTouchUp(SteamVR_Controller.ButtonMask.Trigger))
101         {
102
103             Debug.Log("我是手柄上的trigger键,松开状态");
104             if (onTriggerUp!=null) {
105                 onTriggerUp ();
106             }
107         }
108
109         //触摸圆盘
110         if (device.GetTouch(SteamVR_Controller.ButtonMask.Touchpad))
111         {
112             Debug.Log("我是左手柄上的触摸屏,手指保持触摸状态");
113         }
114
115         // 菜单键 (三横线)
116         if (device.GetTouch(SteamVR_Controller.ButtonMask.ApplicationMenu))
117         {
118             Debug.Log("我是手柄菜单键,保持按下状态");
119         }
120
121         //手心键(随便取个名^^) 左右两边可以按但其实是一个键!
122         if (device.GetTouch(SteamVR_Controller.ButtonMask.Grip))
123         {
124             Debug.Log("我是左手柄左右侧按键,保持按下状态");
125         }
126
127         // 这些键位都有了!! 好像还有个System键把!!能用吗? 经过短时间测试,不要用,没效果不说,容易导致其他的都不灵还要重新连接手柄!
128         //查看定义可以知道:     public const ulong System= (1ul << (int)EVRButtonId.k_EButton_System); // reserved    reserved了,reserved什么意思?保留! 不是留留给你的 ^ ^!
129         if (device.GetTouch(SteamVR_Controller.ButtonMask.System))
130         {
131             print("你看不见我!");
132         }
133
134         //以下三个获取 追踪设备的姿态(矩阵等信息),按键的状态等等,请自行研究,欢迎回帖补充
135         device.GetPose();
136         device.GetState();
137         device.GetPrevState();
138
139         //还没完!继续
140         // vive 有个Trigger键,有一定键程,那么你按下这个trigger到什么程度会触发呢?
141         //经过测试,大概是 75%的样子!!(why?为什么要研究这个,有意义么? Of Course!)
142         // 因为 device.GetHairTrigger(), hairTrigger:一触即发的意思!就是说Trigger键你可以轻轻一碰就能触发!
143         if (device.GetHairTriggerDown())
144         {
145             print("看到我时,食指不要动,看你按到了多少?");
146         }
147         // 你肯定按了0.1,也就是10%的键程,我怎么知道?
148         //print("因为你按了:" + device.hairTriggerDelta);
149         // 那么,修改了hairTriggerDelta,是不是就修改了 一触即发的键程? √
150
151         //修改一触即发键程为一半,再按按试试看!
152         if (Input.GetKeyDown(KeyCode.A))
153         {
154             device.hairTriggerDelta = 0.5f;
155         }
156
157
158         // 最后!
159         //Axis,轴
160         //经测试,Axis0对应的是圆盘SteamVR_Controller.ButtonMask.Touchpad ,都可以用
161         //Axis1,对应的是trigger键位!
162         // 在SteamVR_Controller.ButtonMask类里面定义了还有2,3,4Axis呢,它们对于啥呢?
163         //它们不对应啥,猜想一:这个是SteamVR!,又不是只给火腿肠vive专用,还有其他VR设备呢,如果其他设备手柄轴用的多呢?
164         // 二:Axis2,3,4能对应菜单键和手心键吗?no no no , 感受一下轴和按钮的区别就明白了,轴一般是范围值,button是yes or no;
165
166
167         if (device.GetTouch(SteamVR_Controller.ButtonMask.Axis0))
168         {
169             Debug.Log("触摸盘");
170         }
171         if (device.GetTouch(SteamVR_Controller.ButtonMask.Axis1))
172         {
173             Debug.Log("trigger键");
174         }
175         if (device.GetTouch(SteamVR_Controller.ButtonMask.Axis2))
176         {
177
178         }
179         if (device.GetTouch(SteamVR_Controller.ButtonMask.Axis3))
180         {
181
182         }
183         if (device.GetTouch(SteamVR_Controller.ButtonMask.Axis4))
184         {
185
186         }
187
188     }
189
190
191     //把圆盘划成4个象限区域按钮,强行用圆盘变出一些按钮以防按钮不够用!
192     public enum TouchPadButton
193     {
194         Default,
195         UpLeft,
196         UpRight,
197         DowmLeft,
198         DownRight
199     }
200
201     public TouchPadButton GetTouchButton()
202     {
203         TouchPadButton touchButton = TouchPadButton.Default;
204         var device = SteamVR_Controller.Input((int)trackedObject.index);
205
206         if (device.GetPressDown(SteamVR_Controller.ButtonMask.Axis0))
207         {
208
209             Vector2 pad = device.GetAxis(EVRButtonId.k_EButton_SteamVR_Touchpad);
210             if (pad.x >= 0 && pad.y >= 0)
211             {
212                 touchButton = TouchPadButton.UpRight;
213             }
214
215             if (pad.x >= 0 && pad.y <= 0)
216             {
217                 touchButton = TouchPadButton.DownRight;
218             }
219
220             if (pad.x <= 0 && pad.y >= 0)
221             {
222                 touchButton = TouchPadButton.UpLeft;
223             }
224
225             if (pad.x <= 0 && pad.y <= 0)
226             {
227                 touchButton = TouchPadButton.DowmLeft;
228             }
229
230         }
231         return touchButton;
232     }
233 }
4.手柄圆盘键的自定义划分
将一个触摸板按照4象限划分成4个按键
通过坐标轴值来划分
将一个触摸板按照4象限旋转45度划分成4个按键
通过斜率值或角度来划分
5.UI交互
1.插件:Vive Input Utility.unitypackage 导入
2.文档
3DUI.docx

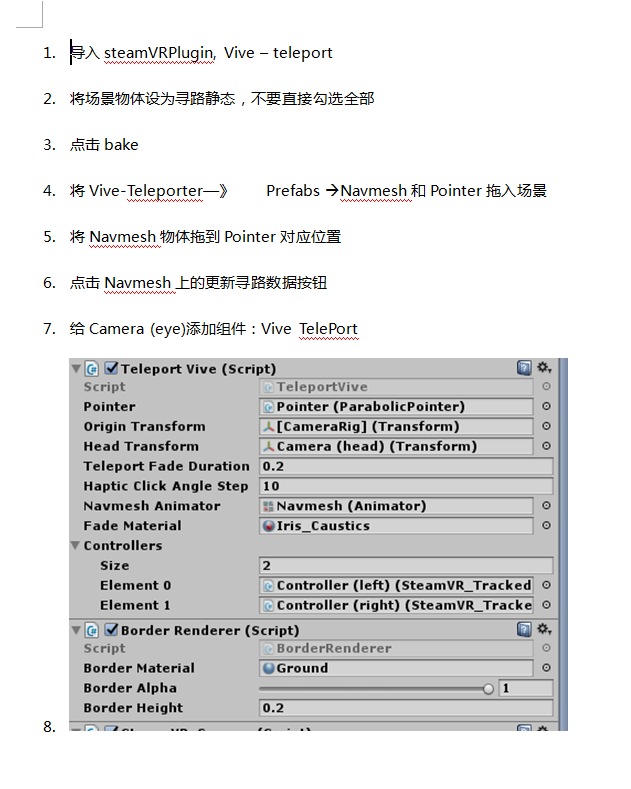
6.瞬移
1.插件:Vive - teleport.unitypackage 导入
2.使用文档
瞬移.docx