本文转载自:http://blog.csdn.net/u012296694/article/details/48055491
本文主要描述了在android2.3平台G-sensor相关软硬件的体系架构和实现原理,按照Applications、Framework、HAL、Driver和Hardware五大层次分别介绍。
1.系统架构 (Architecture)
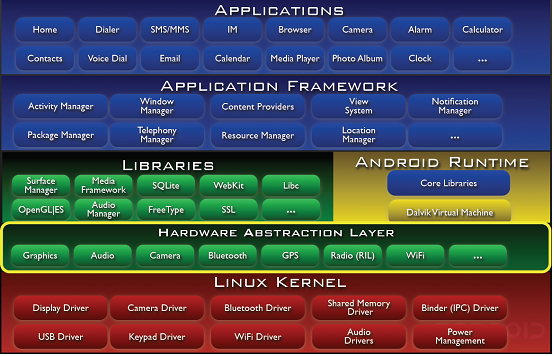
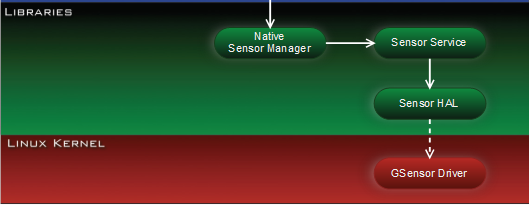
1.1 Android体系架构图
1.2 Sensor子系统架构图
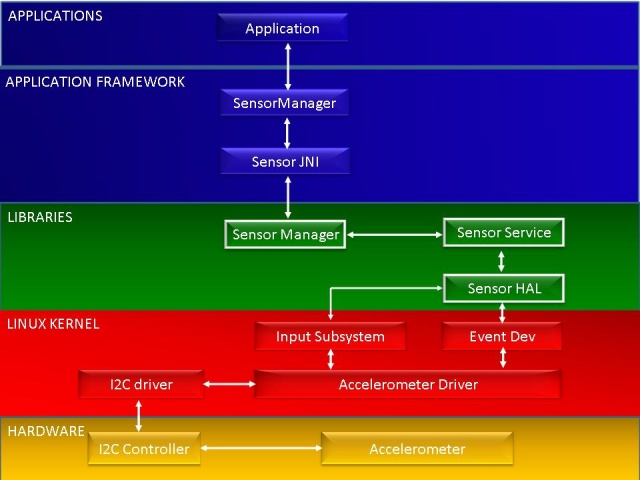
· Application Framework
Sensor应用程序通过Sensor应用框架来获取sensor数据,应用框架层的Sensor Manager通过JNI与C++层进行通信。
· Sensor Libraries
Sensor中间层主要由Sensor Manager、Sensor service和Sensor硬件抽象层组成。
· Input Subsystem
通用的Linux输入框架专为与键盘、鼠标和触摸屏等输入设备而设计,并定义了一套标准事件集合。Sensor输入子系统采用采用了通用的Linux输入框架,它通过/sys/class/input节点和用户空间进行交互。
· Event Dev
Evdev提供了一种访问/dev/input/eventX输入设备事件的通用方法。
· AccelerometerDriver
此驱动通过SIRQ和I2C总线与MMA7660模组进行通信。SIRQ用来产生传感器事件中断。
2 应用 (Applications)
2.1 应用开发五步曲
(1) 获取传感器管理器对象;
mSensorManager =(SensorManager) getSystemService(SENSOR_SERVICE);
(2) 获取传感器对象;
mSensor = mSensorManager.getDefaultSensor(Sensor.TYPE_ACCELEROMETER);
(3) 定义事件监听器;
mEventListener =new SensorEventListener() {
- @Override
- publicvoid onSensorChanged(SensorEvent event) {
- float[] values = event.values;
- mTextView.setText("Accelerometer:" + values[0] +", "
- + values[1] +", " + values[2]);
- }
- @Override
- publicvoidonAccuracyChanged(Sensor sensor,int accuracy) {
- }
(4) 注册事件监听器;
protectedvoid onResume() {
- super.onResume();
- mSensorManager.registerListener(mEventListener, mSensor,
- SensorManager.SENSOR_DELAY_NORMAL);
(5) 卸载事件监听器;
protectedvoid onPause() {
- super.onPause();
- mSensorManager.unregisterListener(mEventListener);
3.1 工作模型
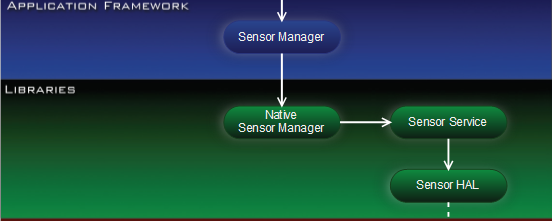
3.1.1 SensorManager的创建
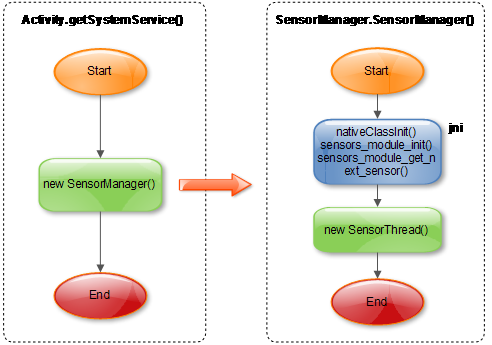
sensors_module_init(): 创建Native SensorManager实例,从SensorService读取Sensor设备列表;
sensors_module_get_next_sensor(): 从SensorService读取下一个Sensor设备;
3.1.2 SensorThread数据接收处理
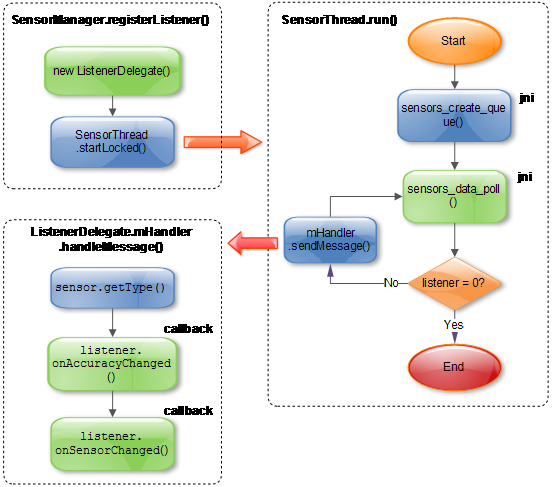
sensors_data_poll(): 从消息队列中读取SensorService发过来的消息;
3.1.3 SensorService的工作原理
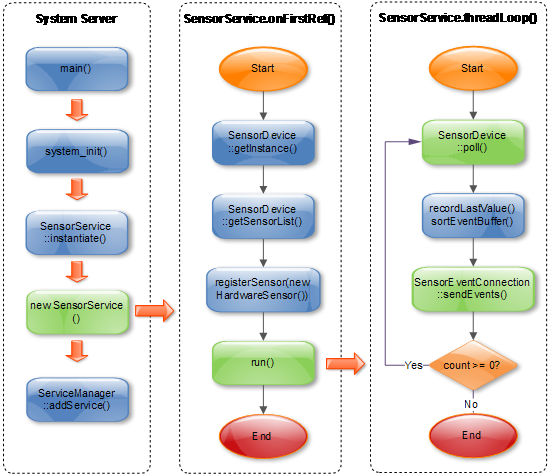
SensorEventConnection::sendEvents(): 往消息队列中写入消息,SensorThread后续会读取该消息;
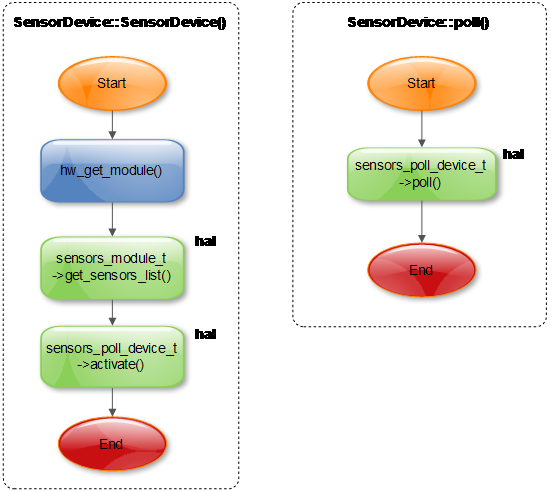
4 硬件抽象层 (HAL)
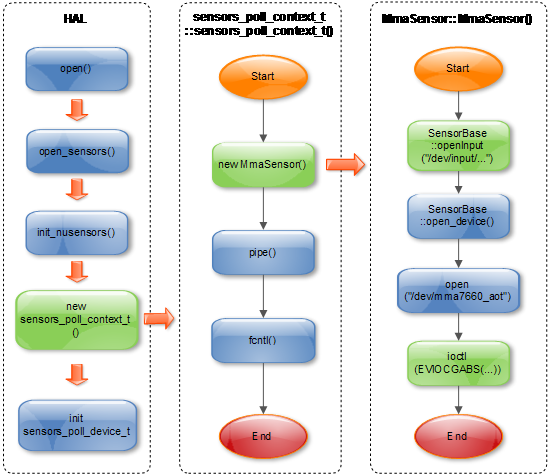
4.1 Sensors HAL关键流程
4.1.1 打开Sensor设备
ioctl(EVIOCGABS(...)) : 获取ABS_X/ABS_Y/ABS_Z的加速度;
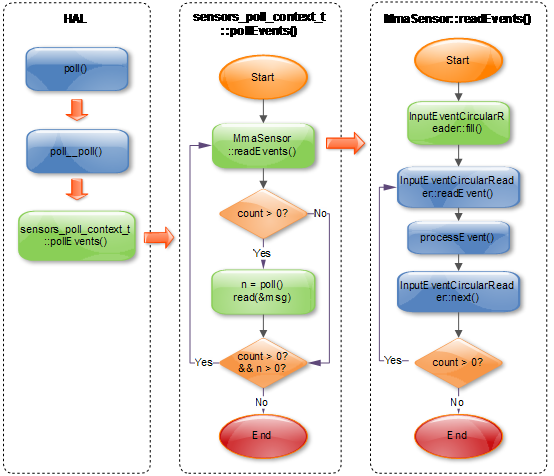
InputEventCircularReader::readEvent(): 从环形缓冲区中读取事件;
InputEventCircularReader::next(): 移动环形缓冲区当前指针;
5.2.1 sensors_module_t
- struct sensors_module_t {
- struct hw_module_t common;
- /**
- * Enumerate all available sensors. The list is returned in "list".
- * @return number of sensors in the list
- */
- int (*get_sensors_list)(struct sensors_module_t* module,
- struct sensor_t const** list);
- };
hw_get_module()会加载HAL模块,并返回HAL入口数据结构(hw_module_t)。HAL_MODULE_INFO_SYM默认是“HAL”,在hw_get_module中用dlsym获取。
- const struct sensors_module_t HAL_MODULE_INFO_SYM = {
- .common = {
- .tag = HARDWARE_MODULE_TAG,
- .version_major = 1,
- .version_minor = 0,
- .id = SENSORS_HARDWARE_MODULE_ID,
- .name = "MMA7660 Sensors Module",
- .author = "The Android Open Source Project",
- .methods = &sensors_module_methods,
- },
- .get_sensors_list = sensors__get_sensors_list
- };
5.2.2 hw_module_methods_t
- .open = open_sensors
5.2.3 sensors_poll_context_t
- struct sensors_poll_context_t {
- struct sensors_poll_device_t device; // must be first
- sensors_poll_context_t();
- ~sensors_poll_context_t();
- int activate(int handle, int enabled);
- int setDelay(int handle, int64_t ns);
- int pollEvents(sensors_event_t* data, int count);
- int handleToDriver(int handle);
- };
5.2.4 sensors_poll_device_t
- struct sensors_poll_device_t {
- struct hw_device_t common;
- int (*activate)(struct sensors_poll_device_t *dev,
- int handle, int enabled);
- int (*setDelay)(struct sensors_poll_device_t *dev,
- int handle, int64_t ns);
- int (*poll)(struct sensors_poll_device_t *dev,
- sensors_event_t* data, int count);
- };
5.2.5 sensor_t
- static const struct sensor_t sSensorList[] = {
- { "MMA7660 3-axis Accelerometer",
- "Freescale Semiconductor",
- 1, SENSORS_HANDLE_BASE+ID_A,
- SENSOR_TYPE_ACCELEROMETER, 3.0f*9.81f, (3.0f*9.81f)/64.0f, 0.35f, 0, { } },
- };
- struct sensor_t {
- const char* name;
- const char* vendor;
- int version;
- int handle;
- int type;
- float maxRange;
- float resolution;
- float power;
- int32_t minDelay;
- void* reserved[8];
- };
6.1 mma7660驱动框架
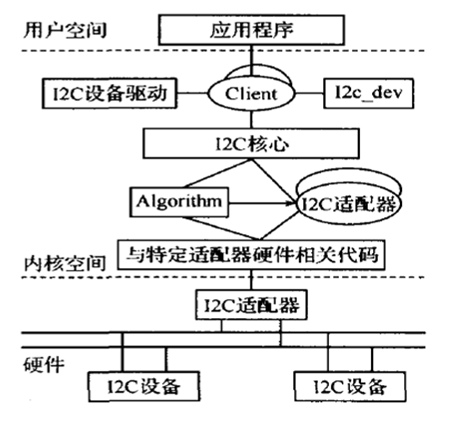
(1) I2C核心
I2C核心提供了I2C总线驱动和设备驱动的注册、注销方法,I2C通信方法(即“algorithm”)上层的、与具体适配器无关的代码以及探测设备、检测设备地址的上层代码等。这部分是与平台无关的。
此部分在Linux内核的I2C驱动中实现,mma7660驱动使用其提供的功能接口来注册设备驱动。
(2) I2C总线驱动
I2C总线驱动是对I2C硬件体系结构中适配器端的实现。I2C总线驱动主要包含了I2C适配器数据结构i2c_adapter、I2C适配器的algorithm数据结构i2c_algorithm和控制I2C适配器产生通信信号的函数。经由I2C总线驱动的代码,我们可以控制I2C适配器以主控方式产生开始位、停止位、读写周期,以及以从设备方式被读写、产生ACK等。不同的CPU平台对应着不同的I2C总线驱动。
此部分在Linux内核的I2C驱动中实现,mma7660驱动直接获取其提供的adapter,并调用I2C核心的接口来注册。
(3) I2C设备驱动
I2C设备驱动是对I2C硬件体系结构中设备端的实现。设备一般挂接在受CPU控制的I2C适配器上,通过I2C适配器与CPU交换数据。I2C设备驱动主要包含了数据结构i2c_driver和i2c_client,mma7660驱动需要实现其中的成员函数。
在Linux内核源代码中的drivers目录下的i2c_dev.c文件,实现了I2C适配器设备文件的功能,应用程序通过“i2c-%d”文件名并使用文件操作接口open()、write()、read()、ioctl()和close()等来访问这个设备。应用层可以借用这些接口访问挂接在适配器上的I2C设备的存储空间或寄存器并控制I2C设备的工作方式。
6.2 mma7660操作流程
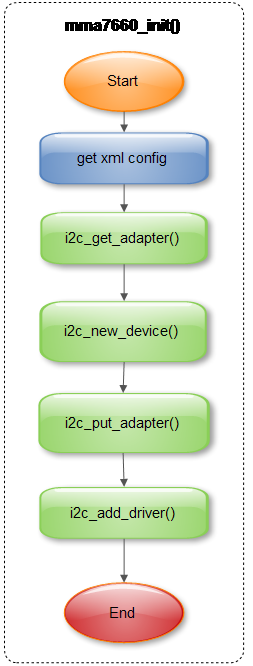
6.2.1 初始化
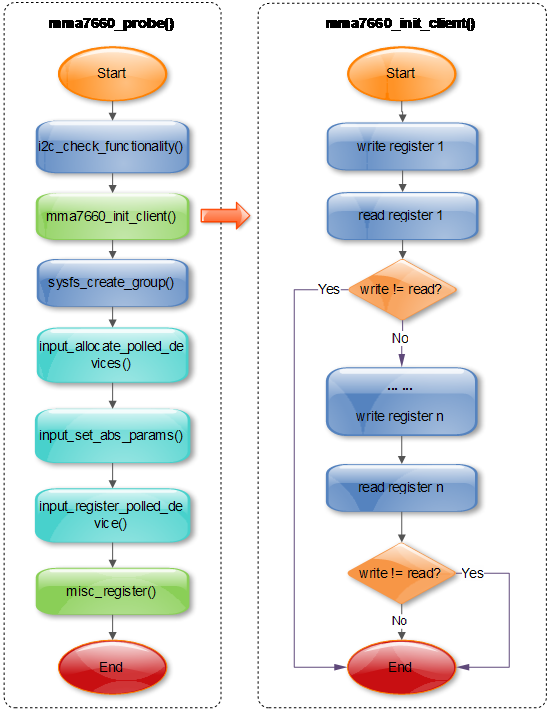
6.2.2 探测设备
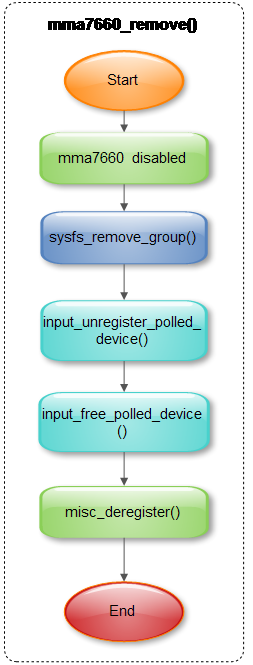
6.2.3 移除设备
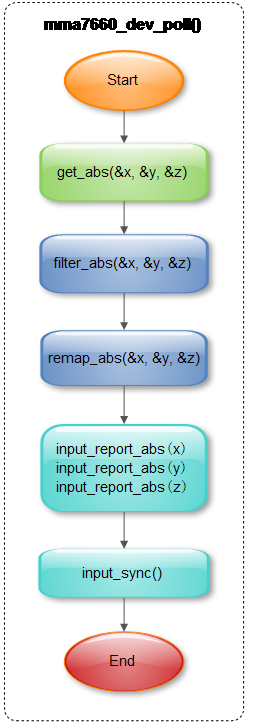
6.2.4 采集数据
6.2.5 睡眠和唤醒
Suspend处理:关闭mma7660模组;Resume处理:使能mma7660模组;
- static int mma7660_suspend(struct i2c_client *client, pm_message_t mesg)
- {
- int result;
- result = i2c_smbus_write_byte_data(client, MMA7660_MODE,
- MK_MMA7660_MODE(0, 0, 0, 0, 0, 0, 0));
- assert(result==0);
- return result;
- }
- static int mma7660_resume(struct i2c_client *client)
- {
- int result;
- result = i2c_smbus_write_byte_data(client, MMA7660_MODE,
- MK_MMA7660_MODE(0, 1, 0, 0, 0, 0, 1));
- assert(result==0);
- return result;
- }
- static struct i2c_driver mma7660_driver = {
- .driver = {
- .name = MMA7660_DRV_NAME,
- .owner = THIS_MODULE,
- },
- .class = I2C_CLASS_HWMON,
- .suspend = mma7660_suspend,
- .resume = mma7660_resume,
- .probe = mma7660_probe,
- .detect = mma7660_detect,
- // .address_data = &addr_data,
- .remove = __devexit_p(mma7660_remove),
- .id_table = mma7660_id,
- };
6.3 命令行调试
6.3.1 sysfs调试接口
(1) 定义sysfs attribute相关数据结构;- static SENSOR_DEVICE_ATTR(all_axis_force, S_IRUGO, show_xyz_force, NULL, 0);
- static SENSOR_DEVICE_ATTR(x_axis_force, S_IRUGO, show_axis_force, NULL, 0);
- static SENSOR_DEVICE_ATTR(y_axis_force, S_IRUGO, show_axis_force, NULL, 1);
- static SENSOR_DEVICE_ATTR(z_axis_force, S_IRUGO, show_axis_force, NULL, 2);
- static SENSOR_DEVICE_ATTR(orientation, S_IRUGO, show_orientation, NULL, 0);
- static struct attribute* mma7660_attrs[] =
- {
- &sensor_dev_attr_all_axis_force.dev_attr.attr,
- &sensor_dev_attr_x_axis_force.dev_attr.attr,
- &sensor_dev_attr_y_axis_force.dev_attr.attr,
- &sensor_dev_attr_z_axis_force.dev_attr.attr,
- &sensor_dev_attr_orientation.dev_attr.attr,
- NULL
- };
- static const struct attribute_group mma7660_group =
- {
- .attrs = mma7660_attrs,
- };
(2) 在probe函数中创建sysfs文件系统;
- result = sysfs_create_group(&client->dev.kobj, &mma7660_group);
- if (result != 0) {
- ERR("sysfs_create_group err ");
- goto exit_sysfs_creat_failed;
- }
(3) 实现sysfs属性相关的读写函数;
- ssize_t show_orientation(struct device *dev, struct device_attribute *attr, char *buf)
- {
- int result;
- u8 tilt, new_orientation;
- mma7660_read_tilt(&tilt);
- DBG("tilt [0x%x] ", tilt);
- new_orientation = tilt & 0x1f;
- if (orientation!=new_orientation)
- orientation = new_orientation;
- switch ((orientation>>2)&0x07) {
- case 1:
- result = sprintf(buf, "Left ");
- break;
- case 2:
- result = sprintf(buf, "Right ");
- break;
- case 5:
- result = sprintf(buf, "Downward ");
- break;
- case 6:
- result = sprintf(buf, "Upward ");
- break;
- default:
- switch(orientation & 0x03) {
- case 1:
- result = sprintf(buf, "Front ");
- break;
- case 2:
- result = sprintf(buf, "Back ");
- break;
- default:
- result = sprintf(buf, "Unknown ");
- }
- }
- return result;
- }
- ssize_t show_xyz_force(struct device *dev, struct device_attribute *attr, char *buf)
- {
- int i;
- s8 xyz[3];
- for (i=0; i<3; i++)
- mma7660_read_xyz(i, &xyz[i]);
- return sprintf(buf, "(%d,%d,%d) ", xyz[0], xyz[1], xyz[2]);
- }
- ssize_t show_axis_force(struct device *dev, struct device_attribute *attr, char *buf)
- {
- s8 force;
- int n = to_sensor_dev_attr(attr)->index;
- mma7660_read_xyz(n, &force);
- return sprintf(buf, "%d ", force);
- }
6.3.2 Gsensor调试实例
- /sys/devices/platform/gl5201-i2c.1/i2c-1/1-004c # ls
- uevent
- name
- modalias
- subsystem
- power
- driver
- all_axis_force
- x_axis_force
- y_axis_force
- z_axis_force
- orientation
- input
- /sys/devices/platform/gl5201-i2c.1/i2c-1/1-004c # cat all_axis_force
- (-1,0,22)
7 Hardware
7.1 mma7660模组
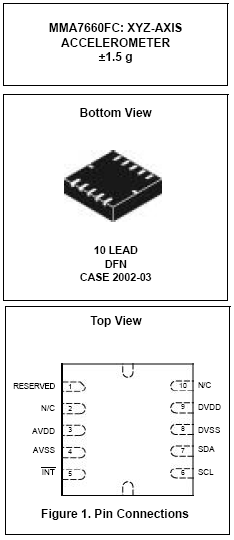
- Sampling Resolution: 6bit
- Digital Output (I2C)
- 3mm x 3mm x 0.9mm DFN Package
- Low Power Current Consumption:
Standby Mode: 2 μA,
Active Mode: 47 μA at 1 ODR
- Configurable Samples per Second from 1 to 120 samples
- Low Voltage Operation:
Digital Voltage: 1.71 V - 3.6 V
- Auto-Wake/Sleep Feature for Low Power Consumption
- Tilt Orientation Detection for Portrait/Landscape Capability
- Gesture Detection Including Shake Detection and Tap Detection
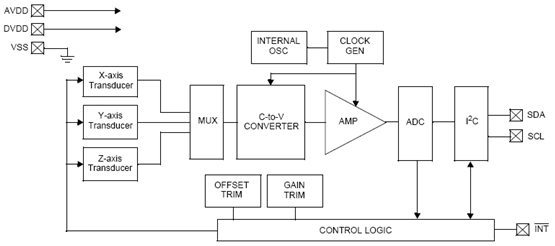
7.2.1 功能模块图
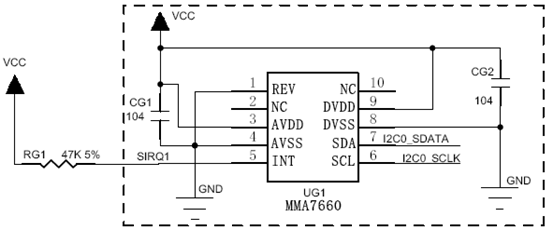
7.2.2 硬件连接图
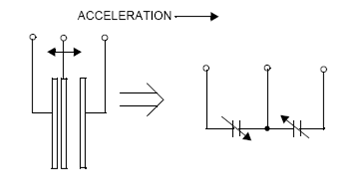
7.2.3 运动检测原理
简单物理模型如下图:
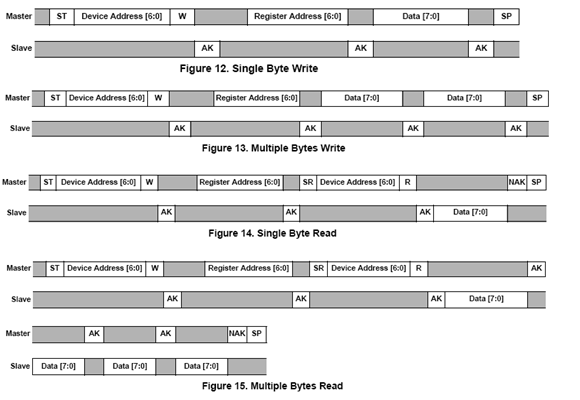
7.2.4 I2C读写时序
7.2.5 工作状态机

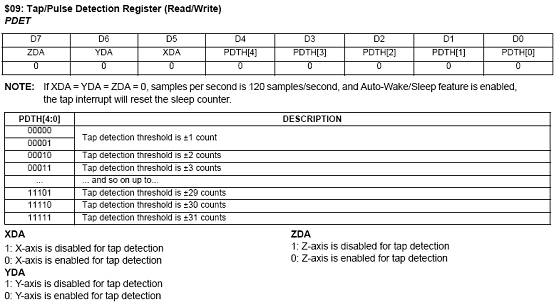
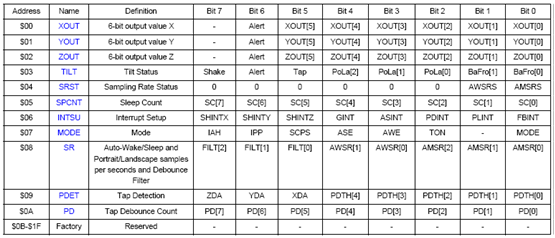
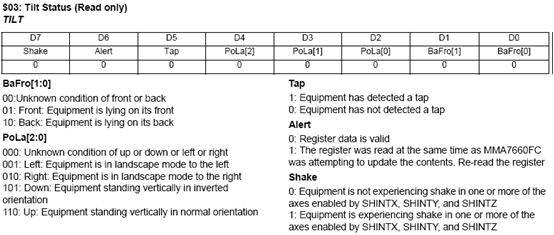
7.2.6 寄存器定义
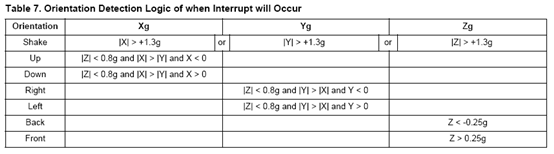
7.2.7 事件检测
- 方向和摇动检测
- 轻拍或倾斜检测