1、说明
uploadify是一款优秀jQuery插件,主要功能是批量上传文件。大多数同学对多附件上传感到棘手,现将asp.net结合uploadfiy如何实现批量上传附件给大家讲解一下,有什么不对的地方还请大家多多交流沟通,下面把代码贴出来大家一起交流。
2、组成
首先说明一下代码实现所用到的技术,仅供参考:
开发工具:vs2010
目标框架:.NET Framework3.5
Uploadify:uploadify-v3.1
Jquery:jquery-1.8.1.js
最后我会将整个Demo上传,如果同学们的电脑上有开发环境可直接打开项目解决方案运行。
3、代码
Default.aspx(测试页面)
|
1
2
3
4
5
6
7
8
9
10
11
12
13
14
15
16
17
18
19
20
21
22
23
24
25
26
27
28
29
30
31
32
33
34
35
36
37
|
<%@ Page Language="C#" AutoEventWireup="true" CodeBehind="Default.aspx.cs" Inherits="FileUpload._Default" %><!DOCTYPE html PUBLIC "-//W3C//DTD XHTML 1.0 Transitional//EN" "http://www.w3.org/TR/xhtml1/DTD/xhtml1-transitional.dtd"><html xmlns="http://www.w3.org/1999/xhtml"><head runat="server"> <title>附件上传</title> <script src="Scripts/jquery-1.8.1.js" type="text/javascript"></script> <script src="Scripts/uploadify-v3.1/jquery.uploadify-3.1.js" type="text/javascript"></script> <link href="Scripts/uploadify-v3.1/uploadify.css" rel="stylesheet" type="text/css" /> <script type="text/javascript"> $(function () { $("#file_upload").uploadify({ "auto": false, "swf": "Scripts/uploadify-v3.1/uploadify.swf", "uploader": "App_Handler/Uploadify.ashx?action=upload", "removeCompleted": false, "onUploadSuccess": function (file, data, response) { alert('文件 ' + file.name + ' 已经上传成功,并返回 ' + response + ' 服务器状态 ' + data); } }); }); </script></head><body> <form id="form1" runat="server"> <div> <input type="file" id="file_upload" name="file_upload" /> </div> <div> <a href="javascript:$('#file_upload').uploadify('upload');">上传第一个</a> <a href="javascript:$('#file_upload').uploadify('upload','*');">上传队列</a> <a href="javascript:$('#file_upload').uploadify('cancel');">取消第一个</a> <a href="javascript:$('#file_upload').uploadify('cancel', '*');">取消队列</a> </div> </form></body></html> |

Uploadify.ashx(一般处理程序)
|
1
2
3
4
5
6
7
8
9
10
11
12
13
14
15
16
17
18
19
20
21
22
23
24
25
26
27
28
29
30
31
32
33
34
35
36
37
38
39
40
41
42
43
44
45
46
47
48
49
50
51
52
53
54
55
56
57
58
59
60
61
62
63
64
65
66
67
68
69
70
71
72
73
74
75
76
77
78
79
80
81
|
<%@ WebHandler Language="C#" Class="UploadifyUpload" %>using System;using System.Collections;using System.Data;using System.Web;using System.Web.Services;using System.Web.Services.Protocols;using System.Web.SessionState;using System.IO;using System.Collections.Generic;using System.Web.UI.WebControls;using System.Text;public class UploadifyUpload : IHttpHandler, IRequiresSessionState{ public void ProcessRequest(HttpContext context) { context.Response.ContentType = "text/plain"; context.Response.Charset = "utf-8"; string action = context.Request["action"]; switch (action) { case "upload": //上传附件 upload(context); break; } context.Response.End(); } /// <summary> /// 上传附件 /// </summary> /// <param name="context"></param> private void upload(HttpContext context) { HttpPostedFile postedFile = context.Request.Files["Filedata"]; if (postedFile != null) { string fileName, fileExtension; int fileSize; fileName = postedFile.FileName; fileSize = postedFile.ContentLength; if (fileName != "") { fileExtension = postedFile.FileName.Substring(postedFile.FileName.LastIndexOf('.')); string path =context.Server.MapPath("/")+ "\App_Attachments\";//设置文件的路径 string fileUrl = path + DateTime.Now.ToString("yyyyMMddHHmmss") + fileExtension;//保存文件路径 if (!Directory.Exists(path)) { Directory.CreateDirectory(path); } postedFile.SaveAs(fileUrl);//先保存源文件 context.Response.Write("上传成功!"); } else { context.Response.Write("上传失败!"); } } else { context.Response.Write("上传失败!"); } } public bool IsReusable { get { return false; } }} |
4、补充
给大家贴出一些uploadfiy参数的讲解,使用方法就是在Default.aspx测试页面里面$("#file_upload").uploadify({});方法中配置,不论参数或事件配置要以英文状态下的逗号结束,最后一个不需要逗号结束。类似于下图 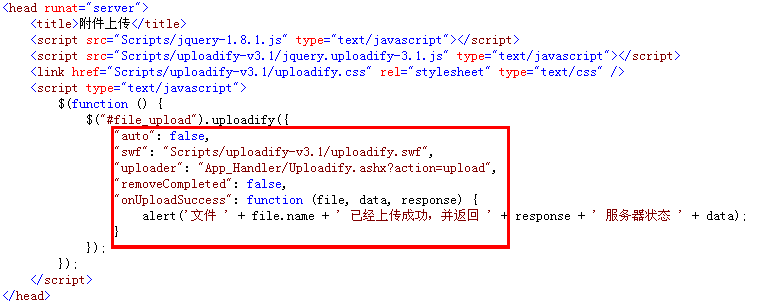
详细参数如下:
|
1
2
3
4
5
6
7
8
9
10
11
12
13
14
15
16
17
18
19
20
21
22
23
24
25
26
27
28
29
30
31
32
33
34
35
36
37
38
39
40
41
42
43
44
45
46
47
48
49
50
51
52
53
54
55
56
57
58
59
60
61
62
63
64
65
66
67
68
69
70
71
72
73
74
75
76
77
78
79
80
81
82
83
84
85
86
87
88
89
90
91
92
93
94
95
96
97
98
99
100
101
102
103
104
105
106
107
108
109
110
111
112
113
114
115
116
117
118
119
120
121
122
123
124
125
126
127
128
129
130
131
132
133
134
135
136
137
138
139
140
141
142
143
144
145
146
147
148
149
150
151
152
153
154
155
156
157
158
159
160
161
162
163
164
165
166
167
168
169
170
171
172
173
174
175
176
177
178
179
180
181
182
183
184
185
186
187
188
189
|
// 所需的参数id: $this.attr('id'), // DOM对象的IDswf: 'Scripts/jquery-uploadify/uploadify.swf', // uploadify.swf 文件的路径uploader: 'App_Handler/Uploadify.ashx', // 后台处理程序的相对路径auto: false, // 设置为true当选择文件后就直接上传了,为false需要点击上传按钮才上传,这里执行doUpload()方法buttonClass: '', // 按钮样式buttonCursor: 'hand', // 鼠标指针悬停在按钮上的样子buttonImage: null, // 浏览按钮的图片的路径buttonText: '选择文件', // 浏览按钮的文本checkExisting: false, // 文件上传重复性检查程序,检查即将上传的文件在服务器端是否已存在,存在返回1,不存在返回0debug: false, // 如果设置为true则表示启用SWFUpload的调试模式fileObjName: 'Filedata', // 文件上传对象的名称,如果命名为’the_files’,PHP程序可以用$_FILES['the_files']来处理上传的文件对象fileSizeLimit: '5MB', // 上传文件的大小限制 ,如果为整数型则表示以KB为单位的大小,如果是字符串,则可以使用(B, KB, MB, or GB)为单位,比如’2MB’;如果设置为0则表示无限制fileTypeDesc: '支持的格式:', // 这个属性值必须设置fileTypeExts属性后才有效,用来设置选择文件对话框中的提示文本,如设置fileTypeDesc为“请选择rar doc pdf文件”fileTypeExts: '*.*', // 设置可以选择的文件的类型,格式如:’*.doc;*.pdf;*.rar’height: 24, // 设置浏览按钮的高度 ,默认值itemTemplate: false, // 用于设置上传队列的HTML模版,可以使用以下标签:instanceID – Uploadify实例的ID fileID – 列队中此文件的ID,或者理解为此任务的ID fileName – 文件的名称 fileSize – 当前上传文件的大小 插入模版标签时使用格式如:${fileName}method: 'post', // 提交方式Post或Getmulti: true, // 设置为true时可以上传多个文件formData: { 'action': 'upload' }, // AnJSON格式上传每个文件的同时提交到服务器的额外数据,可在’onUploadStart’事件中使用’settings’方法动态设置preventCaching: true, // 如果为true,则每次上传文件时自动加上一串随机字符串参数,防止URL缓存影响上传结果progressData: 'percentage', // 设置上传进度显示方式,percentage显示上传百分比,speed显示上传速度listID: false, // 设置附件列表容器DOM元素的IDqueueID: false, // 设置上传队列容器DOM元素的ID,如果为false则自动生成一个队列容器queueSizeLimit: 999, // 队列最多显示的任务数量,如果选择的文件数量超出此限制,将会出发onSelectError事件。注意此项并非最大文件上传数量,如果要限制最大上传文件数量,应设置uploadLimitremoveCompleted: false, // 是否自动将已完成任务从队列中删除,如果设置为ture则会从队列中移除removeTimeout: 3, // 如果设置了任务完成后自动从队列中移除,则可以规定从完成到被移除的时间间隔requeueErrors: false, // 如果设置为true,则单个任务上传失败后将返回错误,并重新加入任务队列上传successTimeout: 30, // 文件上传成功后服务端应返回成功标志,此项设置返回结果的超时时间uploadLimit: 0, // 最大上传文件数量,如果达到或超出此限制将会触发onUploadError事件 75, // 设置文件浏览按钮的宽度设置的事件:onDialogClose : function(swfuploadifyQueue) {//当文件选择对话框关闭时触发 if( swfuploadifyQueue.filesErrored > 0 ){ alert( '添加至队列时有' +swfuploadifyQueue.filesErrored +'个文件发生错误n' +'错误信息:' +swfuploadifyQueue.errorMsg +'n选定的文件数:' +swfuploadifyQueue.filesSelected +'n成功添加至队列的文件数:' +swfuploadifyQueue.filesQueued +'n队列中的总文件数量:' +swfuploadifyQueue.queueLength); }}onDialogOpen : function() {//当选择文件对话框打开时触发 alert( 'Open!');}onSelect : function(file) {//当每个文件添加至队列后触发 alert( 'id: ' + file.id + ' - 索引: ' + file.index + ' - 文件名: ' + file.name + ' - 文件大小: ' + file.size + ' - 类型: ' + file.type + ' - 创建日期: ' + file.creationdate + ' - 修改日期: ' + file.modificationdate + ' - 文件状态: ' + file.filestatus);}onSelectError : function(file,errorCode,errorMsg) {//当文件选定发生错误时触发 alert( 'id: ' + file.id + ' - 索引: ' + file.index + ' - 文件名: ' + file.name + ' - 文件大小: ' + file.size + ' - 类型: ' + file.type + ' - 创建日期: ' + file.creationdate + ' - 修改日期: ' + file.modificationdate + ' - 文件状态: ' + file.filestatus + ' - 错误代码: ' + errorCode + ' - 错误信息: ' + errorMsg);}onQueueComplete : function(stats) {//当队列中的所有文件全部完成上传时触发 alert( '成功上传的文件数: ' + stats.successful_uploads + ' - 上传出错的文件数: ' + stats.upload_errors + ' - 取消上传的文件数: ' + stats.upload_cancelled + ' - 出错的文件数' + stats.queue_errors);}onUploadComplete : function(file,swfuploadifyQueue) {//队列中的每个文件上传完成时触发一次 alert( 'id: ' + file.id + ' - 索引: ' + file.index + ' - 文件名: ' + file.name + ' - 文件大小: ' + file.size + ' - 类型: ' + file.type + ' - 创建日期: ' + file.creationdate + ' - 修改日期: ' + file.modificationdate + ' - 文件状态: ' + file.filestatus + ' - 出错的文件数: ' + swfuploadifyQueue.filesErrored + ' - 错误信息: ' + swfuploadifyQueue.errorMsg + ' - 要添加至队列的数量: ' + swfuploadifyQueue.filesSelected + ' - 添加至对立的数量: ' + swfuploadifyQueue.filesQueued + ' - 队列长度: ' + swfuploadifyQueue.queueLength);}onUploadError : function(file,errorCode,errorMsg,errorString,swfuploadifyQueue) {//上传文件出错是触发(每个出错文件触发一次) alert( 'id: ' + file.id + ' - 索引: ' + file.index + ' - 文件名: ' + file.name + ' - 文件大小: ' + file.size + ' - 类型: ' + file.type + ' - 创建日期: ' + file.creationdate + ' - 修改日期: ' + file.modificationdate + ' - 文件状态: ' + file.filestatus + ' - 错误代码: ' + errorCode + ' - 错误描述: ' + errorMsg + ' - 简要错误描述: ' + errorString + ' - 出错的文件数: ' + swfuploadifyQueue.filesErrored + ' - 错误信息: ' + swfuploadifyQueue.errorMsg + ' - 要添加至队列的数量: ' + swfuploadifyQueue.filesSelected + ' - 添加至对立的数量: ' + swfuploadifyQueue.filesQueued + ' - 队列长度: ' + swfuploadifyQueue.queueLength);}onUploadProgress : function(file,fileBytesLoaded,fileTotalBytes,queueBytesLoaded,swfuploadifyQueueUploadSize) {//上传进度发生变更时触发alert( 'id: ' + file.id + ' - 索引: ' + file.index + ' - 文件名: ' + file.name + ' - 文件大小: ' + file.size + ' - 类型: ' + file.type + ' - 创建日期: ' + file.creationdate + ' - 修改日期: ' + file.modificationdate + ' - 文件状态: ' + file.filestatus + ' - 当前文件已上传: ' + fileBytesLoaded + ' - 当前文件大小: ' + fileTotalBytes + ' - 队列已上传: ' + queueBytesLoaded + ' - 队列大小: ' + swfuploadifyQueueUploadSize);}onUploadStart: function(file) {//上传开始时触发(每个文件触发一次) alert( 'id: ' + file.id + ' - 索引: ' + file.index + ' - 文件名: ' + file.name + ' - 文件大小: ' + file.size + ' - 类型: ' + file.type + ' - 创建日期: ' + file.creationdate + ' - 修改日期: ' + file.modificationdate + ' - 文件状态: ' + file.filestatus );}onUploadSuccess : function(file,data,response) {//上传完成时触发(每个文件触发一次) alert( 'id: ' + file.id + ' - 索引: ' + file.index + ' - 文件名: ' + file.name + ' - 文件大小: ' + file.size + ' - 类型: ' + file.type + ' - 创建日期: ' + file.creationdate + ' - 修改日期: ' + file.modificationdate + ' - 文件状态: ' + file.filestatus + ' - 服务器端消息: ' + data + ' - 是否上传成功: ' + response);} |
5、最后奉上Demo