配置文件
SpringBoot使用一个全局的配置文件 , 配置文件名称是固定的
-
application.properties
-
语法结构 : key=value
-
-
application.yml
-
语法结构 :key:空格 value
-
配置文件的作用 :修改SpringBoot自动配置的默认值,因为SpringBoot在底层都给我们自动配置好了;** **
YAML
YAML是 "YAML Ain't a Markup Language" (YAML不是一种置标语言)的递归缩写。
在开发的这种语言时,YAML 的意思其实是:"Yet Another Markup Language"(仍是一种置标语言)
YAML A Markup Language :是一个标记语言
YAML isnot Markup Language :不是一个标记语言
标记语言
以前的配置文件,大多数都是使用xml来配置;比如一个简单的端口配置,我们来对比下yaml和xml
yaml配置:
server:
    prot: 8080
xml配置:
<server>
    <port>8081<port>
</server>
YAML语法
基础语法:
k:(空格) v
以此来表示一对键值对(空格不能省略);以空格的缩进来控制层级关系,只要是左边对齐的一列数据都是同一个层级的。
注意 :属性和值的大小写都是十分敏感的。例子:
server:
    port: 8081
    path: /hello
值的写法
字面量:普通的值 [ 数字,布尔值,字符串 ]
k
字面量直接写在后面就可以 , 字符串默认不用加上双引号或者单引号;
“” 双引号,不会转义字符串里面的特殊字符 , 特殊字符会作为本身想表示的意思;
比如 : name: "kuang shen" 输出 : kuang 换行 shen
'' 单引号,会转义特殊字符 , 特殊字符最终会变成和普通字符一样输出
比如 : name: ‘kuang shen’ 输出 : kuang shen
对象、Map(键值对)
k:
    v1:
    v2:
在下一行来写对象的属性和值得关系,注意缩进;比如:
student:
    name: qinjiang
    age: 3
行内写法
student: {name: qinjiang,age: 3}
数组( List、set )
用 - 值表示数组中的一个元素,比如:
pets:
 - cat
 - dog
 - pig
行内写法
pets: [cat,dog,pig]
yaml基本类型举例
# k: v # 对空格的要求十分高! # 普通key-value name: zxh # 对象 student: name: zxh age: 20 # 数组 pets: - cat - dog - pig # 行内写法 # 对象 student: {name: zxh, age: 20} # 数组 pets: [cat, dog, pig]
修改SpringBoot的默认端口号
配置文件中添加,端口号的参数,就可以切换端口;
server.port=8081
注入配置文件
程序实现
1. 如果要使用properties配置文件可能导入时存在乱码现象 , 需要在IDEA中进行调整 , 我们这里直接使用yml文件 , 将默认的 application.properties后缀修改为yml

2. 导入配置文件处理器
<!--导入配置文件处理器,配置文件进行绑定就会有提示-->
<dependency>
    <groupId>org.springframework.boot</groupId>
    <artifactId>spring-boot-configuration-processor</artifactId>
    <optional>true</optional>
</dependency>
3.编写yml 配置文件
person:
  name: 张迅豪${random.uuid} # spring的SpEL表达式,调用方法生成uuid
  age: 20
  birth: 2020/03/03
  happy: false
  maps: {k1: v1, K2: v2}
  lists:
    - apple
    - banana
    - orange
  temp: 小 # 可以定义类中没有的属性
  dog:
    name: ${person.temp:temp}旺财 # 表示占位符,表示如果temp为空就不显示,不为空就输出小旺财
    age: 3
4.在SpringBoot的主程序的同级目录下建包,只有这样,主程序才会对这些类生效 ; 我们建一个pojo的包放入我们的Person类和Dog类;
package com.kuang.springbootdemo03.pojo; import org.springframework.boot.context.properties.ConfigurationProperties; import org.springframework.stereotype.Component; import java.util.Date; import java.util.List; import java.util.Map; /* @ConfigurationProperties作用: 将配置文件中配置的每一个属性的值,映射到这个组件中; 告诉SpringBoot将本类中的所有属性和配置文件中相关的配置进行绑定 参数 prefix = “person” : 将配置文件中的person下面的所有属性一一对应 只有这个组件是容器中的组件,才能使用容器提供的@ConfigurationProperties功能 */ @Component //注册bean @ConfigurationProperties(prefix = "person") public class Person { private String name; private Integer age; private Boolean happy; private Date birth; private Map<String,Object> maps; private List<Object> lists; private Dog dog; //get,set方法 //toString方法 }
记得写上 toString()方法,方便调试输出结果
package com.kuang.springbootdemo03.pojo; public class Dog { private String name; private Integer age; //get、set方法 //toString()方法 }
5.确认无误后,到测试单元中进行测试,看是否注入成功!
@RunWith(SpringRunner.class) @SpringBootTest public class SpringbootDemo03ApplicationTests { @Autowired Person person = new Person(); @Test public void contextLoads() { System.out.println(person); } }
运行结果

扩展知识,不使用注解
我们上面采用的方法都是最简单的方式,开发中最常用的;
那我们来唠唠其他的实现方式,道理都是相同得;写还是那样写;
配置文件除了yml还有我们之前常用的properties , 我们没有讲 , properties配置文件在写中文的时候,会有乱码 , 我们需要去IDEA中设置编码格式为UTF-8;
settings-->FileEncodings 中配置;

还有,我们的类和配置文件直接关联着 , 我们使用的是@configurationProperties的方式,还有一种方式是使用@value
测试
@Component //注册bean
public class Person {
    //直接使用@value
    @Value("${person.name}") //从配置文件中取值
    private String name;
    @Value("#{11*2}")  //#{SPEL} Spring表达式
    private Integer age;
    @Value("true")  // 字面量
    private Boolean happy;

    。。。。。。
}
结果

两种方式比较解析
这个使用起来并不友好!我们需要为每个属性单独注解赋值,比较麻烦;我们来看个功能对比图

-
ConfigurationProperties只需要写一次即可 , value则需要每个字段都添加
-
松散绑定:这个什么意思呢? 比如我的yml中写的last-name,在java类的属性中用驼峰命名lastName是一样的, - 后面跟着的字母默认是大写的。这就是松散绑定,可以注入值
-
JSR303数据校验 , 这个就是我们可以在字段是增加一层过滤器验证 , 可以保证数据的合法性
-
复杂类型封装,yml中可以封装对象 , 使用@value就不支持
结论:
-
配置yml和配置properties都可以获取到值 , 强烈推荐 yml
-
如果我们在某个业务中,只需要获取配置文件中的某个值,可以使用一下 @value
-
如果说,我们专门编写了一个JavaBean来和配置文件进行映射,就直接使用@configurationProperties,不要犹豫!
JSR303数据校验
解释
spring-boot中可以用@validated来校验数据,如果数据异常则会统一抛出异常,方便异常中心统一处理。我们这里来写个注解让我们的name只能支持Email格式
就好像是前端的<input type="email">标签里只能填入邮箱格式的字符串;
使用方法
比如:@Email在jakarta.validation-api-2.0.2.jar包下,@Validated在spring-context-5.2.4.RELEASE.jar包下,所以要去看源码;下面有常用的注解;
@Component //注册bean
@ConfigurationProperties(prefix = "person")
@Validated  //数据校验
public class Person {
    //@Value("${person.name}")
    @Email //name必须是邮箱格式
    // @Email(message = "邮箱格式不正确")
    private Stringname;
}
运行结果

使用数据校验,可以保证数据的正确性;
扩展
JSR-303 是JAVA EE 6 中的一项子规范,叫做Bean Validation,Hibernate Validator 是 Bean Validation 的参考实现 . Hibernate Validator 提供了 JSR 303 规范中所有内置 constraint 的实现,除此之外还有一些附加的 constraint。
Bean Validation 中内置的 constraint
Hibernate Validator 附加的 constraint
加载指定配置文件注入值
1. @PropertySource :加载指定的配置文件;使用@configurationProperties默认从全局配置文件中获取值;
我们去在resources目录下新建一个person.properties文件
name=kuangshen
然后在我们的代码中指定加载person.properties文件
@PropertySource(value = "classpath:person.properties") @Component //注册bean public class Person { @Value("${name}") private String name; ...... }
测试结果:

配置文件占位符
随机数
${random.value}、${random.int}、${random.long}、${random.int(10)}等等
person:
  name: 张迅豪${random.uuid} # spring的SpEL表达式,调用方法生成uuid
  age: 20
  birth: 2020/03/03
  happy: false
  maps: {k1: v1, K2: v2}
  lists:
    - apple
    - banana
    - orange
  temp: 小 # 可以定义类中没有的属性
  dog:
    name: ${person.temp:temp}旺财 # 表示占位符,表示如果temp为空就不显示,不为空就输出小旺财
    age: 3
多环境切换
profile是Spring对不同环境提供不同配置功能的支持,可以通过激活不同的环境版本,实现快速切换环境;
方式一:多配置文件
我们在主配置文件编写的时候,文件名可以是 application-{profile}.properties/yml , 用来指定多个环境版本;
例如:application-test.properties 代表测试环境配置 application-dev.properties 代表开发环境配置
但是Springboot并不会直接启动这些配置文件,它默认使用application.properties主配置文件;
-
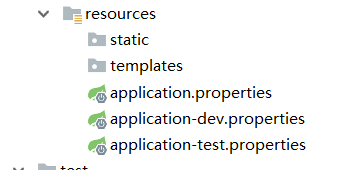
比如:在resources文件夹下有多个环境配置

-
默认会运行application.properties文件
-
我们需要通过一个配置来选择需要激活的环境;
#比如在配置文件中指定使用application-dev.properties环境,那么需要profiles指定到-后面的单词就可以了
#我们可以通过设置不同的端口号进行测试;
#我们启动SpringBoot,就可以看到已经切换到dev下的配置了;
spring.profiles.active=dev
方式二:yml的多文档块
和properties配置文件中一样,但是使用yml去实现不需要创建多个配置文件,更加方便了
server: port: 8081 #选择要激活那个环境块 spring: profiles: active: prod --- server: port: 8083 #配置环境的名称 spring: profiles: dev --- server: port: 8084 spring: profiles: prod #配置环境的名称
注意:如果yml和properties同时都配置了端口,并且没有激活其他环境 , 默认会使用properties配置文件的!
配置文件加载位置
springboot 启动会扫描以下位置的application.properties或者application.yml文件作为Spring boot的默认配置文件
文件在项目中的哪个位置SpringBoot优先扫描哪个文件?
优先级1:项目路径下的config文件夹配置文件
优先级2:项目路径下配置文件
优先级3:资源路径下的config文件夹配置文件
优先级4:资源路径下配置文件
优先级由高到底,高优先级的配置会覆盖低优先级的配置;
SpringBoot会从这四个位置全部加载主配置文件;*互补配置*;
我们在最低级的配置文件中设置一个项目访问路径的配置来测试互补问题;
#配置项目的访问路径
server.servlet.context-path=/kuang
【扩展】指定位置加载配置文件
我们还可以通过spring.config.location来改变默认的配置文件位置
项目打包好以后,我们可以使用命令行参数的形式,启动项目的时候来指定配置文件的新位置;
这种情况,一般是后期运维做的多,相同配置,外部指定的配置文件优先级最高
java -jar spring-boot-config.jar --spring.config.location=F:/application.properties
外部加载配置文件的方式十分多,我们选择最常用的即可,在开发的资源文件中进行配置!
自动配置原理
配置文件到底能写什么?怎么写?
分析自动配置原理
1、SpringBoot启动的时候加载主配置类,开启了自动配置功能 @EnableAutoConfiguration
2、@EnableAutoConfiguration 作用 :
-
利用EnableAutoConfigurationImportSelector给容器中导入一些组件,导入了哪些组件呢?
-
可以查看这个类selectImports()方法的内容,他返回了一个 autoConfigurationEntry , 来自
this.getAutoConfigurationEntry(autoConfigurationMetadata, annotationMetadata);这个方法。我们继续跟踪; -
这个方法中有一个值 :
List<String> configurations = this.getCandidateConfigurations(annotationMetadata, attributes);叫做获取候选的配置 , 我们点击去继续跟踪; -
protected List<String> getCandidateConfigurations(AnnotationMetadata metadata, AnnotationAttributes attributes) {
    List<String> configurations = SpringFactoriesLoader.loadFactoryNames(this.getSpringFactoriesLoaderFactoryClass(), this.getBeanClassLoader());
    Assert.notEmpty(configurations, "No auto configuration classes found in META-INF/spring.factories. If you are using a custom packaging, make sure that file is correct.");
    return configurations;
}
这里里面有一个 SpringFactoriesLoader.loadFactoryNames() ,我们继续进去看 , 它又调用了
loadSpringFactories方法;继续跟踪。发现它去获得了一个资源文件:"META-INF/spring.factories" -
Enumeration<URL> urls = classLoader != null ? classLoader.getResources("META-INF/spring.factories") : ClassLoader.getSystemResources("META-INF/spring.factories");继续阅读源码 , 它将读取到的资源封装在url中,然后遍历url , 将这些url文件封装在Properties文件中;最后返回封装好的结果;他的那个ClassLoader参数,我们追踪回去,看到他就是 EnableAutoConfiguration ;

-
说明了这个逻辑就是 从properties中获取到EnableAutoConfiguration.class类(类名)对应的值,然后把他们添加在容器中
-
总结一句话就是:将类路径下 META-INF/spring.factories 里面配置的所有EnableAutoConfiguration的值加入到了容器中;我们从源码中拿过来
# Auto Configure
org.springframework.boot.autoconfigure.EnableAutoConfiguration=
org.springframework.boot.autoconfigure.admin.SpringApplicationAdminJmxAutoConfiguration,
org.springframework.boot.autoconfigure.aop.AopAutoConfiguration,
org.springframework.boot.autoconfigure.amqp.RabbitAutoConfiguration,
org.springframework.boot.autoconfigure.batch.BatchAutoConfiguration,
org.springframework.boot.autoconfigure.cache.CacheAutoConfiguration,
org.springframework.boot.autoconfigure.cassandra.CassandraAutoConfiguration,
org.springframework.boot.autoconfigure.cloud.CloudServiceConnectorsAutoConfiguration,
org.springframework.boot.autoconfigure.context.ConfigurationPropertiesAutoConfiguration,
org.springframework.boot.autoconfigure.context.MessageSourceAutoConfiguration,
org.springframework.boot.autoconfigure.context.PropertyPlaceholderAutoConfiguration,
org.springframework.boot.autoconfigure.couchbase.CouchbaseAutoConfiguration,
org.springframework.boot.autoconfigure.dao.PersistenceExceptionTranslationAutoConfiguration,
org.springframework.boot.autoconfigure.data.cassandra.CassandraDataAutoConfiguration,
org.springframework.boot.autoconfigure.data.cassandra.CassandraReactiveDataAutoConfiguration,
org.springframework.boot.autoconfigure.data.cassandra.CassandraReactiveRepositoriesAutoConfiguration,
org.springframework.boot.autoconfigure.data.cassandra.CassandraRepositoriesAutoConfiguration,
org.springframework.boot.autoconfigure.data.couchbase.CouchbaseDataAutoConfiguration,
org.springframework.boot.autoconfigure.data.couchbase.CouchbaseReactiveDataAutoConfiguration,
org.springframework.boot.autoconfigure.data.couchbase.CouchbaseReactiveRepositoriesAutoConfiguration,
org.springframework.boot.autoconfigure.data.couchbase.CouchbaseRepositoriesAutoConfiguration,
org.springframework.boot.autoconfigure.data.elasticsearch.ElasticsearchAutoConfiguration,
org.springframework.boot.autoconfigure.data.elasticsearch.ElasticsearchDataAutoConfiguration,
org.springframework.boot.autoconfigure.data.elasticsearch.ElasticsearchRepositoriesAutoConfiguration,
org.springframework.boot.autoconfigure.data.jdbc.JdbcRepositoriesAutoConfiguration,
org.springframework.boot.autoconfigure.data.jpa.JpaRepositoriesAutoConfiguration,
org.springframework.boot.autoconfigure.data.ldap.LdapRepositoriesAutoConfiguration,
org.springframework.boot.autoconfigure.data.mongo.MongoDataAutoConfiguration,
org.springframework.boot.autoconfigure.data.mongo.MongoReactiveDataAutoConfiguration,
org.springframework.boot.autoconfigure.data.mongo.MongoReactiveRepositoriesAutoConfiguration,
org.springframework.boot.autoconfigure.data.mongo.MongoRepositoriesAutoConfiguration,
org.springframework.boot.autoconfigure.data.neo4j.Neo4jDataAutoConfiguration,
org.springframework.boot.autoconfigure.data.neo4j.Neo4jRepositoriesAutoConfiguration,
org.springframework.boot.autoconfigure.data.solr.SolrRepositoriesAutoConfiguration,
org.springframework.boot.autoconfigure.data.redis.RedisAutoConfiguration,
org.springframework.boot.autoconfigure.data.redis.RedisReactiveAutoConfiguration,
org.springframework.boot.autoconfigure.data.redis.RedisRepositoriesAutoConfiguration,
org.springframework.boot.autoconfigure.data.rest.RepositoryRestMvcAutoConfiguration,
org.springframework.boot.autoconfigure.data.web.SpringDataWebAutoConfiguration,
org.springframework.boot.autoconfigure.elasticsearch.jest.JestAutoConfiguration,
org.springframework.boot.autoconfigure.elasticsearch.rest.RestClientAutoConfiguration,
org.springframework.boot.autoconfigure.flyway.FlywayAutoConfiguration,
org.springframework.boot.autoconfigure.freemarker.FreeMarkerAutoConfiguration,
org.springframework.boot.autoconfigure.gson.GsonAutoConfiguration,
org.springframework.boot.autoconfigure.h2.H2ConsoleAutoConfiguration,
org.springframework.boot.autoconfigure.hateoas.HypermediaAutoConfiguration,
org.springframework.boot.autoconfigure.hazelcast.HazelcastAutoConfiguration,
org.springframework.boot.autoconfigure.hazelcast.HazelcastJpaDependencyAutoConfiguration,
org.springframework.boot.autoconfigure.http.HttpMessageConvertersAutoConfiguration,
org.springframework.boot.autoconfigure.http.codec.CodecsAutoConfiguration,
org.springframework.boot.autoconfigure.influx.InfluxDbAutoConfiguration,
org.springframework.boot.autoconfigure.info.ProjectInfoAutoConfiguration,
org.springframework.boot.autoconfigure.integration.IntegrationAutoConfiguration,
org.springframework.boot.autoconfigure.jackson.JacksonAutoConfiguration,
org.springframework.boot.autoconfigure.jdbc.DataSourceAutoConfiguration,
org.springframework.boot.autoconfigure.jdbc.JdbcTemplateAutoConfiguration,
org.springframework.boot.autoconfigure.jdbc.JndiDataSourceAutoConfiguration,
org.springframework.boot.autoconfigure.jdbc.XADataSourceAutoConfiguration,
org.springframework.boot.autoconfigure.jdbc.DataSourceTransactionManagerAutoConfiguration,
org.springframework.boot.autoconfigure.jms.JmsAutoConfiguration,
org.springframework.boot.autoconfigure.jmx.JmxAutoConfiguration,
org.springframework.boot.autoconfigure.jms.JndiConnectionFactoryAutoConfiguration,
org.springframework.boot.autoconfigure.jms.activemq.ActiveMQAutoConfiguration,
org.springframework.boot.autoconfigure.jms.artemis.ArtemisAutoConfiguration,
org.springframework.boot.autoconfigure.groovy.template.GroovyTemplateAutoConfiguration,
org.springframework.boot.autoconfigure.jersey.JerseyAutoConfiguration,
org.springframework.boot.autoconfigure.jooq.JooqAutoConfiguration,
org.springframework.boot.autoconfigure.jsonb.JsonbAutoConfiguration,
org.springframework.boot.autoconfigure.kafka.KafkaAutoConfiguration,
org.springframework.boot.autoconfigure.ldap.embedded.EmbeddedLdapAutoConfiguration,
org.springframework.boot.autoconfigure.ldap.LdapAutoConfiguration,
org.springframework.boot.autoconfigure.liquibase.LiquibaseAutoConfiguration,
org.springframework.boot.autoconfigure.mail.MailSenderAutoConfiguration,
org.springframework.boot.autoconfigure.mail.MailSenderValidatorAutoConfiguration,
org.springframework.boot.autoconfigure.mongo.embedded.EmbeddedMongoAutoConfiguration,
org.springframework.boot.autoconfigure.mongo.MongoAutoConfiguration,
org.springframework.boot.autoconfigure.mongo.MongoReactiveAutoConfiguration,
org.springframework.boot.autoconfigure.mustache.MustacheAutoConfiguration,
org.springframework.boot.autoconfigure.orm.jpa.HibernateJpaAutoConfiguration,
org.springframework.boot.autoconfigure.quartz.QuartzAutoConfiguration,
org.springframework.boot.autoconfigure.reactor.core.ReactorCoreAutoConfiguration,
org.springframework.boot.autoconfigure.security.servlet.SecurityAutoConfiguration,
org.springframework.boot.autoconfigure.security.servlet.SecurityRequestMatcherProviderAutoConfiguration,
org.springframework.boot.autoconfigure.security.servlet.UserDetailsServiceAutoConfiguration,
org.springframework.boot.autoconfigure.security.servlet.SecurityFilterAutoConfiguration,
org.springframework.boot.autoconfigure.security.reactive.ReactiveSecurityAutoConfiguration,
org.springframework.boot.autoconfigure.security.reactive.ReactiveUserDetailsServiceAutoConfiguration,
org.springframework.boot.autoconfigure.sendgrid.SendGridAutoConfiguration,
org.springframework.boot.autoconfigure.session.SessionAutoConfiguration,
org.springframework.boot.autoconfigure.security.oauth2.client.servlet.OAuth2ClientAutoConfiguration,
org.springframework.boot.autoconfigure.security.oauth2.client.reactive.ReactiveOAuth2ClientAutoConfiguration,
org.springframework.boot.autoconfigure.security.oauth2.resource.servlet.OAuth2ResourceServerAutoConfiguration,
org.springframework.boot.autoconfigure.security.oauth2.resource.reactive.ReactiveOAuth2ResourceServerAutoConfiguration,
org.springframework.boot.autoconfigure.solr.SolrAutoConfiguration,
org.springframework.boot.autoconfigure.task.TaskExecutionAutoConfiguration,
org.springframework.boot.autoconfigure.task.TaskSchedulingAutoConfiguration,
org.springframework.boot.autoconfigure.thymeleaf.ThymeleafAutoConfiguration,
org.springframework.boot.autoconfigure.transaction.TransactionAutoConfiguration,
org.springframework.boot.autoconfigure.transaction.jta.JtaAutoConfiguration,
org.springframework.boot.autoconfigure.validation.ValidationAutoConfiguration,
org.springframework.boot.autoconfigure.web.client.RestTemplateAutoConfiguration,
org.springframework.boot.autoconfigure.web.embedded.EmbeddedWebServerFactoryCustomizerAutoConfiguration,
org.springframework.boot.autoconfigure.web.reactive.HttpHandlerAutoConfiguration,
org.springframework.boot.autoconfigure.web.reactive.ReactiveWebServerFactoryAutoConfiguration,
org.springframework.boot.autoconfigure.web.reactive.WebFluxAutoConfiguration,
org.springframework.boot.autoconfigure.web.reactive.error.ErrorWebFluxAutoConfiguration,
org.springframework.boot.autoconfigure.web.reactive.function.client.ClientHttpConnectorAutoConfiguration,
org.springframework.boot.autoconfigure.web.reactive.function.client.WebClientAutoConfiguration,
org.springframework.boot.autoconfigure.web.servlet.DispatcherServletAutoConfiguration,
org.springframework.boot.autoconfigure.web.servlet.ServletWebServerFactoryAutoConfiguration,
org.springframework.boot.autoconfigure.web.servlet.error.ErrorMvcAutoConfiguration,
org.springframework.boot.autoconfigure.web.servlet.HttpEncodingAutoConfiguration,
org.springframework.boot.autoconfigure.web.servlet.MultipartAutoConfiguration,
org.springframework.boot.autoconfigure.web.servlet.WebMvcAutoConfiguration,
org.springframework.boot.autoconfigure.websocket.reactive.WebSocketReactiveAutoConfiguration,
org.springframework.boot.autoconfigure.websocket.servlet.WebSocketServletAutoConfiguration,
org.springframework.boot.autoconfigure.websocket.servlet.WebSocketMessagingAutoConfiguration,
org.springframework.boot.autoconfigure.webservices.WebServicesAutoConfiguration,
org.springframework.boot.autoconfigure.webservices.client.WebServiceTemplateAutoConfiguration
每一个这样的 xxxAutoConfiguration类都是容器中的一个组件,最后都加入到容器中;用他们来做自动配置;
3、每一个自动配置类可以进行自动配置功能;
4、我们以HttpEncodingAutoConfiguration(Http编码自动配置)为例解释自动配置原理;
@Configuration //表示这是一个配置类,以前编写的配置文件一样,也可以给容器中添加组件 //启动指定类的ConfigurationProperties功能; //进入这个HttpProperties查看,将配置文件中对应的值和HttpProperties绑定起来; //并把HttpProperties加入到ioc容器中 @EnableConfigurationProperties({HttpProperties.class}) //Spring底层@Conditional注解 //根据不同的条件判断,如果满足指定的条件,整个配置类里面的配置就会生效; //这里的意思就是判断当前应用是否是web应用,如果是,当前配置类生效 @ConditionalOnWebApplication( type = Type.SERVLET ) //判断当前项目有没有这个类CharacterEncodingFilter;SpringMVC中进行乱码解决的过滤器; @ConditionalOnClass({CharacterEncodingFilter.class}) //判断配置文件中是否存在某个配置:spring.http.encoding.enabled; //如果不存在,判断也是成立的 //即使我们配置文件中不配置pring.http.encoding.enabled=true,也是默认生效的; @ConditionalOnProperty( prefix = "spring.http.encoding", value = {"enabled"}, matchIfMissing = true ) public class HttpEncodingAutoConfiguration { //他已经和SpringBoot的配置文件映射了 private final Encoding properties; //只有一个有参构造器的情况下,参数的值就会从容器中拿 public HttpEncodingAutoConfiguration(HttpProperties properties) { this.properties = properties.getEncoding(); } //给容器中添加一个组件,这个组件的某些值需要从properties中获取 @Bean @ConditionalOnMissingBean //判断容器没有这个组件? public CharacterEncodingFilter characterEncodingFilter() { CharacterEncodingFilter filter = new OrderedCharacterEncodingFilter(); filter.setEncoding(this.properties.getCharset().name()); filter.setForceRequestEncoding(this.properties.shouldForce(org.springframework.boot.autoconfigure.http.HttpProperties.Encoding.Type.REQUEST)); filter.setForceResponseEncoding(this.properties.shouldForce(org.springframework.boot.autoconfigure.http.HttpProperties.Encoding.Type.RESPONSE)); return filter; } 。。。。。。 }
一句话总结 : 根据当前不同的条件判断,决定这个配置类是否生效!
一但这个配置类生效;这个配置类就会给容器中添加各种组件;这些组件的属性是从对应的properties类中获取的,这些类里面的每一个属性又是和配置文件绑定的;
5、所有在配置文件中能配置的属性都是在xxxxProperties类中封装者‘;配置文件能配置什么就可以参照某个功能对应的这个属性类
@ConfigurationProperties( prefix = "spring.http" ) //从配置文件中获取指定的值和bean的属性进行绑定 public class HttpProperties { private boolean logRequestDetails; private final HttpProperties.Encoding encoding = new HttpProperties.Encoding(); public HttpProperties() { } public boolean isLogRequestDetails() { return this.logRequestDetails; } public void setLogRequestDetails(boolean logRequestDetails) { this.logRequestDetails = logRequestDetails; } public HttpProperties.Encoding getEncoding() { return this.encoding; } public static class Encoding { public static final Charset DEFAULT_CHARSET; private Charset charset; private Boolean force; private Boolean forceRequest; private Boolean forceResponse; private Map<Locale, Charset> mapping; 、、、、、、 } }
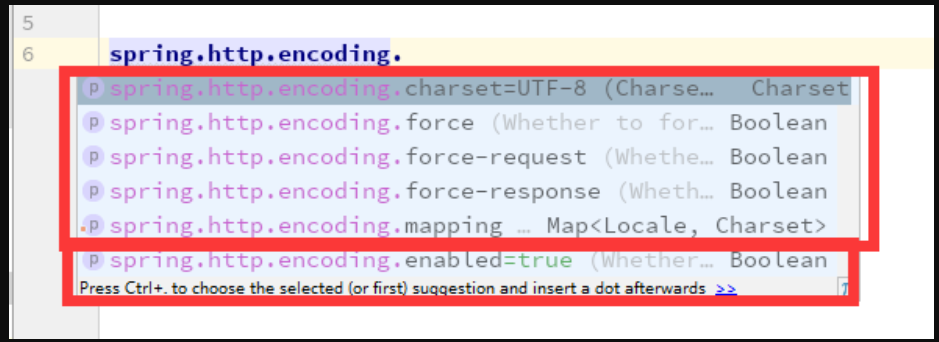
我们去配置文件里面试试前缀,看提示!

这就是自动装配的原理!
精髓:
1)、SpringBoot启动会加载大量的自动配置类
2)、我们看我们需要的功能有没有在SpringBoot默认写好的自动配置类当中;
3)、再看这个自动配置类中到底配置了哪些组件;(只要我们要用的组件存在在其中,我们就不需要再手动配置了)
4)、给容器中自动配置类添加组件的时候,会从properties类中获取某些属性。我们只需要在配置文件中指定这些属性的值即可;
xxxxAutoConfigurartion:自动配置类;给容器中添加组件
xxxxProperties:封装配置文件中相关属性;
@Conditional
了解完自动装配的原理后,我们来关注一个细节问题 ,自动配置类必须在一定的条件下才能生效;
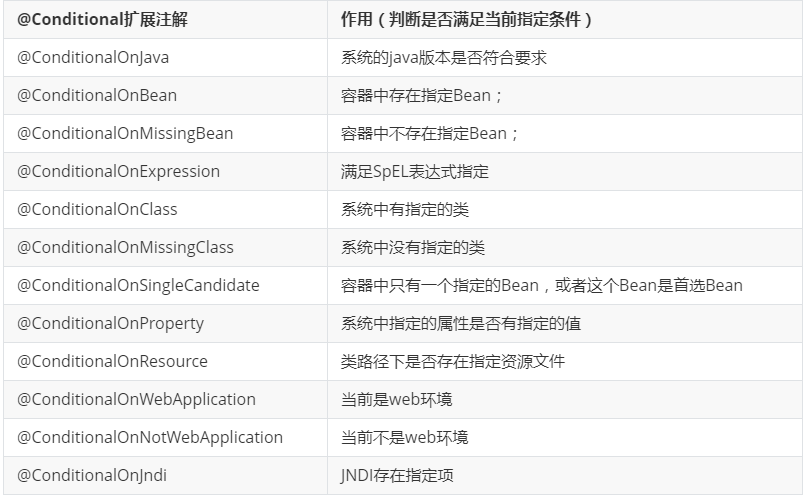
@Conditional派生注解(Spring注解版原生的@Conditional作用)
作用:必须是@Conditional指定的条件成立,才给容器中添加组件,配置配里面的所有内容才生效;

那么多的自动配置类,必须在一定的条件下才能生效;也就是说,我们加载了这么多的配置类,但不是所有的都生效了。
我们怎么知道哪些自动配置类生效;我们可以通过启用 debug=true属性;来让控制台打印自动配置报告,这样我们就可以很方便的知道哪些自动配置类生效;
#开启springboot的调试类
debug=true
Positive matches:(自动配置类启用的:正匹配)
Negative matches:(没有启动,没有匹配成功的自动配置类:负匹配)
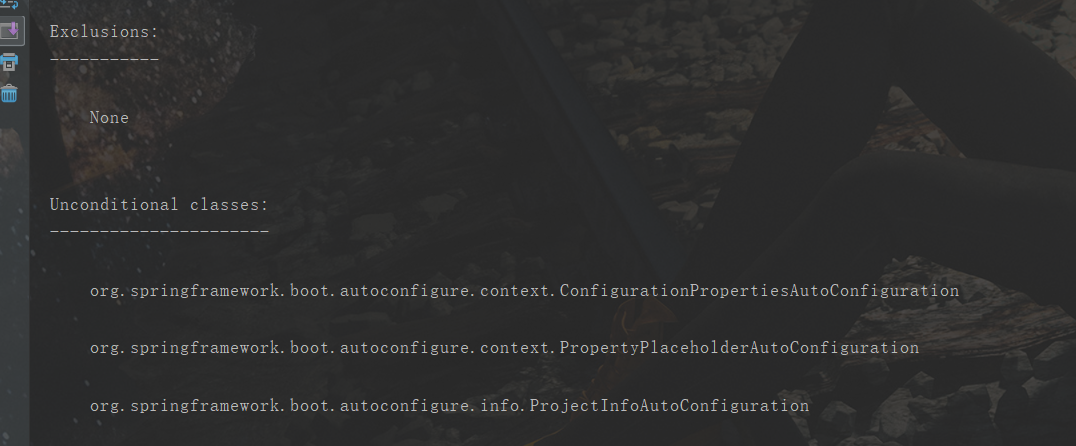
Unconditional classes: (没有条件的类)
输出的日志我们可以在这里看下:


就会在控制台打印日志