目录:
一、TFRecord输入数据格式
1.1 TFrecord格式介绍
1.2 TFRecord样例程序
二、图像数据处理
2.1TensorFlow图像处理函数
2.2图像预处理完整样例
三、多线程数据输入处理框架
3.1 队列与多线程
3.2输入文件队列
3.3组合训练数据(batching)
3.4输入数据处理框架
一、TFRecord输入数据格式
TensorFlow提供了一种统一的格式来存储数据,这个格式就是TFRecord
1.1 TFrecord格式介绍
TFRecord文件中的数据都是通过tf.train.Example Protocol Buffer 的格式存储的。格式如下
message Example{
    Features features=1;
    }
message Features{
  map<string Feature> feature = 1;
}
message Feature{
  oneof kind {
      BytesList bytes_list = 1;
      FloatList  float_list =2 ;
      Int64List int64_list =3;
    }
}
1.2 TFRecord样例程序
将数据转化为TFRecord格式
import tensorflow as tf
from tensorflow.examples.tutorials.mnist import input_data
import numpy as np
#生成整数型的属性
def _int64_feature(value):
    return tf.train.Feature(int64_list = tf.train.Int64List(value=[value]))

#生成字符串属性
def _byte_feature(value):
    return tf.train.Feature(bytes_list = tf.train.BytesList(value=[value]))

mnsit = input_data.read_data_sets("mnist_set",one_hot=True)
images = mnsit.train.images
#训练数据所对应的正确答案,可以作为一个属性保存在TFRecord中。
labels = mnsit.train.labels
#训练数据的图像分辨率,这可以作为Example中的一个属性。
pixels = images.shape[1]
num_examples = mnsit.train.num_examples

#输出TFRecord文件的地址。
filename = "path/to/output.tfrecords"
#创建一个writer来写TFRecord文件。
writer = tf.python_io.TFRecordWriter(filename)
for index in range(num_examples):
    #将图像矩阵转化为一个字符串。
    image_raw = images[index].tostring()
    #将一个样例转化为Example Protocol Buffer ,并将所有信息写入这个数据结构。
    example = tf.train.Example(features = tf.train.Features(feature={
        "pixels":_int64_feature(pixels),
        "label":_int64_feature(np.argmax(labels[index])),
        'image_raw':_byte_feature(image_raw)
    }))
    #将一个Example写入TFrecord中
    writer.write(example.SerializeToString())
writer.close()
读取TFRecord文件
import tensorflow as tf

#创建一个reader来读取TFRecord文件中的数据
reader = tf.TFRecordReader()
#创建一个队列来维护输入文件列表
#tf.train.string_input_producer函数
filename_queue = tf.train.string_input_producer(["path/to/output.tfrecords"])
#从文件中读出一个样例。也可以使用read_up_to函数一次性读取多个样例
_,serialed_example = reader.read(filename_queue)
#解析读入的一个样例。如果需要解析多个样例,可以用parse_example函数
features = tf.parse_single_example(serialed_example,features={
    'image_raw':tf.FixedLenFeature([],tf.string),
    'pixels':tf.FixedLenFeature([],tf.int64),
    'label':tf.FixedLenFeature([],tf.int64)
})
#tf.decode_raw可以将字符串解析成图像对应的像素数组
images = tf.decode_raw(features['image_raw'],tf.uint8)
labels = tf.cast(features['label'],tf.int32)
pixels = tf.cast(features['pixels'],tf.int32)

#启动多线程处理数据
sess = tf.Session()
coord = tf.train.Coordinator()
thread = tf.train.start_queue_runners(sess=sess,coord= coord)
#每次运行可以读取Tfrecord文件中的一个样例。当所有的样例都读完之后,在此样例程序中会重头读取
for i in range(10):
    image,label,pixel = sess.run([images,labels,pixels])
二、图像数据处理
通过图像的预处理,可以尽量避免模型受到无关因素的干扰。
2.1TensorFlow图像处理函数
tensorflow提供了几类图像处理的函数。
图像编码处理
一个RGB模式的彩色模式的图像可以看作一个三维矩阵。然而图像的存储并不是记录这些矩阵中的数组,而是经过压缩编码之后的结果。TensorFlow提供了对图像的编码、解码函数。例如tf.image.decode_jpeg等
# -*- coding:utf-8 -*-
import matplotlib.pyplot as plt
import tensorflow as tf
#读取图像的原始数据
image_raw_data = tf.gfile.FastGFile('path/to/picture.jpeg','rb').read()
with tf.Session() as sess:
    #将图像解码,得到三维矩阵。解码为一个张量,在使用它的值之前需要明确调用运行的过程
    img_data = tf.image.decode_jpeg(image_raw_data)
    print(img_data.eval())
#使用pyplot工具可视化得到图像
    plt.imshow(img_data.eval())
    plt.show()
    #将数据的类型转化为实数,方便后面的程序对图像处理
    img_data = tf.image.convert_image_dtype(img_data,dtype=tf.uint8)
    #将表示一张图像的三维矩阵按照jpeg的格式重新编码并保存。可得到与原图一样的图像。
    encode_image = tf.image.encode_jpeg(img_data)
    with tf.gfile.GFile("path/to/output_image.png","wb") as f:
        f.write(encode_image.eval())
图像大小调整
一般来说,网络上获取的图像大小是不固定的,但神经网络的节点的个数是固定的。TensorFlow提供了四种方法,并且将它们分装在tf.image.resize_images函数中。
# -*- coding:utf-8 -*-
import matplotlib.pyplot as plt
import tensorflow as tf
#读取图像的原始数据
image_raw_data = tf.gfile.FastGFile('path/to/picture.jpeg','rb').read()
with tf.Session() as sess:
    #将图像解码,得到三维矩阵。解码为一个张量,在使用它的值之前需要明确调用运行的过程
    img_data = tf.image.decode_jpeg(image_raw_data)
    img_data = tf.image.convert_image_dtype(img_data,dtype=tf.float32)
    #通过tf.image.resize_images调整图像大小。第一个参数为原始图像,第二和第三个参数为调整图像大小,method为调整图像大小的算法
    resized = tf.image.resize_images(img_data,[300,300],method=0)
    print(resized.get_shape())
    plt.imshow(resized.eval())
    plt.show()
图像的剪裁和填充
#resize_image_with_crop_or_pad  超过原始图像的大小,自动填充,小于原始图像的大小自动裁剪
  resized = tf.image.resize_image_with_crop_or_pad(img_data,1500,1800)
    print(resized.get_shape())
    plt.imshow(resized.eval())
    plt.show()
等比例裁剪
    #通过tf.image.central_crop等比例调整图像大小。第一个参数为原始图像,第二个参数为调整图像大小的比例,范围(0,1】
    resized = tf.image.central_crop(img_data,0.3)
    print(resized.get_shape())
    plt.imshow(resized.eval())
    plt.show()
上述函数都是截取或填充图像中间的部分,TF还提供了裁剪或填充指定区域的函数,如tf.image.crop_to_bounding_box或 tf.image.pad_to_bounding_box
图像翻转
    #上下翻转
    fliped_up_down = tf.image.flip_up_down(img_data)
    #左右翻转
    fliped_l_r = tf.image.flip_left_right(img_data)
    #沿着对角线翻转
    flip_transpose = tf.image.transpose_image(img_data)
    #随机翻转
    ram_flip_up_dn = tf.image.random_flip_up_down(img_data)
    ram_flip_left_right = tf.image.random_flip_left_right(img_data)
图像色彩调整
    #图像亮度调整
    adjusted_down = tf.image.adjust_brightness(img_data,-0.5)
    adjusted_up = tf.image.adjust_brightness(img_data,0.5)
    #随机在【-0.5,0.5】之间调整
    adjusted_random = tf.image.random_brightness(img_data,0.5)
类似的函数还有:对比度adjust_contrast、random_contrast,色相adjust_hue、random_hue,饱和度adjust_saturation、random_saturation
图像的标准化
所谓图像的标准化就是将图像上的亮度均值变为0,方差为1
adjusted_ = tf.image.per_image_whitening (img_data)
处理标注框
    #缩小图像
    image_data = tf.image.resize_images(img_data,[180,267],method=1)
    #图像矩阵转化为实数类型.tf.image.draw_bounding_boxes输入的是一个batch也就是多张图像组成的四维矩阵,所有需要在怎讲一维
    batched = tf.expand_dims(tf.image.convert_image_dtype(image_data,dtype=tf.float32),0)
    #标注框需要四个数字【Ymin,Xmin,Ymax,Xmax】
    boxes = tf.constant([[[0.05,0.05,0.97,0.7],[0.35,0.47,0.5,0.56]]])
    #添加标注
    result = tf.image.draw_bounding_boxes(batched,boxes)
2.2图像预处理完整样例
import tensorflow as tf
import numpy as np
import matplotlib.pyplot as plt

def distort_color(image,color_ordering=0):
    if color_ordering == 0:
        image = tf.image.random_brightness(image,32.0/255.0)
        image = tf.image.random_saturation(image,lower=0.5,upper=1.5)
        image = tf.image.random_hue(image,0.2)
        image = tf.image.random_contrast(image,lower=0.5,upper=1.5)
    elif color_ordering == 1:
        image = tf.image.random_saturation(image,lower=0.5,upper=1.5)
        image = tf.image.random_brightness(image,32.0/255.0)
        image = tf.image.random_hue(image,0.2)
        image = tf.image.random_contrast(image,lower=0.5,upper=1.5)

    return tf.clip_by_value(image,0.0,1.0)
def preprocess_for_train(image,height,width,bbox):
    #如果没有标注提示框,则认为整张图想是需要关注的部分
    if bbox is None:
        bbox = tf.constant([0.0,0.0,1.0,1.0],dtype=tf.float32,shape=[1,1,4])
    #转换图像张量的类型
    if image.dtype != tf.float32:
        image = tf.image.convert_image_dtype(image,dtype=tf.float32)
    #随机截取的图像,减少需要关注的物体大小对图像识别的影响
    bbox_begin,bbox_size,_ = tf.image.sample_distorted_bounding_box(tf.shape(image),bounding_boxes=bbox)
    distorted_image = tf.slice(image,bbox_begin,bbox_size)
    #将截取的图像调整为神经网络输入层大小。大小调整的算法是随机的
    distorted_image = tf.image.resize_images(distorted_image,[height,width],method=np.random.randint(4))
    #随机左右翻转图像
    distorted_image = tf.image.flip_left_right(distorted_image)
    #使用一种随机的顺序调整图像色彩
    distorted_image = distort_color(distorted_image,np.random.randint(2))
    return distorted_image

image_raw_data = tf.gfile.FastGFile("path/to/picture.jpeg",'rb').read()
with tf.Session() as sess:
    img_data = tf.image.decode_jpeg(image_raw_data)
    boxes = tf.constant([[[0.05,0.05,0.97,0.7],[0.35,0.47,0.5,0.56]]])
    for i in range(6):
        result = preprocess_for_train(img_data,299,299,boxes)
        plt.imshow(result.eval())
        plt.show()
三、多线程数据输入处理框架
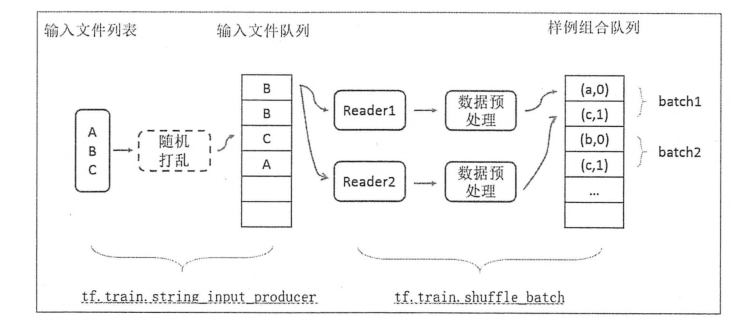
为了避免图像与处理成为神经网络模型训练效率的瓶颈,TensorFlow提供了一套多线程处理数据的框架。下面提供了一个经典的数据处理的流程图。

3.1 队列与多线程
在TF中,队列和变量类似,都是计算图上有状态的节点。对于队列,修改队列状态的操作主要有Enqueue、EnqueueMany和Dequeue。
import tensorflow as tf
#创建一个先进先出的队列,指定队列最多可以保存连个元素,斌指定类型为整数。
q = tf.FIFOQueue(2,"int32")
#使用enqueue_many函数来初始化队列中的元素。和变量初始化类似,在使用队列之前需要明确的调用这个初始化的过程
init = q.enqueue_many(([0,10],))
#使用Dequeue函数将队列中的第一个元素出队列。这个元素的值将被存在变量x中。
x = q.dequeue()
#将得到的值加1
y = x + 1
#将加1 后的值重新加入队列
q_inc = q.enqueue([y])

with tf.Session() as sess:
    #运行初始化队列操作
    init.run()
    for _ in range(5):
        #运行q_inc将执行数据出队列、出队列的元素 +1、重新加入队列的整个过程
        v , _  = sess.run([x,q_inc])
        print(v)
TF提供了FIFOQueue和RandomShufflerQueue两种队列。
TF提供了tf.coordinator和tf.QueueRunner两个类来完成多线程的协同功能。tf.coordinator 主要应用于多个线程协同停止,有request_stop 、should_stop、join三个函数。
import tensorflow as tf
import numpy as np
import threading
import time

#线程中运行的程序,这个程序每隔1S判断是否需要停止并且打印自己的ID
def MyLoop(coord,worker_id):
    while not coord.should_stop():
        #随机停止所有线程
        if np.random.rand() < 0.1:
            print("stoping from id %d
"%worker_id)
            #调用request_stop()函数来通知其他线程停止
            coord.request_stop()
        else:
            print("working from id :%s
"%worker_id)
        time.sleep(1)
#声明一个Coordinator来协同多个线程
coord = tf.train.Coordinator()
#创建5个线程
threads=[threading.Thread(target=MyLoop,args=(coord,i,)) for i in range(5)]
#启动所有的线程
for t in threads:
    t.start()
coord.join(threads)
tf.QueueRunner主要用于启动多个线程来操作同一个队列。
import tensorflow as tf
import  numpy as np
#声明一个先进先出的队列,队列中最多100个元素,类型为实数
queue = tf.FIFOQueue(100,"float")
#定义队列的入队操作
enqueue_op = queue.enqueue([tf.random_normal([1])])
#tf.train.QueueRunner创建多个线程运行队列的入队操作
#参数1:需要操作的队列,参数2:需要启动的线程
qr = tf.train.QueueRunner(queue,[enqueue_op]*5)

#将定义过的QueueRunner加入计算图指定的集合
tf.train.add_queue_runner(qr)
#定义出队操作
out_queue = queue.dequeue()
with tf.Session() as sess:
    coord = tf.train.Coordinator()
    threads = tf.train.start_queue_runners(sess,coord)
    #获取队列中的取值
    for _ in range(3):
        print(sess.run(out_queue)[0])
    coord.request_stop()
    coord.join(threads)
3.2输入文件队列
数据量较大的时候,可以将数据分成多个TFRecord文件来提高处理效率。TensorFlow提供了tf.train.match_filename_once函数来获取符合正则表达式的所有文件列表,得到的文件列表可通过tf.train.string_input_producer函数进行有效管理。
通过设置shuffle参数,tf.train.string_input_producer函数支持随机打乱文件列表中文件出队的顺序。
当一个输入队列中的文件都被处理完后,它会将初始化时提供的文件列表中的文件重新加入队列。tf.train.string_input_producer函数可以设置num_epochs参数来限制加载初始文件的最大轮数。
生成样例数据
import tensorflow as tf
#创建TFRecord文件的帮助函数
def _int64_feature(value):
    return tf.train.Feature(int64_list = tf.train.Int64List(value=[value]))
#模拟海量数据写入不同文件。num_shards定义有多少文件,instance_per_shard定义每个文件多少数据
num_shards = 2
instance_per_shard = 2

for i in range(num_shards):
    filename = "path/to/data.tfrecords-%.5d-of-%.5d"%(i,num_shards)
    writer = tf.python_io.TFRecordWriter(filename)
    #将数据封装成Example结构并写入TFRecord文件
    for j in range(instance_per_shard):
        example = tf.train.Example(features=tf.train.Features(feature = {
            "i":_int64_feature(i),
            "j":_int64_feature(value=j),
        }))
        writer.write(example.SerializeToString())
    writer.close()
用tf.train.match_filename_once和tf.train.string_input_producer来处理生成的样例
import tensorflow as tf
#使用tf.train.match_filename_once的正则表达式方式获取文件列表
files = tf.train.match_filenames_once("path/to/data.tfrecords-*")
#通过tf.train.string_input_producer创建输入队列
filename_queue = tf.train.string_input_producer(files,shuffle=False)

recorder = tf.TFRecordReader()
_,serialize_example = recorder.read(filename_queue)


features = tf.parse_single_example(serialize_example,features={
    "i":tf.FixedLenFeature([],tf.int64),
    "j":tf.FixedLenFeature([],tf.int64),
})
with tf.Session() as sess:
    #使用tf.train.string_input_producer函数也需要初始化变量,注意要初始化本地变量
    tf.global_variables_initializer().run()
    tf.local_variables_initializer().run()

    #声明tf.train.Coordinator类来协同不同的线程,并启动线程
    coord = tf.train.Coordinator()
    threads = tf.train.start_queue_runners(sess=sess,coord=coord)
    for i in range(6):
        print(sess.run([features['i'],features['j']]))
    coord.request_stop()
    coord.join(threads)
3.3组合训练数据(batching)
TF提供了tf.train.batch和tf.train.shuffle_batch函数来讲单个的样例组织成batch的形式输出。
import tensorflow as tf
#使用tf.train.match_filename_once的正则表达式方式获取文件列表
files = tf.train.match_filenames_once("path/to/data.tfrecords-*")
#通过tf.train.string_input_producer创建输入队列
filename_queue = tf.train.string_input_producer(files,shuffle=False)

recorder = tf.TFRecordReader()
_,serialize_example = recorder.read(filename_queue)


features = tf.parse_single_example(serialize_example,features={
    "i":tf.FixedLenFeature([],tf.int64),
    "j":tf.FixedLenFeature([],tf.int64),
})

example,label = features['i'],features['j']
#一个batch中样例的个数
batch_size = 3
#组合样例的队列中最多可以存储的样例的个数。这个队列如果太大,消耗内存。如果太小,出队受阻。
capacity = 1000 +batch_size*3
#使用tf.train.batch来组合样例。【exmple,label】参数:需要组合样例的元素。
example_batch,label_batch = tf.train.batch([example,label],batch_size,capacity=capacity)

with tf.Session() as sess:
    tf.global_variables_initializer().run()
    tf.local_variables_initializer().run()
    coord = tf.train.Coordinator()
    threads = tf.train.start_queue_runners(sess=sess,coord=coord)
    for i in range(2):
        cur_example_batch,cur_label_batch = sess.run([example_batch,label_batch])
        print((cur_example_batch,cur_label_batch))
    coord.request_stop()
    coord.join(threads)
打乱batch顺序,只需要将example_batch,label_batch = tf.train.batch([example,label],batch_size,capacity=capacity)改成example_batch,label_batch = tf.train.shuffle_batch([example,label],batch_size,capacity=capacity,min_after_dequeue =30)min_after_dequeue限制了出队时队列中元素的最少个数,这个值应该不大于capacity
tf.train.batch和tf.train.shuffle_batch函数的参数num_threads,可指定多个线程同时执行入队操作
tf.train.batch_join和tf.train.shuffle_batch_join函数,从输入文件队列中获取不同文件中的样例分配给不同的线程
3.4输入数据处理框架
按照本节开头给出的流程图,用一个完整程序串联起来之前的步骤实现一个TF处理输入数据。在看一下流程图
import tensorflow as tf
import numpy as np

#创建文件列表,创建文件输入队列

files = tf.train.match_filenames_once("path/to/pattern-*")
filename_queue = tf.train.string_input_producer(files,shuffle=False)
#解析TFRecord格式文件的数据
reader = tf.TFRecordReader()
_,serialized_example = reader.read(filename_queue)
features = tf.parse_single_example(serialized_example,features = tf.train.Features({
    "image":tf.FixedLenFeature([],tf.string),
    "label":tf.FixedLenFeature([],tf.int64),
    "height":tf.FixedLenFeature([],tf.int64),
    "width":tf.FixedLenFeature([],tf.int64),
    "channels":tf.FixedLenFeature([],tf.int64),
}))

image,label = features['image'],features['label']
height,width = features['height'],features['weight']
channels = features['channels']
#从原始图像解析出像素矩阵,并根据图像尺寸还原图像
decoded_image = tf.decode_raw(image,tf.uint8)
decoded_image.set_shape([height,width,channels])
#定义神经网络输入层图片的大小
image_size = 299


def distort_color(image,color_ordering=0):
    if color_ordering == 0:
        image = tf.image.random_brightness(image,32.0/255.0)
        image = tf.image.random_saturation(image,lower=0.5,upper=1.5)
        image = tf.image.random_hue(image,0.2)
        image = tf.image.random_contrast(image,lower=0.5,upper=1.5)
    elif color_ordering == 1:
        image = tf.image.random_saturation(image,lower=0.5,upper=1.5)
        image = tf.image.random_brightness(image,32.0/255.0)
        image = tf.image.random_hue(image,0.2)
        image = tf.image.random_contrast(image,lower=0.5,upper=1.5)

    return tf.clip_by_value(image,0.0,1.0)
def preprocess_for_train(image,height,width,bbox):
    #如果没有标注提示框,则认为整张图想是需要关注的部分
    if bbox is None:
        bbox = tf.constant([0.0,0.0,1.0,1.0],dtype=tf.float32,shape=[1,1,4])
    #转换图像张量的类型
    if image.dtype != tf.float32:
        image = tf.image.convert_image_dtype(image,dtype=tf.float32)
    #随机截取的图像,减少需要关注的物体大小对图像识别的影响
    bbox_begin,bbox_size,_ = tf.image.sample_distorted_bounding_box(tf.shape(image),bounding_boxes=bbox)
    distorted_image = tf.slice(image,bbox_begin,bbox_size)
    #将截取的图像调整为神经网络输入层大小。大小调整的算法是随机的
    distorted_image = tf.image.resize_images(distorted_image,[height,width],method=np.random.randint(4))
    #随机左右翻转图像
    distorted_image = tf.image.flip_left_right(distorted_image)
    #使用一种随机的顺序调整图像色彩
    distorted_image = distort_color(distorted_image,np.random.randint(2))
    return distorted_image


distorted_image = preprocess_for_train(decoded_image,image_size,image_size,None)

#将样例组合batch
min_after_dequeue = 10000
batch_size =100
capacity = min_after_dequeue+ batch_size *3
image_batch,label_batch = tf.train.shuffle_batch([decoded_image,label],batch_size,capacity=capacity,min_after_dequeue=min_after_dequeue)


#定义神经网络的结构及优化过程
def inference(image_data):
    """
    计算前向传播,参考前面的内容
    :param image_data:
    :return:
    """
    pass
def calc_loss(logit,label):
    """
    bp ,calc the loss,参考前面的内容
    :param logit:
    :param label:
    :return:
    """
    pass
logit = inference(image_batch)
loss = calc_loss(logit,label_batch)

train_step = tf.train.GradientDescentOptimizer(0.01).minimize(loss)

with tf.Session() as sess:
    tf.global_variables_initializer().run()
    tf.local_variables_initializer().run()
    coord = tf.train.Coordinator()
    threads = tf.train.start_queue_runners(sess=sess,coord=coord)
    for i in range(10000):
        sess.run(train_step)
    coord.request_stop()
    coord.join(threads)
整个数据处理的流程如下