https://linuxconfig.org/how-to-create-multiboot-usb-with-linux
29 May 2020
Objective
Create a bootable usb device containing multiple Linux distributions.
Requirements
- An usb device with enough size to contain multiple isos
- Root permissions to modify the device partitions and install grub
Difficulty
MEDIUM
Introduction
Being able to run an entire operating system directly from an installation media it’s extremely useful: we can test a distribution, use it for backup purposes, or perhaps to repair an existing system. The usual way to create a bootable media is to write a system image on it using the dd command or some dedicated tool. In this tutorial we will see how to create a multiboot usb device which can host multiple distributions images.
A word on BIOS vs UEFI
UEFI (Unified Extensible Firmware Interface) it’s the modern firmware created as a replacement for the legacy BIOS (Basic Input Output System). The majority of recent Linux distributions can boot in both modes without problems: the installer will automatically adjust its behavior accordingly.
The two firmwares are, by standard, associated with a specific partition table layout: UEFI goes hand in hand with gpt, while BIOS comes with the msdos one. Those associations, however are not strictly mandatory, since, at least in theory, a UEFI firmware can start the boot process from a msdos disk layout and a legacy BIOS system can do the same from a gpt partitioned disk.
In the former case the EFI partition must be the first one on the disk, and be formatted with the fat32 fileystem, in the latter, a bios boot partition without any filesystem on it should exists, needed to store the grub stage 1.5, since on a gpt layout the gap between the master boot record and the first partition doesn’t exist (this is where this grub stage usually gets installed).
We will prepare our device using a traditional msdos layout, installing the grub bootloader in both efi and legacy mode to be able to start the distributions both in UEFI and BIOS mode.
Preparing the device
The first thing we have to do is to prepare our device. We will create two partitions, in order:
- An
EFIpartition - A data partition
The first is needed to boot in UEFI mode, since its where grub-efi gets installed. The partition must be formatted with a fat32 filesystem. Theoretically, the setup would work even with just this partition, since we could also use it to store the distributions images we want to use. However in that case we would be limited, since fat32 doesn’t support files lager than 4GB, and some iso can exceed this size.
The second partition will be formatted with a filesystem supported by grub, and will host the images and the grub configuration files.
For the sake of this tutorial I will assume the device we want to prepare is /dev/sdb.
The partition table and the EFI partition
The first thing to do is to create a msdos partition table on the device:
$ sudo parted -s /dev/sdb mklabel msdos
After this step, we can create the EFI partition and format it with a fat32 filesystem. The recommended size for the partition is 550 MiB: on smaller partitions we could receive an error such as “not enough clusters for 32 bit FAT”:
$ sudo parted -s /dev/sdb mkpart primary 1MiB 551MiB
We will then proceed in activating the esp and boot flags:
$ sudo parted -s /dev/sdb set 1 esp on
$ sudo parted -s /dev/sdb set 1 boot on
Finally we must create the fat32 filesystem:
$ sudo mkfs.fat -F32 /dev/sdb1
The data partition
The other partition we must create is the data partition, which will host the ISO images of the distributions and the grub configuration files. We can adjust the size of the partition to our needs: the bigger it is, the most images it will be able to contain. Here we will use all the remaining space on the device:
$ sudo parted -s /dev/sdb mkpart primary 551MiB 100%
We can format the partition with one of the filesystems supported by grub. In this case I will use ext4:
$ sudo mkfs.ext4 /dev/sdb2
Create the mountpoints and mount the partitions
The next step is to mount the EFI partition and the data partition somewhere in our system so we can create the necessary directories on them, install grub and put our iso files in place:
# Create the mountpoints
$ sudo mkdir /media/{efi,data}

# Mount the EFI partition
$ sudo mount /dev/sdb1 /media/efi

# Mount the data partition
$ sudo mount /dev/sdb2 /media/data
Installing the grub bootloader
In order for our device to be able to work in both legacy and UEFI modes we need to install grub and grub for efi. On Fedora the grub binary it’s called grub2 and to generate a custom configuration on a UEFI setup, the installation of the grub2-efi-modules package is also necessary. On some other distributions the name of the binary it’s just “grub”:
# Installing legacy grub2
sudo grub2-install
  --target=i386-pc
  --recheck
  --boot-directory="/media/data/boot" /dev/sdb

# Installing grub for efi
sudo grub2-install
  --target=x86_64-efi
  --recheck
  --removable
  --efi-directory="/media/efi"
  --boot-directory="/media/data/boot"
As you can observe, in both cases we used /media/data/boot as the grub boot-directory. This directory will be automatically created when the commands above are launched, and it will host grub configuration files.
Copy the images and create the grub.cfg file
To create or update a grub configuration on a modern linux system we usually run the grub2-mkconfig command, or, in debian-based distributions, the update-grub wrapper-script. These tools perform the needed operations automatically.
In our case, however, we must get our hands dirty and create the configuration manually. Not all distributions require the same directives, but here will see some common examples. First we should create the directory which will host the images of our distributions:
$ sudo mkdir /media/data/boot/iso
Optionally we may want to take ownership of this directory, to be able to move images on it more easily. Assuming a id and gid of 1000 we would run:
$ sudo chown 1000:1000 /media/data/boot/iso
Now, suppose we want to include the latest Fedora netinstall image in our setup. First we have to download the image in the /media/data/iso directory:
$ wget -O /media/data/boot/iso/Fedora-Workstation-netinst-x86_64-28-1.1.iso
https://download.fedoraproject.org/pub/fedora/linux/releases/28/Workstation/x86_64/iso/Fedora-Workstation-netinst-x86_64-28-1.1.iso
Then, once the download is finished, we must add an entry for it in the grub.cfg file in the /media/data/boot/grub2 directory. Since it is the first entry we add the file itself must be created:
menuentry "Fedora-Workstation-netinst-x86_64-28-1.1" {
    isofile="/boot/iso/Fedora-Workstation-netinst-x86_64-28-1.1.iso"
    loopback loop "${isofile}"
    linux (loop)/isolinux/vmlinuz iso-scan/filename="${isofile}" inst.stage2=hd:LABEL=Fedora-WS-dvd-x86_64-28 quiet
    initrd (loop)/isolinux/initrd.img
}
The entry structure it’s pretty simple: we defined the isofile variable, with the path to our image as a value. Grub is able to boot from an iso directy, and that’s what the loopback command is for: in the example above the filesystem image will be mounted and made available on the loop device.
The line starting with linux contains the path to vmlinuz, which is the kernel executable, plus other boot directives. Among them you can notice iso-scan/filename which is needed to find the iso image on the disk using the specified path.
Finally, the line starting with initrd specifies the path to the initrd. All those paths are, obviously, relative to the loop device, that’s why they are prefixed by the (loop) notation.
How do we know the directives we should use in a specific case? One way is to mount the image somewhere in our system and take a look at the files placed in the isolinux directory. However, pre-written configuration already exists and are easy to find online.
Another example, now: we will add the latest Ubuntu release image to our bootable device:
$ wget http://releases.ubuntu.com/18.10/ubuntu-18.10-desktop-amd64.iso?_ga=2.232120863.1006005768.1540658570-734439277.1540658570
-O /media/data/boot/iso/ubuntu-18.10-desktop-amd64.iso
Now, we add the entry to the configuration file:
menuentry "Ubuntu 18.10 - Try without installing" {
    isofile="/boot/iso/ubuntu-18.10-desktop-amd64.iso"
    loopback loop "${isofile}"
    linux (loop)/casper/vmlinuz iso-scan/filename="${isofile}" boot=casper quiet splash ---
    initrd (loop)/casper/initrd
}
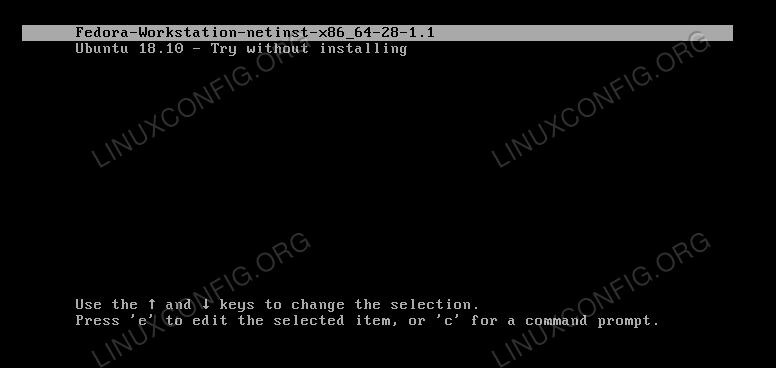
Here is what our multiboot-menu should look like at this point:
Closing thoughts
In this tutorial we saw how to create a multiboot-usb device containing many distributions images. Following this setup, we will be able to boot both on legacy on UEFI firmware, choosing what image to launch from the grub menu.
The
grub.cfg setup here presented is absolutely minimal, and can be further customized to include many other modules and adjust other settings like the grub timeout: consulting the official grub documentation is the perfect way to start exploring the many possibilities.