本文介绍Git的一些常用操作。
git 安装配置
☕️ Centos安装命令:
# 安装 git
yum install -y git

# 查看版本
git version
⭐️ 设置个人的用户名称和邮箱:
# 设置使用 git 时的姓名和邮箱地址
git config --global user.name "Firstname Lastname"
git config --global user.email "your_email@example.com"
上述命令会在~/.gitconfig中以如下形式输出设置:
[user]
	name = Firstname Lastname
	email = your_email@example.com
✏️ 配置git命令的输出为彩色:
git config --global color.ui auto
上述命令会在~/.gitconfig中增加如下设置:
[color]
	ui = auto
配置SSH Key
一个远程的Git仓库通常会提供给用户HTTPS和SSH两种连接认证方式,HTTPS方式每次认证都需要输入密码,而SSH方式配置了SSH密钥之后就不需要输入密码 。使用ssh-keygen生成公钥对:
$ ssh-keygen -t rsa -C "your_email@example.com"
Generating public/private rsa key pair.
Enter file in which to save the key (~/.ssh/id_rsa):[按回车键]
Created directory '/c/Users/huangzongmin/.ssh'.
Enter passphrase (empty for no passphrase):[输入密码]
Enter same passphrase again:[再次输入密码]
Your identification has been saved in ~/.ssh/id_rsa
Your public key has been saved in ~/.ssh/id_rsa.pub
The key fingerprint is:
SHA256:VMCWtR1qgHABwno2wp321qdlufROT1THxzmanODrva8 your_email@example.com
The key's randomart image is:
+---[RSA 3072]----+
| .. ooo+o+o .    |
|  .. .. +o + . o.|
|... .  .. +..  +=|
|o.++   . .. o = +|
| +... . S .. *   |
|     o . *  o    |
|    .   * oo .   |
|       . .o.+    |
|          .o E+. |
+----[SHA256]-----+
在GitHub中添加公钥,点击New SSH key,会出现Title和Key两个输入框:
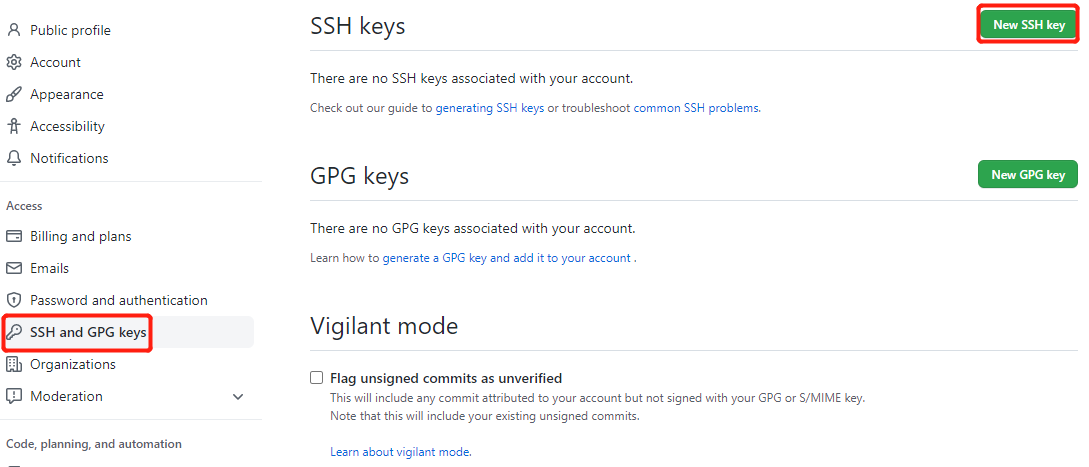
Title中输入适当的密钥名称,Key中填写id_ras.pub文件里的全部内容:
# 查看 id_ras.pub 文件内容
$ cat ~/.ssh/id_rsa.pub
ssh-rsa 公钥内容 your_email@example.com
# 完成上述配置后,可以使用以下命令进行测试
$ ssh -T git@github.com
The authenticity of host 'github.com (20.205.243.166)' can't be established.
ED25519 key fingerprint is SHA256:+DiY3wvvV6TuJJhbpZisF/zLDA0zPMSvHdkr4UvCOqU.
This key is not known by any other names
Are you sure you want to continue connecting (yes/no/[fingerprint])? [输入yes]
Warning: Permanently added 'github.com' (ED25519) to the list of known hosts.
Hi xxx! You've successfully authenticated, but GitHub does not provide shell access.
git 基本概念
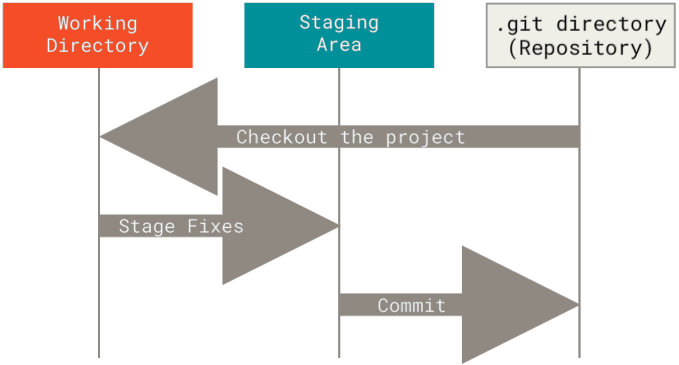
Git项目中拥有三个部分:
Git仓库:Git中的最重要的部分,用来保存项目的所有版本信息,指的就是项目下的.git目录;- 暂存区:一个文件,保存了下次将要提交(commit)的文件列表信息,一般在
Git仓库目录中; - 工作目录:保存了当前从
Git仓库中检出(checkout)的内容,即对项目的某个版本内容的提取。
基本的Git工作流程:
- 在工作目录中修改文件;
- 将想要下次提交的更改选择性地暂存,这些更改的部分会添加到暂存区;
- 提交更新,找到暂存区的文件,将快照永久性存储到
.git仓库目录。
工作目录中的文件根据是否跟踪,还分为两种状态:
- 已跟踪:指的是那些被纳入版本控制的文件,在上一次快照中有它们的记录,即
Git已经知道的文件; - 未跟踪:除已跟踪文件外的其它所有文件都属于未跟踪文件,例如新建的文件。
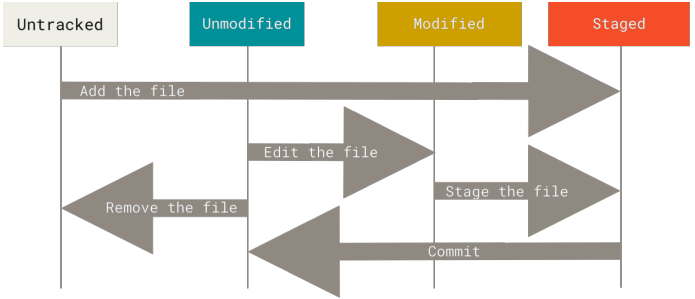
已跟踪文件根据所在阶段不同,还可细以下几种状态:
- 已提交:在
.git目录中保存的特定版本的文件; - 已暂存:已修改并放入暂存区的文件;
- 未修改:自上次检出后,未做修改的文件;
- 已修改:自上次检出后,作了修改但还没有放到暂存区的文件。
git 基本操作
git init(初始化仓库)
# 该命令执行后会在当前目录生成一个 .git 目录,该目录就是本地 Git 仓库
git init

# 初始化后,会在 newrepo 目录下会出现一个名为 .git 的目录
git init newrepo
$ mkdir git-practice
$ cd git-practice
$ git init
Initialized empty Git repository in /xxx/git-practice/.git/
git clone(把远程仓库拉取到本地)
# 克隆仓库的命令格式,<repo> 是远程 Git 仓库
git clone <repo>

# 把仓库克隆到指定的本地目录,使用以下命令格式,<directory> 是本地目录
git clone <repo> <directory>
# 先在 github 中创建一个 git-practice 仓库,然后本地使用 git clone 拉取
$ git clone git@github.com:xxx/git-practice.git
Cloning into 'git-practice'...
remote: Enumerating objects: 5, done.
remote: Counting objects: 100% (5/5), done.
remote: Compressing objects: 100% (4/4), done.
remote: Total 5 (delta 0), reused 0 (delta 0), pack-reused 0
Receiving objects: 100% (5/5), 4.73 KiB | 4.73 MiB/s, done.
git add(将改动添加到暂存区)
# 添加一个或多个文件的改动到暂存区
git add [file1] [file2] ...

# 添加指定目录的改动到暂存区,包括子目录
git add [dir]

# 添加工作目录下的所有改动到暂存区
git add .
$ cat > test1.txt
111
$ cat > test2.txt
aaa
$ git add .
git status(查看仓库的状态)
# 查看在你上次提交之后是否有对文件进行再次修改
git status

# 使用 -s 参数可获得简短的输出结果
git status -s
# Changes to be committed 指的是改动添加到暂存区,但未提交到仓库的文件
# Changes not staged for commit 指的是已被 Git 跟踪,但后续又在工作目录中修改的文件
$ git status
On branch master
Your branch is up to date with 'origin/master'.

Changes to be committed:
  (use "git restore --staged <file>..." to unstage)
        new file:   test1.txt
        new file:   test2.txt
$ cat >> test2.txt
bbb
$ git status
On branch master
Your branch is up to date with 'origin/master'.

Changes to be committed:
  (use "git restore --staged <file>..." to unstage)
        new file:   test1.txt
        new file:   test2.txt

Changes not staged for commit:
  (use "git add <file>..." to update what will be committed)
  (use "git restore <file>..." to discard changes in working directory)
        modified:   test2.txt
# A 指的是添加到暂存区,AM 指的是已被 Git 跟踪但后续又修改
[root@localhost git-practice]# git status -s
A  test1.txt
AM test2.txt
git diff(查看更改前后的差别)
# 显示暂存区和工作目录的差异
git diff [file]

# 显示暂存区和上一次提交(commit)的差异
git diff --cached [file]
git diff --staged [file]

# 显示两次提交之间的差异
git diff [first-branch]...[second-branch]
# + 号标出的是新添加的行,被删除的行用 - 号标出
$ git diff
The file will have its original line endings in your working directory
diff --git a/test2.txt b/test2.txt
index 72943a1..dbee026 100644
--- a/test2.txt
+++ b/test2.txt
@@ -1 +1,2 @@
 aaa
+bbb
$ git diff --cached
diff --git a/test1.txt b/test1.txt
new file mode 100644
index 0000000..58c9bdf
--- /dev/null
+++ b/test1.txt
@@ -0,0 +1 @@
+111
diff --git a/test2.txt b/test2.txt
new file mode 100644
index 0000000..72943a1
--- /dev/null
+++ b/test2.txt
@@ -0,0 +1 @@
+aaa
git commit(将暂存区内容添加到仓库)
# 提交暂存区的全部内容到本地仓库中,message 是本次提交的备注信息
git commit -m [message]

# 提交暂存区的指定文件的改动到仓库区
git commit [file1] [file2] ... -m [message]

# -a 参数设置修改文件后不需要执行 git add 命令,直接提交(前提被修改的文件是已跟踪文件)
git commit -am
$ git add test2.txt
$ git status -s
A  test1.txt
A  test2.txt
$ git commit -m "first commit"
[master 5725557] first commit
 2 files changed, 3 insertions(+)
 create mode 100644 test1.txt
 create mode 100644 test2.txt
$ git status
On branch master
Your branch is ahead of 'origin/master' by 1 commit.
  (use "git push" to publish your local commits)

nothing to commit, working tree clean
git reset(回退历史版本)
# 将当前分支回退某一次提交的版本,默认参数为 --mixed
# --hard:重置工作目录里的内容到指定版本,所有未提交的修改都会被清除
# --mixed(默认):保留工作目录,并清空暂存区,回退导致的所有差异都会放到工作目录
# --soft:保留工作目录和暂存区中的内容,回退导致的所有差异都会放到暂存区
git reset [--soft | --mixed | --hard] [HEAD]

HEAD 表示当前版本
HEAD^ 上一个版本
HEAD^^ 上上一个版本
依此类推...

HEAD~0 表示当前版本
HEAD~1 上一个版本
HEAD~2 上上一个版本
依此类推...

# 回退所有内容到上一个版本
git reset HEAD^
# 回退 test.txt 文件的版本到上一个版本
git reset HEAD^ test.txt
# 回退到指定版本
git reset 052e
# 回退到当前版本初始情况,即将当前版本的所有修改清空
git reset --hard HEAD
# --hard 重置工作目录里的内容到指定版本,所有未提交的修改都会被清除
$ cat > test3.txt
AAA
$ git add test3.txt
$ cat >> test1.txt
222
$ git status
On branch master
Your branch is ahead of 'origin/master' by 1 commit.
  (use "git push" to publish your local commits)

Changes to be committed:
  (use "git restore --staged <file>..." to unstage)
        new file:   test3.txt

Changes not staged for commit:
  (use "git add <file>..." to update what will be committed)
  (use "git restore <file>..." to discard changes in working directory)
        modified:   test1.txt
$ git reset --hard HEAD
HEAD is now at d129d46 first commit
$ git status
On branch master
Your branch is ahead of 'origin/master' by 1 commit.
  (use "git push" to publish your local commits)

nothing to commit, working tree clean
# --mixed 保留工作目录,并清空暂存区,回退导致的所有差异都会放到工作目录
$ cat > test3.txt
AAA
$ git add test3.txt
$ cat >> test1.txt
222
$ git status
On branch master
Your branch is ahead of 'origin/master' by 1 commit.
  (use "git push" to publish your local commits)

Changes to be committed:
  (use "git restore --staged <file>..." to unstage)
        new file:   test3.txt

Changes not staged for commit:
  (use "git add <file>..." to update what will be committed)
  (use "git restore <file>..." to discard changes in working directory)
        modified:   test1.txt
$ git reset HEAD
Unstaged changes after reset:
M       test1.txt
$ git status
On branch master
Your branch is ahead of 'origin/master' by 1 commit.
  (use "git push" to publish your local commits)

Changes not staged for commit:
  (use "git add <file>..." to update what will be committed)
  (use "git restore <file>..." to discard changes in working directory)
        modified:   test1.txt

Untracked files:
  (use "git add <file>..." to include in what will be committed)
        test3.txt

no changes added to commit (use "git add" and/or "git commit -a")
# --soft:保留工作目录和暂存区中的内容,回退导致的所有差异都会放到暂存区
$ git add test3.txt
$ git status
On branch master
Your branch is ahead of 'origin/master' by 1 commit.
  (use "git push" to publish your local commits)

Changes to be committed:
  (use "git restore --staged <file>..." to unstage)
        new file:   test3.txt

Changes not staged for commit:
  (use "git add <file>..." to update what will be committed)
  (use "git restore <file>..." to discard changes in working directory)
        modified:   test1.txt
$ git reset --soft HEAD^
$ git status
On branch master
Your branch is up to date with 'origin/master'.

Changes to be committed:
  (use "git restore --staged <file>..." to unstage)
        new file:   test1.txt
        new file:   test2.txt
        new file:   test3.txt

Changes not staged for commit:
  (use "git add <file>..." to update what will be committed)
  (use "git restore <file>..." to discard changes in working directory)
        modified:   test1.txt
git log(查看提交历史)
# 查看历史提交记录
git log

# 以图表的形式查看历史提交记录
git log --graph
$ git add .
$ git commit -m "second commit"
[master 5f03c13] second commit
 3 files changed, 5 insertions(+)
 create mode 100644 test1.txt
 create mode 100644 test2.txt
 create mode 100644 test3.txt
$ git log --graph
* commit 5f03c132b49126477fa99dfba401364150d867ec (HEAD -> master)
| Author: Firstname Lastname <your_email@example.com>
| Date:   Mon May 16 15:31:58 2022 +0800
|
|     second commit
|
* commit 56207e00369a5137eef38871e4131b82bb6af185 (origin/master, origin/HEAD)
  Author: zong-min <44395764+zong-min@users.noreply.github.com>
  Date:   Mon May 16 14:16:55 2022 +0800

      Initial commit
git branch(显示/创建/删除本地分支)
# 显示本地的所有分支
git branch

# 显示本地和远程的所有分支
git branch -a

# 创建一个本地分支
git branch branchName

# 删除一个本地分支
git branch -d branchName
# * 表示当前工作目录所在的分支
$ git branch branch1
$ git branch
  branch1
* master
$ git branch -d branch1
Deleted branch branch1 (was 5f03c13).
$ git branch
* master
git checkout(切换分支)
# 切换到指定的本地分支
git checkout branchName

# 切换到上一个分支
git checkout -

# 创建新分支并切换到该分支,相当于 git branch + git checkout
git checkout -b branchName

# 切换到指定远程分支,该命令会先创建一个本地分支,然后将该分支与远程分支进行关联
git checkout -b <本地分支名> origin/<远程分支名>
$ git checkout -b branch1
Switched to a new branch 'branch1'
$ git branch
* branch1
  master
$ git checkout master
Switched to branch 'master'
Your branch is up to date with 'origin/master'.
$ git branch
  branch1
* master
git merge(合并分支)
# 合并指定分支
git merge branchName

# 合并指定分支,如果出现合并冲突,放弃此次合并
git merge --abort branchName
$ cat > test3.txt
BBB
$ git commit -am "master commit"
The file will have its original line endings in your working directory
[master 45575cb] master commit
 1 file changed, 1 insertion(+), 1 deletion(-)
$ git checkout branch1
Switched to branch 'branch1'
$ cat >> test3.txt
CCC
$ git commit -am "branch1 commit"
The file will have its original line endings in your working directory
[branch1 778f02d] branch1 commit
 1 file changed, 1 insertion(+)
$ git checkout master
$ git merge branch1
Auto-merging test3.txt
CONFLICT (content): Merge conflict in test3.txt
Automatic merge failed; fix conflicts and then commit the result.
上面出现merge conflict,进行冲突处理,查看test3.txt文件:
<<<<<<< HEAD
BBB
=======
AAA
CCC
>>>>>>> branch1
HEAD中的内容为BBB,branch1中的内容为AAA CCC。如果想要保留branch1的内容,那么只需要删除HEAD的修改,再把 Git 添加的那三行<<< === >>>辅助文字也删掉即可,如下所示:
AAA
CCC
解决完冲突以后,手动进行提交:
$ git commit -am "冲突处理"
[master 7fef12e] 冲突处理
git push(将本地分支上传到远程并合并)
# 命令格式,如果本地仓库与远程仓库已经建立了关联,<远程主机名> 直接写成 origin
git push <远程主机名> <本地分支名>:<远程分支名>

# 如果远程分支名与本地分支名相同,则可以省略冒号
git push <远程主机名> <本地分支名>

# 如果本地分支已经和远程分支建立了关联,可以直接使用 git push
git push

# -u 参数能让本地分支已经和远程分支建立了关联,后续就可以直接使用 git push 命令进行上传
git push -u origin <本地分支名>

# 如果本地版本与远程版本有差异,但又要强制推送可以使用 -f 参数
git push -f origin <本地分支名>

# 删除远程主机的分支可以使用 -d 参数
git push -d origin <远程分支名>
$ git push origin branch1
Enumerating objects: 9, done.
Counting objects: 100% (9/9), done.
Delta compression using up to 8 threads
Compressing objects: 100% (4/4), done.
Writing objects: 100% (8/8), 658 bytes | 219.00 KiB/s, done.
Total 8 (delta 1), reused 0 (delta 0), pack-reused 0
remote: Resolving deltas: 100% (1/1), done.
remote:
remote: Create a pull request for 'branch1' on GitHub by visiting:
remote:      https://github.com/xxx/git-practice/pull/new/branch1
remote:
To github.com:xxx/git-practice.git
 * [new branch]      branch1 -> branch1
$ git branch -a
  branch1
* master
  remotes/origin/HEAD -> origin/master
  remotes/origin/branch1
  remotes/origin/master
$ git push origin -d branch1
To github.com:xxx/git-practice.git
 - [deleted]         branch1
$ git branch -a
  branch1
* master
  remotes/origin/HEAD -> origin/master
  remotes/origin/master
git pull(从远程获取分支并合并本地)
# 命令格式,如果本地仓库与远程仓库已经建立了关联,<远程主机名> 直接写成 origin
git pull <远程主机名> <远程分支名>:<本地分支名>

# 如果本地分支名与远程分支名相同,可以省略冒号
git pull <远程主机名> <远程分支名>

# 如果本地分支已经和远程分支建立了关联,可以直接使用 git pull
git pull
$ git pull origin master
From github.com:zong-min/git-practice
 * branch            master     -> FETCH_HEAD
Already up to date.