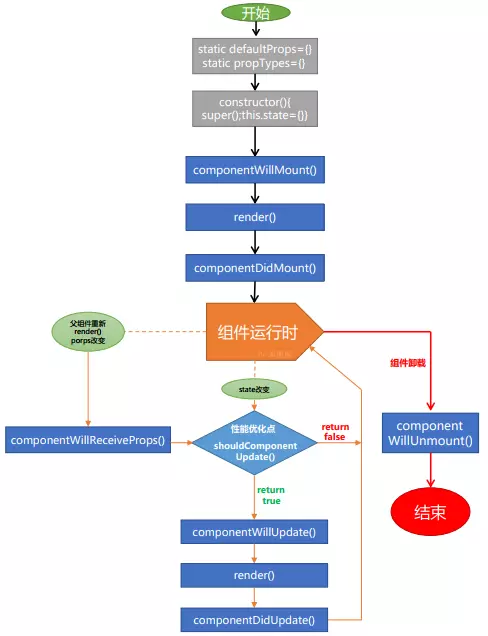
如图,React生命周期主要包括三个阶段:初始化阶段、运行中阶段和销毁阶段,在React不同的生命周期里,会依次触发不同的钩子函数,下面我们就来详细介绍一下React的生命周期函数
一、初始化阶段
constructor( ) 构造方法
constructor是ES6对类的默认方法,通过 new 命令生成对象实例时自动调用该方法。并且,该方法是类中必须有的,如果没有显示定义,则会默认添加空的constructor( )方法。当存在constructor的时候⚠️必须手动调用super方法。如果在constructor中想使用this关键字,就必须先调用super方法 。 在constructor中如果要访问this.props需要在super中传入props。但是无论有没有定义constructor,super是否传入props参数,在react的其他生命周期中this.props都是可以使用的,这是React自动附带的。
class MyClass extends React.component{
    constructor(props){
        super(props); // 声明constructor时必须调用super方法
        console.log(this.props); // 可以正常访问this.props
    }
}
constructor 构造方法常用来初始化state
class MyClass extends React.Component {
    constructor(props){
        super(props);
        this.state = {
            list: this.props.List
        };
        this.state.list = []; //修改state
        setTimeout(() => {
          this.setState({list: [1, 2, 3]}); //异步操作后 setState 触发渲染
        }, 100);
    }
}
需要注意的是,在构造函数里定义了state,当你想在一些操作后修改state,只需要直接操作this.state即可, 如果你在构造函数里执行了异步操作,就需要调用setState来触发重新渲染。在其余的地方当你需要改变state的时候只能使用this.setState,这样 React 才会触发刷新UI渲染。
Class静态方法实例属性 初始化state
class ReactCounter extends React.Component {
    state = {
      list: []
    };
}
具体文章可见Class-的静态方法
componentWillMount() 组件挂载之前
在组件挂载之前调用且全局只调用一次。如果在这个钩子里可以setState,render后可以看到更新后的state,不会触发重复渲染。该生命周期可以发起异步请求,并setState。
(React v16.3后废弃该生命周期,可以在constructor中完成设置state)
因为componentWillMount()将被删除,所以官方推荐使用constructor()替代该方法。componentWillMount该方法应该在新的代码中避免使用
componentWillMount() 是唯一一个在render()之前调用的生命周期方法。因此是在服务端渲染中唯一被调用的方法。
如果使用SSR(服务端渲染),componentWillMount会执行2次,一次在服务端,一次在客户端。而componentDidMount不会。
⚠️不建议在componentWillMount异步请求数据,数据请求是非常耗时的,如果无渲染直接请求会出现渲染延迟,或者渲染失败等问题,那么放到componetDidMount里可以把dom结构正常渲染出去,之后的数据再去请求,这样即便是请求出现问题,用户体验也不会那么差,当然你可以根据返回的状态去给一个提示,还有一点就是假如你做一个加载数据的loading加载中的图标,那么用componetDidMount是最方便不过的了。
render() 渲染组件
render是一个React组件必须定义的生命周期,用来渲染dom。
⚠️不要在render里面修改state,会触发死循环导致栈溢出。render必须返回reactDom
render() {
    const {nodeResultData: {res} = {}} = this.props;
    if (isEmpty(res)) return noDataInfo;
    const nodeResult = this.getNodeResult(res);
    return (
        <div className="workspace-dialog-result">
            {nodeResult}
        </div>
    );
componentDidMount() 组件挂载完成后
在组件挂载完成后调用,且全局只调用一次。
可以在这里使用refs,获取真实dom元素。该钩子内也可以发起异步请求,并在异步请求中可以进行setState。
componentDidMount() {
    axios.get('/auth/getTemplate').then(res => {
        const {TemplateList = []} = res;
        this.setState({TemplateList});
    });
}
二、运行中状态
componentWillReceiveProps (nextProps ) props即将变化之前
props发生变化以及父组件重新渲染时都会触发该生命周期,在该钩子内可以通过参数nextProps获取变化后的props参数,通过this.props访问之前的props。该生命周期内可以进行setState。
(React v16.3后废弃该生命周期,可以用新的周期 static getDerivedStateFromProps 代替)
static getDerivedStateFromProps
- 触发时间:在组件构建之后(虚拟dom之后,实际dom挂载之前) ,以及每次获取新的props之后。
- 每次接收新的props之后都会返回一个对象作为新的state,返回null则说明不需要更新state.
- 配合componentDidUpdate,可以覆盖componentWillReceiveProps的所有用法
class Example extends React.Component {
  static getDerivedStateFromProps(nextProps, prevState) {
    // 没错,这是一个static
  }
}
shouldComponentUpdate(nextProps, nextState) 是否重新渲染
组件挂载之后,每次调用setState后都会调用shouldComponentUpdate判断是否需要重新渲染组件。默认返回true,需要重新render。返回false则不触发渲染。在比较复杂的应用里,有一些数据的改变并不影响界面展示,可以在这里做判断,优化渲染效率。
一个React项目需要更新一个小组件时,很可能需要父组件更新自己的状态。而一个父组件的重新更新会造成它旗下所有的子组件重新执行render()方法,形成新的虚拟DOM,再用diff算法对新旧虚拟DOM进行结构和属性的比较,决定组件是否需要重新渲染
无疑这样的操作会造成很多的性能浪费,所以我们开发者可以根据项目的业务逻辑,在
shouldComponentUpdate()中加入条件判断,从而优化性能。例如React中的就提供了一个
PureComponent的类,当我们的组件继承于它时,组件更新时就会默认先比较新旧属性和状态,从而决定组件是否更新。
值得注意的是,PureComponent进行的是浅比较,所以组件状态或属性改变时,都需要返回一个新的对象或数组。
//数组返回新对象
let newArr = [...oldArr]

//对象深拷贝
let newObj = JSON.parse(JSON.stringfy(oldObj))
componentWillUpdate(nextProps, nextState)
shouldComponentUpdate返回true或者调用forceUpdate之后,componentWillUpdate会被调用。不能在该钩子中setState,会触发重复循环。
(React v16.3后废弃该生命周期,可以用新的周期 getSnapshotBeforeUpdate)
getSnapshotBeforeUpdate
- 触发时间: update发生的时候,在render之后,在组件dom渲染之前。
- 返回一个值,作为componentDidUpdate的第三个参数。
- 配合componentDidUpdate, 可以覆盖componentWillUpdate的所有用法。
class Example extends React.Component {
    getSnapshotBeforeUpdate(prevProps, prevState) {
    // ...
    }
}
componentDidUpdate() 完成组件渲染
除了首次render之后调用componentDidMount,其它render结束之后都是调用componentDidUpdate。该钩子内setState有可能会触发重复渲染,需要自行判断,否则会进入死循环。
componentDidUpdate() {
    if(condition) {
        this.setState({..}) // 设置state
    } else {
        // 不再设置state
    }
}
三、销毁阶段
componentWillUnmount() 组件即将被卸载
组件被卸载的时候调用。一般在componentDidMount里面注册的事件需要在这里删除。例如清理定时器,取消Redux的订阅事件等等。
完整的生命周期示例
import React from 'react'
import ReactDOM from 'react-dom';

class SubCounter extends React.Component {
    componentWillReceiveProps() {
        console.log('9、子组件将要接收到新属性');
    }

    shouldComponentUpdate(newProps, newState) {
        console.log('10、子组件是否需要更新');
        if (newProps.number < 5) return true;
        return false
    }

    componentWillUpdate() {
        console.log('11、子组件将要更新');
    }

    componentDidUpdate() {
        console.log('13、子组件更新完成');
    }

    componentWillUnmount() {
        console.log('14、子组件将卸载');
    }

    render() {
        console.log('12、子组件挂载中');
        return (
                <p>{this.props.number}</p>
        )
    }
}

class Counter extends React.Component {
    static defaultProps = {
        //1、加载默认属性
        name: 'sls',
        age:23
    };

    constructor() {
        super();
        //2、加载默认状态
        this.state = {number: 0}
    }

    componentWillMount() {
        console.log('3、父组件挂载之前');
    }

    componentDidMount() {
        console.log('5、父组件挂载完成');
    }

    shouldComponentUpdate(newProps, newState) {
        console.log('6、父组件是否需要更新');
        if (newState.number<15) return true;
        return false
    }

    componentWillUpdate() {
        console.log('7、父组件将要更新');
    }

    componentDidUpdate() {
        console.log('8、父组件更新完成');
    }

    handleClick = () => {
        this.setState({
            number: this.state.number + 1
        })
    };

    render() {
        console.log('4、render(父组件挂载)');
        return (
            <div>
                <p>{this.state.number}</p>
                <button onClick={this.handleClick}>+</button>
                {this.state.number<10?<SubCounter number={this.state.number}/>:null}
            </div>
        )
    }
}
ReactDOM.render(<Counter/>, document.getElementById('root'));