1、Install gcc-arm-none-eabi
https://devzone.nordicsemi.com/tutorials/7/ This link shows that development with GCC and Eclipse, As it say we should download 、extract and configure arm-none-eabi-gcc. But I find it's hard to download arm-none-eabi-gcc in China(You can chose XunLei to download). Besides I find a easy way to install it in Ubuntu-16.04 as following:
beautifulzzzz@lpc:~$ arm-none-eabi-gcc --version
The program 'arm-none-eabi-gcc' is currently not installed. You can install it by typing:
sudo apt install gcc-arm-none-eabi
beautifulzzzz@lpc:~$ sudo apt install gcc-arm-none-eabi
2、Download Nordic nRF5x SDK
Download the least nRF5x SDK from http://developer.nordicsemi.com/nRF5_SDK/ (the same to the arm-none-eabi-gcc, you can chose the XunLei to download) ,and then extract it in SDK-DIR(as you wish). The following shows the composition of SDK:
beautifulzzzz@lpc:~/Documents/nRF5_SDK_12.2.0_f012efa$ tree -L 2
.
├── components
│   ├── ant
│   ├── ble
│   ├── boards
│   ├── device
│   ├── drivers_ext
│   ├── drivers_nrf
│   ├── libraries
│   ├── nfc
│   ├── proprietary_rf
│   ├── sdk_validation.h
│   ├── serialization
│   ├── softdevice
│   └── toolchain
├── documentation
│   ├── index.html
│   ├── license.txt
│   ├── NordicS.jpg
│   ├── nRF5x_series_logo.png
│   └── release_notes.txt
├── examples
│   ├── ant
│   ├── ble_central
│   ├── ble_central_and_peripheral
│   ├── ble_peripheral
│   ├── crypto
│   ├── dfu
│   ├── dtm
│   ├── multiprotocol
│   ├── nfc
│   ├── peripheral
│   ├── proprietary_rf
│   └── readme.txt
├── external
│   ├── cifra_AES128-EAX
│   ├── fatfs
│   ├── freertos
│   ├── licenses_external.txt
│   ├── micro-ecc
│   ├── nano-pb
│   ├── nfc_adafruit_library
│   ├── nrf_cc310
│   ├── protothreads
│   ├── rtx
│   ├── segger_rtt
│   └── tiny-AES128
├── licenses.txt
├── nRF5x_MDK_8_11_1_IAR.msi
├── nRF5x_MDK_8_11_1_Keil4.msi
└── svd
    ├── nrf51.svd
    ├── nrf52840.svd
    └── nrf52.svd
3、Before Use Makefile To Bulid nRF51 Project
To build an example in the SDK you first need to set the toolchain path in makefile.windows or makefile.posix depending on platform you are using. That is, the .posix should be edited if your are working on either Linux or OS X. These files are located in:
<SDK>/components/toolchain/gcc
Open the file in a text editor, and make sure that the GNU_INSTALL_ROOT variable is pointing to your Gnu tools for ARM embedded Processors install directory.
Correct values for my current setup(my arm-none-eabi-gcc install in /usr/bin):
GNU_INSTALL_ROOT :=/usr
GNU_VERSION := 4.9.3
GNU_PREFIX := arm-none-eabi
4、Use Makefile To Bulid nRF51 Project
Now you can try to build one of the example projects. Will use the blinky example here to keep it simple:
Open terminal and change directory to:
<SDK>/examples/peripheral/<board name>/blank/armgcc/
Type 'make'. GNU Make should start the build using the Makefile and output the result in the _build directory. If everything works you should get the output shown in the screenshot below.
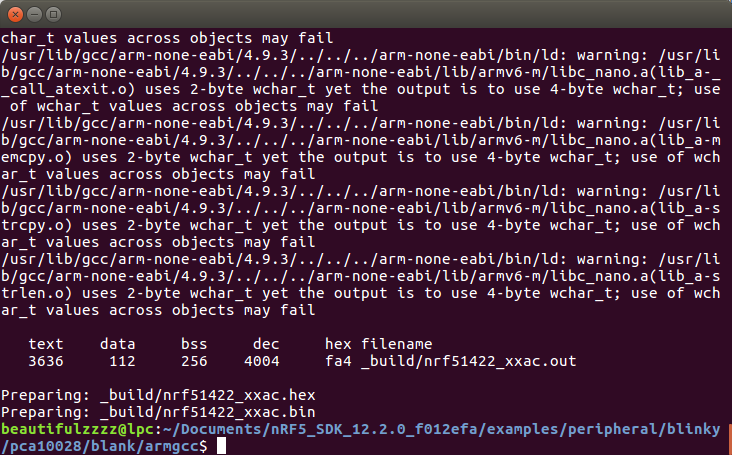
If you instead get an error saying something like "the sysem cannot find the files specified" it typically means that the GNU toolchain path is set incorrectly. Verify the path in makefile.windows/posix if you get this.
5、Install JLink-driver-for-linux
Refer to the blog: [异常解决] ubuntu上安装JLink驱动遇到的坑及给后来者的建议,downloading the corresponding version driver is ok. But I find that the older version driver(older then 5.12) cna't find!!!

Unfortunately my JLink version is 4.80. Finally, I find a Jlink-Linux-v480h-x64 in CSDN: http://download.csdn.net/download/u013903297/6990853 and I also upload it in: https://pan.baidu.com/s/1qXN2uOc. This file is not *.deb file, so we should install it as following:
beautifulzzzz@lpc:~/Downloads$ sudo cp JLink_Linux_V480h_x86_64.tgz /dev/bus
...
beautifulzzzz@lpc:/dev/bus$ sudo tar zxvf JLink_Linux_V480h_x86_64.tgz
beautifulzzzz@lpc:/dev/bus$ sudo rm JLink_Linux_V480h_x86_64.tgz
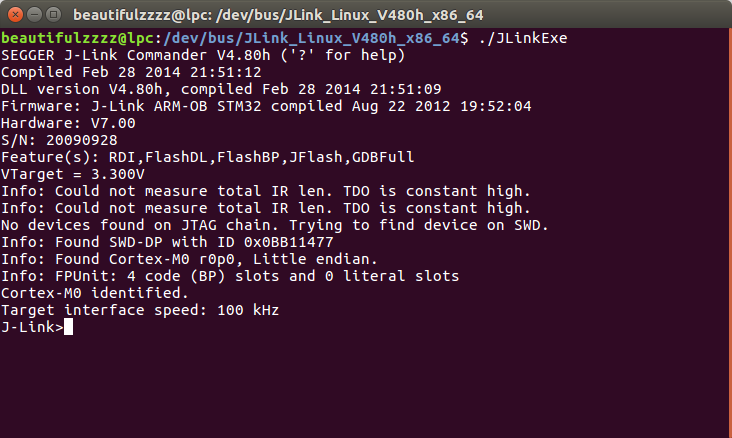
Now plug the JLink device into the USB and then goto the install-path(here is /dev/bus/JLink_Linux_V480h_x86_64), type ./JLinkExe command, you will see(as following screenshot) a Contex-M0 device was fond and the target interface speed is 100khz. If could not find a device, please check whether the JLink device is inserted or the JLink driver version is correct.
6、Loadfile into nRf5x
Now you can use some JLink commands to erase、load、run、quit...
/* Open Jlink Commander from terminal in _build directory */
JLinkExe  -device <nRF51/nRF52>
> erase // Optional: erase target if not already blank
> loadfile <name>.hex // loads FW
> r // Reset and halt
> g // Run
> q //  Exit
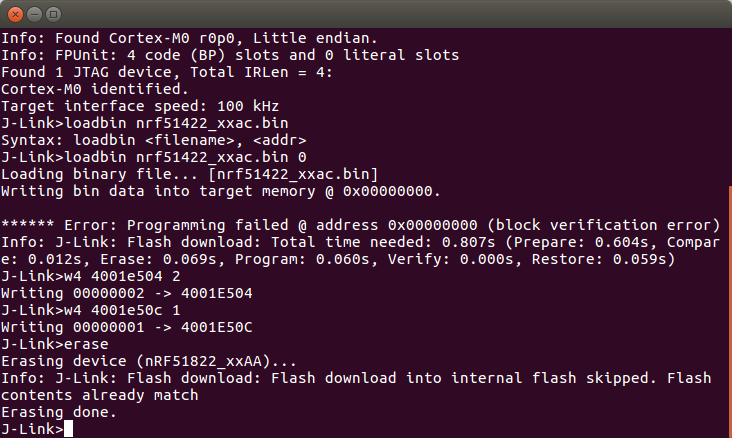
If you get an error (Error: Programming failed @ address 0x00000000 (block verification error)) when tpye eraseloadfile command, you should write one and two to the memory at 4001E50C and 4001E504:(get this from: Getting started with nRF51 development on Mac OS X)
Afer erase whole chip, loading the file into nRF51 is simple—— For simplicity in this tutorial copy the softdevice (S110) .hex file to the _build folder of the Heart Rate Monitor example. The programming is performed from the _build folder:
_build em$ JLinkExe -device nrf51822_xxaa -if swd -speed 4000
[...]
J-Link>loadbin s110_nrf51822_7.0.0_softdevice.bin 0
J-Link>loadbin ble_app_hrs_s110_xxaa.hex 0x16000
J-Link>r
J-Link>g
J-Link>exit
Setting the correct device is crucial, and the speed setting is needed to make the programming fast enough. The softdevice is first programmed in the beginning (location 0) and the application is programmed immediately after (0x16000 for S110 v7.0). After the programming a reset is needed ('r' + 'g').
Next I will write use MakeFile to achieve automating tasks~
@beautifulzzzz
智能硬件、物联网,热爱技术,关注产品
博客:http://blog.beautifulzzzz.com
sina:http://weibo.com/beautifulzzzz?is_all=1