1、bluepy 简介
bluepy 是github上一个很好的蓝牙开源项目,其地址在 LINK-1, 其主要功能是用python实现linux上BLE的接口。
This is a project to provide an API to allow access to Bluetooth Low Energy devices from Python. At present it runs on Linux only; I've mostly developed it using a Raspberry Pi, but it will also run on x86 Debian Linux.
支持python版本:The code is tested on Python 2.7 and 3.4; it should also work on 3.3.
2、安装
直接源码安装,python3加持:
sudo apt-get install git build-essential libglib2.0-dev
git clone https://github.com/IanHarvey/bluepy.git
cd bluepy
python3 setup.py build
sudo python3 setup.py install
注:不要用python2,这辈子都不会用python2!
注:进行到这一步突然惊醒我的台式机无蓝牙,遂开启我的无屏幕树莓派,用命令找其ip,并用ssh登录:
➜  Downloads  sudo nmap -sS -p 22 192.168.31.0/24 | grep -B 5 -A 0 "Pi"
Nmap scan report for 192.168.31.51
Host is up (0.19s latency).

PORT   STATE SERVICE
22/tcp open  ssh
MAC Address: B8:27:EB:71:33:AE (Raspberry Pi Foundation)

➜  Downloads  ssh pi@192.168.31.51
pi@192.168.31.51's password: 1234
3、看文档,玩DEMO
bluepy 的文档地址 LINK-2
在bluepy中新建一个examples文件夹,用来存放接下来我们的测试DEMO:
3.1 scan devices demo
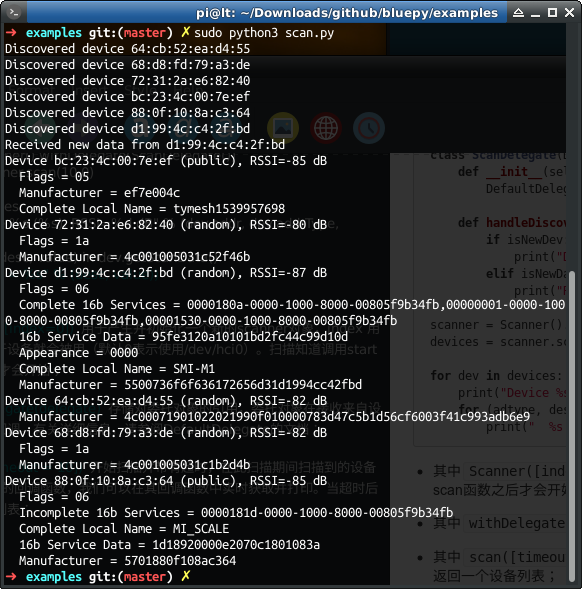
这里第一个DEMO是BLE设备扫描,这里用到了Scanner对象,该对象可以用来搜索BLE设备的广播包数据。在大多数情况下该对象将会扫描出周围所有可连接设备。
下面是我改造为python3的代码:
➜  examples git:(master) ✗ cat scan.py
#!/usr/bin/env python
# coding=utf-8

from bluepy.btle import Scanner, DefaultDelegate

class ScanDelegate(DefaultDelegate):
    def __init__(self):
        DefaultDelegate.__init__(self)

    def handleDiscovery(self, dev, isNewDev, isNewData):
        if isNewDev:
            print("Discovered device", dev.addr)
        elif isNewData:
            print("Received new data from", dev.addr)

scanner = Scanner().withDelegate(ScanDelegate())
devices = scanner.scan(10.0)

for dev in devices:
    print("Device %s (%s), RSSI=%d dB" % (dev.addr, dev.addrType, dev.rssi))
    for (adtype, desc, value) in dev.getScanData():
        print("  %s = %s" % (desc, value))
-
其中
Scanner([index=0])用于产生并初始化一个新的scanner对象,index 用来指名哪一个蓝牙设备就会被用(默认0表示使用/dev/hci0)。扫描知道调用start或scan函数之后才会开始; -
其中
withDelegate(delegate)存储对委托对象的引用,委托对象在接收来自设备的广播时接收回调。有关详细信息,请参阅DefaultDelegate的文档; -
其中
scan([timeout = 10])开始扫描并带有超时,在此扫描期间扫描到的设备会触发Delegate的回调函数,我们可以在其回调函数中实时获取并打印。当超时后会返回一个设备列表;
执行效果如下:

注:注意用sudo运行,更详细的接口见 LINK-3
3.2 get services
bluepy 的DEMO有点少,我又找了个专是DEMO的github项目:LINK-5
将其中的getServices.py改造下:
➜  examples git:(master) ✗ cat get_setvices.py
import sys
from bluepy.btle import UUID, Peripheral

if len(sys.argv) != 2:
  print("Fatal, must pass device address:", sys.argv[0], "<device address="">")
  quit()

p = Peripheral(sys.argv[1],"public")

services=p.getServices()

#displays all services
for service in services:
   print(service)
-
其中
Peripheral(sys.argv[1],"public")是用mac地址创建一个连接,由于我们上一步用scan搜索到的mac地址为public类型,因此这里第二个参数为"public",更详细的介绍见 LINK-6; -
其中
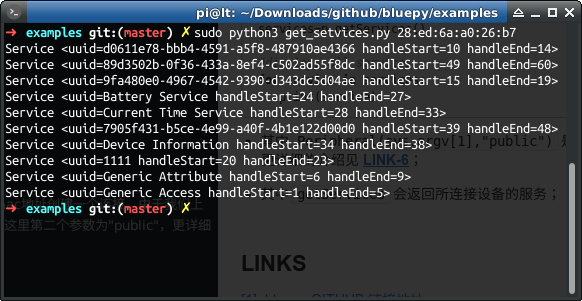
getServices会返回所连接设备的服务;
执行效果如下:

3.3 get characteristics
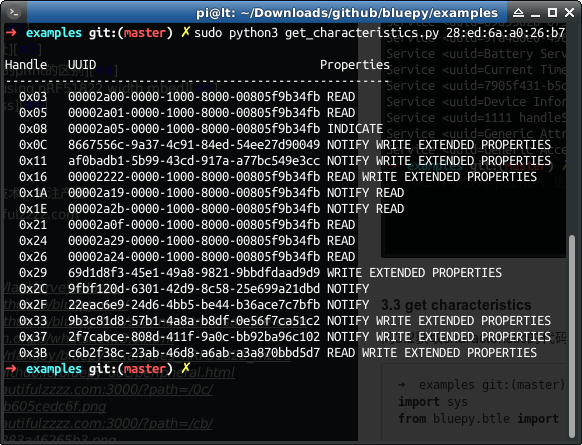
同3.2获取characteristic的代码如下:
➜  examples git:(master) ✗ cat get_characteristics.py
import sys
from bluepy.btle import UUID, Peripheral

if len(sys.argv) != 2:
  print("Fatal, must pass device address:", sys.argv[0], "<device address="">")
  quit()

p = Peripheral(sys.argv[1],"public")

chList = p.getCharacteristics()
print("Handle   UUID                                Properties")
print("-------------------------------------------------------")
for ch in chList:
   print("  0x"+ format(ch.getHandle(),'02X')  +"   "+str(ch.uuid) +" " + ch.propertiesToString())
执行效果如下:

3.4 get device name
直接上代码:
➜  examples git:(master) ✗ cat get_device_name.py
import sys
from bluepy.btle import UUID, Peripheral

dev_name_uuid = UUID(0x2A00)

if len(sys.argv) != 2:
  print("Fatal, must pass device address:", sys.argv[0], "<device address="">")
  quit()

p = Peripheral(sys.argv[1],"public")

try:
    ch = p.getCharacteristics(uuid=dev_name_uuid)[0]
    if (ch.supportsRead()):
            print(ch.read())

finally:
    p.disconnect()
运行效果如下:

小结
bluepy 是非常棒的一款蓝牙BLE工具,掌握它会为你节省比较多的时间~
- : 完~
- 大家觉得不错,可以点推荐给更多人~
LINKS
[1]. bluepy GITHUB 链接地址
[2]. bluepy 的文档地址
[3]. Scanner Demo 地址
[4]. python3和python2的print的区别
[5]. bluepy examples using nRF51822 width mbed
[6]. The Peripheral class
@beautifulzzzz
智能硬件、物联网,热爱技术,关注产品
博客:http://blog.beautifulzzzz.com
园友交流群:414948975