硬编码相对于软编码来说,使用非CPU进行编码,如显卡GPU、专用的DSP、FPGA、ASIC芯片等,性能高,对CPU没有压力,但是对其他硬件要求较高(如GPU等)。
在iOS8之后,苹果开放了接口,并且封装了VideoToolBox&AudioToolbox两个框架,分别用于对视频&音频进行硬编码,音频编码放在后面做总结,这次主要总结VideoToolBox。
Demo的Github地址:https://github.com/wzpziyi1/HardCoding-For-iOS
1、相关基础数据结构:
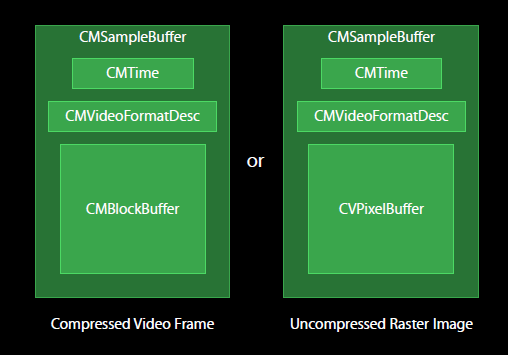
CVPixelBuffer:编码前和解码后的图像数据结构。
CMTime、CMClock和CMTimebase:时间戳相关。时间以64-bit/32-bit的形式出现。
CMBlockBuffer:编码后,结果图像的数据结构。
CMVideoFormatDescription:图像存储方式,编解码器等格式描述。
CMSampleBuffer:存放编解码前后的视频图像的容器数据结构。

// 编码完成回调
void finishCompressH264Callback(void *outputCallbackRefCon, void *sourceFrameRefCon, OSStatus status, VTEncodeInfoFlags infoFlags, CMSampleBufferRef sampleBuffer)
{
    if (status != noErr) return;

    //根据传入的参数获取对象
    ZYVideoEncoder *encoder = (__bridge ZYVideoEncoder *)(outputCallbackRefCon);

    //判断是否是关键帧
    bool isKeyFrame = !CFDictionaryContainsKey( (CFArrayGetValueAtIndex(CMSampleBufferGetSampleAttachmentsArray(sampleBuffer, true), 0)), kCMSampleAttachmentKey_NotSync);

    //如果是关键帧,获取sps & pps数据
    if (isKeyFrame)
    {
        CMFormatDescriptionRef format = CMSampleBufferGetFormatDescription(sampleBuffer);

        //获取sps信息
        size_t sparameterSetSize, sparameterSetCount;
        const uint8_t *sparameterSet;
        CMVideoFormatDescriptionGetH264ParameterSetAtIndex(format, 0, &sparameterSet, &sparameterSetSize, &sparameterSetCount, 0);

        // 获取PPS信息
        size_t pparameterSetSize, pparameterSetCount;
        const uint8_t *pparameterSet;
        CMVideoFormatDescriptionGetH264ParameterSetAtIndex(format, 1, &pparameterSet, &pparameterSetSize, &pparameterSetCount, 0 );

        // 装sps/pps转成NSData,以方便写入文件
        NSData *sps = [NSData dataWithBytes:sparameterSet length:sparameterSetSize];
        NSData *pps = [NSData dataWithBytes:pparameterSet length:pparameterSetSize];

        // 写入文件
        [encoder gotSpsPps:sps pps:pps];
    }

    //获取数据块
    CMBlockBufferRef dataBuffer = CMSampleBufferGetDataBuffer(sampleBuffer);
    size_t length, totalLength;
    char *dataPointer;
    OSStatus statusCodeRet = CMBlockBufferGetDataPointer(dataBuffer, 0, &length, &totalLength, &dataPointer);

    if (statusCodeRet == noErr)
    {
        size_t bufferOffset = 0;
        // 返回的nalu数据前四个字节不是0001的startcode,而是大端模式的帧长度length
        static const int AVCCHeaderLength = 4;

        //循环获取nalu数据
        while (bufferOffset < totalLength - AVCCHeaderLength)
        {
            uint32_t NALUnitLength = 0;

            //读取NAL单元长度
            memcpy(&NALUnitLength, dataPointer + bufferOffset, AVCCHeaderLength);

            // 从大端转系统端
            NALUnitLength = CFSwapInt32BigToHost(NALUnitLength);

            NSData* data = [[NSData alloc] initWithBytes:(dataPointer + bufferOffset + AVCCHeaderLength) length:NALUnitLength];
            [encoder gotEncodedData:data isKeyFrame:isKeyFrame];

            // 移动到写一个块,转成NALU单元
            bufferOffset += AVCCHeaderLength + NALUnitLength;
        }

    }
}
所需要的信息都可以从CMSampleBufferRef中得到。
2、NAL(网络提取层)代码讲解
直播一中提到了NALU概念上的封装,下面是代码部分:
代码B:
- (void)gotSpsPps:(NSData*)sps pps:(NSData*)pps
{
// 拼接NALU的header
const char bytes[] = "x00x00x00x01";
size_t length = (sizeof bytes) - 1;
NSData *ByteHeader = [NSData dataWithBytes:bytes length:length];
// 将NALU的头&NALU的体写入文件
[self.fileHandle writeData:ByteHeader];
[self.fileHandle writeData:sps];
[self.fileHandle writeData:ByteHeader];
[self.fileHandle writeData:pps];
}
- (void)gotEncodedData:(NSData*)data isKeyFrame:(BOOL)isKeyFrame
{
NSLog(@"gotEncodedData %d", (int)[data length]);
if (self.fileHandle != NULL)
{
const char bytes[] = "x00x00x00x01";
size_t length = (sizeof bytes) - 1; //string literals have implicit trailing '�'
NSData *ByteHeader = [NSData dataWithBytes:bytes length:length];
[self.fileHandle writeData:ByteHeader];
[self.fileHandle writeData:data];
}
}
结合这张图片:

一个GOP序列,最前面是sps和pps,它们单独被封装成两个NALU单元,一个NALU单元包含header和具体数据,NALU单元header序列固定为00 00 00 01。那么得到一帧画面时,需要判断该帧是不是I帧,如果是,那么取出sps和pps,再是相关帧的提取写入。(具体参考代码A)。
3、VTCompressionSession进行硬编码
a、给出width、height
b、使用VTCompressionSessionCreate创建compressionSession,并设置使用H264进行编码,相关type是kCMVideoCodecType_H264
c、b中还需要设置回调函数finishCompressH264Callback,需要在回调函数里面取出编码后的GOP、sps、pps等数据。
d、设置属性为实时编码,直播必然是实时输出。
e、设置期望帧数,每秒多少帧,一般都是30帧以上,以免画面卡顿
f、设置码率(码率: 编码效率, 码率越高,则画面越清晰, 如果码率较低会引起马赛克 --> 码率高有利于还原原始画面,但是也不利于传输)
g、设置关键帧间隔(也就是GOP间隔)
h、设置结束,准备编码
代码:
- (void)setupVideoSession
{
    //用于记录当前是第几帧数据
    self.frameID = 0;

    //录制视频的宽高
    int width = [UIScreen mainScreen].bounds.size.width;
    int height = [UIScreen mainScreen].bounds.size.height;

    // 创建CompressionSession对象,该对象用于对画面进行编码
    // kCMVideoCodecType_H264 : 表示使用h.264进行编码
    // finishCompressH264Callback : 当一次编码结束会在该函数进行回调,可以在该函数中将数据,写入文件中
    //传入的self,就是finishCompressH264Callback回调函数里面的outputCallbackRefCon,通过bridge就可以取出此self
    VTCompressionSessionCreate(NULL, width, height, kCMVideoCodecType_H264, NULL, NULL, NULL, finishCompressH264Callback, (__bridge void * _Nullable)(self), &_compressionSession);

    //设置实时编码,直播必然是实时输出
    VTSessionSetProperty(_compressionSession, kVTCompressionPropertyKey_RealTime, kCFBooleanTrue);

    //设置期望帧数,每秒多少帧,一般都是30帧以上,以免画面卡顿
    int fps = 30;
    CFNumberRef fpsRef = CFNumberCreate(kCFAllocatorDefault, kCFNumberSInt32Type, &fps);
    VTSessionSetProperty(_compressionSession, kVTCompressionPropertyKey_ExpectedFrameRate, fpsRef);

    //设置码率(码率: 编码效率, 码率越高,则画面越清晰, 如果码率较低会引起马赛克 --> 码率高有利于还原原始画面,但是也不利于传输)
    int bitRate = 800 * 1024;
    CFNumberRef rateRef = CFNumberCreate(kCFAllocatorDefault, kCFNumberSInt32Type, &bitRate);
    VTSessionSetProperty(_compressionSession, kVTCompressionPropertyKey_AverageBitRate, rateRef);
    NSArray *limit = @[@(bitRate * 1.5/8), @(1)];
    VTSessionSetProperty(self.compressionSession, kVTCompressionPropertyKey_DataRateLimits, (__bridge CFArrayRef)limit);

    //设置关键帧间隔(也就是GOP间隔)
    //这里设置与上面的fps一致,意味着每间隔30帧开始一个新的GOF序列,也就是每隔间隔1s生成新的GOF序列
    //因为上面设置的是,一秒30帧
    int frameInterval = 30;
    CFNumberRef intervalRef = CFNumberCreate(kCFAllocatorDefault, kCFNumberSInt32Type, &frameInterval);
    VTSessionSetProperty(_compressionSession, kVTCompressionPropertyKey_MaxKeyFrameInterval, intervalRef);

    //设置结束,准备编码
    VTCompressionSessionPrepareToEncodeFrames(_compressionSession);
}
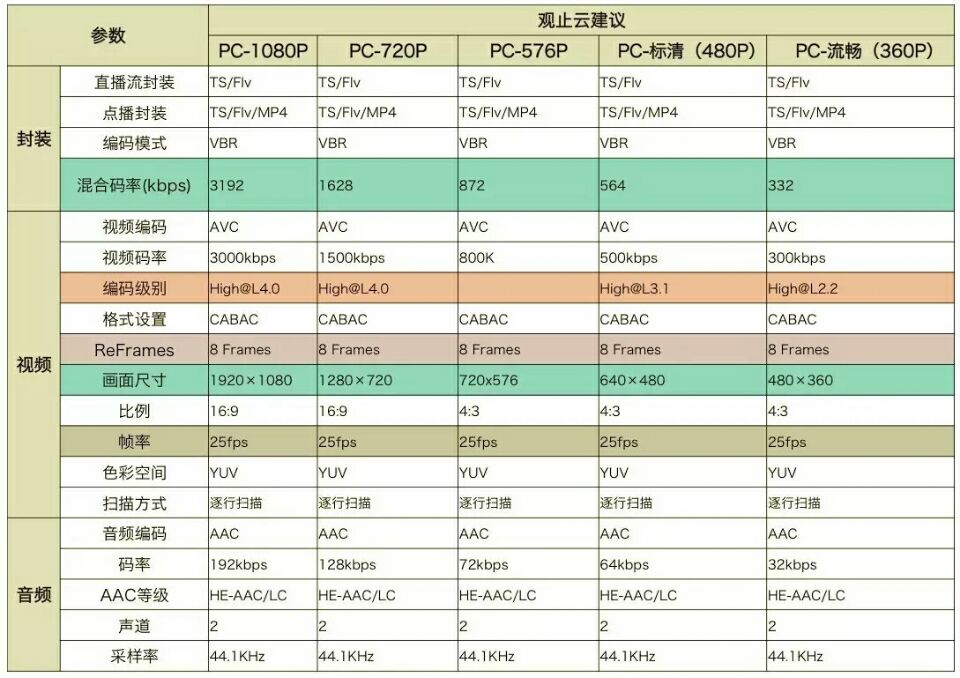
码率:
初始化后通过VTSessionSetProperty设置对象属性
编码方式:H.264编码
帧率:每秒钟多少帧画面
码率:单位时间内保存的数据量
关键帧(GOPsize)间隔:多少帧为一个GOP
参数参考:
