首先准备3台虚拟机,设置好固定IP,用xshell连上,因为xshell有一个发送键输入到所有会话功能比较方便,本次以CentOS7最小版做实践。
#集群关系
192.168.126.100  nginx(代理)、mycat
192.168.126.101  nginx、mysql(主)、php
192.168.126.102  nginx、mysql(从)、php
1、安装nginx,可参考官方文档:http://nginx.org/en/linux_packages.html#RHEL-CentOS
#安装前准备
yum install yum-utils

#设置源
cat >> /etc/yum.repos.d/nginx.repo <<EOF
[nginx-stable]
name=nginx stable repo
baseurl=http://nginx.org/packages/centos/$releasever/$basearch/
gpgcheck=1
enabled=1
gpgkey=https://nginx.org/keys/nginx_signing.key

[nginx-mainline]
name=nginx mainline repo
baseurl=http://nginx.org/packages/mainline/centos/$releasever/$basearch/
gpgcheck=1
enabled=0
gpgkey=https://nginx.org/keys/nginx_signing.key
EOF

#安装nginx
yum install nginx

#启动nginx
systemctl start nginx

#设置开机自启
systemctl enable nginx

#查看nginx状态
systemctl status nginx

#关闭防火墙
systemctl stop firewalld
systemctl disable firewalld
2、安装php,可参考:https://blog.csdn.net/ixuetu/article/details/81535242
#安装依赖
yum -y install epel-release

#添加remi源
rpm -Uvh http://rpms.remirepo.net/enterprise/remi-release-7.rpm

#安装php7
yum-config-manager --enable remi-php70

yum -y install php php-opcache php-fpm

yum -y install php-mysql php-gd php-ldap php-odbc php-pear php-xml php-xmlrpc php-mbstring php-soap curl curl-devel

#启动php-fpm
systemctl start php-fpm

#php-fpm开机自启
systemctl enable php-fpm
3、配置nginx支持php,编辑/etc/nginx/conf.d/default.conf文件修改以下几处地方即可
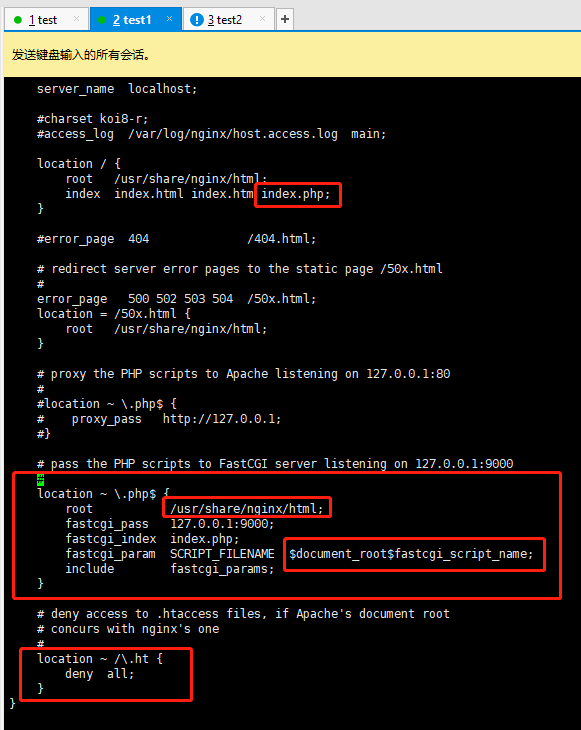
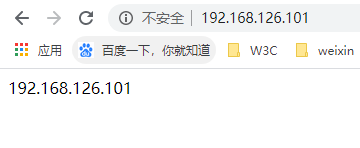
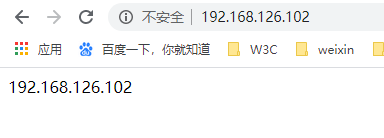
修改完毕重启nginx,再修改 /usr/share/nginx/html下的web文件,把index.html删除,再创建index.php并在里面输出本机IP地址
4、配置反向代理、负载均衡,参考:https://www.cnblogs.com/gbq-dog/p/10653054.html
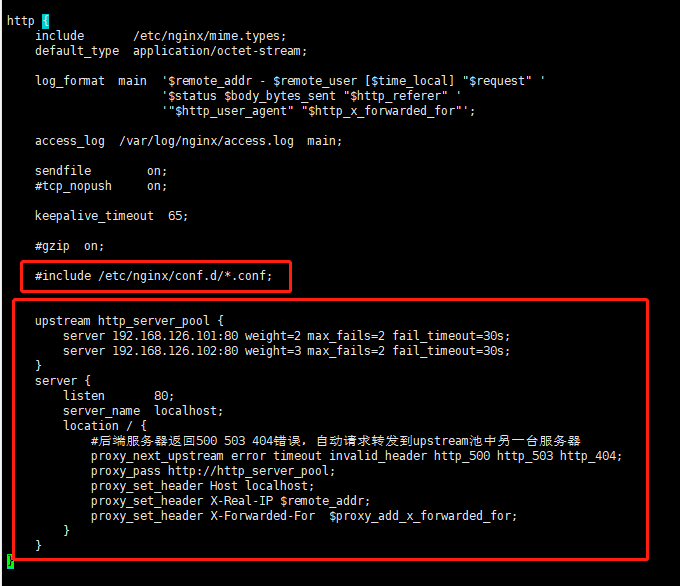
cd /etc/nginx

cp nginx.conf nginx-copy.conf

vim nginx.conf
修改内容如下:
   #include /etc/nginx/conf.d/*.conf;
  #设置地址池
  upstream http_server_pool {
        server 192.168.126.101:80 weight=2 max_fails=2 fail_timeout=30s;
        server 192.168.126.102:80 weight=3 max_fails=2 fail_timeout=30s;
    }
    server {
        listen       80;
        server_name  localhost;
        location / {
            #后端服务器返回500 503 404错误,自动请求转发到upstream池中另一台服务器
            proxy_next_upstream error timeout invalid_header http_500 http_503 http_404;
            proxy_pass http://http_server_pool;
            proxy_set_header Host localhost;
            proxy_set_header X-Real-IP $remote_addr;
            proxy_set_header X-Forwarded-For  $proxy_add_x_forwarded_for;
        }
    }
5、保存重启nginx,浏览器访问192.168.126.100,刷新可见显示内容未192.168.126.101或102
6、安装mysql,本次安装mysql5.6,可参考:https://www.cnblogs.com/zhylioooo/p/11084489.html,安装完毕后添加允许远程连接的账号。
6、mysql主从复制,参考:https://www.cnblogs.com/gl-developer/p/6170423.html,重点思想如下:
- 主服务器:
- 开启二进制日志
- 配置唯一的server-id
- 获得master二进制日志文件名及位置
- 创建一个用于slave和master通信的用户账号
- 从服务器:
- 配置唯一的server-id
- 使用master分配的用户账号读取master二进制日志
- 启用slave服务
主服务器:
1、编辑my.cnf,在[mysqld]下加上下面两行
log-bin=mysql-bin #开启二进制日志
server-id=101 #设置server-id

2、进入mysql命令行
mysql> CREATE USER 'user102'@'192.168.126.102' IDENTIFIED BY '123456';#创建用户
mysql> GRANT REPLICATION SLAVE ON *.* TO 'user102'@'192.168.126.102';#分配权限
mysql>flush privileges;   #刷新权限

3、查看master状态,记录二进制文件名(mysql-bin.000003)和位置(73):
mysql> SHOW MASTER STATUS;
+------------------+----------+--------------+------------------+-------------------+
| File             | Position | Binlog_Do_DB | Binlog_Ignore_DB | Executed_Gtid_Set |
+------------------+----------+--------------+------------------+-------------------+
| mysql-bin.000003 |      524 |              |                  |                   |
+------------------+----------+--------------+------------------+-------------------+
1 row in set (0.00 sec)
从服务器:
1、编辑my.cnf,在[mysqld]下加上下面这行:
server-id=102 #设置server-id,必须唯一

2、重启mysql,进入命令行执行同步SQL语句:
mysql> CHANGE MASTER TO
    -> MASTER_HOST='192.168.126.101',
    -> MASTER_USER='user102',
    -> MASTER_PASSWORD='123456',
    -> MASTER_LOG_FILE='mysql-bin.000003',
    -> MASTER_LOG_POS=524;

3、启动slave同步进程:
mysql> start slave;

4、查看slave状态,当Slave_IO_Running和Slave_SQL_Running都为YES的时候就表示主从同步设置成功了:
mysql> show slave statusG;
*************************** 1. row ***************************
               Slave_IO_State: Waiting for master to send event
                  Master_Host: 192.168.126.101
                  Master_User: user102
                  Master_Port: 3306
                Connect_Retry: 60
              Master_Log_File: mysql-bin.000003
          Read_Master_Log_Pos: 524
               Relay_Log_File: mysqld-relay-bin.000002
                Relay_Log_Pos: 283
        Relay_Master_Log_File: mysql-bin.000003
             Slave_IO_Running: Yes
            Slave_SQL_Running: Yes
              Replicate_Do_DB:
          Replicate_Ignore_DB:
      ......
验证主从复制只需要在主数据库(192.168.126.101)操作,再查看从数据库(192.168.126.102)有没有同步就行了
7、mycat读写分离,参考:https://www.jianshu.com/p/bc45c8bccf3c
1、MyCat是用java语言编写的,需要JDK支持:
yum install java

2、进入mycat官网下载文档版本
wget http://dl.mycat.org.cn/1.6.7.1/Mycat-server-1.6.7.1-release-20190627191042-linux.tar.gz

3、解压缩得到mycat目录,mycat可执行文件在mycat/bin下,配置文件在mycat/conf下:
tar -zxvf Mycat-server-1.6.7.1-release-20190627191042-linux.tar.gz

4、查看server.xml配置文件,拉到最底查看默认账号密码和数据库,默认有两个账号root和user,user只读。

5、配置schema.xml文件,由于只做读写分离,所以精简配置如下:
<?xml version="1.0"?>
<!DOCTYPE mycat:schema SYSTEM "schema.dtd">
<mycat:schema xmlns:mycat="http://io.mycat/">

    <schema name="TESTDB" checkSQLschema="false" sqlMaxLimit="100" dataNode="dn1">
    </schema>

    <dataNode name="dn1" dataHost="localhost1" database="test" />

    <dataHost name="localhost1" maxCon="1000" minCon="10" balance="1" writeType="0" dbType="mysql" dbDriver="native" switchType="1"  slaveThreshold="100">
        <heartbeat>select user()</heartbeat>
        <writeHost host="hostM1" url="192.168.126.101:3306" user="root" password="123456">
            <readHost host="hostS2" url="192.168.126.102:3306" user="root" password="123456" />
        </writeHost>
    </dataHost>
</mycat:schema>

6、进入mycat/bin,启动mycat并查看状态
./mycat start
./mycat status
7、使用Navicat工具可连接mycat,里面的数据库TESTDB与真实数据库test同步
8、验证:先在Navicat编辑100数据,发现写同步到101和102的数据库中,再单独修改102中的数据,发现100中的数据只会是102中的。