一、selector的应用
参考:http://blog.csdn.net/shakespeare001/article/details/7788400
Android中的Selector主要是用来改变ListView和Button控件的默认背景。其使用方法可以按一下步骤来设计:
1.创建mylist_view.xml文件
首先在res目录下新建drawable文件夹,再在新建的drawable文件夹中新建mylist_view.xml,其目录结构为:res/drawable/mylist_view.xml。
2.根据具体需求编辑mylist_view.xml文件
新建mylist_view.xml文件后,在没有添加任何属性时其内部代码结构为:
[html] view plaincopy
- <?xml version="1.0" encoding="utf-8" ?>
- <selector xmlns:android="http://schemas.android.com/apk/res/android">
- </selector>
下面就可以根据项目需求,在其内部定义为自己想要的样式了,主要属性如下:
[html] view plaincopy
- <?xml version="1.0" encoding="utf-8" ?>
- <selector xmlns:android="http://schemas.android.com/apk/res/android">
- <!-- 默认时的背景图片-->
- <item android:drawable="@drawable/pic1" />
- <!-- 没有焦点时的背景图片 -->
- <item android:state_window_focused="false"
- android:drawable="@drawable/pic1" />
- <!-- 非触摸模式下获得焦点并单击时的背景图片 -->
- <item android:state_focused="true" android:state_pressed="true" android:drawable= "@drawable/pic2" />
- <!-- 触摸模式下单击时的背景图片-->
- <item android:state_focused="false" android:state_pressed="true" android:drawable="@drawable/pic3" />
- <!--选中时的图片背景-->
- <item android:state_selected="true" android:drawable="@drawable/pic4" />
- <!--获得焦点时的图片背景-->
- <item android:state_focused="true" android:drawable="@drawable/pic5" />
- </selector>
3.引用mylist_view.xml文件
三种方法可以来引用刚才创建的文件:
(1)在ListView中添加如下属性代码
[html] view plaincopy
- android:listSelector="@drawable/mylist_view"
(2)在ListView的item界面中添加如下属性代码
[html] view plaincopy
- android:background="@drawable/mylist_view"
(3)利用JAVA代码直接编写
[java] view plaincopy
- Drawable drawable = getResources().getDrawable(R.drawable.mylist_view);
- listView.setSelector(drawable);
为了防止列表拉黑的情况发生,需要在ListView中添加以下的属性代码
[html] view plaincopy
- android:cacheColorHint="@android:color/transparent"
属性介绍:
android:state_selected选中
android:state_focused获得焦点
android:state_pressed点击
android:state_enabled设置是否响应事件,指所有事件
二、Image Button
参考资料:http://byandby.iteye.com/blog/815212
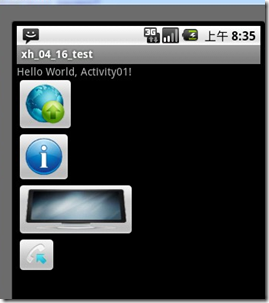
android中除了一些android系统自带的Button外,在android平台中,我们还可以制作一些带图标的按钮,这就需要ImageButton组件了。
要制作带图标的按钮,首先要在布局文件中定义ImageButton,然后通过setImageDrawable方法来设置按钮要显示的图标。同样需要对按钮设置事件监听 setOnClickListener,以此来捕捉事件并处理。 我们先看看这个例子的运行效果。
package com.xiaohang;
import android.app.Activity;
import android.app.AlertDialog;
import android.app.Dialog;
import android.app.AlertDialog.Builder;
import android.content.DialogInterface;
import android.os.Bundle;
import android.view.View;
import android.widget.Button;
import android.widget.ImageButton;
import android.widget.TextView;
public class Activity01 extends Activity {
/** Called when the activity is first created. */
TextView textView;
ImageButton imageButton1,imageButton2,imageButton3,imageButton4;
@Override
public void onCreate(Bundle savedInstanceState) {
super.onCreate(savedInstanceState);
setContentView(R.layout.main);
textView = (TextView)findViewById(R.id.TextView01);
imageButton1 = (ImageButton)findViewById(R.id.ImageButton01);
imageButton2 = (ImageButton)findViewById(R.id.ImageButton02);
imageButton3 = (ImageButton)findViewById(R.id.ImageButton03);
imageButton4 = (ImageButton)findViewById(R.id.ImageButton04);
//给按钮设置使用的图标,由于button1,button2,button3,已经在xml文件中设置了这里就不设置了
imageButton4.setImageDrawable(getResources().getDrawable(android.R.drawable.sym_call_incoming));
//以下分别为每个按钮设置事件监听 setOnClickListener
imageButton1.setOnClickListener(new Button.OnClickListener(){
public void onClick(View v) {
//对话框 Builder是AlertDialog的静态内部类
Dialog dialog = new AlertDialog.Builder(Activity01.this)
//设置对话框的标题
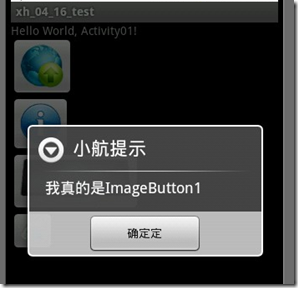
.setTitle("小航提示")
//设置对话框要显示的消息
.setMessage("我真的是ImageButton1")
//给对话框来个按钮 叫“确定定” ,并且设置监听器 这种写法也真是有些BT
.setPositiveButton("确定定", new DialogInterface.OnClickListener(){
public void onClick(DialogInterface dialog, int which) {
//点击 "确定定" 按钮之后要执行的操作就写在这里
}
}).create();//创建按钮
dialog.show();//显示一把
}
});
imageButton2.setOnClickListener(new Button.OnClickListener(){
public void onClick(View v) {
Builder dialog = new AlertDialog.Builder(Activity01.this);
dialog.setTitle("提示");
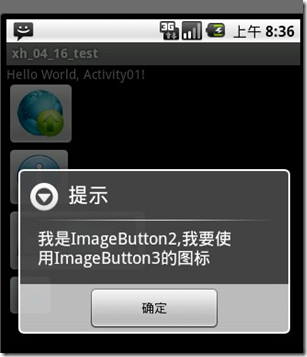
dialog.setMessage("我是ImageButton2,我要使用ImageButton3的图标");
dialog.setPositiveButton("确定", new DialogInterface.OnClickListener(){
public void onClick(DialogInterface dialog, int which) {
//好了我成功把Button3的图标掠夺过来
imageButton2.setImageDrawable(getResources().getDrawable(R.drawable.button3));
}
}).create();//创建按钮
dialog.show();
}
});
imageButton3.setOnClickListener(new Button.OnClickListener(){
public void onClick(View v) {
Builder dialog = new AlertDialog.Builder(Activity01.this);
dialog.setTitle("提示");
dialog.setMessage("我是ImageButton3,我要使用系统打电话图标");
dialog.setPositiveButton("确定", new DialogInterface.OnClickListener(){
public void onClick(DialogInterface dialog, int which) {
//把imageButton3的图标设置为系统的打电话图标
imageButton3.setImageDrawable(getResources().getDrawable(android.R.drawable.sym_action_call));
}
}).create();//创建按钮
dialog.show();
}
});
imageButton4.setOnClickListener(new Button.OnClickListener(){
public void onClick(View v) {
Builder dialog = new AlertDialog.Builder(Activity01.this);
dialog.setTitle("提示");
dialog.setMessage("我没钱买图标使用的是系统图标");
dialog.setPositiveButton("确定", new DialogInterface.OnClickListener(){
public void onClick(DialogInterface dialog, int which) {
}
}).create();//创建按钮
dialog.show();
}
});
}
}
.XML文件
<?xml version="1.0" encoding="utf-8"?>
<LinearLayout xmlns:android="http://schemas.android.com/apk/res/android"
    android:orientation="vertical"
    android:layout_width="fill_parent"
    android:layout_height="fill_parent"
    >
<TextView
android:id="@+id/TextView01"
    android:layout_width="fill_parent"
    android:layout_height="wrap_content"
    android:text="@string/hello"
    />

<ImageButton
android:id="@+id/ImageButton01"
android:layout_width="wrap_content"
android:layout_height="wrap_content"
android:src="@drawable/button1"
/>

<ImageButton
android:id="@+id/ImageButton02"
android:layout_width="wrap_content"
android:layout_height="wrap_content"
android:src="@drawable/button2"
/>

<ImageButton
android:id="@+id/ImageButton03"
android:layout_width="wrap_content"
android:layout_height="wrap_content"
android:src="@drawable/button3"
/>

<ImageButton
android:id="@+id/ImageButton04"
android:layout_width="wrap_content"
android:layout_height="wrap_content"/>

</LinearLayout>


