截止到目前为止,我们已经学习了javascript的一些简单的语法,但是使用这些简单的语法,并不能做出一些我们经常看到的一些效果,比如说表格的全选和反选等,因此为了能够操作网页上的元素,我们需要继续学习BOM相关的知识。
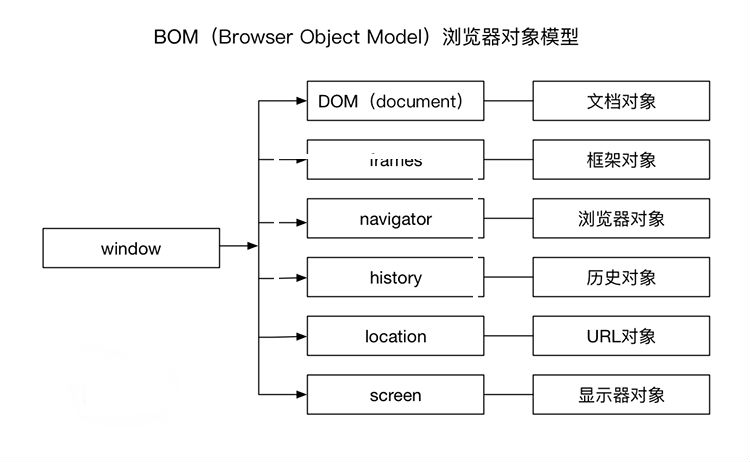
BOM是指浏览器对象模型,它是对一系列在浏览器环境中使用对象的统称,这些对象提供了访问浏览器的功能。在BOM对象中,window对象是最顶层对象,在浏览器环境中它是一个Global全局对象,其它对象(如:DOM对象)对是这个对象的属性(子对象)

BOM中的对象
1.WINDOW对象
window对象对象表示一个浏览器窗口或一个frame框架,它处于对象层次的最顶端,它提供了处理浏览器窗口的方法和属性。window对象是浏览器对象中的默认对象,所以可以隐式地引用window对象的属性和方法。
如,以下两行代码是等价的:
|
1
2
3
|
new Date();
// 等价于
new window.Date();
|
2.DOM(DOCUMENT)相关对象
document是window对象的了个属性,它是一个Document对象实例,表示当前窗口中文档对象。通过该对象,可以对文档和文档中元素、节点等进行操作。
3.FRAMES对象
frames对象是一个集合,表示当前页面中使用的子框架。如果页面中使用了框架,将产生一个框架集合frames,在集合中可以用数字下标(从0开始)或名字索引框架。集全中的每一个对象,包含了框架的页面布局信息,以及每一个框架所对应的window对象。
4.NAVIGATOR对象
navigator是指浏览器对象,该对象提供了当前正在使用的浏览器的信息。navigator对象中的属性是只读的,在W3C在HTML5标准中,对该对象进行了规范。
|
1
2
3
4
5
6
7
8
9
10
11
12
13
14
15
|
`navigator`对象:包含大量有关Web浏览器的信息,在检测浏览器及操作系统上非常有用,也可用window.navigator引用它
`navigator.appCodeName` //浏览器代码名的字符串表示
navigator.appName //官方浏览器名的字符串表示
navigator.appVersion //浏览器版本信息的字符串表示
navigator.cookieEnabled //如果启用cookie返回true,否则返回false
navigator.javaEnabled //如果启用java返回true,否则返回false
navigator.platform //浏览器所在计算机平台的字符串表示
navigator.userAgent //用户代理头的字符串表示
|
5.HISTORY对象
history对象来保存浏览器历史记录信息,也就是用户访问的页面。浏览器的前进与后退功能本质上就是history的操作。history对象记录了用户浏览过的页面,通过该对象提供的API可以实现与浏览器前进/后退类似的导航功能。
|
1
2
3
4
|
history.length // 保存历史记录的数量。
history.back() // 加载 history 列表中的前一个 URL
history.go() // 加载 history 列表中的某个具体页面
|
6.LOCATION对象
location是一个静态对象,该对象是对当前窗口URL地址的解析。该对象提供了可以访问URL中不同部分的信息属性,通过location对象也可以实现页面或锚点跳转等功能。
|
1
2
3
4
5
6
7
8
9
10
11
12
13
14
15
|
location对象:表示载入窗口的URL,也可用window.location引用它
location.href //当前载入页面的完整URL,如http://www.somewhere.com/pictures/index.html
location.portocol //URL中使用的协议,即双斜杠之前的部分,如http
location.host //服务器的名字,如www.wrox.com
location.hostname //通常等于host,有时会省略前面的www
location.port //URL声明的请求的端口,默认情况下,大多数URL没有端口信息,如8080
location.pathname //URL中主机名后的部分,如/pictures/index.htm
location.reload(true | false); //重新载入当前页面,为false时从浏览器缓存中重载,为true时从服务器端重载,默认为false
|
7.SCREEN对象
screen对象中包含了用户显示器屏幕相关信息。通过该对象,可以访问用户显示器屏幕宽、高、色深等信息。
|
1
2
3
|
screen对象:用于获取某些关于用户屏幕的信息,也可用window.screen引用它
screen.width/height //屏幕的宽度与高度,以像素计
|
上面的三个对象中,我们主要学习的是DOM对象,通过DOM编程,可以轻易的实现我们常见的一些效果
1.直接查找
document.getElementById 根据ID获取一个标签
document.getElementsByName 根据name属性获取标签集合
document.getElementsByClassName 根据class属性获取标签集合
document.getElementsByTagName 根据标签名获取标签集合
2.间接查找
parentNode 父节点
childNodes 所有子节点
firstChild 第一个子节点
lastChild 最后一个子节点
nextSibling 下一个兄弟节点
previousSibling 上一个兄弟节点parentElement 父节点标签元素
children 所有子标签
firstElementChild 第一个子标签元素
lastElementChild 最后一个子标签元素
nextElementSibling 下一个兄弟标签元素
previousElementSibling 上一个兄弟标签元素
案例:表格的全选和反选以及取消


<table border="1px">
    <tr>
        <td>192.168.1.1</td>
        <td>80</td>
        <td>111111</td>
        <td><input type="checkbox" class="check"></td>
    </tr>
    <tr>
        <td>192.168.1.2</td>
        <td>81</td>
        <td>222222</td>
        <td><input type="checkbox" class="check"></td>
    </tr>
    <tr>
        <td>192.168.1.3</td>
        <td>82</td>
        <td>333333</td>
        <td><input type="checkbox" class="check"></td>
    </tr>
</table>
</body>
<script>
    function selectAll() {
        // 1. 找到所有的checkbox
        var inpts = document.getElementsByClassName('check');
//        console.log(inpts);
        // 2. 对找到的checkbox进行打钩
        for (var i = 0; i < inpts.length; i++){
//            console.log(inpts[i].checked);
            inpts[i].checked = true;
        }
    }
</script>
1.操作内容
innerText 文本
innerHTML HTML内容
value 值
2.操作属性
attributes 获取所有标签属性
setAttribute(key,value) 设置标签属性
getAttribute(key) 获取指定标签属性
removeAttribute(key) 删除属性
案例:验证码倒计时发送


<input type="button" id="btn" value="发送验证码">
<script>
    var curNum = 10;
    var btn = document.getElementById('btn');
    btn.onclick = function () {
        this.setAttribute('disabled', true);
        this.value = "请在" + curNum + "s内输入验证码";
        setInterval("setRemainTime();", 1000);
    };
    function setRemainTime(){
        if(curNum == 1){
            btn.removeAttribute("disabled");
            btn.value = "发送验证码";
        } else {
            curNum = curNum - 1;
            btn.value = "请在" + curNum + "s内输入验证码";
        }
    }
</script>
3.样式操作
- 3.1 指定类操作
className 获取所有类名
classList.remove(cls) 删除指定类
classList.add(cls) 添加类
案例:左侧菜单显示 和 模态框显示取消


<!DOCTYPE html>
<html lang="en">
<head>
    <meta charset="UTF-8">
    <title>Title</title>
    <style>
        .menu{
            width:300px;
        }
        .header{
            height:38px;
            line-height: 38px;
            background-color: #2459a2;
            cursor: pointer;
        }
        .hide{
            display: none;
        }
    </style>
</head>
<body>
    <div class="menu">
        <div class="header" id="i1" onclick="changeMenu('i1')">菜单1</div>
        <div class="info">
            <div class="content ">内容1</div>
            <div class="content ">内容1</div>
            <div class="content ">内容1</div>
        </div>
        <div class="header" id='i2' onclick="changeMenu('i2')">菜单2</div>
        <div class="info hide">
            <div class="content ">内容2</div>
            <div class="content ">内容2</div>
            <div class="content ">内容2</div>
        </div>
        <div class="header" id="i3" onclick="changeMenu('i3')">菜单3</div>
        <div class="info hide">
            <div class="content">内容3</div>
            <div class="content">内容3</div>
            <div class="content">内容3</div>
        </div>
    </div>
    <script>
        function changeMenu(nid) {
            var header = document.getElementById(nid);
//            var menuDiv = header.parentElement;
//            console.log(menuDiv);
            var infoDiv = document.getElementsByClassName('info');
            for(var i=0; i<infoDiv.length; i++){
                infoDiv[i].classList.add('hide');
            }
            var nextElement = header.nextElementSibling;
//            console.log(nextElement);
            nextElement.classList.remove('hide');
        }
    </script>
</body>
</html>
<!DOCTYPE html>
<html lang="en">
<head>
    <meta charset="UTF-8">
    <title>Title</title>
    <style>
        .c1{
            position: absolute;
            top:0;
            bottom:0;
            right:0;
            left:0;
            background-color: black;
            opacity: 0.5;
        }
        .c2{
            position: absolute;
            top:10%;
            left:35%;
            background-color: white;
            width:500px;
            height:300px;
        }
        .hide{
            display: none;
        }
    </style>
</head>
<body>
    <!--遮罩层开始-->
    <div class="c1 hide"></div>
    <!--遮罩层结束-->
    <!--弹出框开始-->
    <div class="c2 hide">
        <form action="">
            <input type="text" value="1111"><br>
            <input type="text" value="2222"><br>
            <input type="button" value="取消" onclick="cancelModal()">
            <input type="submit" value="提交"><br>
        </form>
    </div>
    <!--弹出框结束-->
    <script>
        function getModal(){
            document.getElementsByClassName('c1')[0].classList.remove('hide');
            document.getElementsByClassName('c2')[0].classList.remove('hide');
        }
        function cancelModal(){
            document.getElementsByClassName('c1')[0].classList.add('hide');
            document.getElementsByClassName('c2')[0].classList.add('hide');
        }
    </script>
</body>
</html>
- 3.2 指定css操作
obj.style.backgroundColor = “red”;

使用js操作css的属性的规律如下:
1.对于没有中划线的css属性一般直接使用style.属性名即可。如:
obj.style.margin,obj.style.width,obj.style.left,obj.style.position等
2.对于含有中划线的css属性,将每个中划线去掉并将每个中划线后的第一个字符换成大写即可。如:
obj.style.marginTop,obj.style.borderLeftWidth,obj.style.zIndex,obj.style.fontFamily等
案例:表格的隔行换色 和 文本框获取失去焦点 以及 小说阅读网站,点击大中小变换字体
4.操作标签
|
1
2
3
4
5
6
7
8
|
// 方式一
var tag = document.createElement('a')
tag.innerText = "zhangsan"
tag.className = "c1"
tag.href = "http://www.shangzekai.com"
// 方式二
var tag = "<a class='c1' href='http://www.shangzekai.com'>zhangsan</a>"
|
1.常见的一些事件
获得焦点事件——–onfocus
失去焦点事件——–onblur
内容改变事件——–onchange
载入页面———–onload
单击事件———–onclick
鼠标移入事件——–onmouseover
鼠标移出事件——–onmouseout
案例:onchange 多级菜单联动


<body>
    <select name="province" id="province" onchange="ld();">
        <option value="-1">请选择</option>
        <option value="0">北京</option>
        <option value="1">山西</option>
    </select>
    <select name="city" id="city">
    </select>
</body>
<script>
    var citys = [
        ["海淀","东城","西城","朝阳"],
        ["太原","大同","运城","晋中"]
    ];
    function ld(){
        var provinces = document.getElementById("province");
        var opts;
        if(provinces.value == -1){
            opts = '';
            document.getElementById("city").innerHTML = opts;
            return;
        }
        var areas = citys[provinces.value];
        for(var i = 0; i < areas.length; i++){
            opts += "<option value='" + i + "'>" + areas[i] + "</option>";
        }
        document.getElementById("city").innerHTML = opts;
    }
</script>
2.绑定事件的三种方式
面试题:写一个行为,样式,结构相分离的页面?
- 2.1 html属性的方式绑定
|
1
|
<a href='www.baidu.com' onclick="t1();"> 百度 </a>
|
作为WEB开发人员,这是最早碰到的一种事件绑定方式,这种绑定方式非常古老
优点:兼容性最强
缺点也很明显:
1:需要在DOM渲染时分析绑定语句,影响DOM渲染速度(IE下尤其)
2:形式上没达到”结构与行为”相分离的原则
- 2.2 对象属性方式
|
1
2
3
4
|
var bd = document.getElementById('bd');
bd.onclick = function(){
console.log(this.id);
}
|
这种绑定是把一个DOM对象onclick属性赋值为一个函数,那此时函数内部的this指向的是该DOM对象,即这个a对象
缺点:该方式只能为一种事件,绑定一个回调函数
即:.onclick = fn1, .onclick=fn2;
最终的效果是.onclick=fn2 执行
- 2.3 addEventListener方式(了解)
|
1
2
3
|
var i0 = document.getElementById('i1');
i0.addEventListener('click', function(){console.log('a');})
i0.addEventListener('click', function(){console.log('b');})
|
格式:addEventListener(‘事件’,绑定的函数, true/false);
1.如果添加了多个事件处理函数,则按添加时的先后顺序来执行
2.事件处理函数中的this指代的是DOM对象本身(w3c标准)
3.第一个事件参数,一律把事件名称的“on”去掉优点: 能为同一种事件,如onclick,绑定多个函数函数中的this指向该DOM对象,操作方便
缺点:IE8及以下版本不支持此方法
1.WINDOW对象常见的方法
1.1 随手就能用到的方法
- window.alert(msg);
- window.confirm(msg);
- window.open(URL, 位置);
|
1
2
3
4
5
6
|
window.alert('fuck');
window.confirm('确认要删除吗?');
window.open('./02.html', '_blank');
// 02.html如下代码:
<input type='button' onclick='window.close()' />
|
1.2 比较常用到的方法
setInerval()
- 在载入后,每隔指定的时间就执行一次回调函数
- timer = setInterval(“函数()” , 毫秒数);
clearInterval()
- 取消setInterval()的设置
- clearInterval(timer)
setTimeout()
- 在载入后,在指定的时间就执行一次回调函数(只是一次)
- timer = setTimeout(“函数()” , 毫秒数);
clearTimeout()
- 取消setTimeout()的设置
- clearTimeout(timer)